
Clarke Summit Pro 18SQ Wet-Dry Vacuum Instruction Manual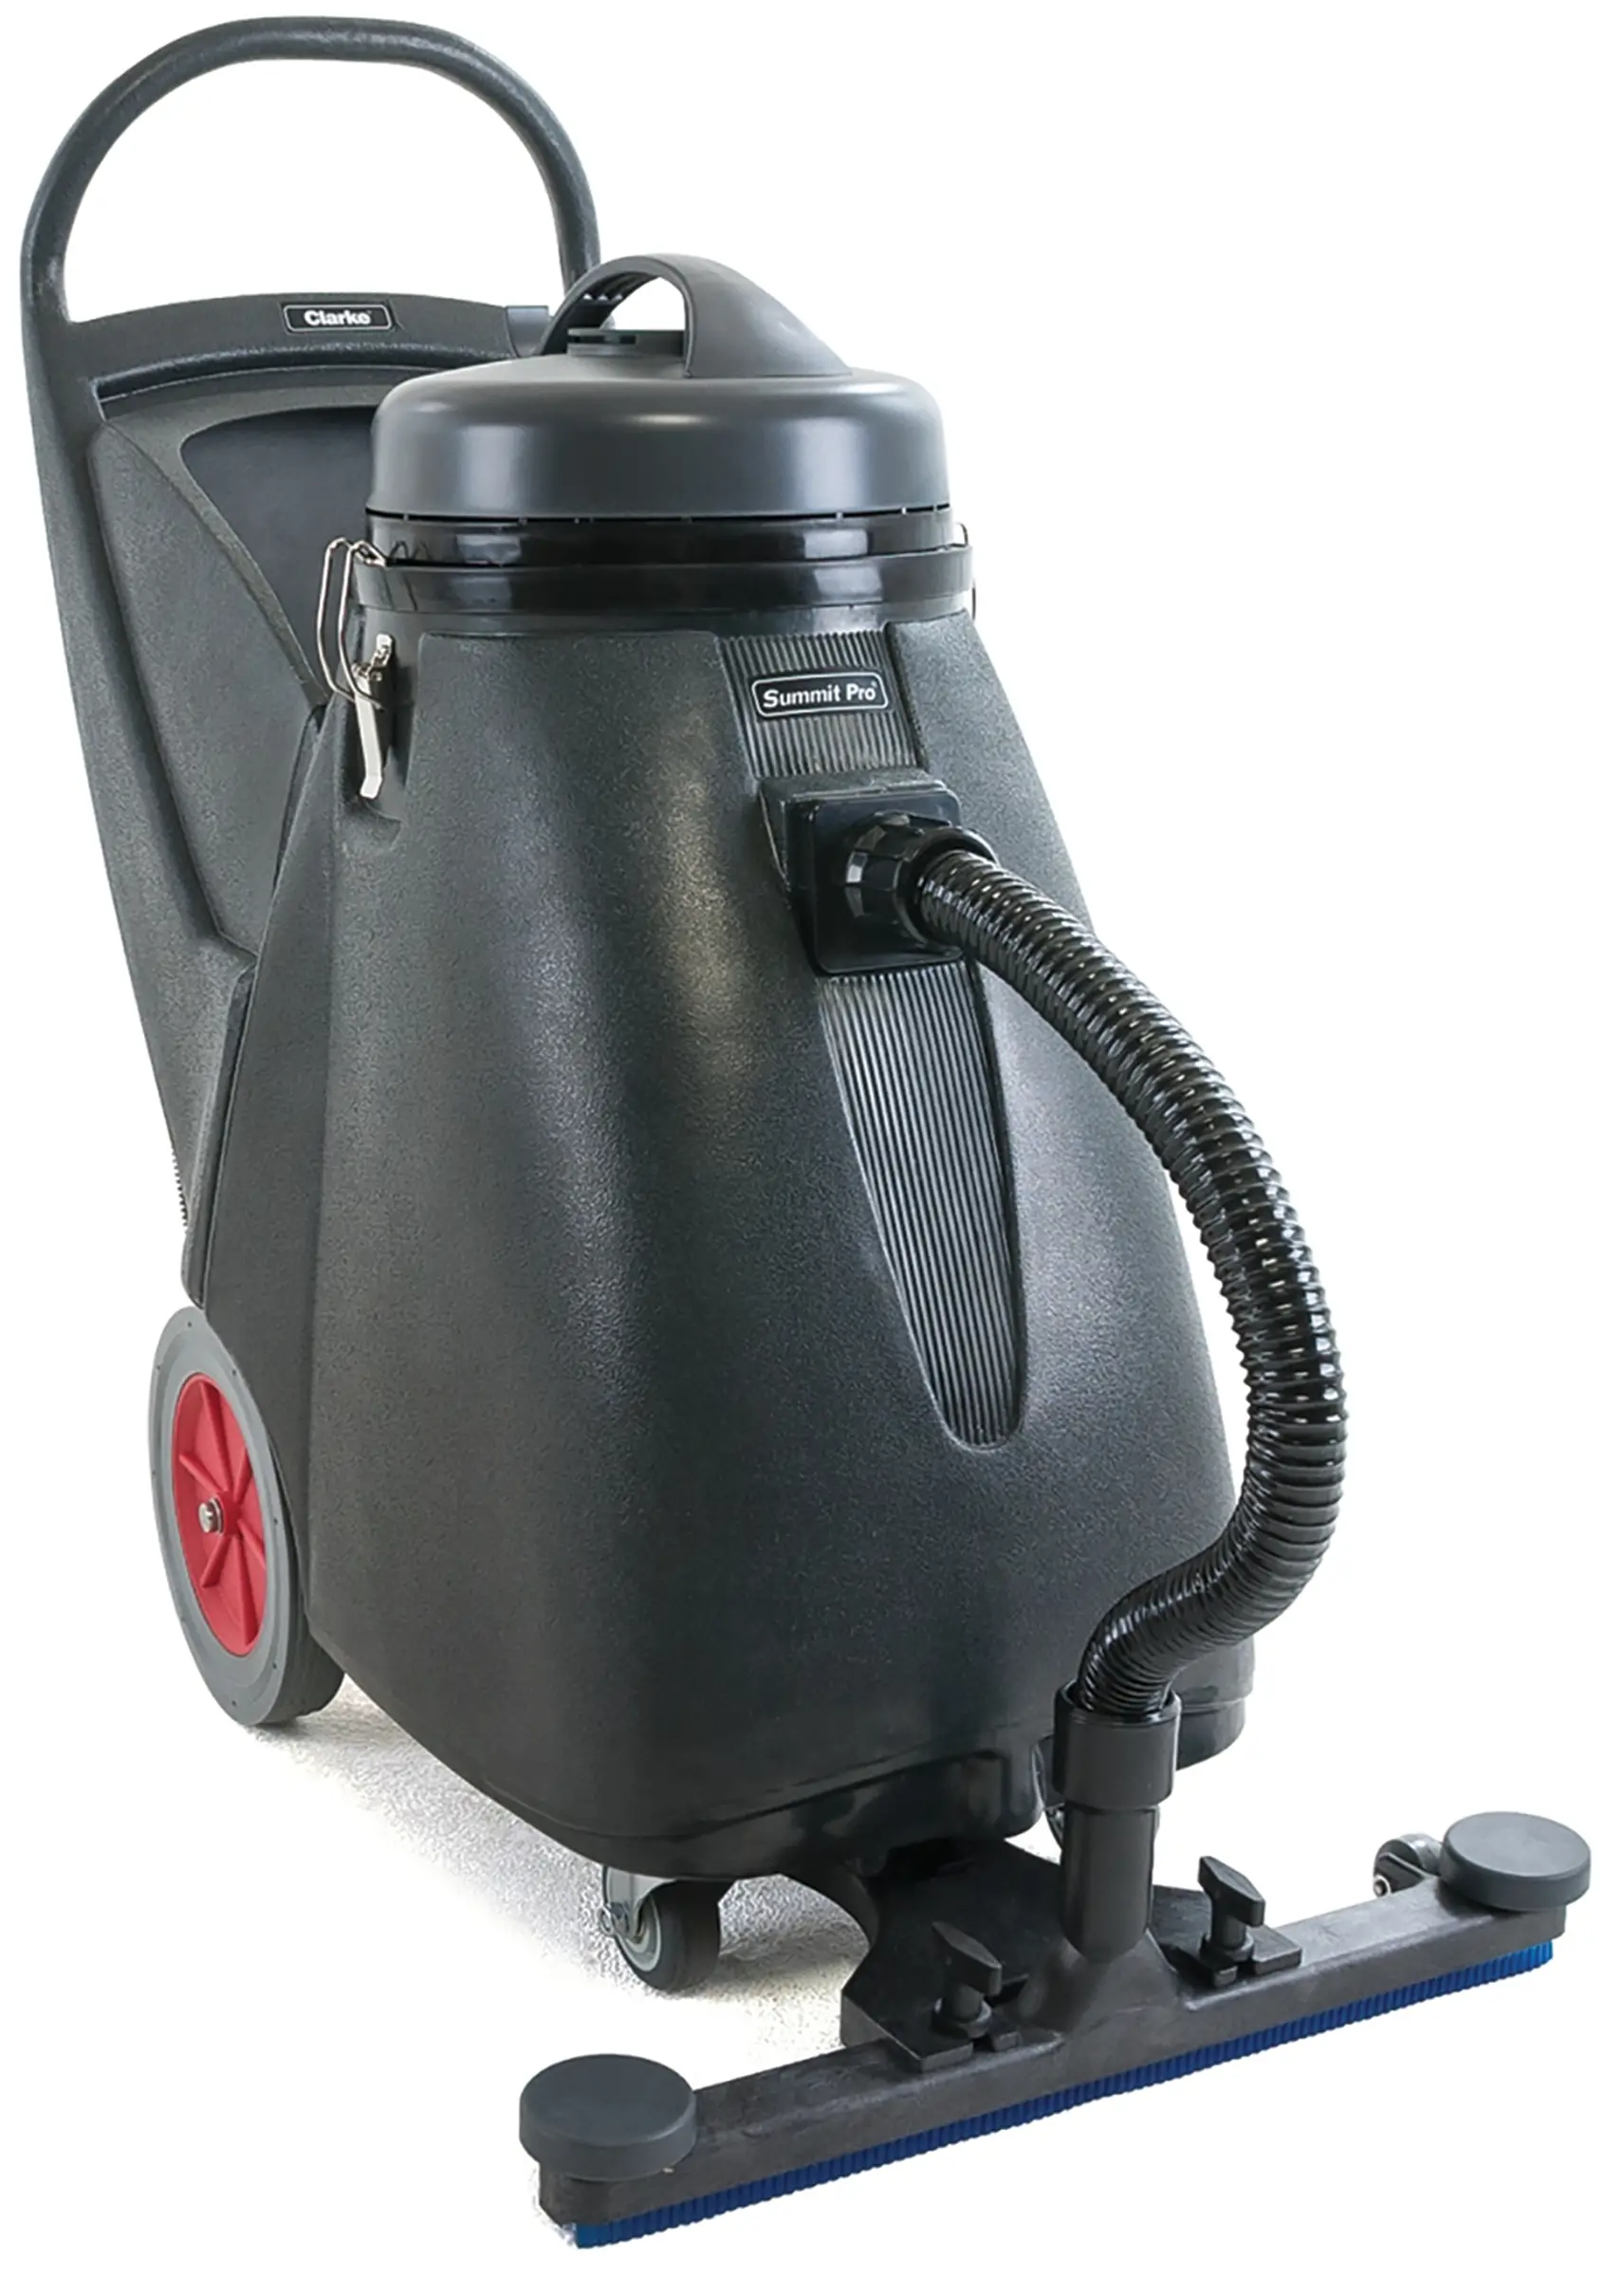
SAFETY PRECAUTIONS
This machine is intended for commercial use. It is constructed for use in an indoor environment and is not intended for any other use. Use only recommended accessories.
All operators shall read, understand and exercise the following safety precautions:
- Do not operate machine:
- Unless trained and authorized.
- Unless you have read and understand operators manual.
- In fl ammable or explosive areas.
- With damaged cord or plug.
- If not in proper operating condition.
- In outdoor areas.
- In standing water.
- Without bag / fi lters in place.
- With the use of extension cords.
- Before operating machine:
- Make sure all safety devices are in place and operate properly
- When using machine:
- Do not run machine over cord.
- Do not pull machine by cord or plug.
- Do not pull cord around sharp edges or corners.
- Turn power switch to “off “ prior to unplugging machine..
- Do not unplug by pulling on the cord.
- Do not stretch cord.
- Do not handle plug with wet hands.
- Keep cord away from heated surfaces.
- Do not pick up burning or smoking debris such as cigarettes, matches or hot ashes..
- Report machine damage or faulty operation immediately.
- Before leaving or servicing machine:
- Turn off machine.
- Unplug cord from outlet.
- When servicing machine:
- An experienced technician should only perform service work.
- Unplug cord from outlet.
- Use manufacturer supplied or approved replacement parts.
GROUNDING INSTRUCTIONS
!!! This machine must be grounded! Grounding provides the path of least resistance for electrical current. To reduce the risk of electrical shock should the machine malfunction, the machine has a special grounding plug. Do not remove the ground pin under any circumstances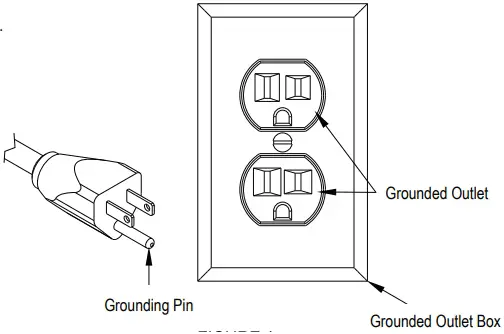
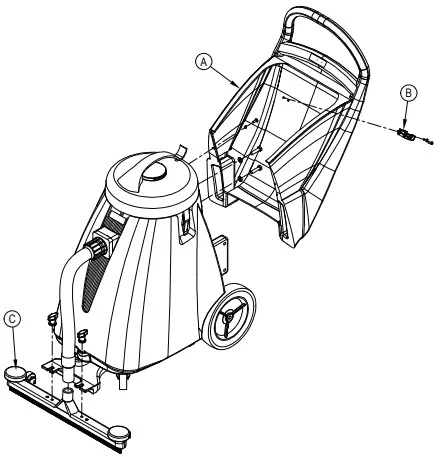
ATTACHING HANDLE
- Remove Handle (A) from ship position and remove upper handle mounting screws from machine.
- Realign Handle (A) as shown and replace screws & washers.
- Attach rear hose dump Clamp (B).
- Attach front mount Squeegee (C).

OPERATION OF WET & DRY VACUUM
READ OPERATORS MANUAL THOROUGHLY PRIOR TO OPERATING OR SERVICING THIS MACHINE.
WET PICKUP
- Remove vacuum head and remove the cloth or paper fi lter from vacuum, install the bubble buster.
- While vacuum head is removed, check to make sure that the fl oat shut-off is unobstructed and fully functional.
- Replace vacuum head and latch it in place.
- Connect vacuum hose to inlet on the machine body.
- Attach appropriate accessory tool for the job to be completed.
- Plug power cord into a grounded outlet.
* Do not use an extension cord in conjunction with the standard power cord. - If using the front-mounted squeegee assembly, be sure that squeegee is attached to front of machine.
- If using the front-mounted squeegee assembly, lower squeegee to the fl oor by depressing the top half of the pedal (rear of the machine) forward with your foot.
- Turn power switch to “on” position.
- During wet pickup, the fl oat shut-off will automatically prevent water from entering the recovery tank once the recovery tank is full.
* If foam develops in the recovery tank during wet vacuuming, use de-foamer chemical to help eliminate the foam. Foam will not activate the fl oat shut-off, and therefore, may cause vacuum motor damage. - To raise the squeegee assembly back to transport position, depress the bottom half of the pedal [rear of the machine] downward with your foot.
* Be sure that the handle is properly assembled on machine body prior to operating machine.
* This wet –dry vacuum includes the GV25014”bubble buster” blue nylon foam suppression bag. This bag must be used in all wet pickup applications. Failure to use the bag will void the warranty on the vacuum motor.
DRY PICKUP
- Remove vacuum head and bubble buster, and be sure the cloth or paper fi lter is properly installed.
* Do not operate machine without bag or fi lter properly installed. - Replace vacuum head and latch it in place.
- Connect vacuum hose to inlet on the machine body.
- Attach appropriate accessory tool for the job to be completed.
- Plug power cord into a grounded outlet.
* Do not use an extension cord in conjunction with the standard power cord. - Turn power switch to “on” position.
- Check the fi lter bag periodically to see if it is full. For optimal performance, replace bag when it is 3/4 full.
DRAINING THE RECOVERY TANK
- Unplug machine from power outlet.
- Transport machine to nearest fl oor drain or bucket.
- Remove drain hose from rear of machine. Remove ball plug from drain hose, and drain the contents of the tank.
- After the contents have drained, remove the vacuum head and rinse recovery tank with clean water.
- Replace the ball plug on the drain hose and hang hose back on the rear of the machine.
* To prevent odors in the recovery tank, remove the vacuum head when machine is not in operation to allow air to circulate.
MAINTENANCE
To keep the machine performing well for many years, please follow the following maintenance procedures.
* Always confi rm that the machine is unplugged prior to performing any maintenance or repairs.
- Drain and rinse recovery tank after each use.
- Clean fl oat shut-off after each use.
- Check bag to see if it is full after each use. Replace bag when it is 3/4 full.
- Clean outside of machine with a mild cleaner.
- Check power cord for any damage.
- Clean squeegee blades with a cloth.
* Do not use your fi ngers to wipe the blades! - Check vacuum hose for holes and clogs.
- Lubricate wheels, casters and axles with a water resistant lubricant every month.
- Check machine for loose or missing nuts and bolts, and replace as necessary.
* After each use in a wet pick-up application, remove the GV25014 “Bubble Buster” blue nylon foam suppression bag and rinse it with clean water. This will aid in preventing any build-up which can reduce air fl ow.
STORAGE
- Unplug machine from power source.
- Store in upright position in a dry area.
- Store with squeegee assembly off the ground.
- Store with vacuum head off unit so that tank may breathe.
PARTS LIST
VAC HEAD ASSEMBLY
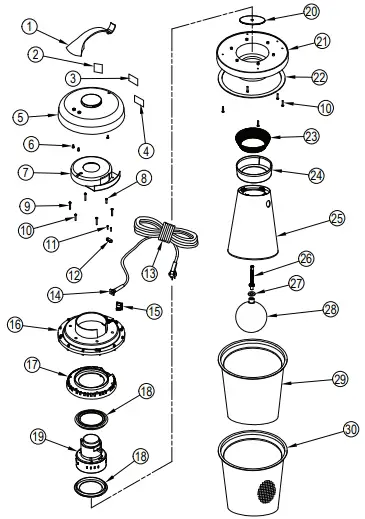
| Item | Ref. No. | Qty | Description |
| 1 | GT10004 | 1 | Handle |
| 2 | VF40994 | 1 | Read Manual Label |
| 3 | 1 | Serial Tag | |
| 4 | VA81315 | 1 | Decal, Warning |
| 5 | GT10003B | 1 | Cover, Vac Head |
| 6 | GT13001 | 3 | ST5 x 12,PH |
| 7 | GT10019 | 1 | Upper Cover, Motor |
| 8 | GT13004 | 1 | ST5 x 20,PH |
| 9 | GT13034 | 4 | ST5 x 50,PH |
| 10 | GT13033 | 6 | ST5 x 44,PH |
| 11 | VA13470 | 2 | ST3 x 16,PH |
| 12 | VA21517 | 1 | Clamp, Block |
| 13 | VA65001GE | 1 | Cable,Power |
| 14 | VA21521 | 1 | Grommet,Power Cord |
| 15 | VA91346 | 1 | On/Off Switch |
| 16 | GV15002 | 1 | Mounting Cover, Motor. |
| 17 | FC25002A | 1 | Mounting Plate,Motor |
| 18 | VA41032 | 2 | Gasket, Motor |
| 19 | 2049000A | 1 | Vac Motor,115v |
| 20 | GV25002 | 1 | Seal Plate |
| 21 | GV15004A | 1 | Mounting Base,Motor |
| 22 | GV15006 | 1 | Gasket, Mounting Plate |
| 23 | GV25010 | 1 | Filter Screen |
| 24 | GV25013 | 1 | Water Guard |
| 25 | GV25006 | 1 | Trumpet |
| 26 | GV25003 | 1 | Pole, Ball |
| 27 | VF 14090 | 1 | ‘Cr Ring |
| 28 | GV25009 | 1 | Ball |
| 29 | GV0014 | 1 | Vacuum Filter Assy |
| 30 | GV25014 | 1 | Bubble Buster |
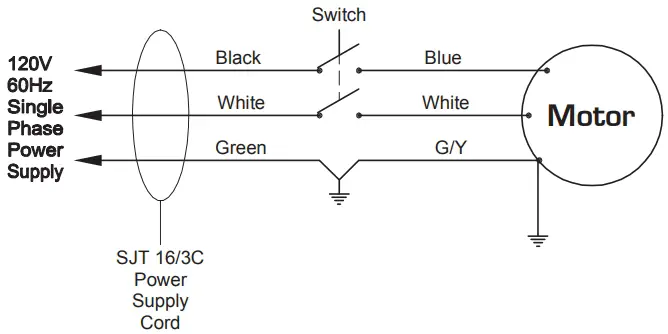
WIRING DIAGRAM
TANK ASSEMBLY
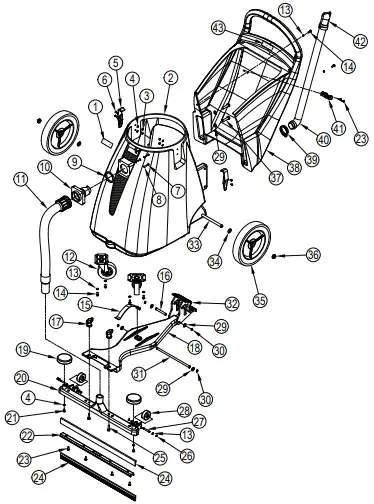
| Item | Ref. No. | Qty | Description |
| 1 | VA81314 | 1 | Logo, Summit Pro |
| 2 | VA75001 | 1 | Tank |
| 3 | GT13022 | 4 | Nut, M5, Nylon Insert |
| 4 | VF13474A | 6 | Washer |
| 5 | VA21595 | 2 | Catch |
| 6 | VA14010 | 4 | Screw, M5 X 20 |
| 7 | VA14004 | 4 | Self-Tapping Screw, ST4 X 20 |
| 8 | VA13483 | 4 | Washer |
| 9 | VA21514 | 1 | Gasket |
| 10 | VA21513A | 1 | Intake |
| 11 | VA85018 | 1 | Hose Assembly |
| 12 | VA91342 | 2 | 3.5” Caster |
| 13 | VF13600 | 10 | Washer |
| 14 | VF13495 | 6 | Screw, M6 X 16 |
| 15 | VA75005 | 1 | Leaf Spring |
| 16 | VA75013 | 1 | Axle |
| 17 | VA85003 | 2 | Knob |
| 18 | VA75006 | 1 | Mounting Plate, Pick-Up Tool |
| 19 | VA75007 | 2 | Bumper |
| 20 | VA85002 | 1 | Body, Pick-Up Tool 24” |
| VA75008 | 1 | Body, Pick-Up Tool 30” | |
| 21 | VA13471 | 2 | Self-Tapping Screw, ST5 X 10 |
| 22 | VA85001 | 1 | Clamp, Blade, 24” |
| VA75009 | 1 | Clamp, Blade, 30” | |
| 23 | VV20501 | 6 | SCREW, M5 X 14, PH |
| 24 | VA85007 | 2 | Blade, 24” |
| VA75010 | 2 | Blade, 30” | |
| 25 | VA13491 | 2 | Screw, M8 X 25 |
| 26 | VA85005 | 4 | Lock |
| 27 | VA85004 | 2 | Axle, Wheel |
| 28 | VA91345-8 | 2 | Wheel, 2” |
| 29 | VF13516 | 8 | Washer |
| 30 | VA14001 | 4 | Lock |
| 31 | VA75011 | 1 | Axle, Mounting Plate |
| 32 | VA75012 | 1 | Pedal |
| 33 | VA75003 | 1 | Axle, Pedal |
| 34 | VV60113S | 2 | Washer |
| 35 | VA75004 | 2 | 10” Wheel |
| 36 | VV10011 | 2 | Cap, Axle, Wheel |
| 37 | VA14002 | 6 | Screw, M10 X 50 |
| 38 | VA75002 | 1 | Handle |
| 39 | VV10113 | 1 | Clamp 2” |
| 40 | VA93208A | 1 | Drain Hose |
| 41 | GV70034 | 1 | Clamp, Drain Hose |
| 42 | VA20104A | 1 | Plug Drain Hose |
| 43 | VA81317 | 1 | Logo, Clarke |
ACCESSORIES
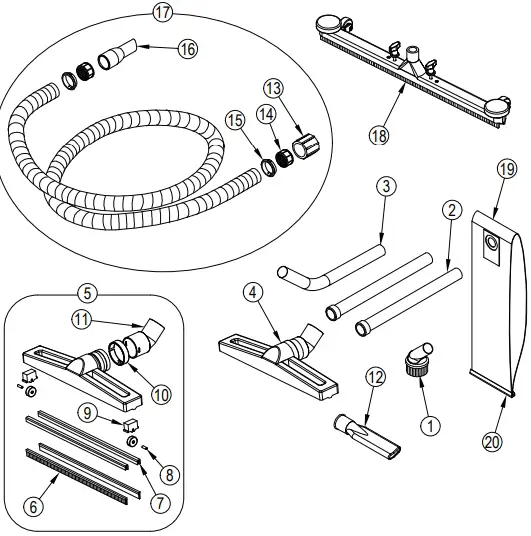
| Item | Ref. No. | Qty | Description |
| 1 | VA20803 | 1 | Dusting Tool |
| 2 | VA20248 | 2 | Tube |
| 3 | VA20209 | 1 | Wand |
| 4 | GV0040-D | 1 | Dry Pick-Up Tool |
| 5 | GV0040-W | 1 | Wet Pick-Up Tool |
| 6 | VA20207-8 | 2 | Rubber Blades, 400mm |
| 7 | VA20207-5A | 2 | Seat, Blade, 400mm |
| 8 | VA20413 | 2 | Pin, Wheel |
| 9 | VA20207-4 | 2 | Seat, Wheel |
| 10 | VA20207-3 | 1 | Clip, Floor Tool Adapter |
| 11 | VA20207-2 | 1 | Floor Tool Adapter(38mm) |
| 12 | VA20806 | 1 | Crevice Tool |
| 13 | VA20201 | 1 | Machine End |
| 14 | VA20202 | 2 | Threaded Insert |
| 15 | VA20203 | 2 | Clip Ring |
| 16 | VA20206 | 1 | Angled Hose End, 38mm |
| 17 | VA20288 | 1 | Hose Assy |
| 18 | VA00001 | 1 | 24” Front Mount Squeegee Assy |
| VA00002 | 1 | 30” Front Mount Squeegee(Optional)Assy | |
| VA00005 | 1 | 24” Dry Pick-Up Tool Assy(Optional) | |
| 19 | VA75020 | 1 | Cloth Bag,Dust(Optional) |
| 20 | VA75020-1 | 1 | Clip, Cloth Bag(Optional) |
CUSTOMER SERVICE

14600 21st Avenue North
Plymouth, MN 55447-3408
www.clarkeus.com
Phone: 800-253-0367
Fax: 800-825-2753
©2013 Nilfi sk-Advance, Inc.


