
Earda Technologies 12TBNVT-US Smart Dimmer Switch
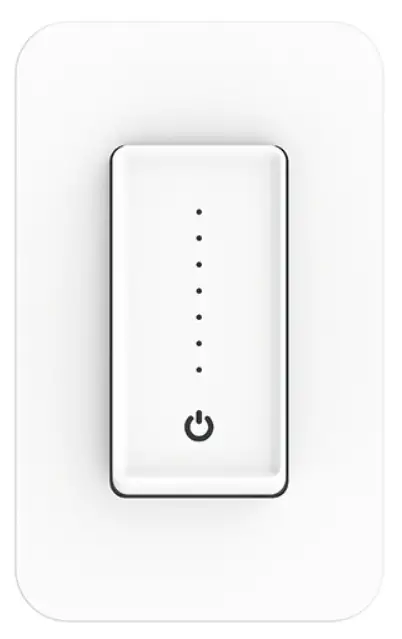
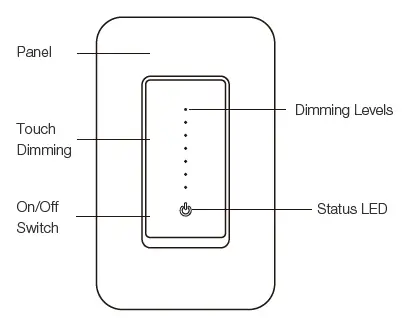
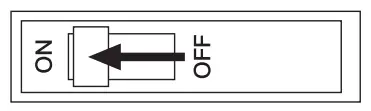
Product Outline
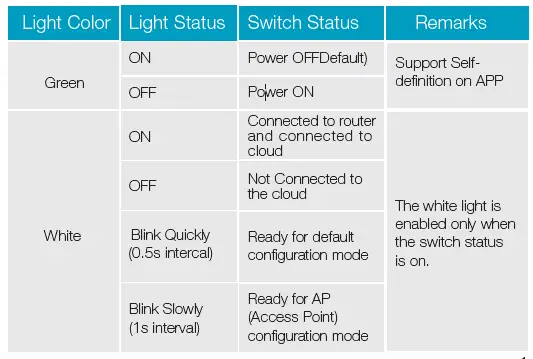
Indicator Light Status
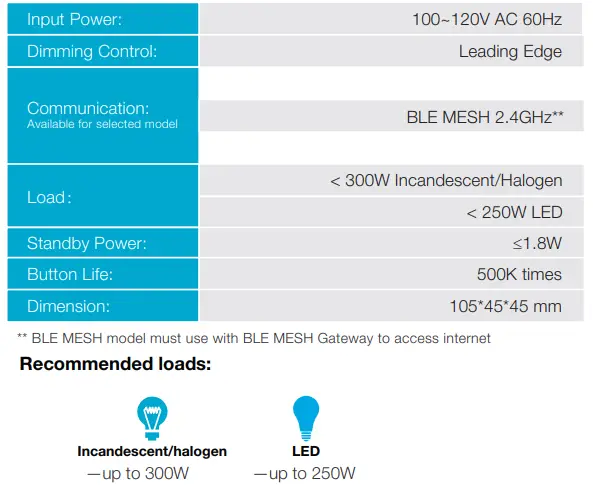
Specification
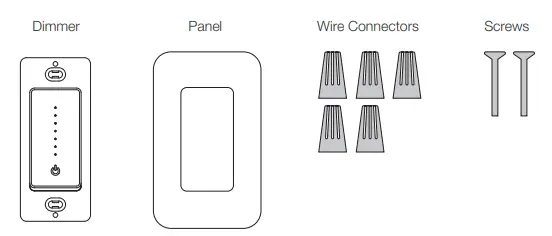
Contents Supplied
Safety Information
WARNING: RISK OF ELECTRIC SHOCK
Electricity can cause personal injury and property damage if handled improperly.If you are not sure about any part of these instructions, please seek professional assistance from a qualified electrician. Ensure all wark meets applicable local and national codes.
Installation
STEP 1: Turn Off Power
Locate your circuit breaker panel and turn off the power to each switch you are replacing.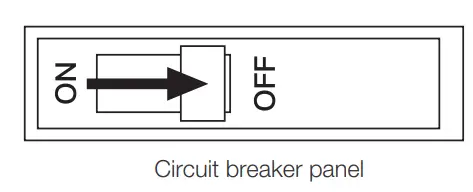
STEP 2: Remove the switch and pull it away from the wall.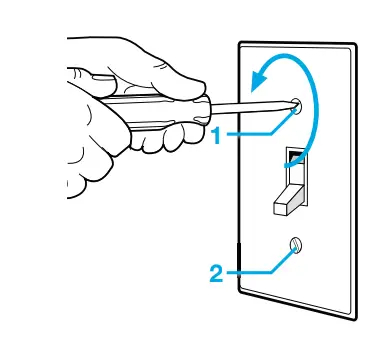
STEP 3: Verify Power is Off
- We recommend you to remove the faceplate from the old switch and use an electrical tester to test all wires connected to the switch to ensure there is no voltage in the circuit.
- You may need to turn off more than on circuit breaker.


STEP 4: Pull Out Old dimmer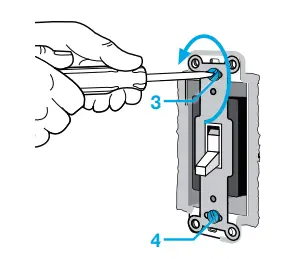
STEP 5: Identify The Old dimmer
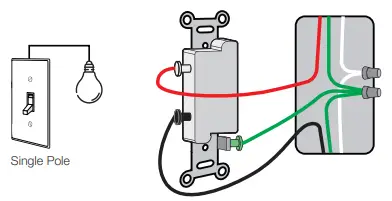
- Single Pole Dimmer:
Only one dimmer control one light or a bundle of lights.
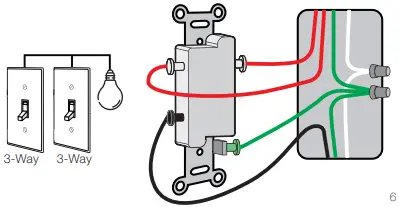
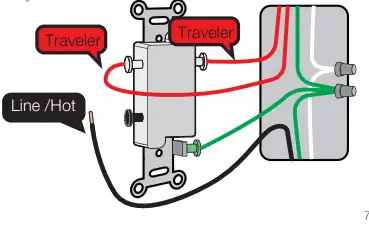
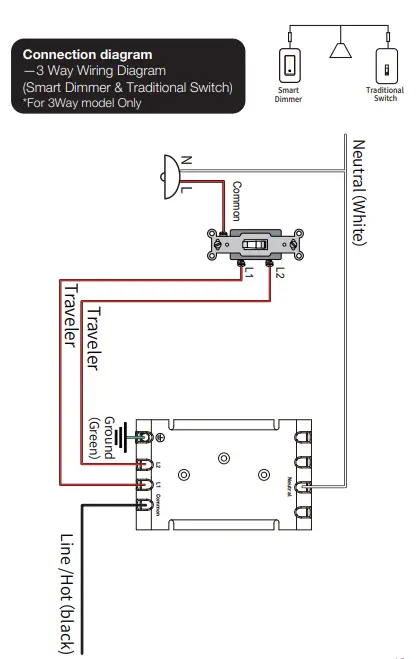
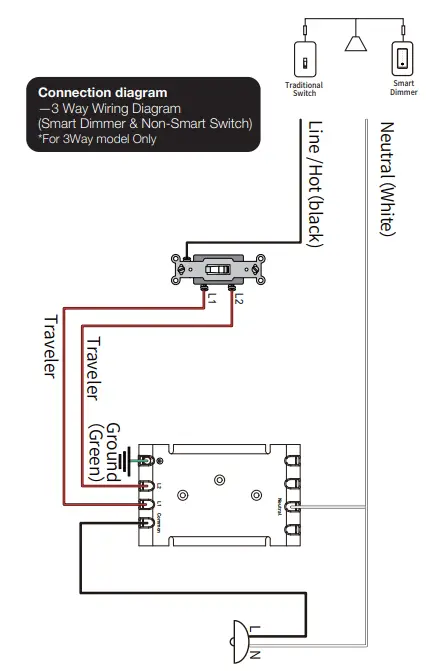
- 3-Way Dimmer:
Two Dimmer control the same light or the same bundle of lights.
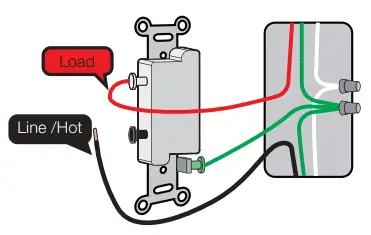
STEP 6: identify Line/Load Wire
LINE/LOAD wire (usually BLACK, attached with a black screw, and may be Remarked “common”.)
Note: The color of your wire may be different from the color shown on the manual.
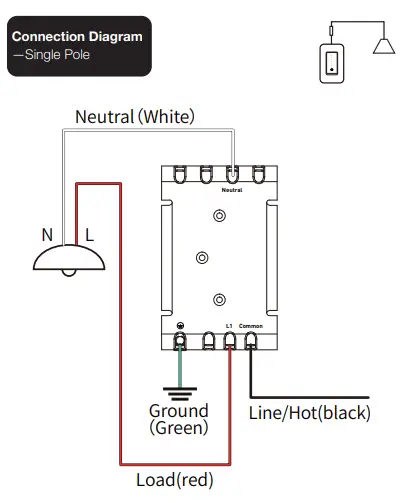
- Single Pole Dimmer

- 3-Way Dimmer

STEP 7: Find the NEUTRAL Wires
Neutral wire is required to install the smart dimmer .Most likely a bundle of one or more white wires in the wall.
Note: If there is no neutral, please try another location or call an electrician for help.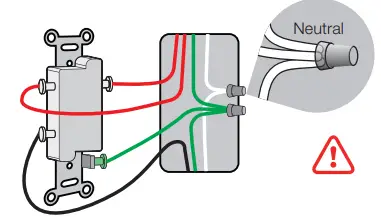 STEP 8: Test NEUTRAL and GROUND Wires
Make sure there is no power on the neutral wires from neighboringcir-cuit. lf necessary, shut off additional circuits until no voltage is found.
GROUND wires are usually BARE COPPER or GREEN.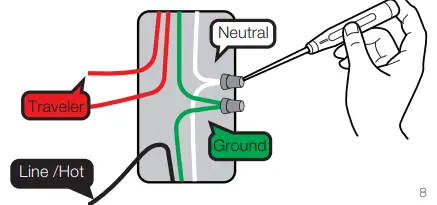
STEP 9: Take Pictures of the Wiring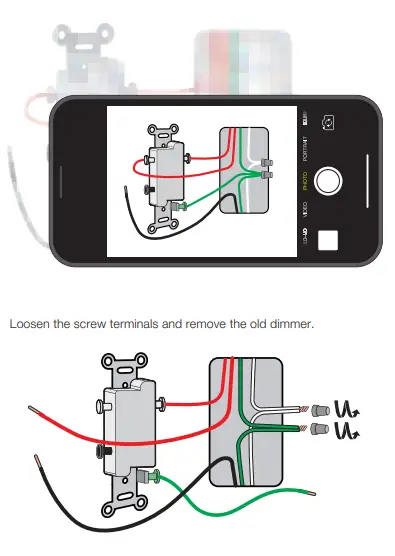
STEP 10: Wire the Smart Dimmer Switch
- Load(red) Cap off the remaining L1 wire (RED) from the Switch with a wire nut.

- Replace ONE of your REGULAR 3-WAY SWITCHES with SMART SWITCH


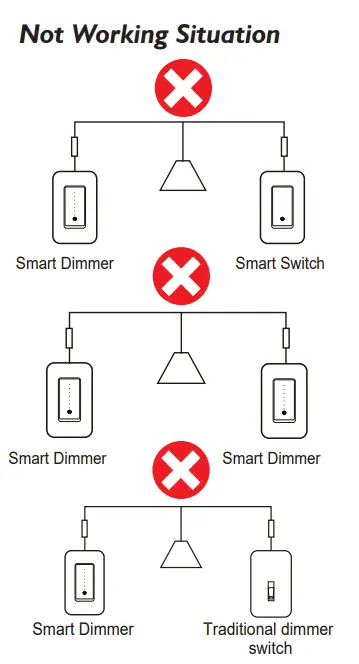
- Not Working Situation
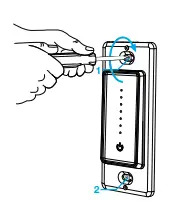
STEP 11 Mount The Dimmer
- Use the screws provided.

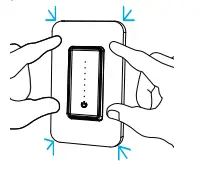
- Attach The Wallplate:
Attach the adapter to the dimmer using the screws provided and snap on the wallplate.
STEP 12: Turn on the power
The light(s) may flash once during smart dimmer first time power up
Add Devices
STEP 1: Download Smart Life APP
Please scan QR code and download the Smart Life app iOS or Android version 
STEP 2: Register And Login
Enter the Register/Login interface; tap “Register” to create an account by entering your phone umber to get verification code and “Set password”, Choose“Log in” if you already have a Smart Life account some third-party accounts log in directly.
STEP 3: Add the Switch To APP
Preparation:Ensure the switch has connected with electricity; ensure your phone has connected to Wifi router and is able to connect to the internet.
Note: BLE MESH versions have slightly different to access the APP. Please make sure that the corresponding gateway is online, and then select the applicable gateway to add the switch(es).
After the user login,Tap the “+” icon on the top right conner to add device;slect the “dimmer”menu and choose the switch device icon. 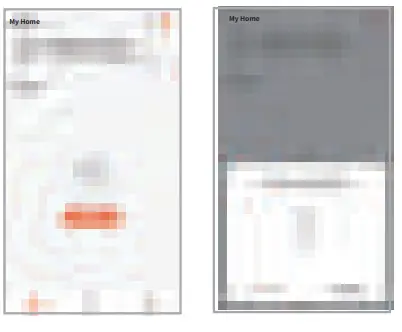
Reset
Press and hold Switch button for 5s to reset the Dimmer and get into quick configure mode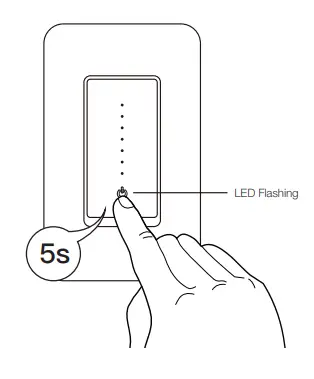
Smart Life Skills (Alexa)
STEP 1
Log in your Alexa account on a smart phone or a computer,then tap Home>Skills & Games
STEP 2
Search “Smart Life”and select the right one according the blue logo (same with App)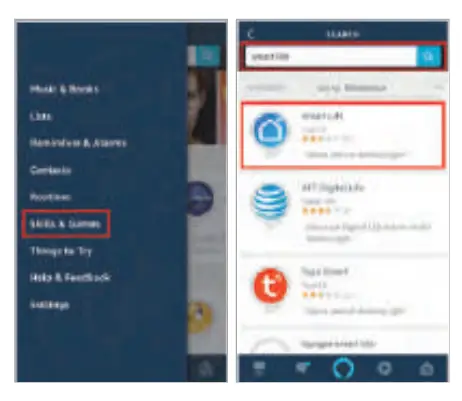 STEP 3
Enable the skill
STEP 4
Login the account you registered on the App in Part 2, then click “Link Now”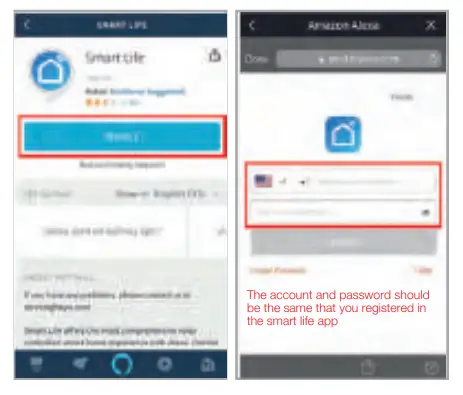
STEP 5
The Account is linked successfully, and then tap Authorize to Complete.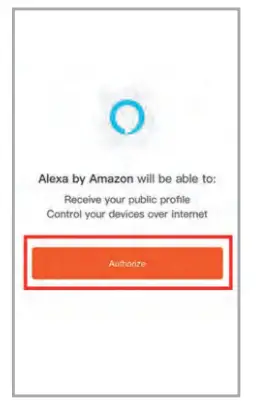 STEP 6
Congratulations! Alexa Devices (Echo) can Control the Swtich ON/OFF.
To add or delete switches, please delete or add them in the Smart Life App (See Part 2) and then the Alexa will synchronize automatically. If you cannot see the name of switches in the Devices List in Alexa Page, You can click “Discover” in Alexa page it will synchronize from the Smart Life App.
Smart Life Skills (Google)
STEP 1
Find “Home Control” in the hamburger menu on the Google Home app’s home page > Home Control tap “+”. STEP 2
Find “Smart Life” in the list
STEP 3
Input your Smart Life account and password you registered in Part 2, then tap “Link Now”.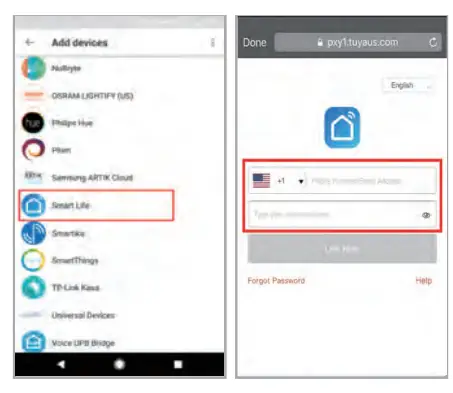 STEP 4
After you assign rooms for the Switch,your Switch will be listed in the Home Control page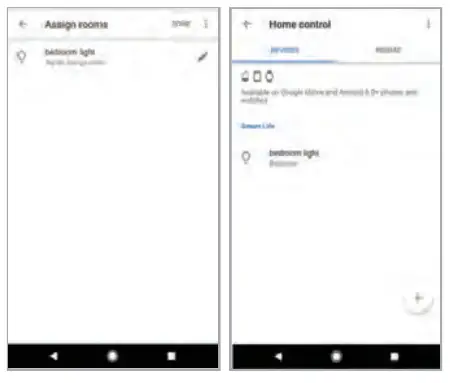
STEP 5
Control your smart switch through Google Home Now you can control your smart switch through Google Home. If you set the name as “bedroom light”, the supported voice commands are as below:
- Ok Google, turn on bedroom light.
- Ok Google, set bedroom light to 50%.
FCC Caution
This device complies with part 15 of the FCC Rules. Operation is subject to the following two conditions:
- This device may not cause harmful interference, and
- This device must accept any interference received, including interference that may cause undesired operation.
- § 15.21 Information to user.
Any Changes or modifications not expressly approved by the party responsible for compliance could void the user’s authority to operate the equipment. - § 15.105 Information to the user.
Note: This equipment has been tested and found to comply with the limits for a Class B digital device, pursuant to part 15 of the FCC Rules. These limits are designed to provide reasonable protection against harmful interference in a residential installation. This equipment generates uses and can radiate radio frequency energy and, if not installed and used in accordance with the instructions, may cause harmful interference to radio communications. However, there is no guarantee that interference will not occur in a particular installation. If this equipment does cause harmful interference to radio or television reception, which can be determined by turning the equipment off and on, the user is encouraged to try to correct the interference by one or more of the following measures:- Reorient or relocate the receiving antenna.
- Increase the separation between the equipment and receiver.
- Connect the equipment into an outlet on a circuit different from that to which the receiver is connected.
- Consult the dealer or an experienced radio/TV technician for help.
- This equipment complies with FCC radiation exposure limits set forth for an uncontrolled environment. This equipment should be installed and operated with minimum distance 20cm between the radiator & your body.
IC Caution
- This device complies with Industry Canada licence-exempt RSS standard(s). Operation is subject to the following two conditions:
- This device may not cause interference, and
- This device must accept any interference, including interference that may cause undesired operation of the device.
- This equipment complies with IC radiation exposure limits set forth for an uncontrolled environment. This equipment should be installed and operated with minimum distance 20cm between the radiator & your body.


