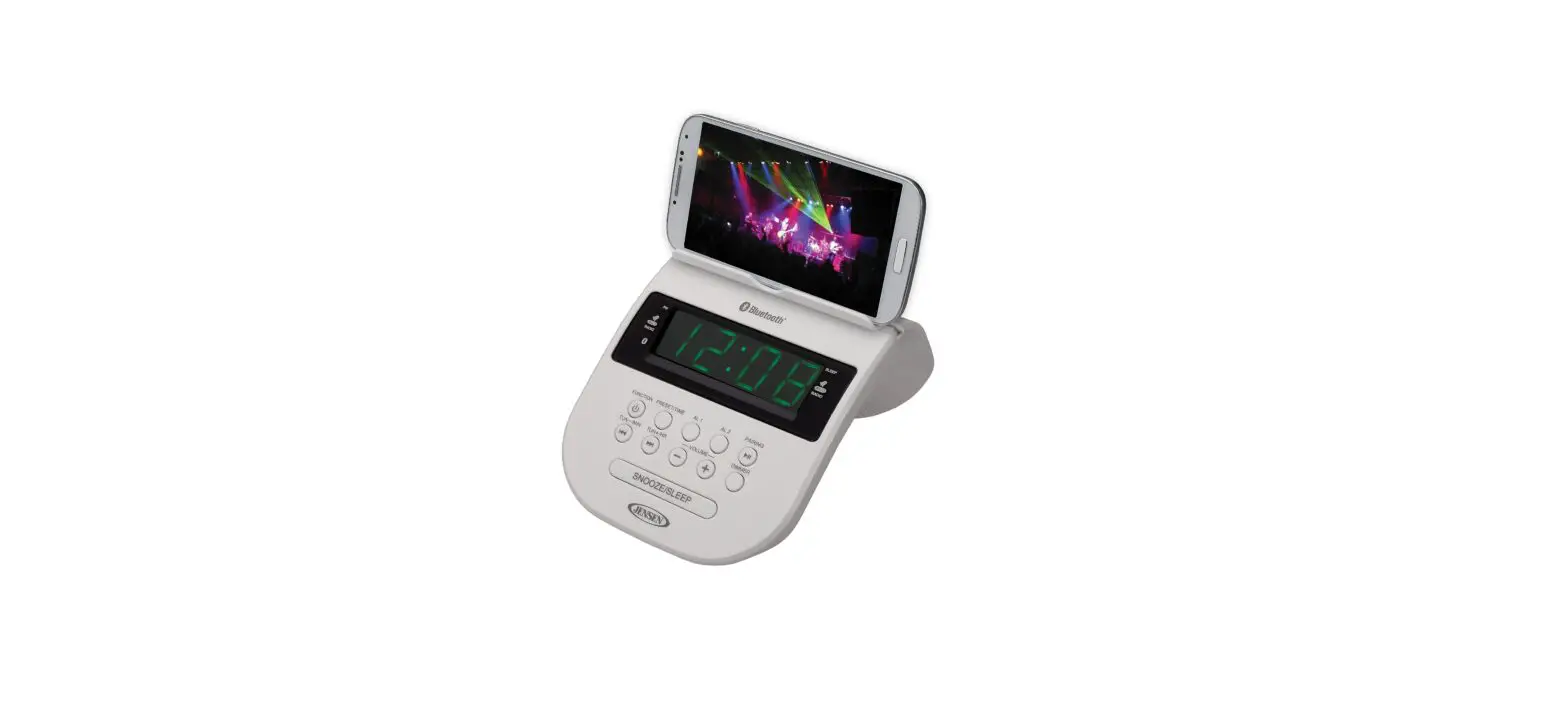
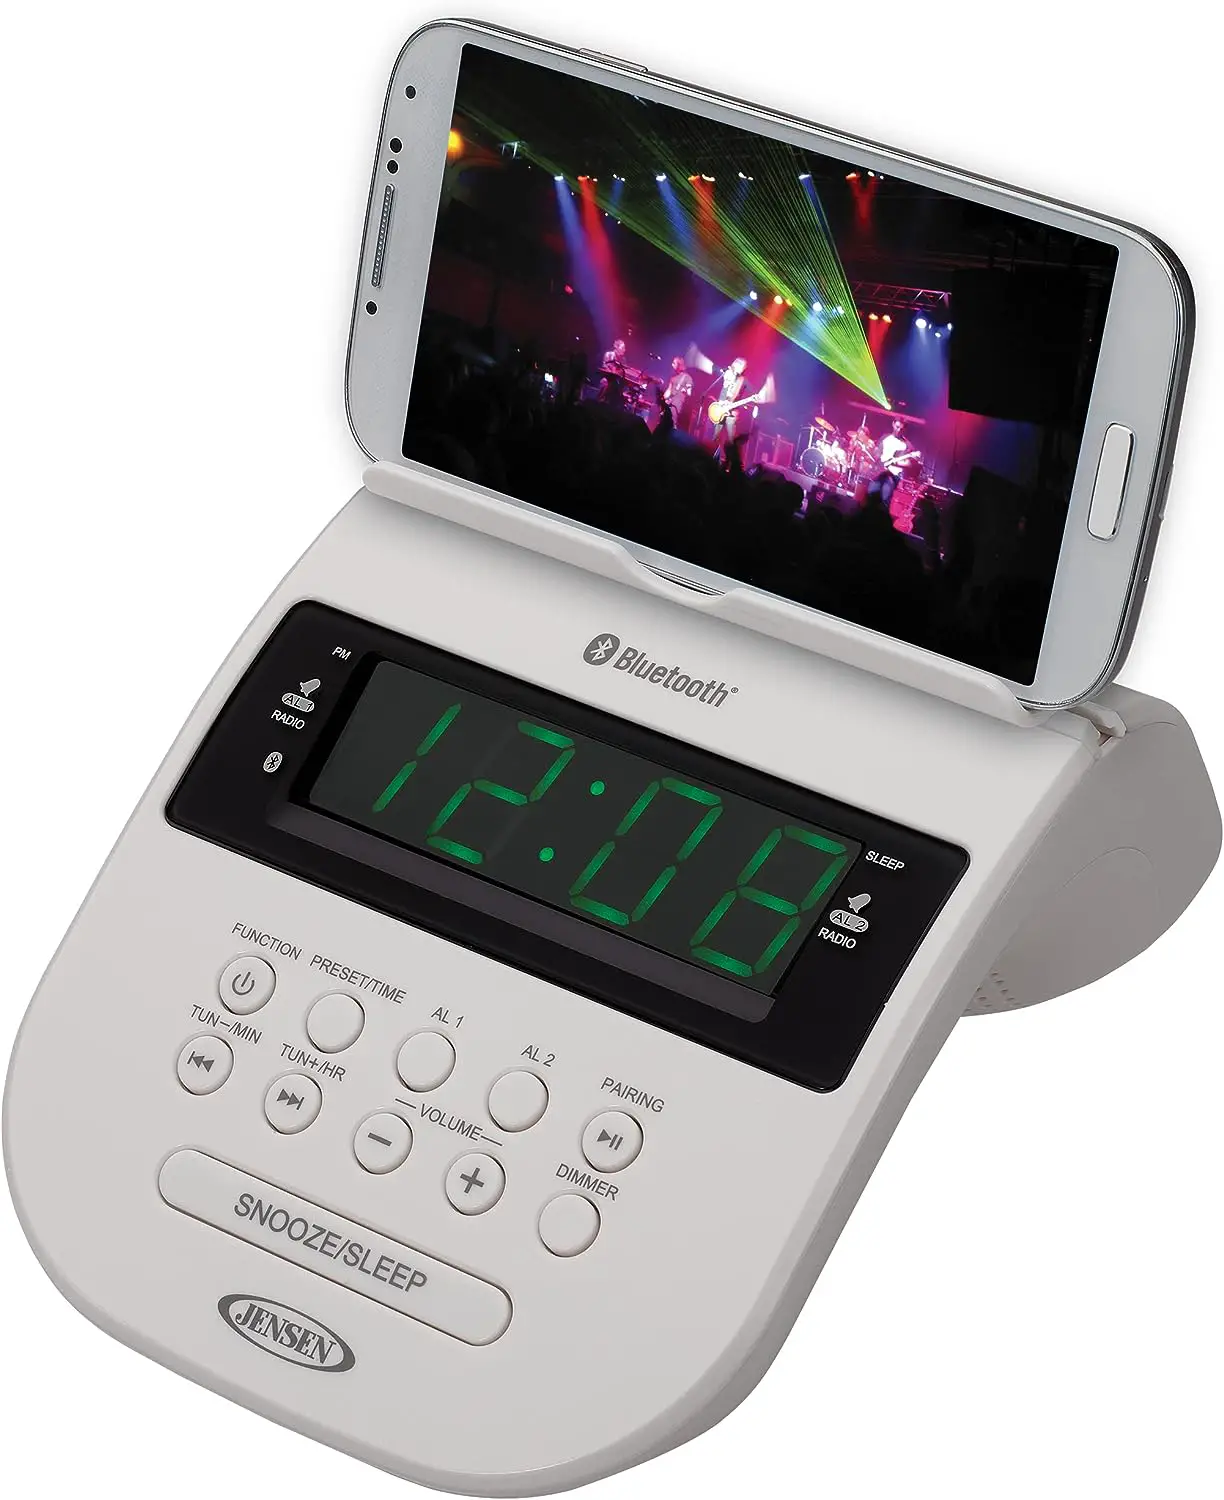
JENSEN JCR-295 Bluetooth Clock Radio with Cellphone Holder
CAUTION
Follow the advice below for safe operations.
- Stop operation immediately if any liquid or solid object should fall into the cabinet.
- If the unit is not to be used for a long period of time, make sure that all power sources are disconnected from the unit. Remove all batteries from the battery compartment, and unplug the AC-DC adaptor from the wall outlet. Make it a practice to remove the AC-DC adaptor by grasping the plug and not by pulling the cord.
ON PLACEMENT
- Do not use the unit in places, which are extremely hot, cold, dusty or humid.
- Place the unit on a flat and even surface.
- Do not restrict the airflow of the unit by placing it in a place with poor ventilation, by covering it with a cloth or by placing it on a carpet.
ON CONDENSATION
- When left in a heated room where it is warm and damp, water droplets or condensation may form inside the unit.
- When there is condensation inside the unit, the unit may not function normally.
- Let it stands for 1 to 2 hours before turning the power on, or gradually heat the room upanddrytheunitbefore use.
Should any trouble occur, remove the power source and refer servicing to qualified personnel.
COMPLIANCE WITH FCC REGULATIONS
This device complies with Part 15 of the FCC Rules. Operation is subject to the following two conditions:
- This device may not cause harmful interference, and
- This device must accept any interference received, including interference that may cause undesired operation.
This equipment has been tested and found to comply with the limits for a Class B Digital Device, pursuant to Part 15 of the FCC Rules. These limits are designed to provide reasonable protection against harmful interference in a residential installation. This equipment generates, uses and can radiate radio frequency energy and, if not installed and used in accordance with the instructions, may cause harmful interference to radio communications. However, there is no guarantee that interference will not occur in a particular installation. If this equipment does cause harmful interference to radio or television reception, which can be determined by turning the equipment off and on, the user is encouraged to try to correct the interference by one or more of the following measures:
- Reorient or relocate the receiving antenna.
- Increase the separation between the equipment and receiver.
- Connect the equipment into an outlet on a circuit different from that to which the receiver is connected.
- Consult the dealer or an experienced radio/TV technician for help.
WARNINGS
Changes or modifications to this unit not expressly approved by the party responsible for compliance could void the user’s authority to operate the equipment.
PROTECT YOUR FURNITURE!!
This system is equipped with non-skid rubber ‘feet’ to prevent the product from moving when you operate the controls. These ‘feet’ are made from non-migrating rubber material specially formulated to avoid leaving any marks or stains on your furniture. However certain types of oil based furniture polishes, wood preservatives, or cleaning sprays may cause the rubber ‘feet’ to soften, and leave marks or a rubber residue on the furniture.
To prevent any damage to your furniture we strongly recommend that you purchase small self-adhesive felt pads, available at hardware stores and home improvement center severywhere, and apply these pads to the bottom ofthe rubber ‘feet’ before you place the product on fine wooden furniture.
DEAR JENSEN® CUSTOMER
Selecting fine audio equipment such as the unit you’ve just purchased is only the start of your musical enjoyment. Now it’s time to consider how you can maximize the fun and excitement your equipment offers. This manufacturer and the Electronic Industries Association’s Consumer Electronics Group want you toget the most out of your equipment by playing it at a safe level. One that lets the sound come through loud and clear with out annoying blaring or distortion and, most importantly, without affecting your sensitive hearing. Sound can be deceiving. Over time your hearing “comfort level” adapts to higher volumes of sound. So what sounds “normal” can actually be loud and harmful to your hearing. Guard against this by setting your equipment at a safe level BEFORE your hearing adapts.
To establish asafe level:
- Start your volume control at a low setting.
- Slowly increase the sound until you can hear it comfortably and clearly, and without distortion.
- Once you have established a comfortable sound level: Set the dial and leave it there.
Taking a minute to do this now will help to prevent hearing damage or loss in the future. After all, we want you listening for a lifetime. We Want You Listening For a Lifetime Used wisely, your new sound equipment will provide a lifetime of fun and enjoyment. Since hearing damage from loud noise is often undetectable until it is too late, this manufacturer and the Electronic Industries Association’s Consumer Electronics Group recommend you avoid prolonged exposure to excessive noise. Customer’s Record:
The serial number of this product is found on its bottom cover. You should note the serial number of this unit in the space provided as a permanent record of your purchase to aid in identification in the event of theft of loss.
LOCATION OF CONTROLS

- PM INDICATOR
- ALARM 1 WAKE TO ALARM/RADIO INDICATORS
 BLUETOOTH INDICATOR
- PRESET/TIME BUTTON
- POWER / FUNCTION BUTTON
- TUN-/MIN
 / TUN+/HR/ BUTTON
 - BATTERY COMPARTMENT
- CELLPHONE HOLDER
- LED DISPLAY
- SLEEP INDICATOR
- ALARM 2 WAKE TO ALARM/RADIO INDICATORS
- ALARM 1 / ALARM 2 BUTTONS
- PAIRING / PLAY / PAUSE BUTTON
- DIMMER BUTTON
- VOLUME +/- BUTTONS
- SNOOZE / SLEEP BUTTON
- AUX IN JACK
- USB JACK ( for USB charging )
- DC JACK
- FM ANTENNA
POWER SOURCE (AC ADAPTER ONLY)
The JCR-295 operates with an external AC-DC adaptor with a rating of DC 5V, 1200mA . The system is also equipped with a battery back-up system for the clock that is powered by 2 pieces of “AAA” (UM-4) size batteries (Not included).
Note: The batteries may be installed as a backup option to maintain the clock time if electrical
AC OPERATION
The JCR-295 only operates using the AC-DC adaptor. Be sure to use an AC-DC adapter with a rating of DC 5V, 1200 mA and with the following polarity:

If you are using a universal adaptor with an output polarity switch or polarized plugs, be sure to set the polarity of the center plug to “+”.
WARNING: Never use this radio near water or in the shower when using an AC adaptor. Shock or personal injury could occur.
INTALL BACKUP BATTERIES
- Remove the Battery Door on the bottom of the unit.
- Following the polarity diagram as shown inside the battery compartment (#7), insert 2 AAA size batteries (not included ) and replace the door.
IMPORTANT:
Be sure that the batteries are installed correctly. Wrong polarity may damage the unit.
- Only an adult should replace the batteries.
- Use only the size and type of batteries specified.
- For better performance and longer operating time, we recommend the use of alkaline-type batteries.
- Do not mix old and new batteries.
- Do not mix alkaline, standard (carbon-zinc) or rechargeable (nickel-cadmium) batteries.
- If the unit is not to be used for an extended period of time, remove the batteries.
- Old or leaking batteries can cause damage to the unit and may void the warranty.
- Do not dispose of batteries in fire, batteries may leak or explode.
- Do not try to recharge batteries not intended to be recharged, they can overheat and rupture. (Follow battery manufacturer’s directions.)
SETTING THECLOCK TIME
In order for the clock to function properly, the clock has to be set before you use it for the first time. After powering up the unit or press and hold PRESET/TIME Button (#4) at standby mode, the clock display will flash. To set the time, follow the steps below:
- Tap the TUN-/MIN/ / TUN+/HR/ Buttons (#6) until the correct time is displayed..
- Press the PRESET/TIME Button (#4) to confirm the time
NOTE:
- Make sure the hour is set so that AM or PM is correctly displayed. There is a PM Indicator (#1) located in the upper left corner of the LED display (#9). If the PM Indicator (#1) is showing on the display, the displayed time is “PM”. If the PM Indicator (#1) is not showing on the display, the time displayed is “AM”.
- The two dots between the Hour and Minute digits keep flashing at Standby Mode and light steadily when in On (RADIO, BLUETOOTH or AUX ) mode.
RADIO OPERATION
- Press the POWER/FUNCTION Button (#5) repeatedly to Turn On the unit and select Radio Mode, frequency will show on the LED display (#9).
- Press and hold the TUN-/MIN/ OR TUN+/HR/ Buttons (#6) to search for the next /previous available station. If the reception is poor, try Manual Tuning to fine-tune the station. Press the TUN-/MIN/ OR TUN+/HR/ Buttons (#6) briefly to manually tune through the frequency band.
- Adjust the VOLUME +/- Control (#15) to obtain the desired sound level.
- The LED display will change to show the clock time after a few seconds. Press the TUN-/MIN/ OR TUN+/HR/ Buttons (#6) to check the tuned frequency.
Setting the Radio Station Presets
The unit allows you to store up to 20 stations for easy recall at any time.
- Tune to the radio station you want to store in memory.
- Press and hold the PRESET/TIME Button (#4). The preset channel number “P01” will be flashing on display.
- To change the preset channel number location, press the TUN-/MIN/ OR TUN+/HR/ Buttons (#6) to step through the preset locations ( P01 – P20 ).
- To confirm the preset location, press PRESET/TIME Button (#4).
- To store up to 20 station presets, repeat steps 1-4 above.
RECALL PRESET STATION
In Radio mode, press PRESET/TIME Button (#4) repeatedly to select the preset channel.
TIPS FOR BEST RADIO RECEPTION
To insure maximum FM tuner reception, unwrap and fully extend the EXTERNAL FM WIRE ANTENNA (#24) for best FM radio reception.
BLUETOOTH OPERATION
Pairing a Bluetooth enabled device with the JCR-295.
![]()
![]()
![]()
![]()
![]()

FREQUENTLY ASKED QUESTIONS


