FAFREES FF91 Electric Bicycle

Congratulations on your purchase!
Please write down your frame number in the blank space below in case of future need.
Important Note
- This manual include important safety performance information and service information. Please make sure you have read the following warning content before the first time you use our product.
- If you borrow your electric bicycle to other people, please let the user read this manual it could help to decrease the risk of accident.
- Please wear a suitable and safe helmet while riding, please wear clothes with fluorescent and reflective stripes when you ride at night. Don’ t exceed speed limit, it is one of the main causes of traffic accident, and abide by the traffic rule.
- Do not touch the charging hole or touch it with metal objects, otherwise it will cause an accident due to an instantaneous short circuit of the current.
- Zero starting, braking frequent, driving against the wind, carrying people or anything, insufficient air pressure on the tires will use more power, and then reduce the endurance mileage. If you want the best endurance mileage , please do as follows:
- Use assist mode .
- Don’t brake frequently or use zero starting .
- Don’t overload .
- Before riding, please check the tire pressure, and supply proper pressure.
- The E-bike should avoid prolonged exposure to the sun or rain , avoid storage in places with high temperature or corrosive gas ,so as to avoid electroplating parts and paint surface by chemical corrosion and electrical parts damage , resulting in operational failure and accidents .
- When charging the E-bike , please make sure that there is no foreign matter in the charging port . Connect the charger to the bicycle first , then connect the AC power to avoid sparking.
- When the E-bike is not used for a long time , please turn off the main switch in time and charge it in time. Store the battery after fully charged, and charge it frequently if not been used for a long time , so as to avoid serious power loss of battery.
- Your current insurance business may not cover the situation you may encounter when riding an electric bike , please contact your insurance company or insurance broker for relevant consultation .
- Follow the local road laws, riders under 18 years old should get parental permission before riding it.
- E-bikes are vehicles with certain risk factors . At the same time , when emergency, brake the rear wheel first , then brake the front wheel. There is a danger of tipping over if you brake the front wheel suddenly, please ride carefully.
- Keep the two keys properly. If necessary, you should get more spare keys.
Structure illustration
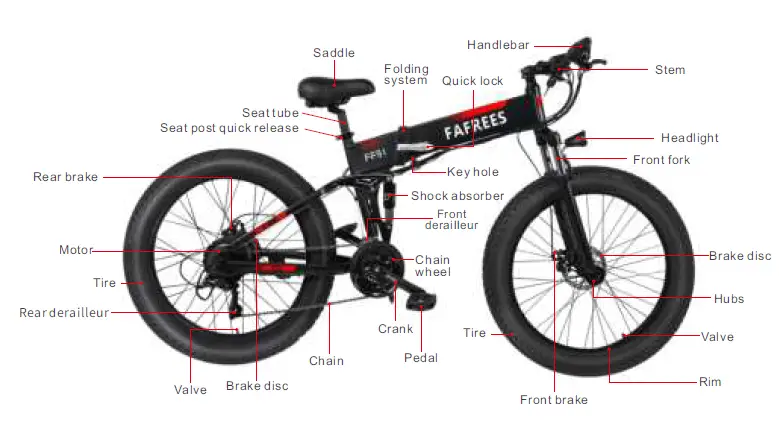
 E-bike electric bicycle package, It includes the following parts in the package box. Please check it when opening. Any lack or loss, please contact the local official distributor/dealer or after-sales department.
| No. | 1 | 2 | 3 | 4 | 5 | 6 | 7 | 8 | 9 |
| Part Name | E-bike | Front wheel | Saddle assembly | Charger | Battery | Pedals | Reflector | Tool | Manual |
| Qty(piece) | 1 | 1 | 1 | 1 | 1 | 2 | 2 | 2 | 1 |
Parts list as following pictures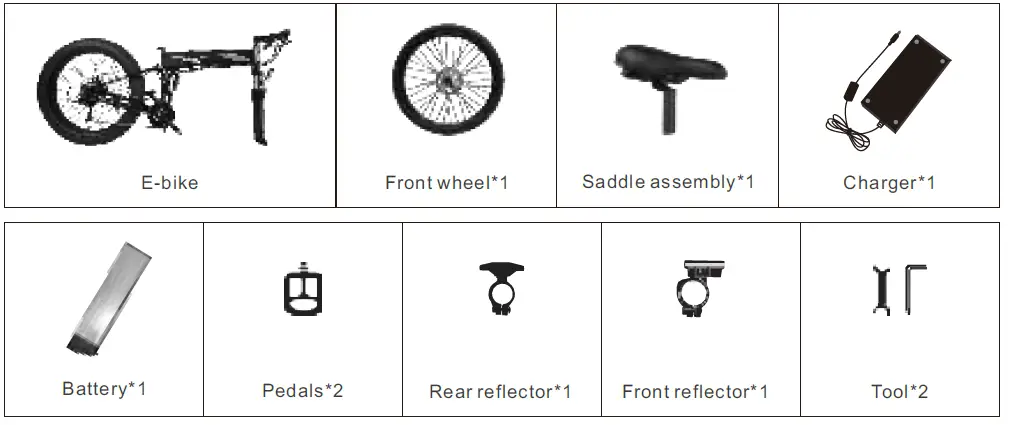 *Some parts are directly assembled on the bicycle
Unfolding instructions
 Remove the ebike from the package.
  Take out the front wheel set and align it with the clearance of the front brake before installing it, then install.
 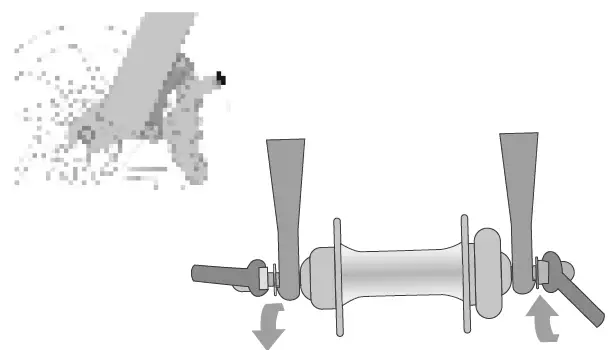 A rod is pierced on the center shaft of the wheel. Tighten the nuts at both ends, and then use a wrench to lock it in a clockwise direction.
  Check whether there is a gap on both sides of the disc rotor after locking.
  First remove the four screws of the handlebar stem, install the handlebar in the center position and tighten the screws(5.1 Nm)
 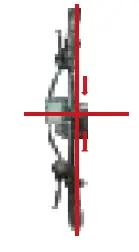 Adjust the angle of the handlebar stem to the position perpendicular to the frame , first lock the screws of the stem cover, and then lock the two screws pointed by the arrows.
 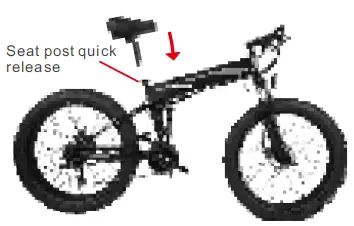 Install the seat, adjust it to a suitable height and fix it with quick release.
 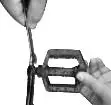 The left pedal is tightened counterclockwise and the right pedal is tightened clockwise.
 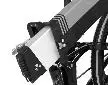 The bicycle battery has been assembled before leaving the factory, and can be removed and installed later.
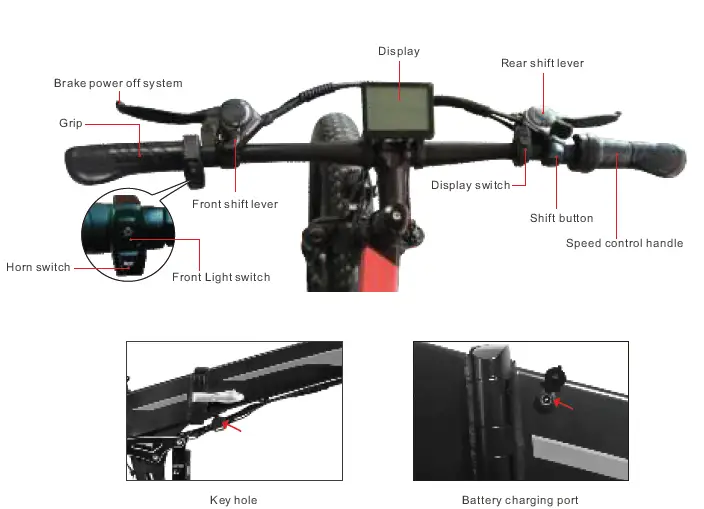
Battery key positions
Familiarize yourself with the key port and key positions before riding the bike. The photo below shows the key port aligned in key position 1, in line with the icon .In key position 1, the battery is in the“![]() ” position, with the battery locked to the frame, and the key can’t be removed.
” position, with the battery locked to the frame, and the key can’t be removed.
| Key Position/ICon | Directions |
| 1 | Power on, Locked to Frame |
| 2 | Power off, Lock to Frame |
| 3 | Initial position, Unlocked from Frame (for battery removal) |
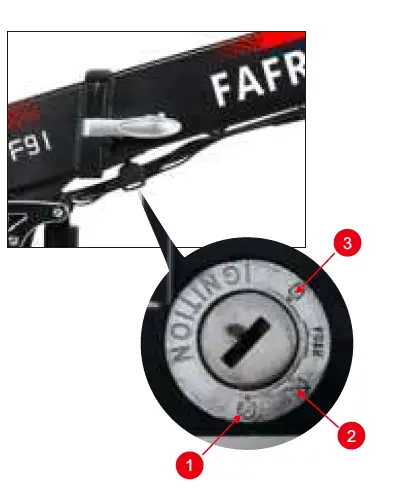
Anytime the battery is in key position1, ( , Power on, Locked to frame) the display power button will turn the bike on and off, but the battery cannot be removed.
If the battery is in key position.2,( , locked to the frame) no buttons or controls can be activated, the bike will remain off, and the battery cannot be removed.
Anytime the battery is in key position.3,( , Initial position, Unlocked from Frame,(for battery removal)) the battery must be removed from the bike before moving or riding the bike. The key can be removed from battery.
NOTICE: You have to press the key then you can switch to unlock position
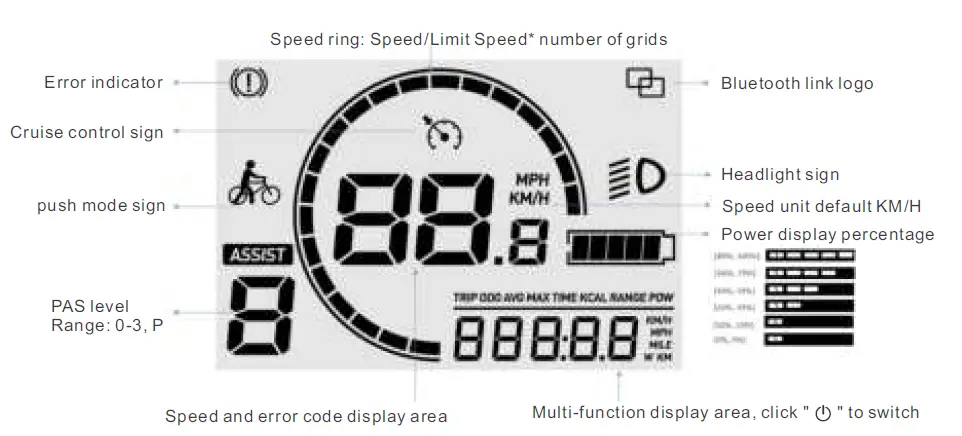
Display description
Function parameter
| Item | Specific parameters | Remark |
| Real-time speed | 0.0-99.9km/h | |
| Real-time motor power | 0-999W | |
| Battery power | 0-100% | |
| Power-assisted level | 0-N | Adjusable |
| Total mileage | 0-99999km | |
| Trip miles | 0-9999.9km | Resettable |
| Trip maximum speed | 0-99.9 km/h | Resettable |
| Trip average speed | 0-99.9km/h | Resettable |
| Trip time | Hours: minutes | Resettable |
| Calories burned | 0-99999 Kcal | Resettable |
| Cruise control | Support | Need agreement support |
| Front light indication | Support | |
| Error code | Support | According to the agreement |
| Setting menu | Support | |
| Automatic shutdown time | 0-10 min | О means no automatic shutdown |
| Backlight adjustment | 0-5 | |
| Bluetooth function* | Optional |
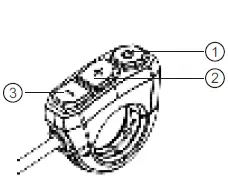
| 1 | ОN/OFF |
| 2 | UP |
| 3 | DOWM |
System use
Initial operation
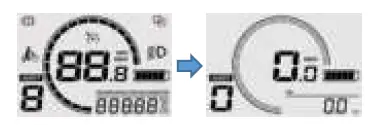
Boot into the cycling interface
- Long press the ”
 ” button and the interface is fully lit to enter the riding interface.
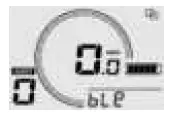
 Connect to Bikewise Pro
- Long press the “+” and “-” buttons at the same time to enter the setup menu.
- Use the “+”/”-” button to navigate to the BLE menu option and press the ” ” key. At this time, the Bluetooth icon flashes and enters the Bluetooth search binding mode.

- After downloading the app and registering, use Bikewise Pro to bind the meter with Bluetooth.
- Bikewise Pro download link, please scan the QR code below to download:

- After the Bluetooth connection is successful, the Bluetooth icon is always on, and the Bluetooth binding mode is automatically exited and stays in the BLE menu option.
However, please note the following Liability disclaimer:
The apps presented do not belong to FAFREES. We expressly disclaim all liability of any kind whatsoever for third-party software and are not responsible for their content, code or for any loss or damage arising from the use of them. If you use third party resources, you are subject to their terms and conditions and licenses and are no longer protected by our privacy policy or our security measures.
Control Button Operation
- “+” button:
Short press Long press Press and hold Instrument interface PAS level up —– —– Menu interface Cursor up/increase —– —– - “-” button:
Short press Long press Press and hold Instrument interface PAS level down —– 6km/h push mode Menu interface Cursor down/decrease —– —– - button:
Short press Long press Press and hold Instrument interface Change display info On/off —– Menu interface Confirm/Next —– —–
Remark: Press and hold “+” and “-” together for 2 seconds to enter or exit the menu interface; Press and hold “+” and “ ” together for 2 seconds to clear the trip data.
Instrument interface
Menu interface
In the instrument interface, long press the “+” and “-” buttons to enter the menu interface. To ensure user safety, the menu interface can only be entered when the Ebike is stationary (speed is 0); when the speed is not 0, even in the menu settings, it will be forced to exit the menu and return to the riding interface. In the menu interface, press the “+” and “-” button to jump through the menu items, and the ” ” button to enter the selected menu item.
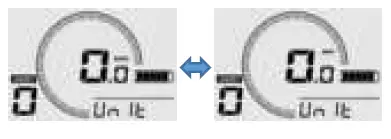
Set unit
When selecting the “Unit” menu item, press the ” button to confirm ” KM/H or MPH.
 Set the backlight brightness
When selecting the “Light” menu item, press the “![]() ” button to enter this item, and then the “+” and “-” buttons to confirm the backlight brightness, ranging from 1-5; then press the “
” button to enter this item, and then the “+” and “-” buttons to confirm the backlight brightness, ranging from 1-5; then press the “![]() ” button to confirm and exit this item.
” button to confirm and exit this item. 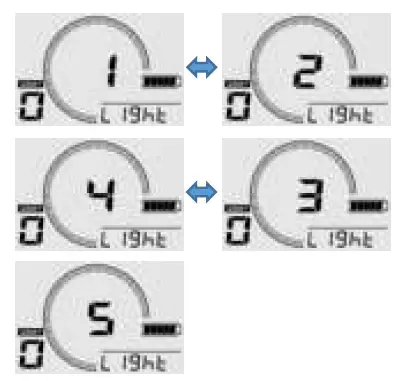 Set automatic shutdown time
When selecting the “OFF” menu item, press the ” ![]() ” button to enter this item, and the “+” and “-” buttons will confirm the time, ranging from 0-10 min, where 0 means to cancel the automatic shutdown; press the “
” button to enter this item, and the “+” and “-” buttons will confirm the time, ranging from 0-10 min, where 0 means to cancel the automatic shutdown; press the “![]() button again to confirm and exit This item.
button again to confirm and exit This item.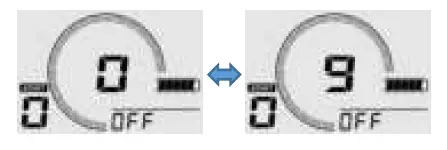 Set wheel diameter
When selecting the “Size” item, press the “![]() ” button to enter this item, and then press the “+” and “-” buttons to select the wheel diameter, ranging from 04-99. In particular, the 27.5-inch display “27.5”: press the ”
” button to enter this item, and then press the “+” and “-” buttons to select the wheel diameter, ranging from 04-99. In particular, the 27.5-inch display “27.5”: press the ” ![]() ” button again to confirm And exit the item.
” button again to confirm And exit the item. 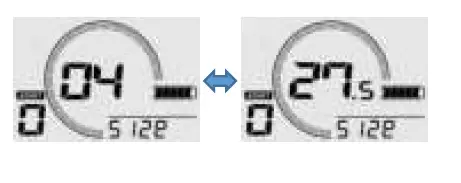
Error code
When there is a fault, the error indicator lights up, and the real-time speed area is displayed as a Error code.
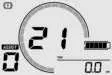 The Error code varies with the controller and protocol used by the customer. For specific fault information, please refer to the corresponding controller protocol Protocol Error code:
| Error code | Causes | Solutions |
| 21 | Abnormal current or damaged MOS tube |
|
| 22 | Handle throttle abnormal |
|
| 23 | Motor phase loss |
|
| 24 | Motor Hall abnormality |
|
| 25 | Abnormal braking |
|
| 26 | Under voltage |
|
| 30 | Communication error |
|
APP instructions
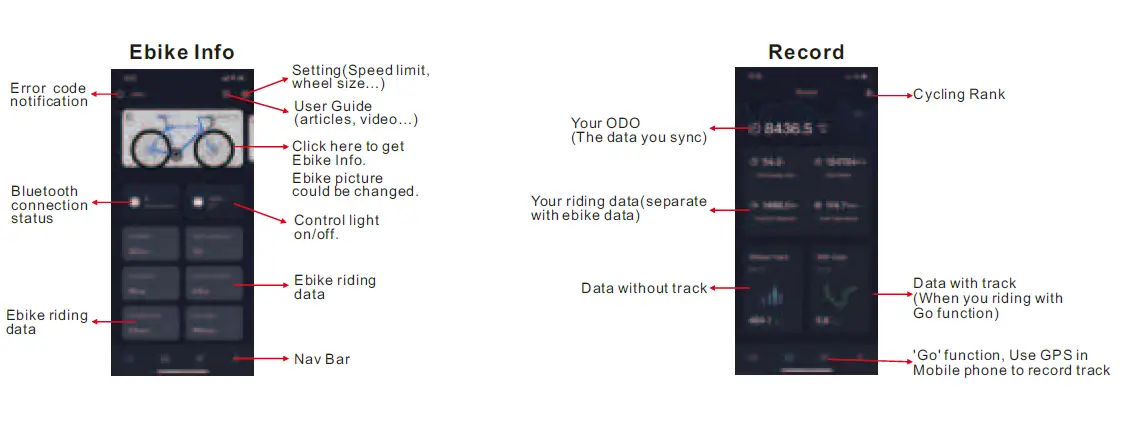

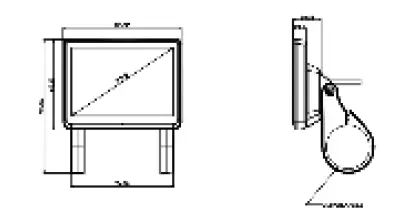
Product parameters
| Dimensions | Product dimensions | 1970*1145*630mm |
| Package dimensions | 1620*330*810mm | |
| Tire size | 26”*4.0 inch | |
| Performance | Max Load Weight | 150kg |
| Maximum Speed | 35Km/h | |
| Product weight | 29Kg | |
| Package weight | 36Kg | |
| Electronics | Battery type | Lithium-ion battery |
| Battery capacity | 48V10Ah | |
| Battery Adapter | DC 54 .6V 2A | |
| Maximum Range | Power assisted model around 80KM | |
| Recharge Time | ≈5H | |
| Drive Type | Rear Drive | |
| Motor | High Speed Motor / 48V 1000W | |
| Display | LCD Display | |
| Features | Frame Material | Aluminum Alloy |
| Front and rear brake | Mechanical Disc Brakes | |
| Speed transmission | 21 Speed | |
| Chainset | 24-34-42 Tooth | |
| Chain | KMC Z7 RB | |
| Rims | Alloy | |
| Front light | Yes |
* The above data allows for 2% manufacturing tolerance due to different batches.
Daily use
After the bike has been properly assembled according to the instruction, all components are secured correctly. And you have read this entire manual, turn on the e-bike and select a pedal assist level to start following the steps below.
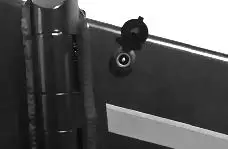
Charging Method
Step 1: The battery can be charged on and off the bike. The charging port is at the tail of the battery.
Step2: Inset the charging port of the charger to the connecting charge port of the battery
(please make sure the charge port is dry).
Step 3: When the charger indicator turns red, it is charging; when it turns green, it is fully charged. After fully charged, please stop charging, as long-term charge will affect the service life of the battery.
Step 4: After charging, please cover the charging port in case water in.
 Safety tips when charging
Please charge at least 5 hours before first use.
In order to maximum extend the battery life, please charge it every one month or two days after riding it. Please charge it under proper temperature and environment.
Not charging timely may cause battery damage. As time goes by, battery capacity will gradually run out, and eventually lead to battery over-discharge. Please use the battery, charger and cable provided by original manufacturer, to avoid dangers caused by battery overcharge .
Please ensure correct connection of the charger and the cable, as well as enough ventilation environment.
Please use it under dry condition. It is NOT allowed to make the charger or cable connect with water, as it may result in electric shock. Please do not tough with wet hands. If there is any failure during charging, please immediately pull up the power plug.
Please guarantee to pull it up from the plug, not from the cable.
Please do not make the charger or cable contact sharp or high temp. articles. Please regularly make sight check to the charger and its cable
If there is obvious damage of the charger or cable, in order to avoid further damage, please do not use the charger any more, and contact for exchange. Please do not personally repair the battery, charger or cable. Any questions, please contact us.
Battery Lock
Test the battery lock security. Ensure the key port is aligned with the icon, which indicated the battery is powered on and locked onto the frame mount.
Carefully use both hands to pull up on the battery to test that the lock is secure.
Handlebar and Seat
Ensure proper handlebar and seat adjustment. Lowering the seat so the rider can put one or both feet flat on the ground may offer a safer and more comfortable introduction to operating the bike. Ensure the handlebar bolts and seat post quick release are fully and properly secured.
Power on/off
Press and hold the power button “ ” for approximately 3 seconds to turn on/off the bike.
Front Light
Long press the ” ” button to turn on/off the front light.
Electric Horn
Press the horn switch to remind passers-by or animals ahead when needed.
PAS Level
Select the desired level of pedal assistance(PAS) between level 0 to 3. Using the + and – buttons to remote. Level 1 corresponds to the lowest level of pedal assistance and level 3 corresponds to the highest level of pedal assistance. Level 0 indicates pedal assistance is inactive. Start in PAS level 0 or 1 and adjust from there.
Speed Control Handle
The speed control handle is used by slowly and carefully rotate the handle downward without pedaling. Do not use the throttle unless you are on the bike.
6km/h Push Mode
Long press ” – ” button for 5 seconds till the push mode mark turns up on the screen. Then the push mode is activated.
Cruise Control
Accelerate the bike with the speed control handle to the speed that you want and keep for over 8 seconds. Then the cruise mode will be activated. The cruise mode can be turned off by braking or accelerating.
Troubleshooting
| Symptoms | Possible Causes | Most Common Solutions | |
| 1 | The bike does not work |
|
|
| 2 | Irregular acceleration and/or reduced top speed |
|
|
| 3 | The motor does not respond when the bike is powered on |
|
|
| 4 | Reduced range |
|
|
| 5 | The battery will not charge |
|
|
| 6 | Wheel or motor makes strange noises |
|
|


