![]()
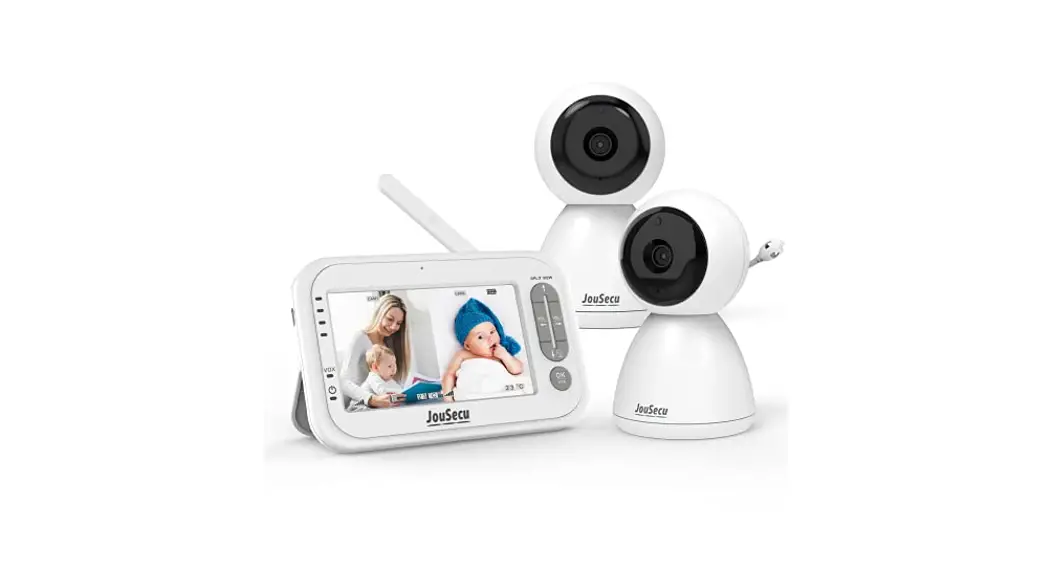
INSTRUCTION MANUAL
B255
Service Email: [email protected]
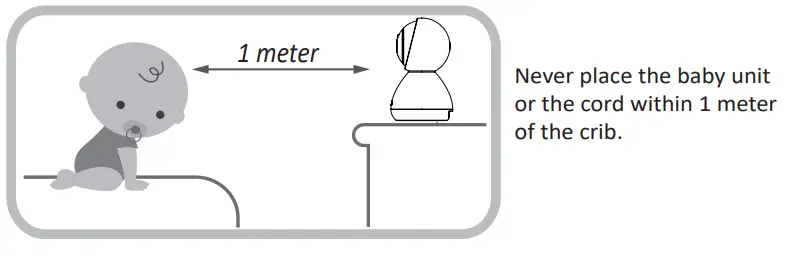
![]() WARNING STRANGULATION HAZARD-Children have STRANGLED in cords. Keep this cord out of reach of children (more than 3 feet/1 meter away from the crib). Never use extension cords with AC adapters. Only use the AC Adapters provided.
WARNING STRANGULATION HAZARD-Children have STRANGLED in cords. Keep this cord out of reach of children (more than 3 feet/1 meter away from the crib). Never use extension cords with AC adapters. Only use the AC Adapters provided.![]() WARNING
WARNING
Adult assembly required. Keep small parts away from children when assembling.
Warning Information
*Keep this instruction manual for future reference.
*For adult use only.
Setup and use your video baby monitor
Installing Baby Unit
A. Place the Baby Unit on a flat surface, such as a desk or shelf.
B. Connect the small plug of the power adapter to the Baby Unit and the other end to a suitable electrical outlet. Only use the enclosed adapter (5V DC 1000mA). The baby unit is turned on and the power LED will be green. 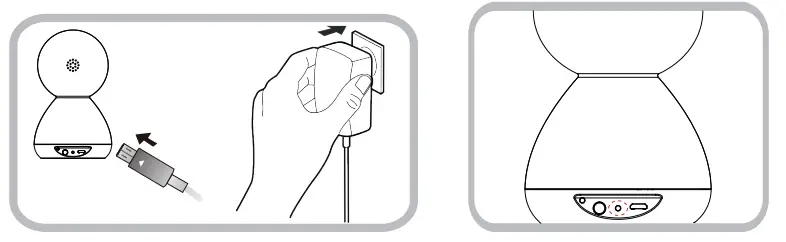
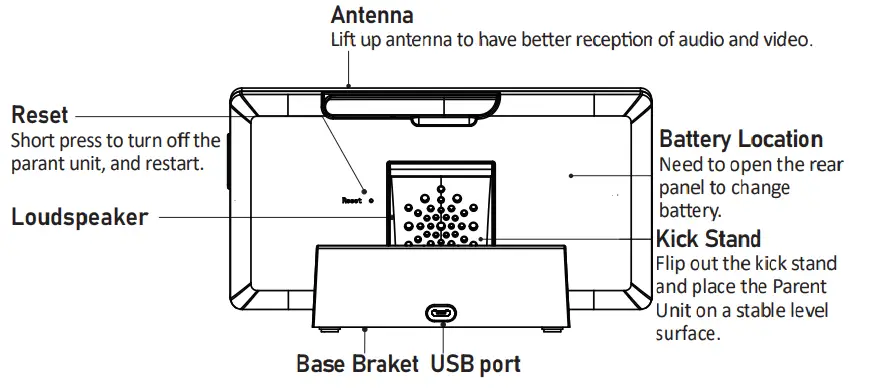
C. Connecting the power supply for the Parent Unit. Connect the small plug of the power adapter to the base bracket or the parent unit and the other end to an electrical outlet. Only use the enclosed adapter (5V DC/2000mA).
Recommend charging time of at least 3 hours before first use.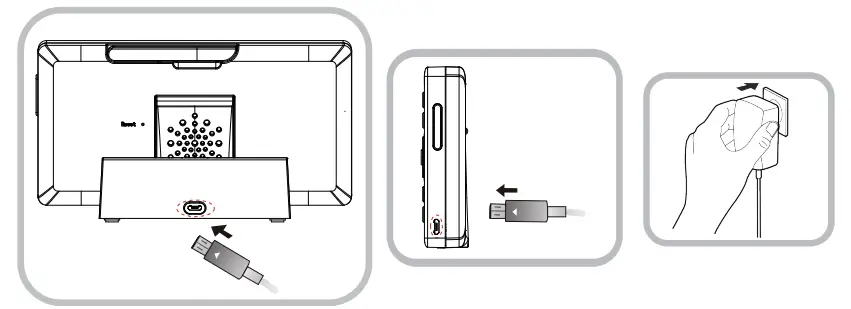
D. After pressing the SOS button, the SOS signal is wirelessly transmitted to the camera and then to the monitor. Press any key on the screen to turn off this SOS alarm. The SOS function is opened by default, and it can be turned off through Menu>Seting>Alarm>SOS>Off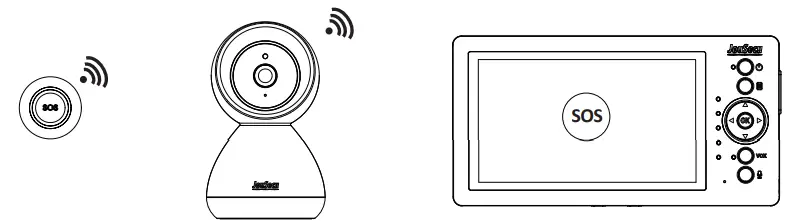
Precaution: use of battery for Parent Unit Only charge the battery when the battery life indicator is low. Constant recharging of your battery before the low battery indicator light comes on will decrease the life of your batteries. When the battery is low, the power on-off LED (icon) will flash red and the on-screen display battery icon will flash red indicating that the battery needs to be charged. 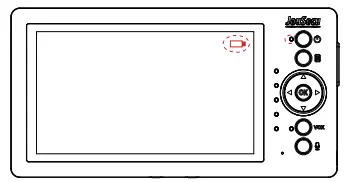
The function of keys and LED indicators
Parent Unit
Power on-off status LED
Steady Green: The parent unit is powered on. Flash Red: Battery Low.
Steady Orange: Charging when the monitor is on.
Steady Red: Charging when the monitor is off.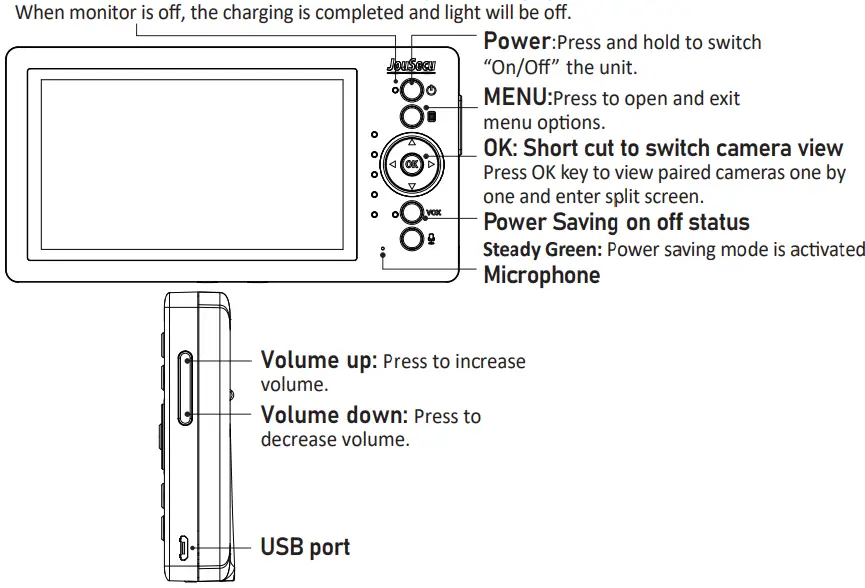
| Talk | Press and hold to talk to the baby unit. | |
OK | Select | Menu mode (Press to select menu option) |
VOX | Power Saving-on/off | Press to switch on/off Power Saving (When the power-saving mode is enabled, the screen will be turned off) |
| Up/Down Camera Up/Down | Menu mode (Press to adjust menu settings) View camera mode(Press to control the current camera to rotate up/down) |
| Left/Right Camera Left/Right | Menu mode (Press to adjust menu settings) View camera mode(Press to control the current camera to rotate left/right) |
Baby Unit
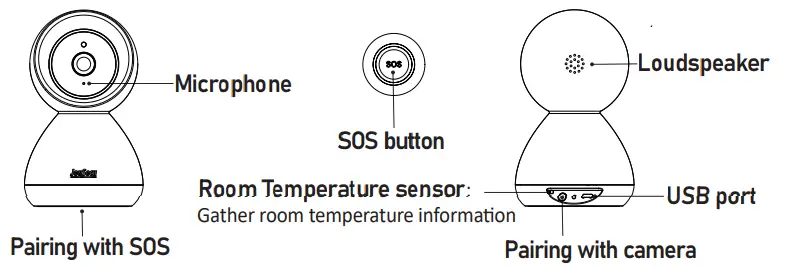
| Pairing with SOS | Hold it down with a needle, power LED starts to blink, then press the SOS button. After you hear a “beep” sound, the pairing is successful. |
| Pairing with camera | When the camera is powered on, press it the power LED starts to blink, the camera is in pairing mode, and press it again to exit pairing mode. |
Start to use the monitor
Status bar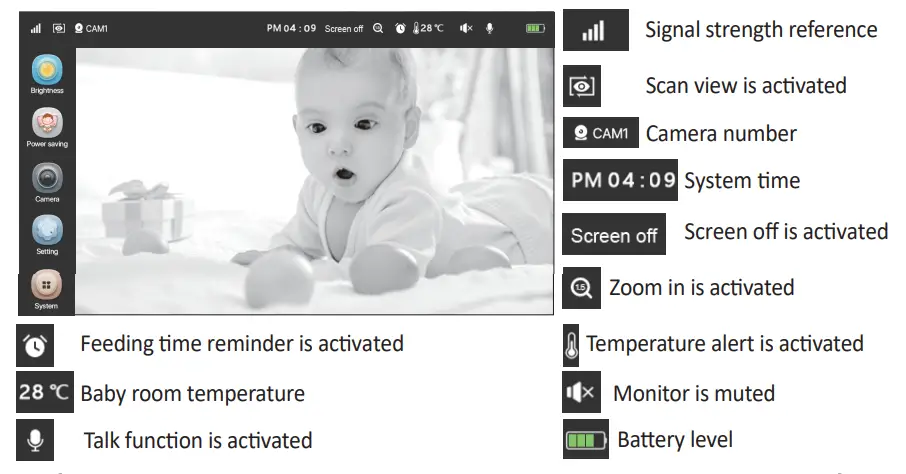
![]() Adjust Parent Unit LCD Brightness lighter or darker.
Adjust Parent Unit LCD Brightness lighter or darker.
Power saving mode: To activate the Parent unit from Power saving mode.
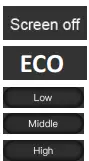 Turn off the screen and leave audio on: Keep audio continuously on when the screen is off in power-saving mode.
ECO mode: Turn off both video and audio to save more battery energy. When the camera detects sound, the monitor automatically activates. Three detection sound levels can be set.
Quiet: Baby cry a little bit to activate the Parent Unit.
Medium: Baby cry moderate to activate the Parent Unit.
Loud: Baby cry louder to activate the Parent Unit.
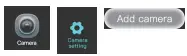 ADD: Add an additional camera. Four cameras can be added.
Step 1: Move the parent unit to the same area as the camera. Both parent and baby units are powered on.
Step 2: Select the camera number in Add camera Menu. Press “OK” to begin pairing.
Step 3: Within 50 seconds, press “Pairing button” on the camera to pair, and the camera light will be flashing.
Step 4: Once successfully paired, the camera light will stop flashing and video will appear on the monitor screen within 50 seconds.![]() Delete camera: Delete paired camera from the added camera list.
Delete camera: Delete paired camera from the added camera list.
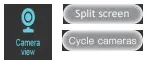 The camera will be in auto-view mode.
SCAN: Display paired cameras one by one.
![]() Off: Deactivate the loop display function of paired cameras.
Off: Deactivate the loop display function of paired cameras.![]() Cycle time setting, 10s, 15s, and 30s can be set.
Cycle time setting, 10s, 15s, and 30s can be set.

![]() Adjust camera volume: Sound level from 1 to 5. Adjust the baby unit’s speaker volume.
Adjust camera volume: Sound level from 1 to 5. Adjust the baby unit’s speaker volume.
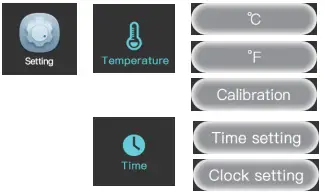 C: Display temperature in Celsius scale.
F: Display temperature on the Fahrenheit scale.
Calibration: Offset displayed temperature based on your thermometer.
Time setting: Set the monitor system time. Feeding time alert setting. Three different feeding time points can be set.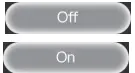 OFF: Deactivate the feeding time alarm function.
On: Activate the feeding time alarm function. When the feeding reminder alarm is set, after the time is up, even the parent unit is in VOX mode, beeps sound on the parent unit, and the message “Feeding Time” is displayed on the screen. Press any key to cancel the reminder.![]() Activate or deactivate the lullaby function, 5 lullabies can be chosen. When turning on the lullaby, the Baby Unit side will always hear the ringtone from the Parent Unit.
Activate or deactivate the lullaby function, 5 lullabies can be chosen. When turning on the lullaby, the Baby Unit side will always hear the ringtone from the Parent Unit.
 OFF: Deactivate lullaby function.
Repeat: Repeat all lullabies.
Turn on the room temperature alarm function, and set the higher and lower limits. Or turn off the function.
Off/On: Turn off/on the room temperature alarm function.
High/Low: Beep Alarm is issued when the room temperature is higher/lower than this setting.![]() On/Off: Turn on/off the SOS function.
On/Off: Turn on/off the SOS function.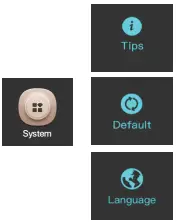 Explanation On/Off: We try to explain the status and function of the menu. You can turn the explanation on or off based on your usage.
Reset: Choose whether to restore the monitor to factory default settings. All paired cameras will be removed from the paired camera list.
Language: To change the language of the parent unit menu display.
![]() WARNING
WARNING
THIS PRODUCT CAN NOT REPLACE RESPONSIBLE ADULT SUPERVISION
- When an AC Adapter is plugged into an electrical outlet, do not the exposed end.
- Test baby monitor before first use, periodically, and when changing location of the baby unit(Camera).
- Do not use a monitor near water (Such as bathtub, Sink, etc).
- Keep parent unit away from heat sources (Such as stoves, radiators, etc).
- Make sure there is proper ventilation around the baby unit and parent unit.
- This product is not a toy. Do not allow children to play with it.
- The mains plug or an appliance coupler is used as the disconnect device, the disconnect device shall remain readily operable.
- The baby monitor should not be considered as a medical device. While using the baby monitor, it is strongly recommended to have an adult directly check on your baby. Premature babies or children considered at risk must be supervised by your pediatrician or other medical staff.
![]() Battery Warning
Battery Warning
- Use only the original rechargeable battery provided.
- Do not shoot-circuit supply terminals.
- Remove the battery when the product is stored for long periods of time or when the battery is exhausted.
- Dispose of exhausted battery properly.
- Keep all batteries away from children.
- The apparatus shall not be exposed to dripping or splashing and no objects filled with liquids, such as vases, shall be placed on the apparatus.
- The danger of explosion if the battery is incorrectly replaced. Replace only with the same or equivalent type.
- Batteries (battery pack or batteries installed) shall not be exposed to excessive heat such as sunshine, fire or the like.
Precautions
- Do not overload wall outlets, extension cords, or integral convenience receptacles as this can result in a risk of fire or electric shock.
- The baby monitor works better in temperatures ranging between 0 C and 40 C (32 F and 104 F ).
- Do not dismantle the appliance. It does not contain any parts that may be used independently.
- Never expose the baby monitor for long period to the sun’s direct rays and never place it next to a source of heat, in a damp or very dusty room.
- Never push objects of any kind into this product through openings they may touch dangerous voltage points or short-out parts that could result in a fire or electric shock. Never spill liquid of any kind on the product.
- Do not attempt to service this product yourself as opening or removing covers may expose you to dangerous voltage or other hazards. Refer all servicing to qualified service personnel. The product should be mounted to a wall or ceiling only as recommended by the manufacturer JouSecu’s baby monitor warranty policy JouSecu will repair (at our option) your unit free of charge for 12 months from the date of purchase if the unit is defective in workmanship or materials. To claim your repair/replacement, the product must be returned to JouSecu together with a copy of the purchase receipt. In the absence of the purchase receipt, the warranty will be 12 months from the date of manufacture. This warranty does not apply to normal wear or damage from misuse, abuse, improper and handling, installation, accident, unauthorized repair, or alteration. Please contact our Customer service by Email: [email protected].
IC Radiation Exposure Statement:
This equipment complies with IC R55-102 radiation exposure limit set forth for an uncontrolled environment. This equipment should be installed and operated with minimum distance 20cm between the radiator and your body. Cet equipement est conforme aux CNR-102 d’industrie Canada. Cet equipement dolt etreinstalle et utilise avec une distance minimale de 20 centimetres entre le radiateur et votrecorps. Cet emetteur ne doit pas etre co-localisees ou operant en conjoncti on avec autreantenne ou emetteur. Les antennes utilisees pour cet emetteur doivent etre installes etfournir une distance de separation d’au moins 20 centimetre de toute personne et doit pas etre co-situee ni fonctionner en onjonction avec une autre antenne ou emetteur.
This device complies with Part 15 of the FCC Rules. Operation is subject to the following two conditions: (1) This device may not cause harmful interference, and (2) This device must accept any interference received, including interference that may cause undesired operation.
FCC Caution
To assure continued compliance, any changes or modifications not expressly approved by the party responsible for compliance could void the user’s authority to operate this equipment. (Example -use only shielded interface cables when connecting to computer or peripheral devices).
FCC Radiation Exposure Statement This equipment complies with FCC RF radiation exposure limits set forth for an uncontrolled environment. This equipment should be installed and operated with a minimum distance of 20 centimeters between the radiator and your body. This transmitter must not be co-located or operating in conjunction with any other antenna or transmitter. The antennas used for this transmitter must be installed to provide a separation distance of at least 20cm from all persons and must not be co-located or operating in conjunction with any other antenna or transmitter.
Industry Canada Statement
This device complies with the Industry Canada licence-exempt RSS standard. Operation is subject to the following two conditions: (1) this device may not cause interference, and (2) this device must accept any interference, including interference that may cause undesired operation of the device.
Federal Communication Commission Interference Statement
This equipment has been tested and found to comply with the limits for a Class B digital device, pursuant to Part 15 of the FCC Rules. These limits are designed to provide reasonable protection against harmful interference in a residential installation. This equipment generates, uses, and can radiate radio frequency energy and, if not installed and used in accordance with the instructions, may cause harmful interference to radio communications. However, there is no guarantee that interference will not occur in a particular installation. If this equipment does cause harmful interference to radio or television reception, which can be determined by turning the equipment off and on, the user is encouraged to try to correct the interference by one of the following measures:
- Reorient or relocate the receiving antenna.
- Increase the separation between the equipment and receiver.
- Connect the equipment into an outlet on a circuit different from that to which the receiver is connected.
- Consult the dealer or an experienced radio/TV technician for help.


