tuya GSM Smart Security Panel Kit
General Description
Welcome to use the smart security system kit, your home security is the direction of our efforts.
The security panel is embedded with a high-performance and low-power intelligent microprocessor, adopts a 4.3-inch IPS color screen, and uses capacitive touch control. The security panel can be wirelessly connected to motion detectors, door sensors, smoke detectors, gas detectors, emergency buttons, remote controls and other accessories. After the accessory is triggered, the security panel can display the alarm status and issue an alarm in real time. It can also push the status of the security panel to the user’s mobile APP in real time through the built-in WiFi. At the same time, the built-in 2G/4G module can also make alarm calls and send SMS notifications to designated phone numbers.
Description of Terms
Security Panel: The security panel is the core of home security and an integrated gateway for all accessories.
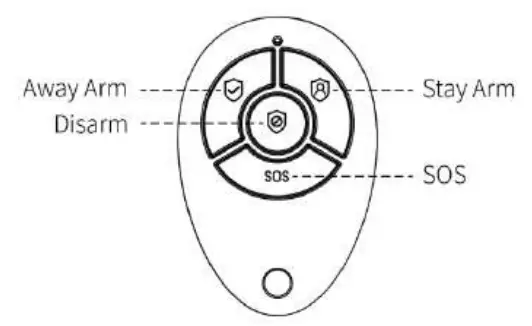
Away Arm: The security panel is in a monitoring state, when the accessories are triggered, the security panel will alarm.
Stay Arm: When the user is at home, in this mode, some areas can be monitored and alarms.
Disarm: The security panel cancels the monitoring state, and only the SOS button or the accessories with “24h always active” can trigger the alarm.
Remote Control: After pairing with the security panel, the security panel can be remotely controlled to enter the states of “Away arm”, “Stay arm”, and “Disarm”, and also SOS button.
Detector: According to the type of the detector, install it in the corresponding area. After the detector is triggered, it will immediately send an alarm to the panel for processing. Common detectors include door sensors, infrared detectors, smoke detectors, gas detectors, etc.
Wireless Siren: After pairing with the security panel, when the accessory is triggered to alarm, the security panel will notify the wireless siren to alarm, and the alarm volume can be maximized.
Emergency Number: When the security panel alarms, it will also send a text message or make a call to the set phone number for real-time reminders.
Arm Delay: When the security panel is in the “Away Arm” state, the safety panel will enters the armed state after a delay, so that the user has time to evacuate the monitoring area.
Alarm Delay: When the security panel receives the alarm from the detector, the alarm will be delayed for a period of time. During the alarm delay period, the user password can be used to cancel the alarm.
Siren Time: The duration of the alarm on the security panel, after which the siren stops sounding.
User Password: The default user password is 1234, and the user can customize the user password.
WiFi network configuration, disarming, accessory setting, phone number setting, security setting, user password is required.
System Password: The default system password is 9876, and the user can customize the system password. The security panel “Recover” and “Reboot”, the system password is required.
Password Rules: After entering the correct password, there is no need to enter the password again during the screen standby time set by the user, and the maximum time is no more than 5 minutes (the latest version does not exceed 2 minutes), and the password needs to be entered again.
Obfuscated Password: When entering the password, you can enter 5 to 8 digits of the obfuscated password, as long as it contains the correct 4 digits in succession, it can be recognized as the correct password.
Local Alarm: When the security panel alarms, the security panel horn and wired siren emit the alarm sound.
Siren Alarm: When the security panel alarms, it will send a wireless alarm code to control the wireless siren to alarm.
Siren Beep: When the status of the security panel is switched, it will send a wireless code to control the wireless siren to beep for a short time as a reminder.
Delay Beep: When the security panel is in the delay arming or delay alarm state, it will sound a reminder.
Door/Window Opened Warning: When the security panel enters the armed state, if the doors and windows are not closed, the security panel interface will pop up to prompt.
Door/Window Opened Chime: When the doors and windows are opened, the safety panel will have a sound.
Voice Prompts: There is a corresponding voice prompt when the user operating the security panel.
Key Beep: When operating the virtual buttons on the security panel, there will be a corresponding prompt sound, which improves the touch experience.
Doorbell Volume: When the doorbell button is triggered, the security panel will emit a doorbell tone.
Remote Control: The user can arm and disarm the devices through APP.
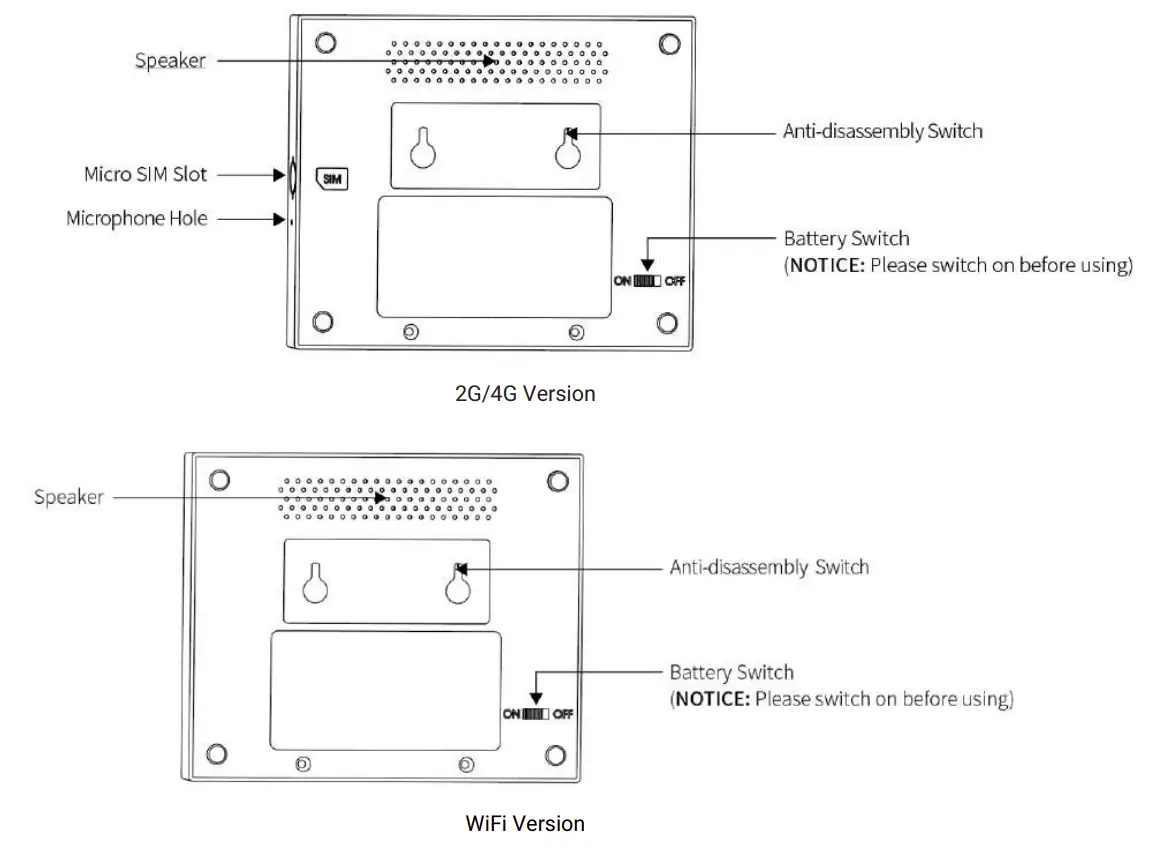
Tamper switch: There is a device anti-dismantling switch on the back of the security panel, which alarms when the panel is removed by external force.
Timer: The user can customize the time when the security panel enters the Away Arm/Stay Arm/ Disarm/ SOS on the APP.
Doorbell: When the doorbell is triggered, no alarm will be generated, and the security panel will prompt a “dingdong” sound.
Alarm type: The user sets the corresponding type according to the detector type and application scenario, which is convenient for the user to manage and can quickly distinguish the corresponding device type after triggering an alarm.
The alarm types are as follows: System Alarm, Door Alarm, Parlor Alarm, Panic Alarm, Bedroom Alarm, Window Alarm, Balcony Alarm, Perimeter Alarm, Fire Alarm, Gas Leak, CO Leak and Water Leak.
Zone: Used to distinguish the detectors, when the detector is triggered, the user can determine the alarm location by the zone number.
Mode 7 options
- All Arm Active When the security panel is in “Away Arm” or “Stay Arm”, the panel will alarm after the detector is triggered. It is recommended that the outdoor detector can be set to this mode.
- Away Arm Active When the security panel is in “Away Arm”, the panel will alarm after the detector is triggered. It is recommended that the outdoor detector can be set to this mode.
- 24h Always Active Regardless of the state of the security panel, any time the detector is triggered, the panel will alarm. It is recommended to set this mode for gas leaks or smoke detectors , etc.
- Disable The security panel will not respond to the alarm request of the detector set in this mode.
- Secret Report When an accessory set to this mode triggers an alarm, the security panel will send out a remote alarm notification (APP notification, Phone/SMS notification), but no local alarm notification will be sent.
- All Arm Active (no delay) When the security panel is in “Away Arm” or “Stay Arm”, the panel will alarm immediately after the detector is triggered, and there will be no alarm delay.
- Away Arm Active (no delay) When the security panel is in “Away Arm”, the panel will alarm immediately after the detector is triggered, and there will be no alarm delay.
Security Panel
Main Features
- Built-in high-performance core processor, the main frequency is up to 600MHz, powerful performance, fast and smooth operation.
- 4.3-inch IPS color display, wider viewing angle of the screen, better visual experience.
- With capacitive touch screen, the touch experience is more comfortable.
- New Xsense UI interactive interface.
- Built-in WiFi, 2G/4G, support APP push, phone/SMS notification.
- Up to 200 Detectors + Remote Control, Doorbell (up to 6).
- 7 zone modes
- Network automatic calibration time.
- Up to 150 alarm records, 50 arm and disarm records.
- Support setting 5 groups of custom phone numbers.
- Power failure alarm, low battery alarm, anti-dismantling alarm, etc.
- Door/Window open Chime function.
- Alarm pop-up prompt.
- Wired siren, wireless siren supported.
- Obfuscated password supported.
- APP Remote Control.
- Multi-language supported.
- OTA online upgrade supported.
Appearance Design
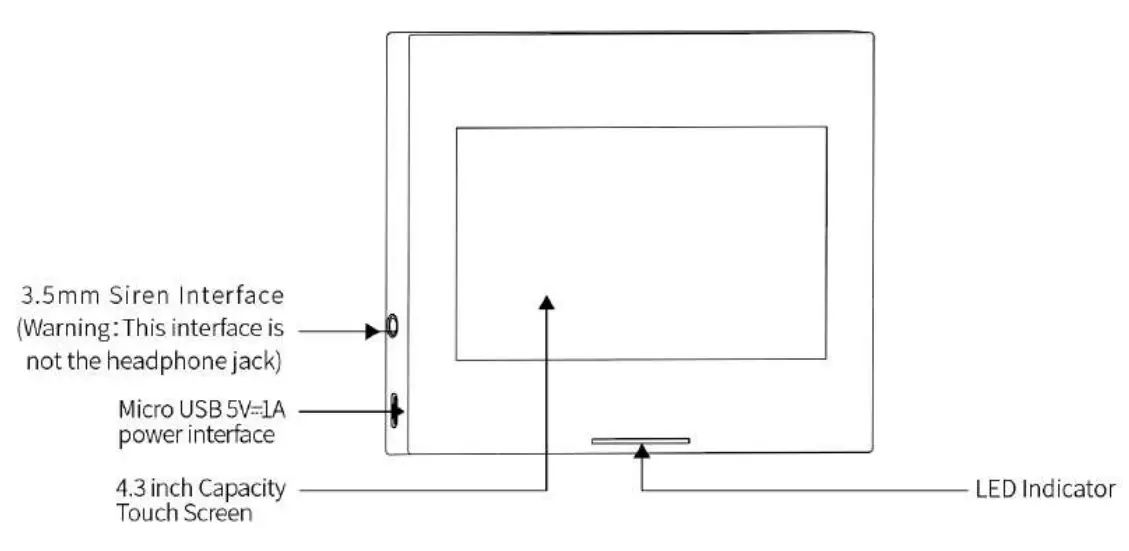
Indicator:
| Color | Panel status |
| Red | Alarming |
| Red/Green | Armed |
| Green | Disarmed |
| Flashing | Panel status |
| Yellow/Green | Alarming |
| Red/Green | Armed |
Notice:
(1) The security panel should be installed as close to each detector as possible to ensure the best wireless communication between the security panel and the detector.
(2) Since the security panel and the detector use wireless communication, the installation location should be as far away as possible from household appliances with high frequency interference or heavy doors that are difficult to penetrate.
Functions
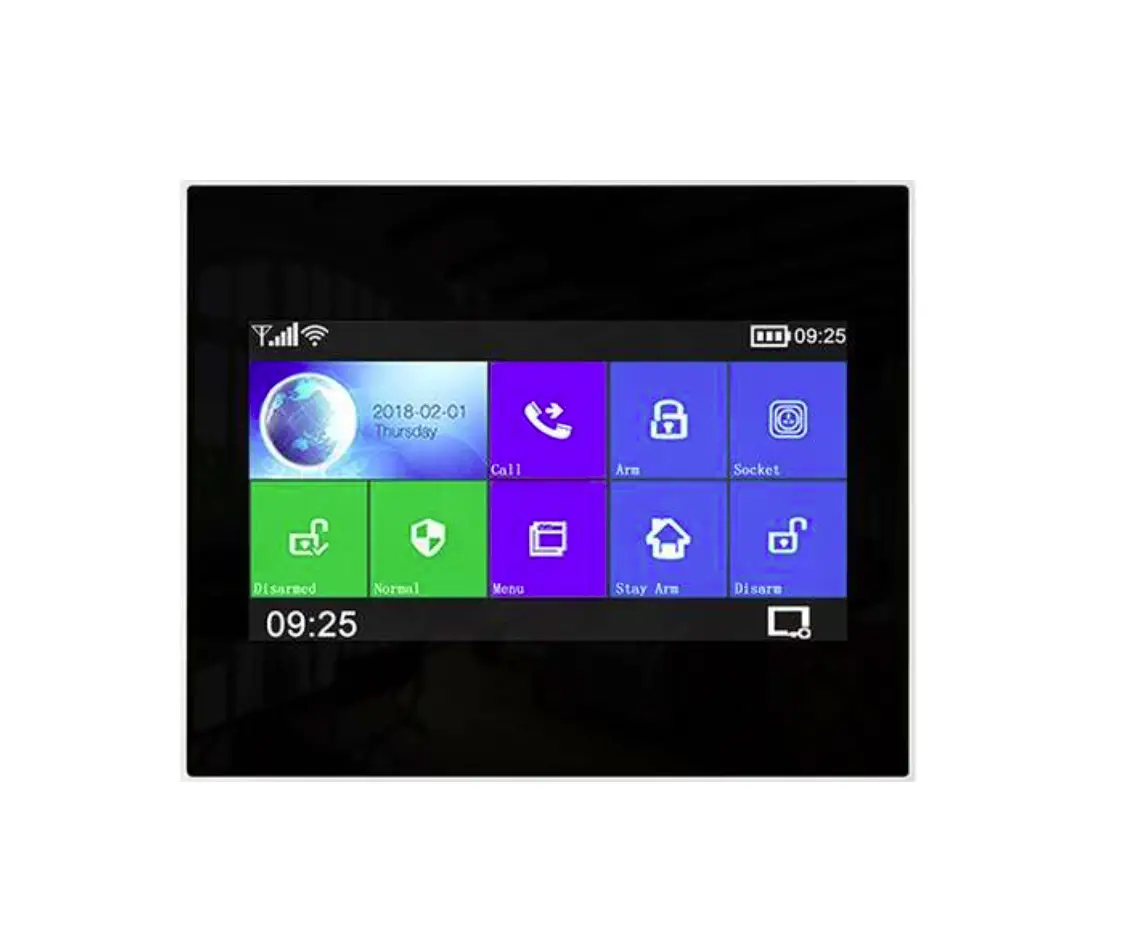
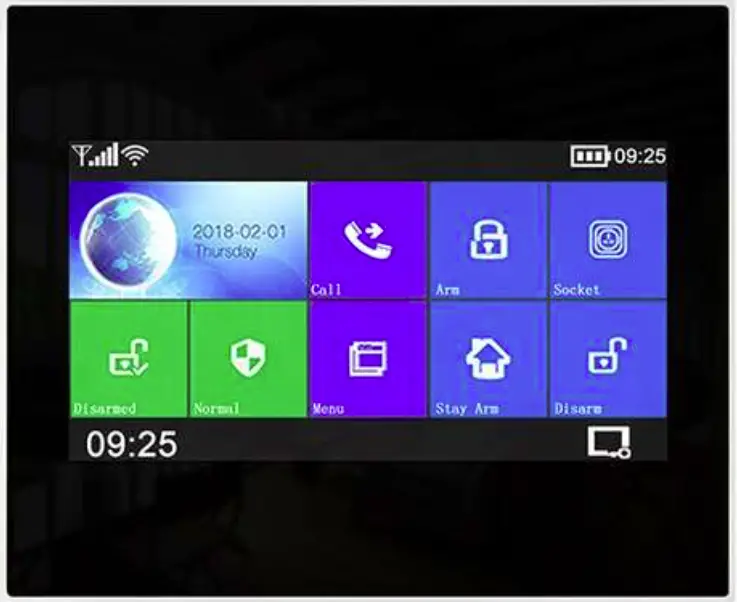
User Interface
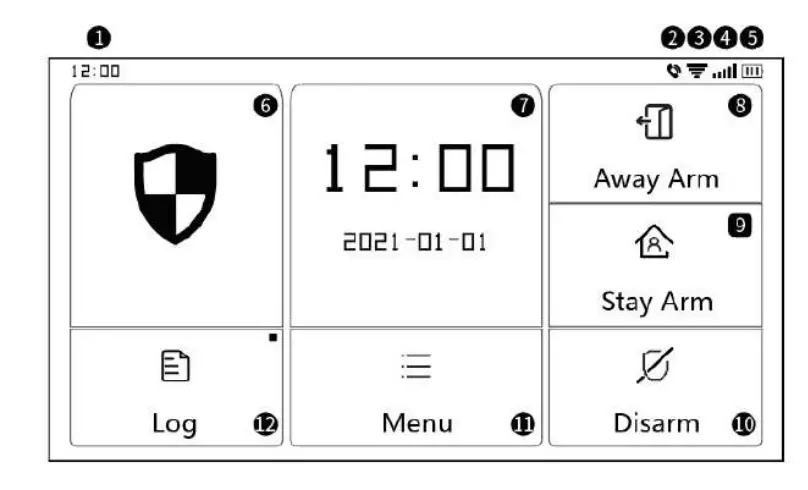
① ② ③ ④
| Status Bar | ① Time | 24-hour time is displayed |
| ② SMS | Sending SMS | |
| ② Call | Calling Emergency number | |
| ③ WiFi signal | Indicates the strength of WIFI signal | |
| Full gray means no WiFi signal | ||
| ④2G/4G signal | The SIM card is not inserted or inserted incorrectly | |
| Indicates the strength of 2G/4G signal | ||
| Full gray means no 2G/4G signal | ||
| ⑤ Power supply status | External power supply | |
| Battery power | ||
| Main Interface | ⑥Security panel Status Indicator Bar | Disarm Status: The pattern is in white Arm Delay Status: Orange circle shows counting down Armed Status: The pattern is in orange Alarm Delay Status: Red circle shows counting down Alarm Status: The pattern is in red |
| ⑦ Time/Event | When the security panel is in the normal state, it displays the current year/month/day/24h system time, and displays detailed information when it is abnormal | |
| ⑧ Away Arm | The pattern is in orange indicates “Away Arm” has been activated or is being activated | |
| ⑨ Stay Arm | The pattern is in orange indicates “Stay Arm” has been activated | |
| ⑩ Disarm | The pattern is always in white. | |
| ⑪ Menu | Click to view the security panel menu | |
| ⑫ Log | Click to view the armed records and alarm records, the red dot in the upper right corner indicates that there are new unchecked records |
| Menu | Accessory | Detector | Edit all detectors | |
| Remote | Edit all remote control | |||
| Doorbell | Edit all doorbell | |||
| Siren | Wireless siren pair | |||
| Phone | Phone call | Dial Phone number | ||
| Phone setup | 5 groups of alarm calls can be set up, and support to individually control whether each number makes a call or SMS notification | |||
| Security | Delay | Arm delay(sec) | Set arming delay time | |
| Unit: second; Range: 0~180; Default: 40 seconds | ||||
| Alarm delay(sec) | Set alarm delay time | |||
| Unit: second; Range: 0 ~ 180; Default: 30 seconds | ||||
| Siren time | Set the alarm sounding time | |||
| Unit: second; Range: 0 ~ 1800; Default: 180 seconds | ||||
|
Password | User password edit | Change the user password, if you forget the password, please contact customer service | ||
| Range: 0000 ~ 9999; Default: 1234 | ||||
| Sys password edit | Change the system password | |||
| Range: 0000 ~ 9999; Default: 9876 | ||||
|
Alarm | Siren alarm | Turn on/off the Siren alarm sound | ||
| Range: off or on; Default: Off | ||||
| Local alarm | Turn on/off the local alarm sound | |||
| Range: off or on; Default: On | ||||
| Siren beep | Turn on/off the siren beep | |||
| Range: off or on; Default: Off | ||||
| Delay beep | Turn on/off the delay beep. | |||
| Range: off or on; Default: On | ||||
| Door/Window
opened chime | Turn on/off the chime function | |||
| Range: off or on; Default: Off | ||||
| Door/Window opened warning | Turn on/off the warning. Need door sensor to support this function | |||
| Range: off or on; Default: Off | ||||
| Settings | WiFi | Airlink recommend | WiFi quick configuration (recommended) | |
| SoftAP | WiFi hotspot configuration | |||
| Time | Setting time | Set the year, month, day, hour, minute and second of security panel. | ||
| Time sync | Set whether to adopt network synchronization time Range: off or on; Default: On | |||
|
Audio |
Voice tone | Set whether the voice prompt tone is turned on or not | ||
| Range: off or on; Default: On | ||||
|
Key beep | Set whether the key sound effect is turned on or not | |||
| Range: off or on; Default: On | ||||
| Doorbell Vol | Set doorbell volume | |||
| Range: 0 ~ 9; 0 indicates that the doorbell is muted; Default: 8 | ||||
|
System vol | Set the prompt volume of the security panel system | |||
| Range: 0 ~ 9; 0 indicates that the system prompts mute; Default: 7 | ||||
| Display | Screen display time | |||
| Unit: seconds; Range: (0 means always on) 10 ~ 180; Default: 60 seconds | ||||
| Language | Built-in 10 languages | English / Deutsch / русский / français / Português / Español / Italiano / Polski / Nederlands / 简体中文 | ||
| Recover | Recover | Security panel reset to factory settings | ||
| Reboot | Restart the security panel | |||
| Clean | Select this mode when the device screen needs to be cleaned, all keys fail for one minute to prevent false triggering | |||
| Help | User manual QR code: Scan the QR code to view the Chinese/English manual | |||
| : Display model version, SN information, WiFi MAC information, 2G/4G module CSQ, IMEI, module serial number | ||||
Arm/Disarm Panel by SMS command
The 2G/4G version panel can be arm/disarmed by SMS command .
The panel can be arm/disarmed by App remotely, also can be arm/disarmed by SMS command (firmware version should be 1.0.20 or above).
The SMS commands and panel actions taken are as bellow:
| No. | SMS Command | Action taken by the panel | Replied SMS |
| 1 | away arm | The panel will be in “Away Arm” status | System away armed! |
| 2 | stay arm | The panel will be in “Stay Arm”status | System stay armed! |
| 3 | disarm | The panel will be in “Disarm” status | System disarmed! |
The panel will reply message to confirm the command are executed successfully.
NOTICE: The panel only accept SMS commands from the phone number set in the panel.(Menu–>Phone-
->Settings),the SMS commands sent by other mobile numbers will be not recognized and no action will be taken .
Specification
| Input power: DC5V 1.0A, Micro USB | WiFi standard: IEEE802.11b/g/n 2.4G frequency band |
| Built-in battery: 3.7 V 500mAh lithium battery | Working temperature:14 ~122 (-10 ~ +50 ) |
| Working power consumption: 3 W | Relative humidity: 95% (no condensation) |
| Wireless parameters: 433MHz, eV1527 | Mobile standard: 2G/4G |
| Product size:120 98 12mm |
Using Smart Life APP
This device can be connected and controlled through the “Smart Life” APP. Please download the “Smart Life” APP in advance from the app store. The relevant guide details are as follows:
Download APP – Smart Life
Users can search “Smart Life” in major global app stores or scan the QR code below to download.
|
|
|


- iOS users, please scan the iOS link QR code.
- Android users, please scan the QR code of the Google Play link.
- All users can scan the QR code of the official website link to download with guide.
APP Sign up & Login
- When the user uses the Smart Life APP for the first time, the APP will pop up “Login In” and “Sign Up” options.
- The user can register an account by clicking the “Sign Up” option. After clicking ” Sign Up “, the “User Agreement and Privacy Policy” will appear, please read it carefully and click “Agree”.
- After clicking “Agree”, the account registration interface will appear. Two options will appear in the interface: “Country”, “Mobile Number/E-mail”.
- Users need to select their own country from the “Country” option.
- In the “Mobile Number/E-mail” option, It is recommended that users enter their mobile phone number and click: “Get verification code”, then the APP interface will jump to: “Enter verification code”, and the user can fill in the six-digit verification code received into the APP.
- After finishing the previous step, the interface will pop up to set the “password”. Users can set the APP login password according to their own preferences or habits. After the password is set successfully, the APP will pop up to enter the “User Authorization Interface”, the user can choose to authorize, and click “Enter APP” after authorization to enter the APP interface.
- Users can log in to the APP with a registered account and password.
Connect panel to Smart Life APP
NOTICE: You should connect your mobile phone to the 2.4G WiFi network before using smart life APP to
connect the device.
- Open the “Smart Life” APP and enter the “Home” interface of the APP.
- Click the “+” in the upper right corner of the interface and select “Add Device”.
- Click the “Sensors” option, and then click “Alarm (WiFi)”, the interface will display the WiFi connected to the phone.
- Input the WiFi password.
- After input the WiFi password, click “next” and choose “Confirm the indicator is blinking rapidly” in the pop-up interface.
- Click “next” and “adding device” will be displayed in the app interface.
- Click “Menu”, “Settings” and “WiFi” in the Security Panel in turn.
- Enters the default user password: 1234, and then clicks “Airlink (recommended)”.
- The device will pop up “WiFi settings will be reset, please confirm”. After click “OK”, the device will prompt “setting up, please wait”.
- When the device is successfully connected to the APP, the device will give a voice prompt of “Setup successful”. The APP will also show that the device has been added successfully.
- Users can set the name of the device according to their preferences. If the user does not want to change the device name, they can click “Done” in the upper right corner.
- In order to allow users to use APP to realize remote control equipment more conveniently. As long as the device and the APP are connected, even if the phone is not connected to the original WiFi network, the user can use the APP to remotely control the device.
User interface of Smart Life APP
| Status bar | Power Supply Status | External Power Supply | Indicates that the panel is currently powered by external power |
| Battery power supply | Indicates that the panel is currently powered by the built-in battery | ||
| 2G/4G signal | No Network | Indicates that the security panel has no 2G/4G network | |
| No SIM Card | Indicates that the security panel has not detected a SIM card | ||
| Network Signal | Indicates that the security panel 2G/4G signal strength is 1 ~ 5 | ||
| Security panel Status | Displays the status of the security panel, including Away arm, Stay arm, SOS, and Disarm. | ||
| Control Bar | Away arm | Control the security panel enter the “Away arm” state | |
| Stay arm | Control the security panel enter the “Stay arm” state | ||
| SOS | Control the security panel enter the “SOS alarm” state | ||
| Disarm | Control the security panel enter the “Disarm” state | ||
| History records | Display the alarm record and operation record of the security panel | ||
| Accessories | You can add, delete, view, and rename accessories | ||
| Setting | Various settings of the security panel | ||
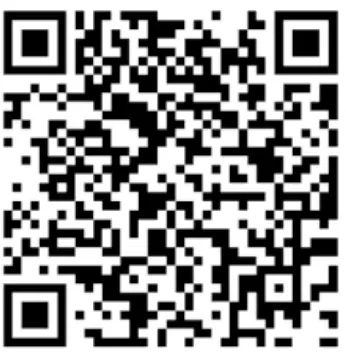
Setting Accessories on Smart Life APP
The steps are as follows:
- Open the APP, click “Accessories”, you can view the number of remote controls, detectors, doorbells that have been added, as well as the type and attributes of the defense zone.
- Accessories can be added remotely through the “+” button in the upper right corner of the interface. After clicking “+”, the accessories will be triggered around the panel to achieve quick pairing between the panel and the accessories, as shown in the “Accessories Interface”.
- Press and slide the accessory to the left to delete or modify the accessory.
- The accessories can be renamed for easier management and more detailed alarm content; The type and attributes of each detector can be modified on the APP. As shown in the “Accessories Editing Interface”.
Accessories
Motion Detector
Installation Diagram
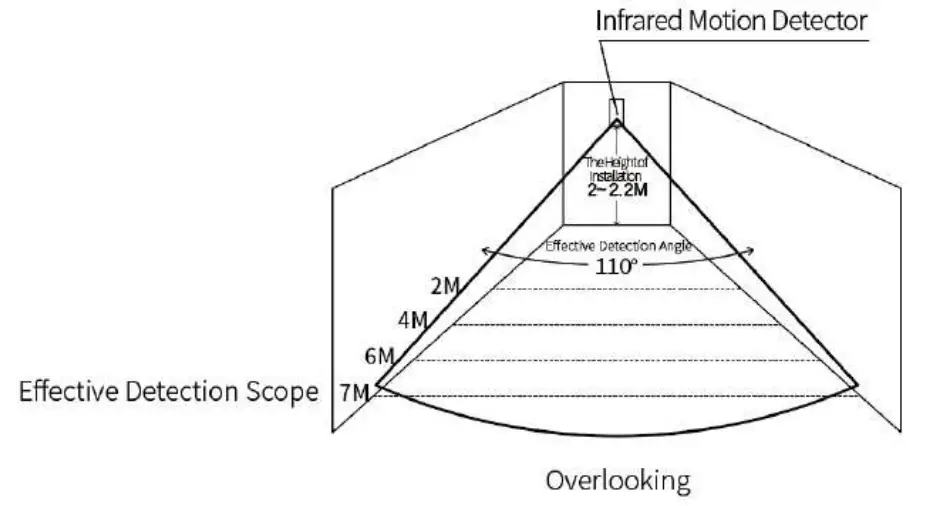
NOTICE:
- The installation height is 2.0~2.2 meters above the ground, the detection distance is 7M, the transmission distance is 150M (without obstacles), please test the distance before installation, the transmission distance will be different for different obstacles.
- The installation of the motion detector should be at a certain angle to the line of movement of the person in the room (the detection effect is the best if it is 90° with the direction of the person’s movement).
- It is not advisable to directly face glass, doors and windows.
- It is not advisable to face the hot and cold vents or sources of cold and heat.
- It should not be directly facing the cold and hot vents or cold and hot sources.
- There should be no furniture, large bonsai plants or other obstacles in the detection range.
- It is not advisable to install multiple detectors in the same detection area to avoid interference caused by simultaneous triggering.
Specification
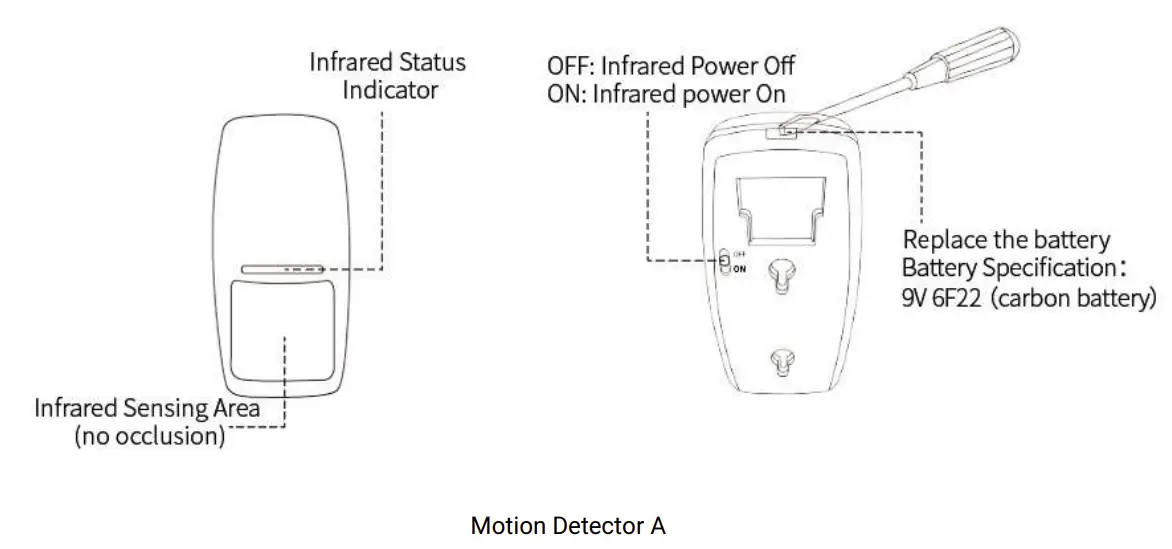
Motion Detector A
| Battery specification: 6F22 9V 1 | Quiet current: 40 A |
| Alarm current: 45mA | Detection angle: 110 |
| Relative humidity: 95% (no condensation) | Working temperature: 14 ~122 (-10 ~ +50 ) |
| Wireless parameters: 433MHz, eV1527 | Product Size: 110 52 38mm |
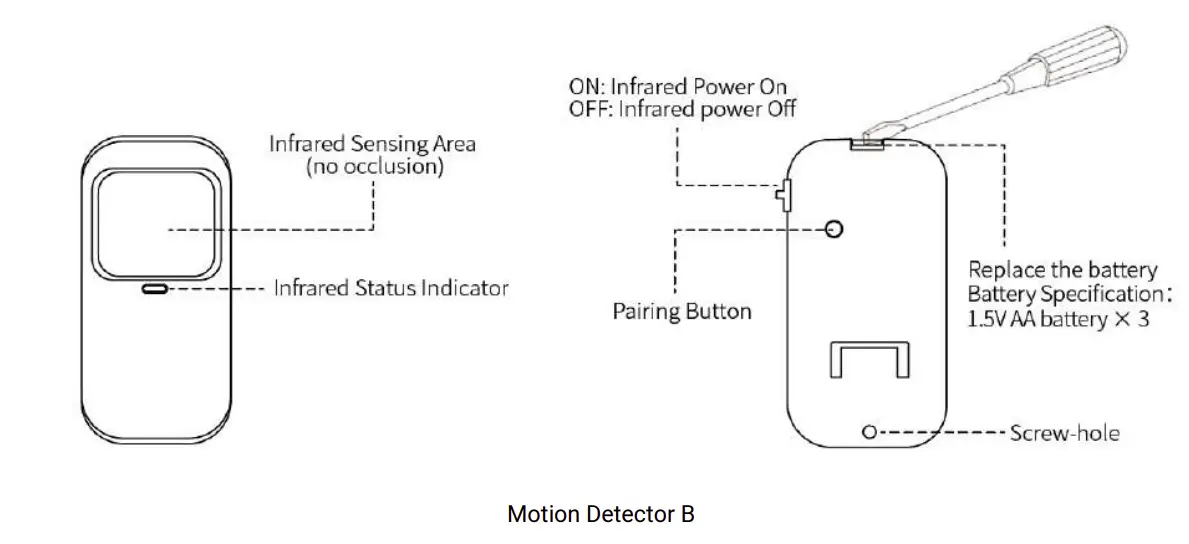
Motion Detector B
| Battery specification: 1.5V AA battery 3 | Quiet current: 15 A |
| Alarm current: 15mA | Detection angle: 110 |
| Relative humidity: 95% (no condensation) | Working temperature: 14 ~122 (-10 ~ +50 ) |
| Wireless parameters: 433MHz, eV1527 | Product Size: 114.5 60 42.8mm |
Remote Control
Parts Description
Battery Replacement
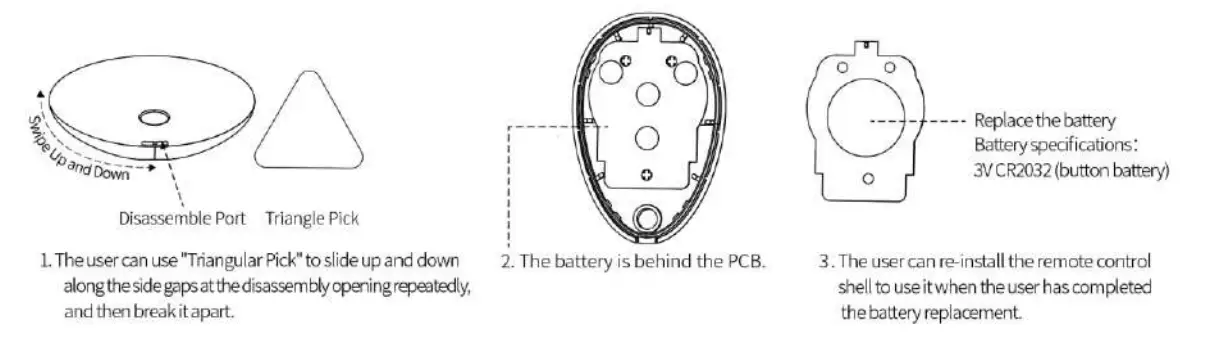
Specification
| Battery specification: CR2032 x 1 | Quiescent current ≤ 1 A |
| Working current: ≤10mA | Working temperature: 14 ~122 (-10 ~ +50) |
| Wireless parameters: 433MHz, eV1527 | Product size: 60 39.7 12mm |
Door/Window Sensor
Installation
The door sensor should be installed on the door or window.
- First, wipe the corresponding position on the door clean, take out the door sensor, and stick double-sided tape on the bottom.
- The door sensor transmitter (large) and the door sensor magnet (small) should be installed separately, that is, the transmitter should be installed on a fixed door frame, and the magnet should be installed on the movable door.
- The triangle marks on the transmitter and the magnet should be facing each other, and the distance between the two is less than 10mm.
- When the door is opened after installation, the indicator light will be on for 2 seconds to indicate that the installation is complete.
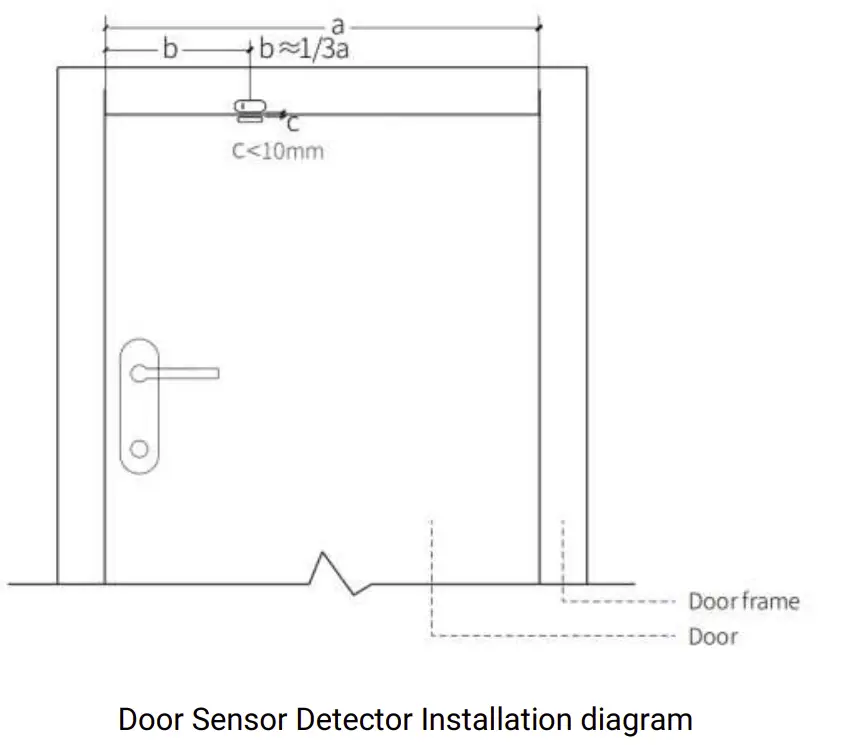
NOTICE:
- The magnetic transmission distance is 100M (without obstacles), please test the distance before installation, the transmission distance will be different for different obstacles.
- The door sensor indicator light is on for 2 seconds to indicate an alarm, and the indicator light flashes for 2 seconds to indicate a low battery.
- If the door sensor is installed on the iron door, the distance C should be as small as possible.
- It is not advisable to install multiple detectors in the same detection area to avoid interference caused by simultaneous triggering.
Battery Replacement
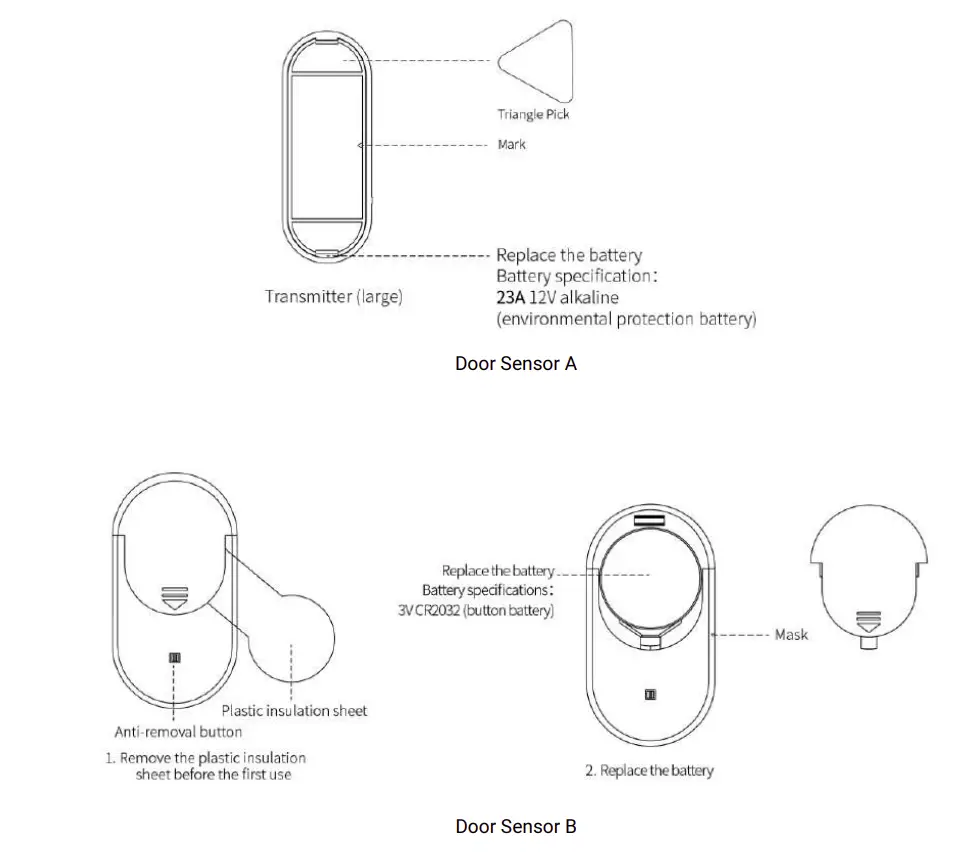
Specification
Door Sensor A
| Battery specification: 23A12V 1 | Quiet current: 1 A |
| Alarm current: 20mA | Working temperature: 14 ~122 (-10 ~ +50) |
| Relative humidity: 95% (no condensation) | Wireless parameters: 433MHz, eV1527 |
| Product size: 65 25 13mm (large) 52 11.4 13mm (small) |
Door Sensor B
| Battery specification: CR2032 1 | Quiet current: 8 A |
| Alarm current: 15mA | Working temperature: 14 ~122 (-10 ~ +50 ) |
| Relative humidity: 95% (no condensation) | Wireless parameters: 433MHz, eV1527 |
| Product Size: 49 35 26 12.5 12mm (large) 12mm (small) |
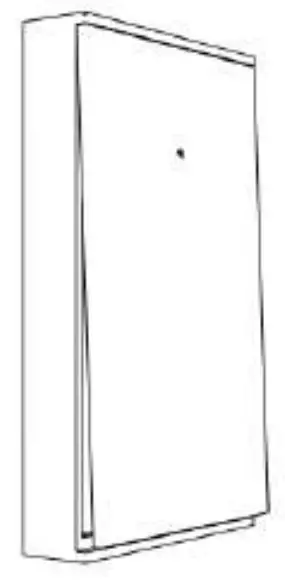
Doorbell
Features
- Two installation methods: support glue and screw fixation.
- No standby power consumption.
- Using DC12V power supply, higher transmitting power, longer wireless distance.
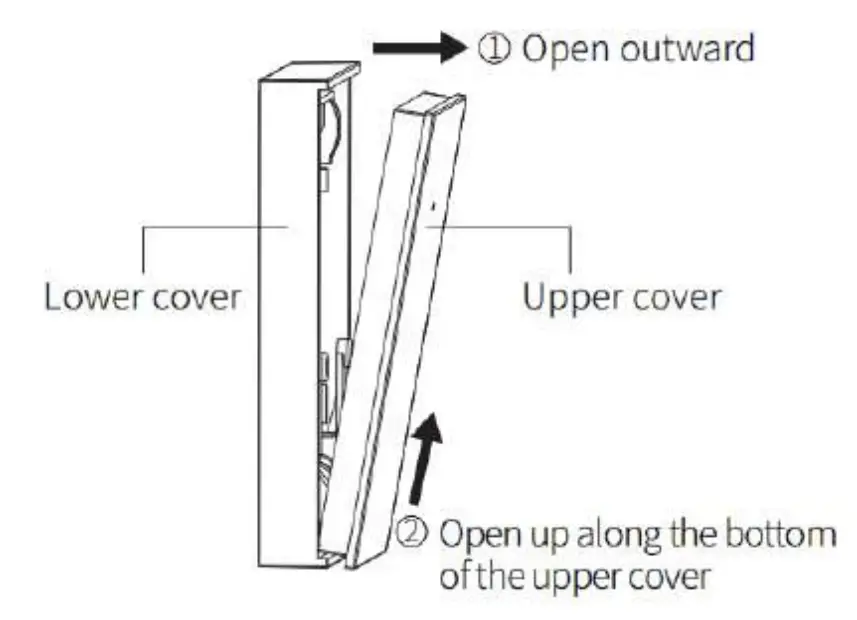
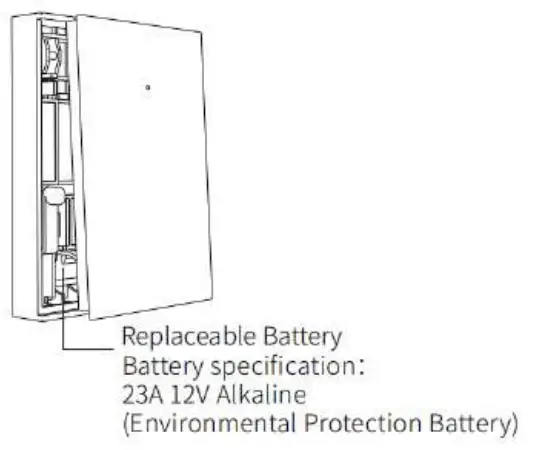
Install/Replace Battery
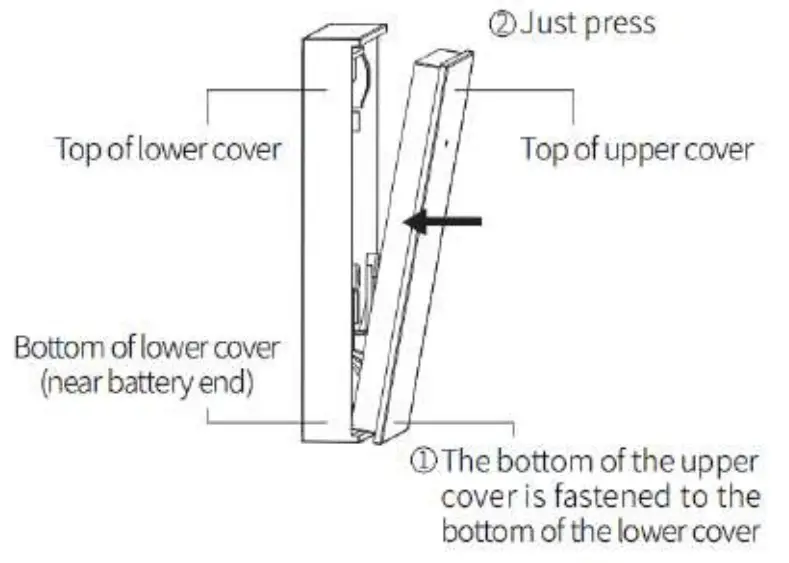
- Hold the lower cover tightly with your left hand, open the upper cover with your right hand, and then open it upwards along the bottom of the upper cover, as shown in the figure below:

- Disassembling is complete, install battery.

- Hold the lower cover tightly with your left hand, fasten the upper cover and the lower cover with your right hand, and then press along the edges, as shown in the following figure:

- Installation is complete

Specifications
| Battery specification: 23A12V 1 | Standby current: 0mA |
| Working current: ≤40mA | Working temperature: 14℉~122℉(-10℃~ +50℃) |
| Relative humidity: 95% (no condensation) | Wireless parameters: 433MHz, eV1527 |
| Product Size: 48 76 11mm |
Troubleshooting and Maintenance
| Failure | The Reason | The Solution |
|
Remote control malfunction |
|
4. Purchase accessories of the same type with technical parameters |
| Door sensor failure |
|
|
| Motion Detector failure |
|
|
| Security panel does not alarm |
|
|
| The signal distance of the panel receiving accessories becomes shorter |
|
|
| No emergency call was made when the alarm was triggered |
|
|
| WiFi network configuration failed |
|
|
| Door/Window opened warning is invalid |
|
|
Hazardous Substance Declaration
Component Name | Harmful substance | |||||
| Lead Pb | Mercury Hg | Cadmium Cd | Hexavalent chromium Cr(VI) | Polybrominated biphenyls PBB | Polybrominated diphenyl ethers PBDE | |
Metal parts | O | O | O | O | O | O |
| Plastic parts | O | O | O | O | O | O |
Warranty Rules
- Please contact our after-sales service for any failure caused by the product itself during the warranty period.
- The goods are guaranteed for one year from the date of sale, and the warranty service is only valid under normal use.
- Damage caused by the use environment not meeting the requirements of this product is not covered by the warranty.
- Product damage caused by man-made and force majeure is not covered by the warranty.