![]() R200 Ring Flash Head
R200 Ring Flash Head
Instruction Manual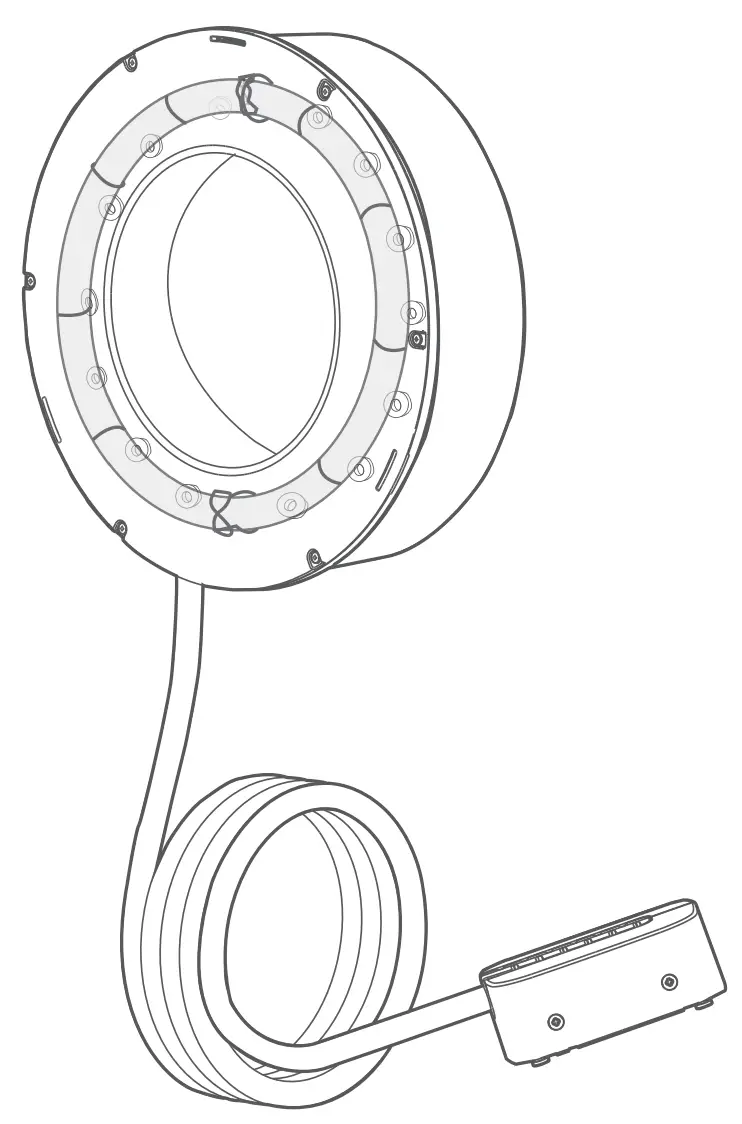
R200
Ring Flash Head
Instruction Manual
Foreword
Thank you for purchasing!
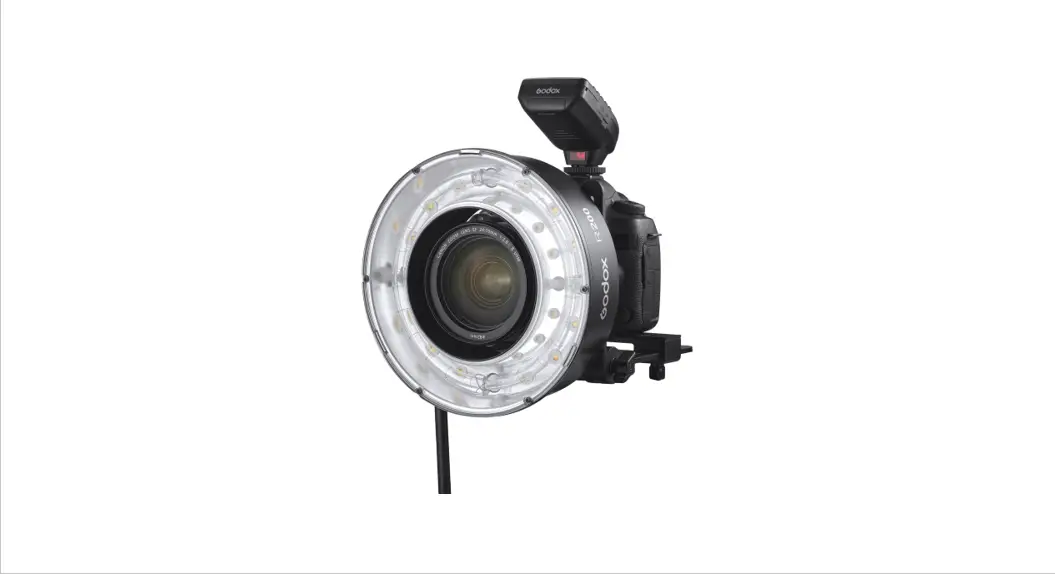
Ring Flash Head R200 has a compact structure, 200Ws strong power and a convenient installation method. It can be collocated with AD200/AD200Pro to create a super-even lighting source nearly without shadows, quite suitable for portrait shooting, macro shooting, medical shooting, dental shooting, etc.
Warning
![]() Do not disassemble. Should repairs become necessary, this product must be sent to an authorized maintenance center.
Do not disassemble. Should repairs become necessary, this product must be sent to an authorized maintenance center.![]() Keep out of reach of children.
Keep out of reach of children.![]() Stop using this product if it breaks open due to extrusion, falling, or a strong hit. Otherwise, an electric shock may occur if you touch the electronic parts inside it.
Stop using this product if it breaks open due to extrusion, falling, or a strong hit. Otherwise, an electric shock may occur if you touch the electronic parts inside it.![]() Do not leave or store the flash unit if the ambient temperature reads over 50°C .
Do not leave or store the flash unit if the ambient temperature reads over 50°C .![]() Do not fire the flash directly into the eyes (especially those of babies) within short distances. Otherwise, visual impairment may occur.
Do not fire the flash directly into the eyes (especially those of babies) within short distances. Otherwise, visual impairment may occur.![]() Do not use the flash unit in the presence of flammable gases, chemicals, and other similar materials. In certain circumstances, these materials may be sensitive to the strong light emitting from this flash unit, and fire or electromagnetic interference may result.
Do not use the flash unit in the presence of flammable gases, chemicals, and other similar materials. In certain circumstances, these materials may be sensitive to the strong light emitting from this flash unit, and fire or electromagnetic interference may result.![]() In certain circumstances, please pay attention to the relevant warnings.
In certain circumstances, please pay attention to the relevant warnings.![]() Always keep this product dry. Do not use it in rain or in damp conditions.
Always keep this product dry. Do not use it in rain or in damp conditions.![]() Turn off the devices immediately in the event of a malfunction.
Turn off the devices immediately in the event of a malfunction.![]() R200 does not support the HSS function.
R200 does not support the HSS function.
Name of Parts
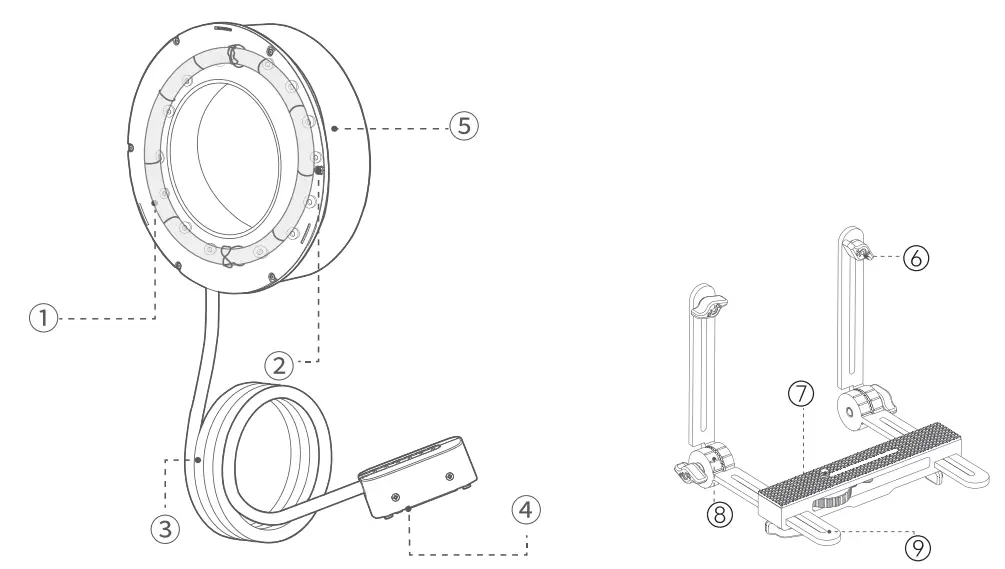
- Flash Tube
- LED Beads
- Power Cable
- Power Male Socket
- Flash Body
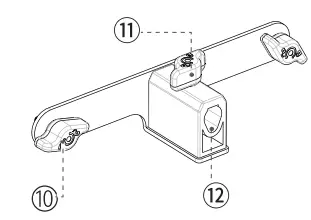
- Height Guide Rail
- 1 /4″ Screw
- Angle Adjusting Knob
- Depth Guide Rail

- Bracket Mount Knob
- Bolt
- Umbrella Hole
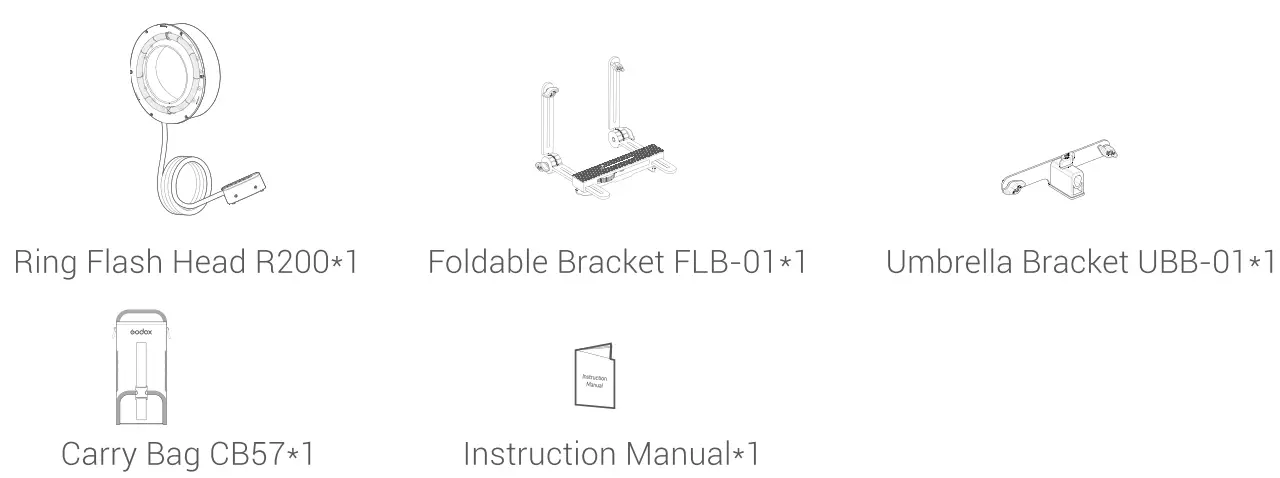
Included Items of R200
Separately Sold Accessories
Honeycomb for Standard Reflector R200-RHC20/R200-RHC30/R200-RHC40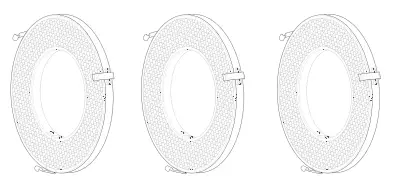
Honeycomb for Light Body R200-HC20/R200-HC30/R200-HC40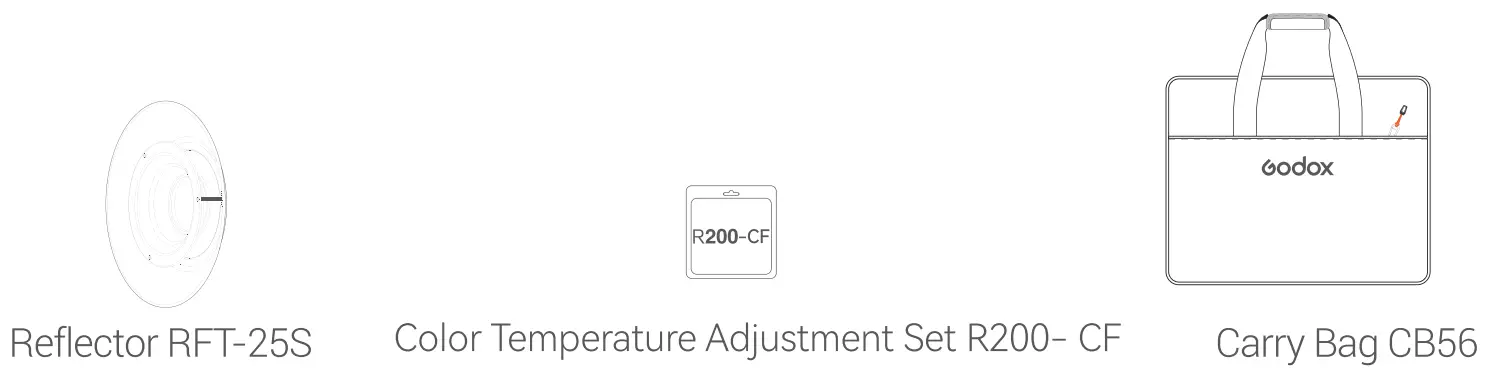
Operation Instructions
- Connecting to Pocket Flash AD200/AD200Pro
Insert the power male socket of R200 into the mount female socket of AD200/AD200Pro, push forward to connect. - Detaching R200
Press the locking button of AD200/AD200Pro and pull out the power male socket of R200. - Detaching the Flash Tube
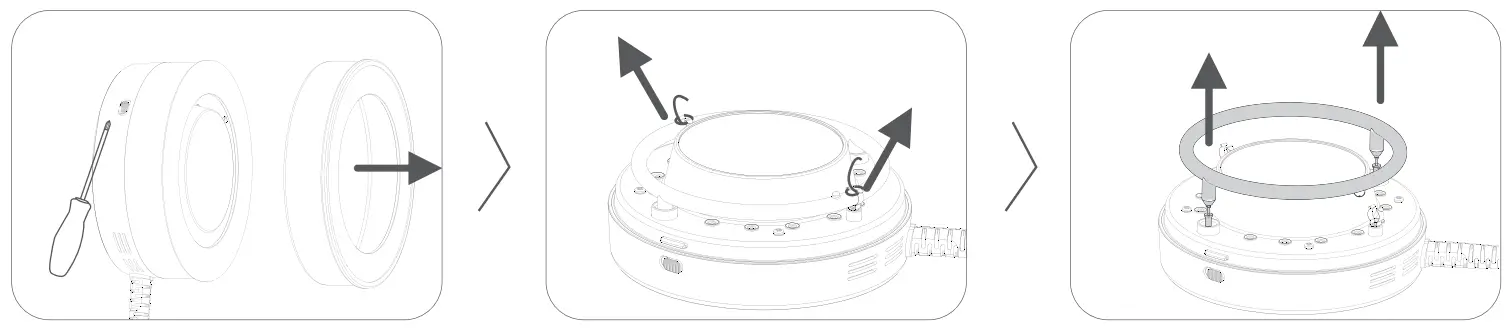
Remove the upper shell of the flash body by using a cross screwdriver, take out the tungsten wire that fixes the flash tube, then pull out the flash tube from the fixing sockets.
 Tip: Make sure to power off before detaching the flash tube. Please wear gloves to take out the flash tube. ‘)
 - Installing the Flash Tube
Insert the flash tube feet into the sockets of AD200/AD200Pro.Note: Please insert with the correct direction, the end with the red mark is the positive anode.
The flash tube can’t be installed when the bulgy end is aimed at the U- spring J - Installing the Reflector (Included Items of R200 Kit)
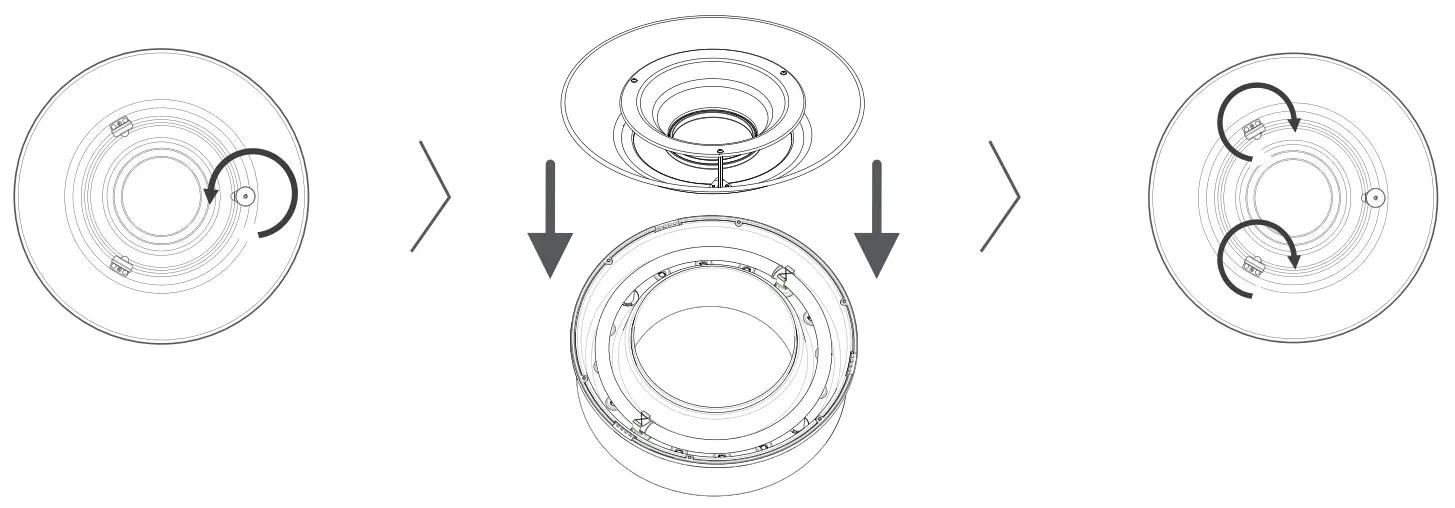
Rotate counterclockwise to screw off the fixing knob of the reflector, mount the reflector to Ring Flash Head R200, and then rotate clockwise to tighten the fixing knob.
- Installing the Camera (sold separately)
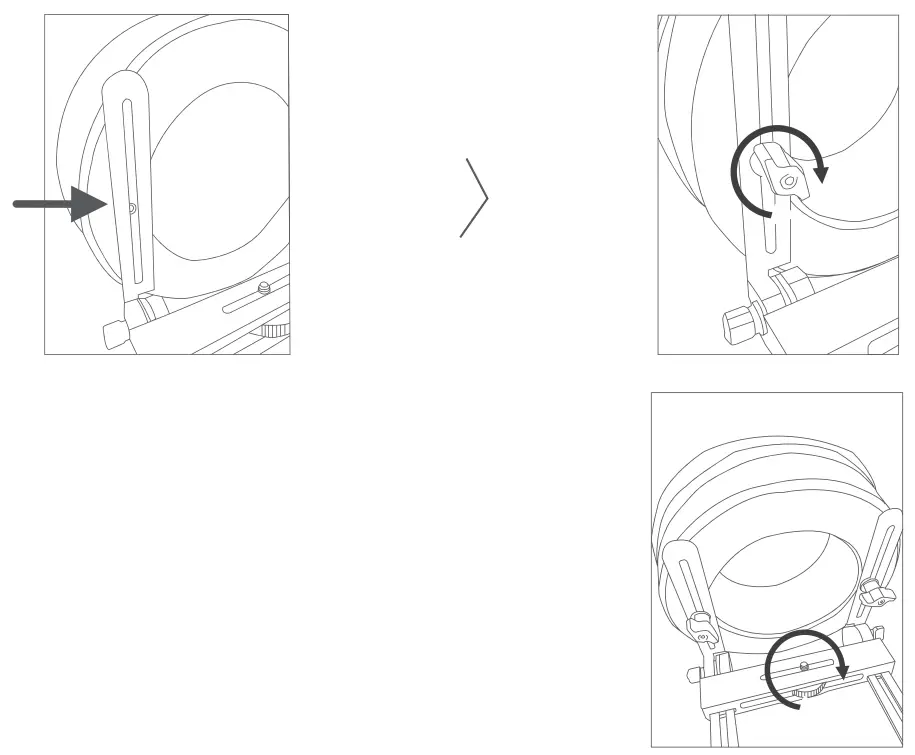
 6.1 Aim the Height Guide Rail of Foldable Bracket FLB-01 at the screw holes on the back of Ring
Flash Head R200, install the fixing ring, then rotate clockwise to tighten the Bracket Mount Knob.
6.2 Aim the screw hole of the camera at the 1/4’screw of Foldable Bracket FLB-01, then rotate clockwise to tighten.
Tip: The distance between the camera lens and the flash can be adjusted by rotating the knob on the bottom. - Installing the Umbrella (sold separately)
7.1 Aim the Umbrella Bracket UBB-01 at the screw holes on the back of the flash, insert it into the Bracket Mount Knob and rotate clockwise to tighten.
 6.1 Aim the Height Guide Rail of Foldable Bracket FLB-01 at the screw holes on the back of Ring
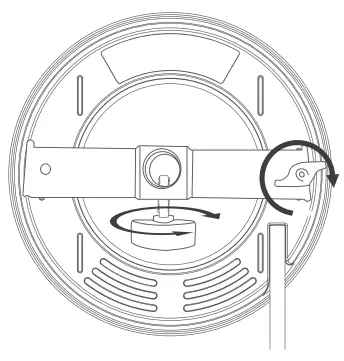
7.2 Insert the umbrella and rotate it clockwise to tighten it.
Technical Data
| Model | R200 |
| Flash Power | 200Ws |
| Flash CCT | 5800±200K |
| Modeling Lamp Power | 10W(20 Light Beads) |
| 100% Brightness (Lux,in 0.5 meters) (t) | 1300 |
| Modeling Lamp CCT | 4500±300K |
| Modeling Lamp Level | Low/Medium/High |
| Dimension (excluding power cable) | 188*188*60mm |
| Net Weight | 0.64kg |
* Changes made to the specifications or designs may not be reflected in this manual.
Maintenance
Shut down the device immediately should the abnormal operation be detected.
Avoid sudden impacts and the product should be deducted regularly.
It is normal for the light beads to be warm when in use.
Avoid continuous flashes if unnecessary.
Maintenance of the light must be performed by our authorized maintenance department which can provide original accessories.
This product, except for consumables, is supported with a one-year warranty.
Unauthorized service will void the warranty.
If the product had failures or was wetted, do not use it until it is repaired by professionals.
Changes made to the specifications or designs may not be reflected in this manual.
Declaration of Conformity
GODOX Photo Equipment Co, Ltd. hereby declares that This equipment is in compliance with the essential requirements and other relevant provisions of EU Directive 2014/35/EU, 2014/30/EU. They are allowed to be used in all EU member states.
For more information on DoC, Please click this web link:http://www.godox.com/DOC/Godox_R200_DOC.pdf.
FCC Statement
This device complies with part 15 of the FCC Rules. Operation is subject to the following two conditions: (1) This device may not cause harmful interference, and (2) this device must accept any interference received, including interference that may cause undesired operation Any Changes or modifications not expressly approved by the party responsible for compliance could void the user’s authority to operate the equipment
Note: This equipment has been tested and found to comply with the limits for a Class B digital device, pursuant to part 15 of the FCC Rules. These limits are designed to provide reasonable protection against harmful interference in a residential installation. This equipment generates uses and can radiate radio frequency energy and, if not installed and used in accordance with the instructions, may cause harmful interference to radio communications. However, there is no guarantee that interference will not occur in a particular installation. If this equipment does cause harmful interference to radio or television reception, which can be determined by turning the equipment off and on, the user is encouraged to try to correct the interference by one or more of the following measures:
- Reorient or relocate the receiving antenna.
- Increase the separation between the equipment and the receiver.
- Connect the equipment to an outlet on a circuit different from that to which the receiver is connected.
- Consult the dealer or an experienced radio/TV technician for help
Warranty
Dear customers, as this warranty card is an important certificate to apply fer our maintenance service, please fill in the following form in coordination with the seller and safe- keep it. Thank you!
Note: This form shall be sealed by the seller.
| Product Information | Model | Product Code Number |
| Customer Information | Name | Contact Number |
| Address | ||
| Seller Information | Name | |
| Contact Number | ||
| Address | ||
| Date of Sale | ||
| Note | ||
Applicable Products
The document applies to the products listed on the Product Maintenance Information (see below for further information). Other products or accessories (e.g. promotional items, giveaways, and additional accessories attached, etc.) are not included in this warranty scope.
Warranty Period
The warranty period of products and accessories is implemented according to the relevant Product Maintenance Information. The warranty period is calculated from the day(purchase date) when the product is bought for the first time, And the purchase date is considered as the date registered on the warranty card when buying the product.
How to Get the Maintenance Service
If maintenance service is needed, you can directly contact the product distributor or authorized service institutions. You can also contact the Godox after-sale service call and we will offer you service. When applying for maintenance service, you should provide a valid warranty card. If you cannot provide a valid warranty card, we may offer you maintenance service once confirmed that the product or accessory is involved in the maintenance scope, but that shall not be considered our obligation.
inapplicable Cases
The guarantee and service offered by this document are not applicable in the following cases: @. The product or accessory has expired its warranty period; @ . Breakage or damage caused by inappropriate usage, maintenance, or preservation, such as improper packing, improper usage, improper plugging in/out external equipment, falling off or squeezing by an external force, contacting or exposing to the improper temperature, solvent, acid, base, flooding, and damp environments, etc; @. Breakage or damage caused by the non-authorized institutions or staff in the process of installation, maintenance, alteration, addition, and detachment; @. The original identifying information of the product or accessory is modified, alternated, or removed; ©. No valid warranty card; ©. Breakage or damage caused by using illegally authorized, nonstandard, or non-public released software; @. Breakage or damage caused by force majeure or accident; @. Breakage or damage that could not be attributed to the product itself. Once met these situations above, you should seek solutions from the related responsible parties and Godox assumes no responsibility. The damage caused by parts, accessories, and software that is beyond the warranty period or scope is not included in our maintenance scope. The normal discoloration, abrasion, and consumption are not breakages within the maintenance scope.
Maintenance and Service Support Information
The warranty period and service types of products are implemented according to the following Product Maintenance Information:
| Product Type | Name | Maintenance Period(month) | Warranty Service Type |
| Parts | Circuit Board | 12 | The customer sends the product to the designated site |
| Battery | 3 | The customer sends the product to the designated site | |
| Electrical parts e.g.battery charger, power cord, sync cable, etc. | 12 | The customer sends the product to the designated site | |
| Other Items | Flash tube, modeling lamp, lamp body, lamp cover, locking device, package, etc. | No | Without warranty |
Godox After-sale Service Call 0755-29609320-8062
 http://weixin.qq.com/r/vEPI0F7ERgM5rRqz9xau
WeChat
Official Account
GODOX Photo Equipment Co., Ltd.
Add.: Building 2, Yaochuan Industrial Zone, Tangwei Community, Fuhai Street, Bao’ a District, Shenzhen
518103, China Tel: +86-755-29609320(8062) Fax:+86-755-25723423 E-mail: [email protected]
www.godox.com
MadeinChina | 705-R20000-02![]()


