
MASINGO Spirito H11 Bluetooth Karaoke Microphone Speaker
Specifications
- BRAND: MASINGO
- SPECIAL FEATURE: Portable, Wireless
- COLOR: Black
- INCLUDED COMPONENTS: warranty card, battery
- RECOMMENDED USES FOR PRODUCT: Singing, Karaoke
- SPEAKER OUTPUT: 6 Watt
- BATTERY LIFETIME: 2-3 Hours
- ITEM WEIGHT:46 pounds
- PRODUCT DIMENSIONS:58 x 3.58 x 11.14 inches
Introduction
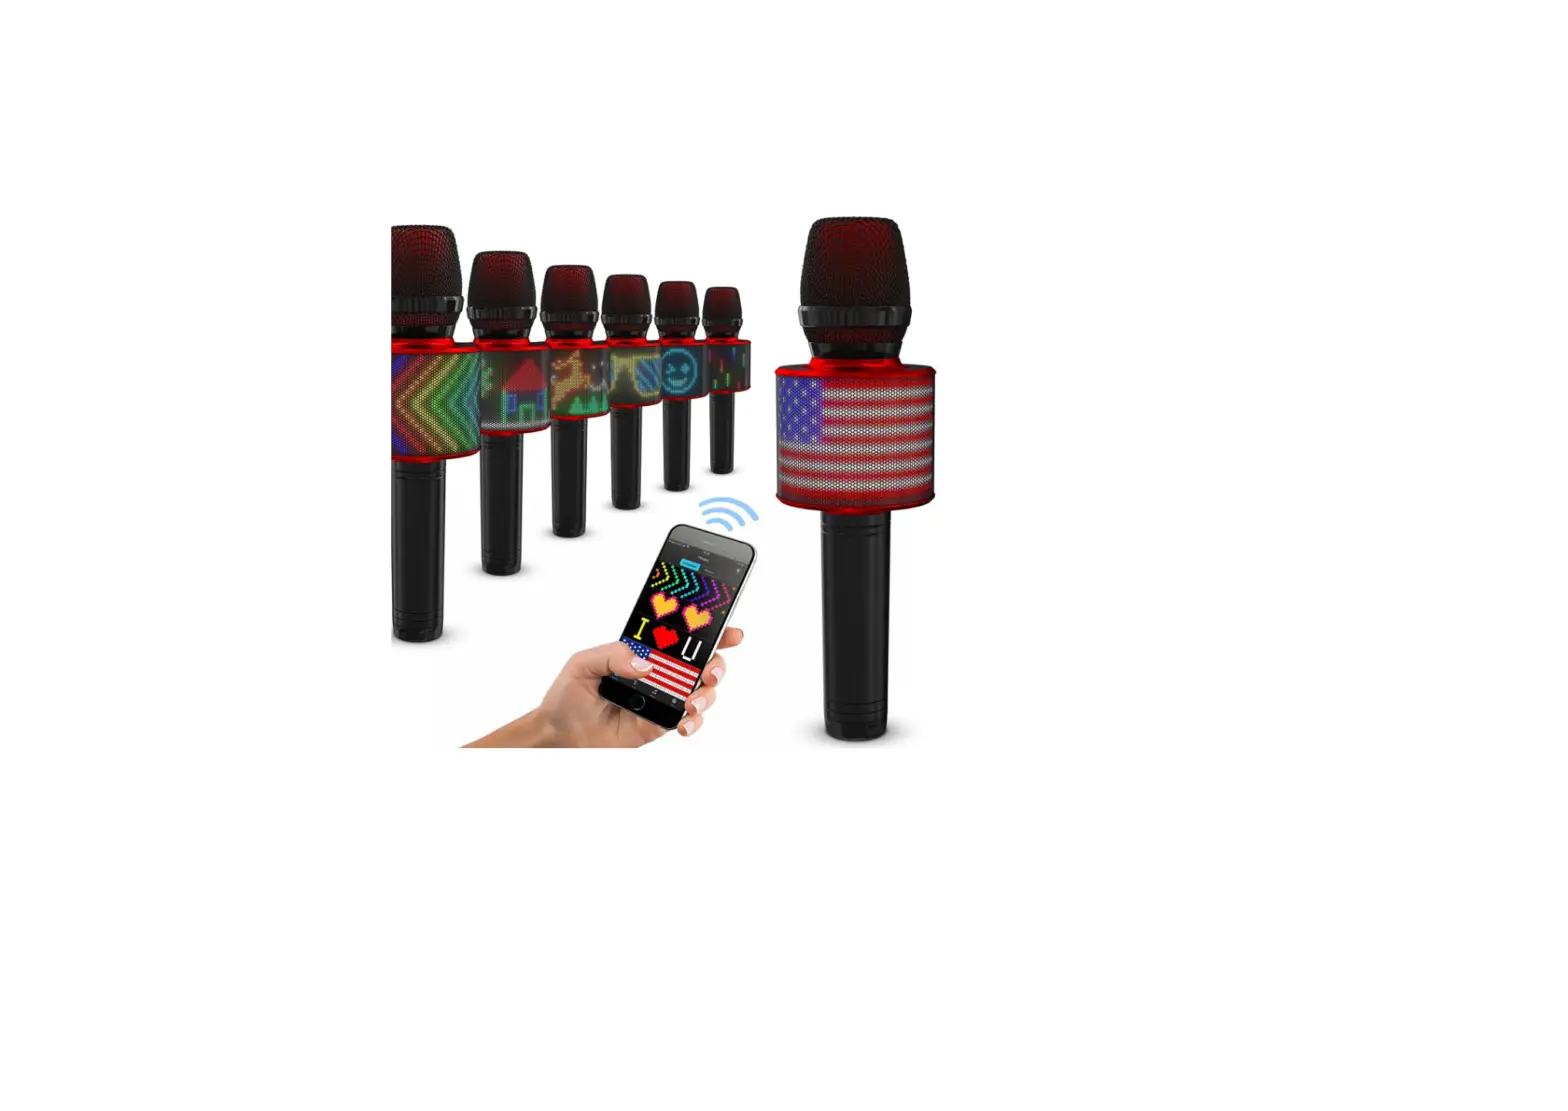
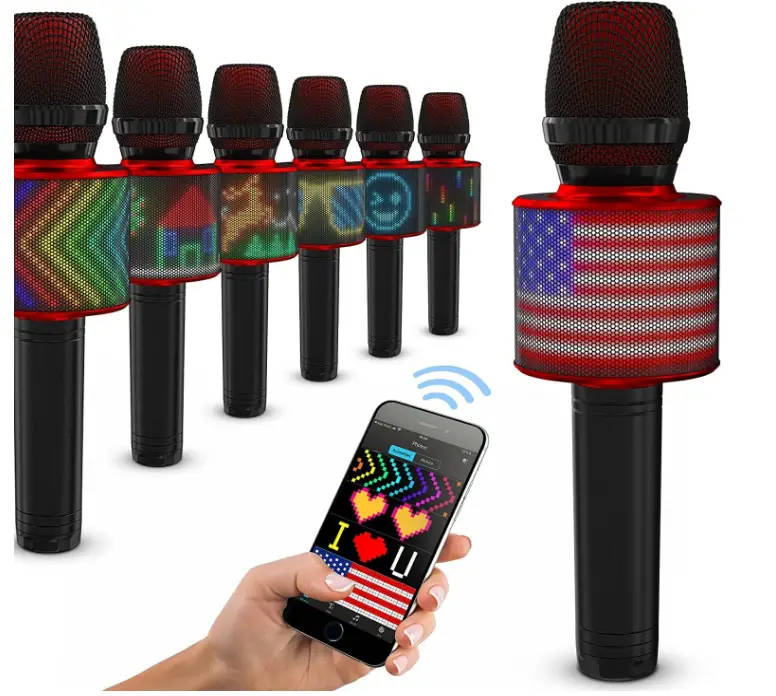
This wireless Bluetooth karaoke microphone features LED lights and a wrap-around LED board that is COMPLETELY customizable. To create original artwork, compose unique messages, or select from an almost limitless selection of animations in the graphics library, download the FREE software. For every musical mood, these vibrant LED lights flash brightly! A strong 6-watt speaker amplifies your voice with a crystal-clear microphone. At the touch of a button, TWS technology pairs your H11 with other H11s so you can sing duets of your favorite songs with the people you love. You’ll always have an enthusiastic audience, even when singing alone, thanks to the three amusing crowd SFX. This portable handheld mic allows you to stream your music through Bluetooth, plug in your playlist by USB or Micro-SD, or simply connect your device to the AUX-in connector.
With so many different ways to connect, you may also use this wireless karaoke microphone as a typical portable speaker for listening to music. Alternately, turn off the music and use the PA to deliver snappy celebration announcements. The ideal car-based karaoke microphone! A portable karaoke microphone with all the features of a full karaoke system is called the Spirito H11. Together, the speaker, lights, karaoke microphone, and music player comprise a portable performing powerhouse for fun on the go. Additionally, because of the long-lasting rechargeable battery, the music plays indefinitely. It’s time for Bluetooth karaoke with a wireless microphone! The ideal birthday present for boys and girls of all ages is this wireless karaoke microphone for children and adults.
WHAT’S INCLUDED
- 1 x Masingo karaoke microphone
- 1 x DC 5V 1A charging cord
- 1 x 3.5 mm AUX to 2*Micro USB adaptor
- 1 x Performer’s manual
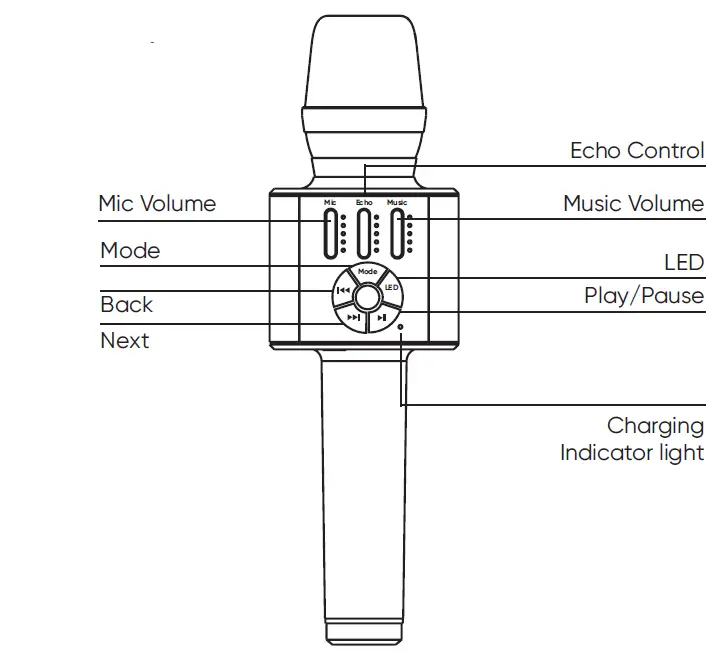
MICROPHONE DIAGRAM – FRONT
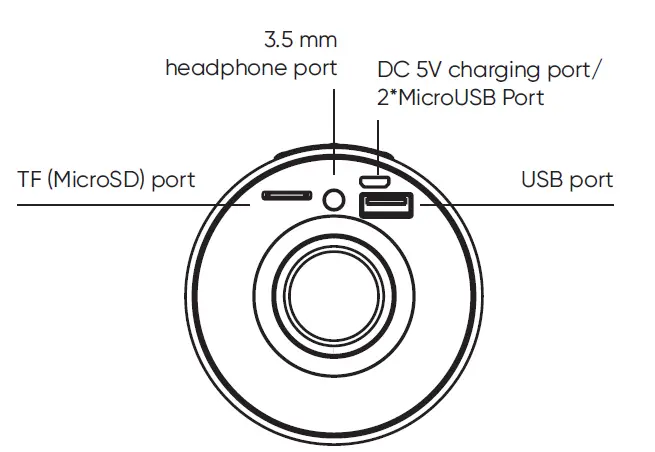
MICROPHONE DIAGRAM – BOTTOM
REVIEW BEFORE USING
- Keep this manual for future reference.
- Adhere to all warnings.
- Keep ventilation openings clear; do not block any of this microphone’s vents/openings.
- Install and set up the microphone according to the manufacturer’s instructions provided in this manual.
- Do not install near any heat sources (i.e. radiators, heat registers, stoves, amplifiers, or any other objects that produce heat).
- Protect the microphone’s power cord. Prevent the power cord from being walked on or pinched – particularly at the plug, wall outlet, and the connection to the microphone.
- Unplug the microphone during lightning storms or when unused for long periods of time.
- Refer all technical services to qualified personnel. Servicing is required when the microphone has been damaged in any way, such as damage to the power-supply cord or plug, contact with liquid, exposure to moisture or rain, if the microphone has been dropped, or anything else which may cause the microphone to fail to operate normally.
- Do not force the SD card into its slot. It can only be inserted in one direction. If the card does not insert easily, remove it and try reinserting in the opposite direction.
- To maintain peak performance and battery longevity, fully charge the karaoke microphone at least once every three months and be- for storing it away for a long period of time.
QUICK START GUIDE
- Charge your new H11 machine.
- Power it on, just like a dream.
- Pick your favorite playback setting.
- Download the app, free for the getting.
- Choose a LED design to display.
- Select your music and sing away!
NOTE
See the “Detailed Usage Guide” section of this manual for more information on how to operate your microphone.
- Check the microphone for damage before each use.
- Do not expose this product to water, moisture, heat, or steam. Do not place objects filled with liquid on this product.
- Do not use the microphone with attachments not approved by the manufacturer.
- Replace the battery only with the same or equivalent type and size. The danger of explosion if the battery is incorrectly replaced
- Clean and store the microphone after each use.
- Do not expose the battery to excessive heat such as sunshine, fire, or other heat sources to reduce the risk of fire or explosion.
MICROPHONE
HOW TO CHARGE THE MICROPHONE
Plug the microphone’s charging cable into the DC5V microphone charging port (16) and into a wall outlet. Be sure to charge fully before each use. The indicator light (13) will turn on to indicate charging.
HOW TO TURN THE MICROPHONE ON/OFF
- To power the microphone on, hold the Power button (7) in the center of the microphone’s function board for three seconds.
- To power the microphone off, hold the Power button for three seconds once more.
HOW TO ADJUST THE MICROPHONE’S VOLUME
The H11 has two volume controls for maximum flexibility.
- The Music Volume control (5)—at the top left of the function board—controls music volume in your selected playback mode (Please see the “Playback and Music” section below for additional instructions). Press the + side of the button to increase the volume. Press the – side of the button to decrease the volume.
- The Mic Volume control (1)—at the top right of the function board—controls the volume of your voice while singing or making announcements. Press the + side of the button to increase the volume. Press the – side of the button to decrease the volume.
PLAYBACK AND MUSIC
HOW TO SET UP PLAYBACK
Your microphone has five different playback options: Bluetooth, MicroSD, USB, AUX & PA. Each has its own set-up method. See the “Content/Parts’’ section above for hook-up locations and the relevant subsection below for more information on how to set up your preferred playback mode.
HOW TO CONNECT VIA BLUETOOTH
(i.e. playing music from your smart device)
The microphone is ready to connect to Bluetooth as soon as it powers on. To use this feature, simply search for the microphone name (“Masingo”) under your smart device’s Bluetooth connection settings and connect as you would to any Bluetooth device. The microphone will say “Bluetooth connected” when the connection is successful.
CAUTION
Do not turn your smart device volume to maximum or damage to speakers may occur. Place your device volume at midrange and then adjust the volume using the Music Volume control (5) on the microphone. You may however use either the controls on your device or the controls on the microphone to play, pause, or switch between tracks.
HOW TO USE PA MODE
When there is no music playing, this microphone will automatically start in PA Mode. Simply speak into the microphone, ensuring that the Mic Volume (1) is audible.
HOW TO USE SD MODE
PLAYING MUSIC FROM AN MICROSD CARD
Plug your MicroSD card into the designated slot (TF Slot) (14). Once inserted, press the Mode (8) button to switch to SD mode and then press the Play (10) button to begin playing your music. Press the Next (11) or Back (12) button to change tracks. Press the Play button again to pause a track.
NOTE
The Mode button will only cycle through to SD mode if an SD chip is inserted. If USB or AUX are also connected, the microphone may cycle through these as well upon pressing the mode button. Press the Mode button multiple times to cycle through all available modes.
HOW TO USE THE AUX MODE
(i.e. Playing music *from* an AUX-compatible device such as phone or MP3 player)
When the microphone is on, plug the MicroUSB side of the AUX- to-MicroUSB adaptor into the MicroUSB port (16) on the H11. Plug the AUX end into the device from which you wish to play music from.
Once connected, press the Mode (8) button to switch to AUX mode. Use the controls on your AUX-compatible device to play, pause, and switch between tracks.
NOTE
The Mode button will only cycle through to AUX mode if the AUX cable is connected.
If USB or MicroSD are also connected, the microphone may cycle through these as well upon pressing the Mode button. Press the Mode button multiple times to cycle through all available modes.
HOW TO START USB MODE
- Playing music from a USB drive.
- Plug a USB drive into a USB port (17). Once connected, press the Mode button to switch to USB mode. Press the Play (10) button to begin playing your music. Press the Next (11) or Back (12) button to change tracks. Press the Play button again to pause the track.
NOTE
The Mode button will only cycle through to USB mode if a USB storage drive is connected.
- If AUX and MicroSD are also connected, the microphone may cycle through these as well upon pressing the Mode button. Press the Mode button multiple times to cycle through all avail- able modes.
HOW TO USE MULTIPLE PLAYBACK MODES
To use playback modes interchangeably, simply activate each mode according to the instructions above, then press Mode (8) to switch between the inputs.
HOW TO CONNECT HEADPHONES
(i.e. Playing music *to* AUX-compatible headphones)
When the microphone is on, plug your 3.5mm headphones into the 3.5mm headphone port (15).
CAUTION
Playing headphone volume at maximum can damage your hearing. Ensure that your microphone volume is at mid-to- low range before putting on your headphones.
HOW TO CONNECT VIA TWS (TRUE WIRELESS STEREO)
TWS (True Wireless Stereo) allows you to sync with other H11s. For this mode to work, you will need to have two Spirito H11 microphones on hand.
- Power on both microphones but DO NOT connect them *yet* via any of the above playback modes.
- Press the Mode button (8) on *each* microphone twice in rapid succession
- You should hear a sound effect indicating the two mics have been paired.
- Connect one of the microphones using your preferred play- back mode.
- Both microphones will now play the same music simultaneously.
HOW TO SING KARAOKE USING YOUR MICROPHONE
- Find a karaoke track of your preferred song online. Karaoke tracks are available for thousands of songs through various online karaoke music services. Many are also available for free on YouTube channels such as “Sing King,” etc. These karaoke services often include lyrics.
- Download the track to USB/MicroSD, OR stream it via Blue- tooth/AUX.
- Connect via your preferred playback mode.
- Rock on!
LIGHT AND SOUND EFFECTS
HOW TO ADJUST THE MICROPHONE’S ECHO EFFECTS
The Echo Control (3) adjusts the microphone’s reverberation effect. Press the + half of the button to increase how much your voice echoes. Press the – half of the button to decrease the effect. Note that the echo effect only works on sound from the micro-phone. It will not affect the music being played.
HOW TO USE THE MICROPHONE’S ‘CROWD’ SOUND EFFECTS
The H11 comes with 3 pre-programmed sound effects. Each sound effect can be activated by *holding* (as opposed to pressing) one of the music playback buttons.
- To create the sound of a laughing crowd, *hold* down the Play button (10).
- To create the sound of a booing crowd, *hold* down the Next button (11).
- For an applause sound effect, *hold* down the Back button (12).
HOW TO USE ‘MAGIC MODE’ VOICE EFFECTS
The H11 comes with 4 pre-programmed voice effects: ‘Male,’ ‘Loli,’ ‘Monster,’ and ‘Female.’
- The microphone will start up without any voice effect activated.
- To activate the ‘Magic Mode’ *hold* the Mode button (8) for two seconds. Then simply *click* the mode button to cycle through each effect until you reach the desired option.
- To return the microphone to ‘karaoke mode,’ (i.e. normal voice) *hold* the mode button again for two seconds until the ma- chine says “karaoke mode.”
HOW TO CYCLE THROUGH THE PRE-PROGRAMMED LED DISPLAYS
- The H11 comes with 10 preset LED displays. To activate, *hold* the LED button (9) for 3 seconds. *Click* the button to cycle through each possible display until you reach your desired display.
- To make use of the LED board’s full functionality, please see the “Using the ‘BAIAI LED’ app” section below.
- Using the ‘BAIAI LED’ App
WHAT IS THE ‘BAIAI LED’ APP?
The BAIAI LED app is the Masingo-approved app for getting the most out of your microphone’s LED board. Through the BAIAI LED app, you can choose from an entire library of LED designs, create custom designs, write custom messages, and display sound equalizer bars.
HOW TO DOWNLOAD THE BAIAI-LED APP
- Open your preferred app store and search ‘BAIAI LED.’ Down- load the BAIAI LED app like you would any app for that device.
- If you do not have access to the app store, go to http://app. xiaobaizhuli.com/LED/ledappdownload.html to download the app. You may need to adjust your phone’s settings to allow for the installation of apps outside of the marketplace.
HOW TO CONNECT THE BAIAI LED APP TO MY H11 MICROPHONE
- Open the BAIAI LED app.
- Click the settings (gear) icon in the top right of the screen. Under “Settings,” click “Device Connection.”
- Under “Select the Device you want to connect to,” choose “Masingo LED.”
- A pop-up should indicate a successful connection. Also, the microphone’s LED board will display a chain link symbol upon a successful connection.
- Note that the LED Bluetooth connection functions separately from the music Bluetooth connection. The H11 contains two dedicated Bluetooth chips—one for music and one for LEDs. Both music and the LED board need to be connected separately as instructed above.
HOW TO FIND AND DISPLAY ADDITIONAL DESIGNS USING THE APP
- Open the app.
- Select “Material” at the bottom of the app home screen.
- “Material” contains two libraries: “Animation,” which shows moving designs, and “Pictures,” which shows stationary de- signs.
- Select your preferred library and scroll through the available designs by swiping up and down.
- When you find a design you wish to display, click to display it on the microphone’s LED board.
HOW TO WRITE A CUSTOM MESSAGE USING THE APP
- Open the app.
- Select “Text” at the bottom of the home screen.
- Click the “+” icon in the top right corner.
- Choose your preferred color using the color slider.
- Type your desired text in the text box. (Note: the text box is beneath the “OK” button, and is separate from the display box. It will only appear once you press “+”).
- Choose from one of four effects (if desired).
- Choose the motion you wish the text to make using the “<” and “>” arrows at the bottom of the screen. The default set- ting is “move to the left.”
- Slide the time duration bar to the right to increase the speed of your text, or towards the left to decrease the speed of your text.
- Click “Confirm” to preview the text.
- Once you are satisfied with your message, click “OK.” It will then appear in the list of available text messages underneath the display box. (NOTE: Once you click “OK”, you will no longer be able to edit your text).
- Select your text and click send (the paper airplane icon) to display it on your microphone’s LED board.
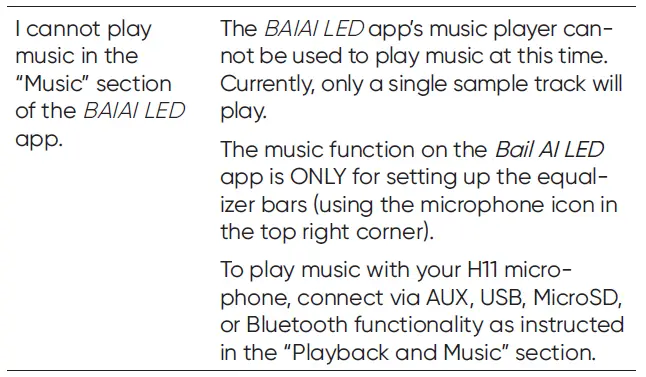
HOW TO PLAY MUSIC USING THE APP
The H11 DOES NOT support the music player found in the BAIAI LED app at this time. Please use one of the other playback options as detailed in the “Music” section above.
HOW TO ACTIVATE EQUALIZER BARS ON THE MICROPHONE’S LED DISPLAY
- Open the app.
- Select “Music” at the bottom of the app home screen.
- Click the microphone icon in the top right corner of the screen.
- Your microphone’s LED board will now display equalizer bars moving in sync with any sound your smart device can hear.
Note: Please note that your smart device—not the H11 mic— is the listening device for the equalizer bars. In order for the equalizer bars to work, your smart device must be able to hear the H11’s speaker.
HOW TO CREATE A CUSTOM-LED DESIGN
- Open the app.
- Select “DIY” at the bottom of the home screen.
- Click the “+” icon in the top right corner to display the DIY drawing board.
- Note: There are four controls in the DIY board: color, edit, erase, and trash.
- Select the edit button (pen icon).
- Select your preferred color by sliding the selector along the color bar. (You may have multiple colors in the same design, but you must select your preferred color each time you wish to add a color).
- Draw your design using your finger or stylus in the drawing grid.
- To erase, select erase and move your finger along an area of the drawing grid you wish to remove.
- When done, press saves to save your design.
HOW TO DISPLAY MY CUSTOM DESIGN ON MY MICROPHONE’S LED BOARD
- Open the app.
- Select “DIY” at the bottom of the home screen.
- Click your preferred custom design to send it to your microphone’s board.
NOTE
*Hold* rather than click on your custom design to continue to edit it, or to delete it.
MAINTENANCE
HOW TO CLEAN
- Turn the microphone and microphones off. Unplug the microphone’s power cord and disconnect any AUX, MicroSD, or USB plug-ins.
- Gently wipe the outside of the microphone using a clean, dry cloth. Keep all vents, buttons, and openings free of lint and dirt. Do not immerse the microphone in water and do not use any harsh cleaners.
HOW TO STORE
- Charge the microphone so it is ready for the next use. Make sure that the microphone is clean and dry.
- Bind the power cord and AUX cable individually and gently with electrician-approved fasteners. (Note: Do not wrap or fold against the natural bend of the cords or cable.
- Do not wrap the cord around the microphone). Store the microphone in a cool, dry place away from damaging elements.
- For best results, clean and store the microphone after each use.
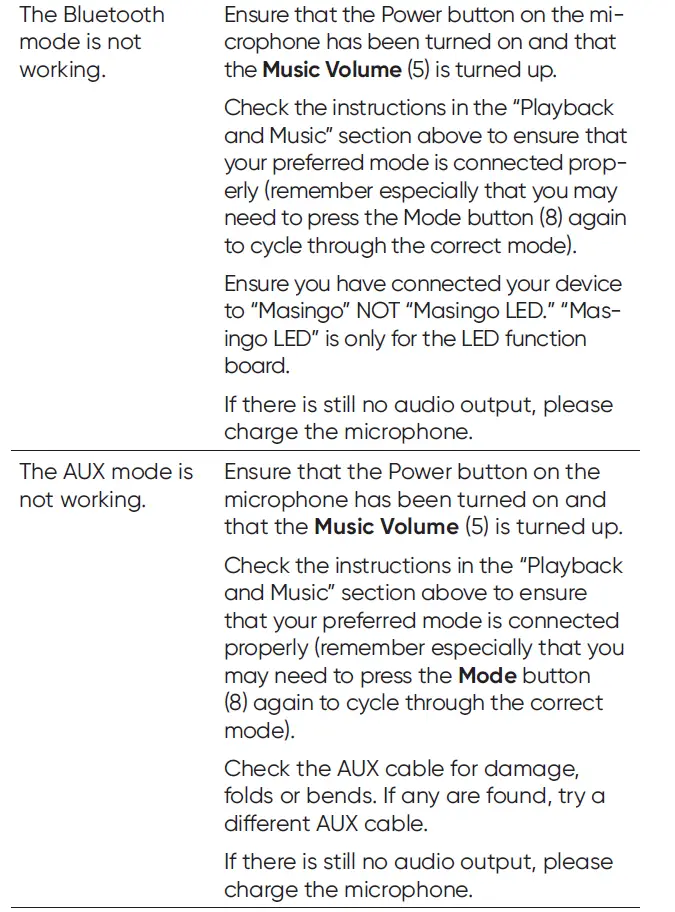
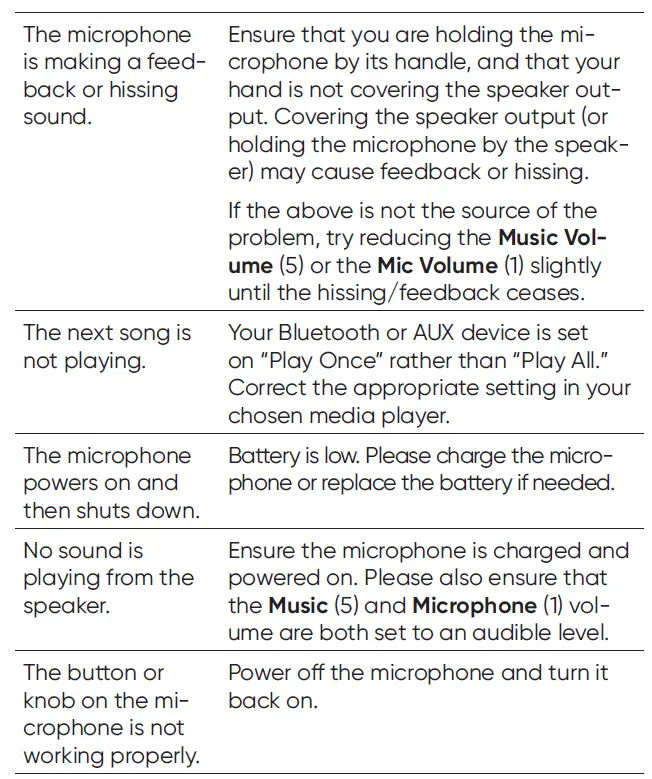
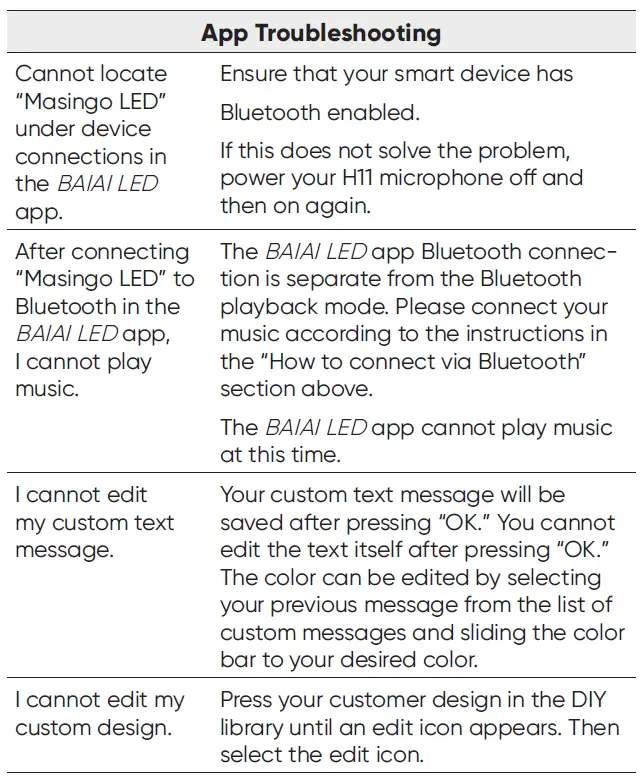
TROUBLESHOOTING GUIDE
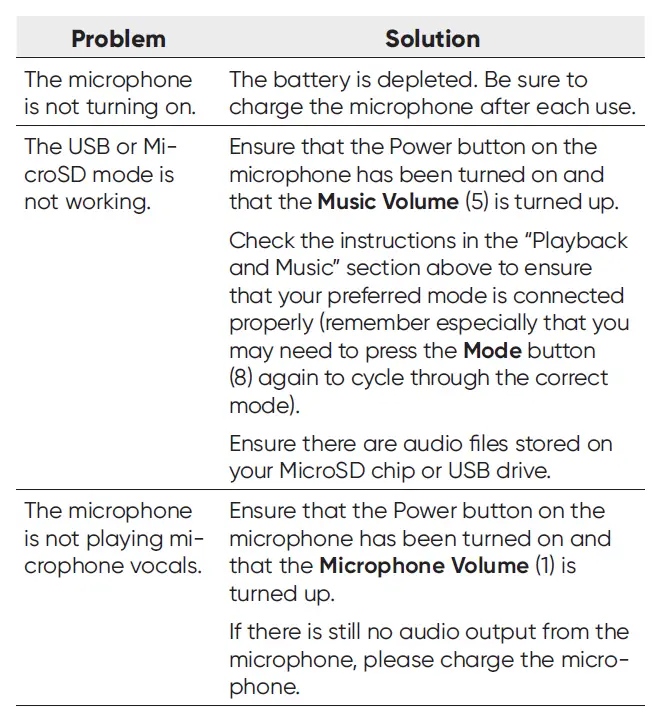
If any of these issues persist, or if any part of the microphone becomes damaged, discontinue use and consult a licensed electrician for repair. Do not attempt to modify or repair the microphone yourself. You can also contact our customer service department (see next page).
Frequently Asked Questions
You can customize LED Banner uses the APP ‘BAIAI LED’, you can customize your message and you can also draw your own design.
You can pair two H11.
The H11 comes with 4 pre-programmed voice effects: ‘Male,’ ‘Loli,’ ‘Monster,’ and ‘Female.’ The microphone will start up without any voice effect activated. To activate the ‘Magic Mode’ *hold* the Mode button (8) for two seconds. Then simply *click* the mode button to cycle through each effect until you reach the desired option.
No, our H11 Microphone doesn’t come with a case.
The Bluetooth Karaoke Microphone is using a micro USB charger.
You will need to have two Spirito H11 microphones on hand, then you need you power on both microphones but DO NOT connect them yet, you need to Press the Mode button on microphone twice in rapid succession. You should hear a sound effect indicating the two mics have been paired. Both microphones will now play the same music simultaneously.
You will get one H11 microphone on every order.
You may practice your vocal chords (for better or worse) whenever, wherever, and without having to tote around heavy equipment by using a karaoke microphone.
Wireless. First, activate your karaoke machine’s bluetooth discovery setting. Search for devices in the bluetooth section of your TV’s settings after that. Your karaoke machine will appear in the list of choices; simply select it and tap pair (or connect to this device) to link it to your TV.
Simply activate your microphone’s bluetooth discovery. After that, activate Bluetooth on your TV and look for devices there. After your microphone appears, you may select “pair device” to pair the device. Your smart TV and microphone are now linked.
The device uses Bluetooth to send audio signals to an amplifier, which amplifies the audio before it is sent to the Bluetooth speaker. Using your smartphone and the wire-free Bluetooth microphone, you may sing whenever and wherever you choose.
A Bluetooth microphone type is often the greatest option for podcasters since it allows them to record audio with excellent sound quality without having to worry about wires getting in the way.
To begin with, it’s simple to use Bluetooth to link it to your smartphone or tablet when you want to sing along with a video. If you are adamantly opposed to utilizing an auxiliary cord, don’t panic; you can still connect your device to the speaker.
(iOS) using a phone Go to Bluetooth in the settings. Your device should be listed under “OTHER DEVICES” at the bottom. Connect after choosing the device. (Android) Swipe the screen down; tap and hold Bluetooth; select the keyboard from the list of devices; and pair.
The purpose of a Bluetooth speaker is to pair with another Bluetooth speaker. But in order to connect to a Bluetooth speaker, regular microphones need a Bluetooth transmitter.


