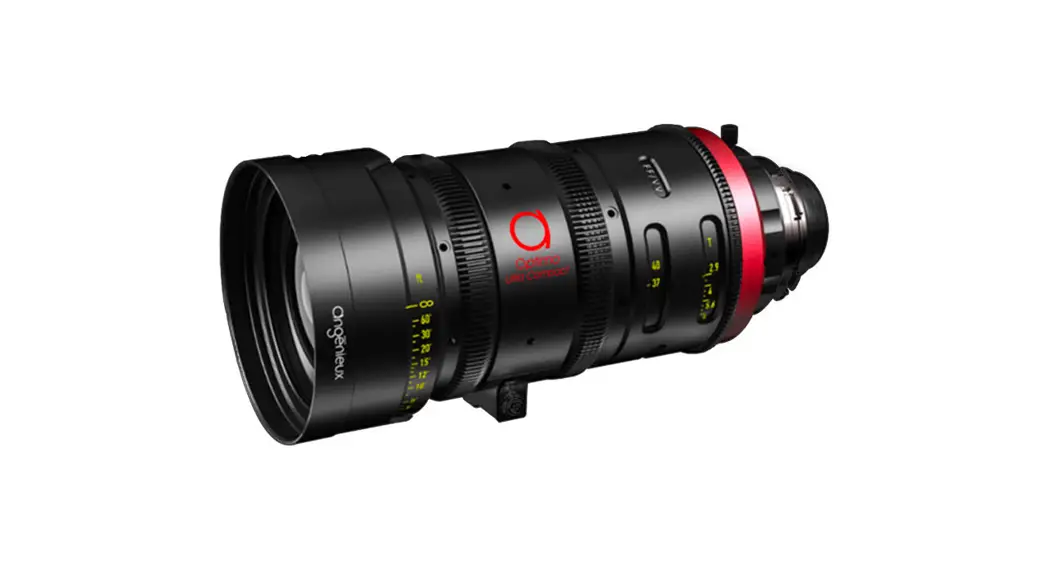
![]() Optimo Ultra Compact 37-102mm Zoom Lens
Optimo Ultra Compact 37-102mm Zoom Lens
User Manual
Optimo Ultra Compact 37-102mm Zoom Lens
Miscellaneous
All rights reserved.
THALES LAS FRANCE ANGÉNIEUX division. Photos and drawings are not contractually binding. The data is given for information.
THALES LAS FRANCE ANGÉNIEUX division reserves the right to change the performances of its products without notice.
This document is the full and sole property of THALES LAS FRANCE ANGÉNIEUX division. Any reproduction, rights of reproduction, translation, modification, or publication on material or digital medium in whole or in part of the document, is strictly forbidden.
Before using the product described in this manual, be sure to read and understand all respective instructions. This instruction manual applies to the Optimo Ultra Compact lens.
Foreword
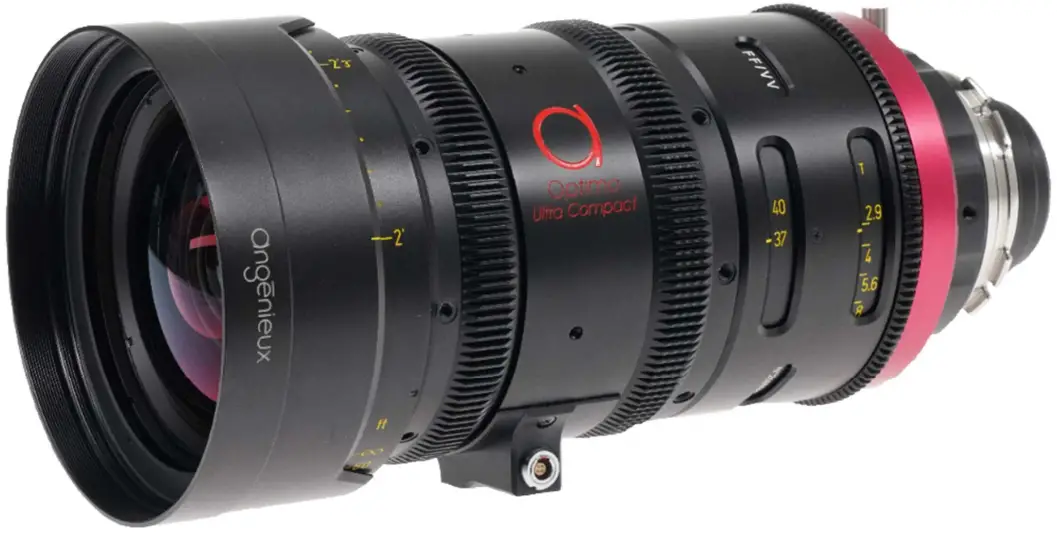
Congratulations on the purchase of Angénieux Optimo Ultra Compact. The Optimo Ultra Compact provides a full frame 46.3mm image circle coverage with a minimum 2.9 T-stop and has identical colorimetry to the legacy Optimo zooms and Optimo Primes.
Available with a PL mount, it is the perfect companion for your digital camera.
Optimo Ultra compact has to support Cooke/I and is ARRI LDS2 ready.
This user manual describes the different configurations and uses of your lens. If you need additional information, don’t hesitate to contact us at [email protected]. Additional product documentation is available on the Angénieux website at the service and support page: https://www.angenieux.com/service-and-support/.
Safety information
CAUTION
Always follow these guidelines to ensure against injury to yourself or others and damage to the system or other objects.
- This safety information comes in addition to the product-specific operating instructions in general and must be strictly observed for safety reasons.
- Read and understand all safety and operating instructions before you operate or install the lens.
- Do not use accessories or attachments that are not recommended by Angénieux, as they may cause hazards and invalidate the warranty.
- Do not attempt to repair any part of the system. Repairs must only be carried out by authorized Angénieux Service Centers.
WARNINGS
- Handle any lens with care.
- Do not expose the lens to water or moisture.
- Do not subject the lens to severe shocks.
- Never insert objects of any kind into any part of the lens if these are not clearly qualified for the task in the manual.
- Do not remove any paint-marked screws.
- Changing camera lenses should be done in a dry and dust-free environment. If this is not possible, take extra care that no dust enters the camera while the lens is off.
- Keep the protective caps on the lens when not set on camera or not in operation.
- Follow the cleaning instructions in this manual to avoid damage to the lens.
- Do not look at high-intensity light directly through any lens.
STORAGE CONDITIONS
- Store any lens in a dry place where the temperature does not exceed –40°C and +70°C (- 40°F and + 158°F).
- Do not store the lens in places where it may be subject to extreme temperatures, direct sunlight, high humidity, severe vibration, or strong magnetic fields.
- Condensation: When moving the lens from a cold to a warm location or when the lens is used in a damp environment, condensation may appear on glass surfaces and on internal or external electrical connections. Operating the lenses while condensation is present may result in damage to the equipment. Condensation on the optical components may have a visible effect on the output images. To prevent condensation, store the lens in a dry area. If the lens is in a humid area, dry it and store it in a plastic bag with desiccant before using it. After moving the lens from a cold to a warm and humid environment, wait for some time for the lens to warm up to the ambient temperature to avoid condensation.
TEMPERATURE OF OPERATION
- Any lens is designed to be used between – 20°C and + 45°C (- 4°F and + 113°F).
- The optomechanical design is passively thermalized. It allows Optimo Ultra Compact to prevent a back focus shift with temperature changes.
RECYCLING AND ENVIRONMENT
 Follow the guidance sets up by your local authority for recycling the Optimo Ultra Compact.
What’s in the box?
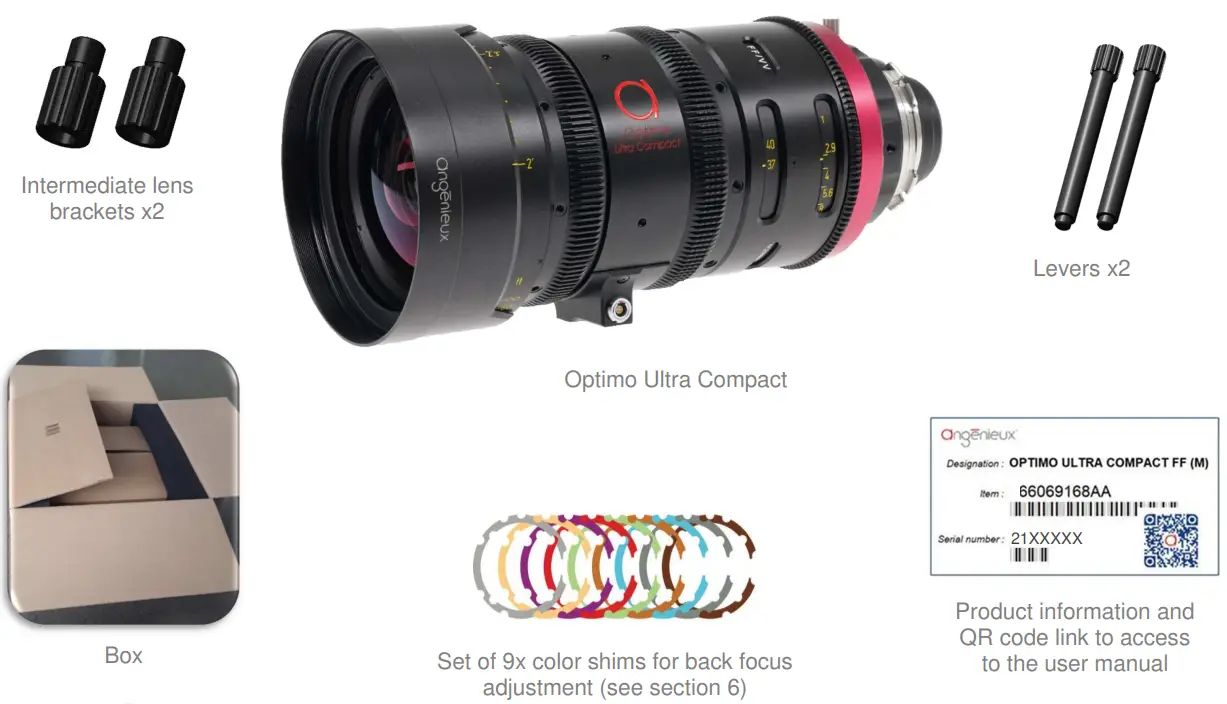
![]() In case you require any assistance or noticed a missing or broken item, please contact our service team at: [email protected]
In case you require any assistance or noticed a missing or broken item, please contact our service team at: [email protected]
Technical information
| ANGENIEUX OPTIMO ULTRA COMPACT | |
| Zoom ratio | 2,7x |
| Focal Length (mm) | 37-102 |
| Maximum aperture | T2.9 |
| Minimum Object Distance (ft)/(m) | 2′ / 0,6m |
| Image coverage (mm) | 46,3 |
| Weight (kg / lbs) | 2,6 / 5,73 |
| Front diameter (mm) | 114 |
| Max diameter (mm) | 114 |
| Length (front to mount) (mm) | 235mm = 9 1/4 in |
| Mounts | PL |
| Internal focus | Yes |
| Iris scales 2 opposite scales | 2 opposite scales |
| Angular rotation of iris ring (°) | 71,4° |
| Iris gear drive | 126 teeth, pitch 32 |
| Zoom scales | 2 opposite scales |
| Angular rotation of zoom ring (°) | 150° |
| Zoom gear drive | 126 teeth, pitch 32 |
| Focus scales | 2 opposite scales, metric or footage marked |
| Angular rotation of focus ring (°) | 310° |
| Focus gear drive | 126 teeth, pitch 32 |
| Angular Field of View (for Full-Frame:40.96×21.6mm) | |
| Focal Length | 37mm / 102mm |
| Horizontal angular field of view | 57.3° / 22.7° |
| Object dimensions at MOD (mm) | 449 x 237 / 159 x 84 |
General view and installation
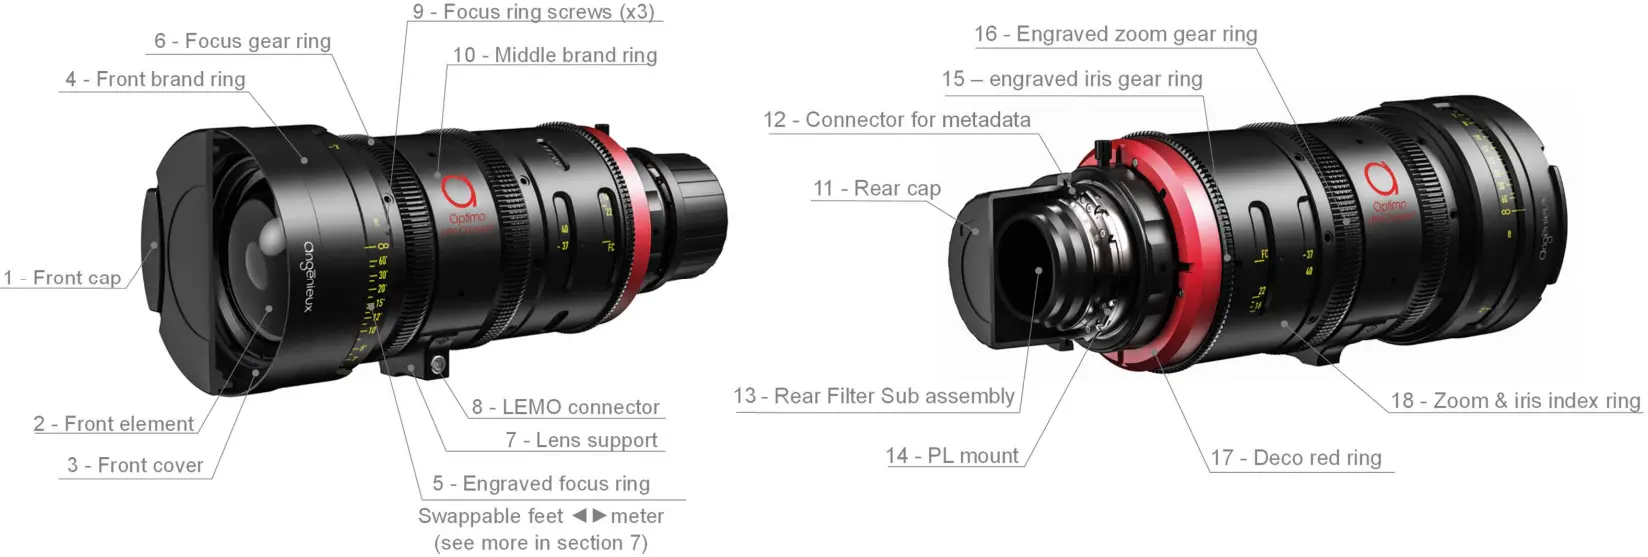
For a standard installation on the camera please proceed as below:
- Remove the rear cap (11) and make sure the rear filter (13) is clean. If not, please refer to maintenance (section 7)
- Make sure the Optimo Ultra Compact PL mount (14) and camera mount are perfectly clean
- Mount the Optimo Ultra Compact on the camera mount with electronic pins (12) in the correct orientation. Lock the camera mount
- Remove the front cap (1) and make sure the front element (2) is clean. If not, please refer to maintenance (section 7)
- While using motors, to prevent damaging the lens mechanisms make sure the motors are calibrated properly before operating them
Spare parts and optional accessories
In case you need additional spare parts, please contact your local reseller or our service team at: [email protected].
| SPARE PARTS | |
| (1) – Front cap | 311819 |
| (2) – Front element | 66070757AA |
| (3) – Front cover | 66068379AA |
| (4) – Front brand ring | 66069059AA |
| (5) – The engraved focus ring | Feet: 66070583AA |
| (6) – Focus gear ring | 66066724AA |
| (7) – Lens support / (8) – LEMO connector | 66070258AA/ 0315740 |
| (9) – Focus ring screws (x3) | 990297 |
| (10) – Middle brand ring | 66069060AA |
| (11) – Rear cap | 311816 |
| (12) – Connector for metadata | 66066447AA |
| (13) – Rear Filter | 66066659AB |
| (14) – PL mount | 66066785AA |
| (15) – Iris gear ring | 66070858AA |
| (16) – Engraved zoom gear ring | 66066723BA |
| (17) – Deco red ring | 66066352AA |
| (18) – Zoom & iris index ring | 66066722AA |
| Flange shim set of 9 shims (see size detail in section 6) | 321060 |
| Screws for lens support including LEMO connector holder (x2 with thread lock) | 982467 |
| Screws for camera interface metadata connector (x2) | 913327 |
| Screw for the middle brand ring (x1) | 984957 |
| Screws for the front brand ring (x3) | 982397 |
| Screw for zoom and iris index ring (x3) | 984957 |
| Screws for engraved focus ring (x3) | 990297 |
| ADDITIONAL ACCESSORIES COMPATIBLE | |
| Lemo to USB cable for computer electronic settings | 66068093AA |
| Electronic setting software to be downloaded | https://www.angenieux.com/service-and-support/ |
Electronics specifications
The Optimo Ultra Compact is compatible with the Cooke /I Technology version 3.0 (June 2012) and is ARRI LDS2 ready.
Updates of the embedded software can be found at https://www.angenieux.com/service-and-support/#downloads or by contacting your distributor. Use cable 66068093AA to connect the lens to the USB port of the computer for software updates and focus or iris data adjustments during lens maintenance.
| Voltage | Consumption | ||
| Camera connector | 4 pins on PL mount | 9-42 V | About 50 mA / 12V |
| External connector | LEMO 4 pins connector EGB00304CLL | 9-42 V | About 50 mA / 12V |
Adjustments
TOOLS FOR ADJUSTMENT
In the below table, you can find the screwdrivers and the LEMO spanner we are using in the factory. You can use your proper tools but be sure they can fit perfectly to prevent any damage to the screws head, rings, or optics.
| Description | Type | Reference |
| Screwdriver for all Phillips screws outer rings | Phillips screwdriver | VESSEL 9900 P.00-75 |
| Screwdriver for focus engraved ring and iris gear ring | Flat screwdriver | BERGEON 140 |
| Spanner for LEMO connector nut 4pins | Special spanner | LEMO DCH.91.101.PA |
| Set of flat spanners for collet nuts | Special spanner |
REPLACING THE MOUNT
Please refer to the next page figure for the numbers in brackets.
- Place the Optimo Ultra Compact on the front cap
- Unscrew the rear filter sub-assembly (1) anticlockwise
- Remove the two holding screws and the electronic camera interface (3)
- Unscrew the eight screws (2) from the PL mount and remove the PL mount (4)
CAUTION: pull out the PL mount straightly to prevent any damage to the electronic camera interface inner pins (3) - Replace the defective PL mount with a new one
- Put back all elements in reverse order
- Check your back focus and change the thickness of the flange shims to adjust the back focus distance if necessary
ADJUSTING THE BACK-FOCUS
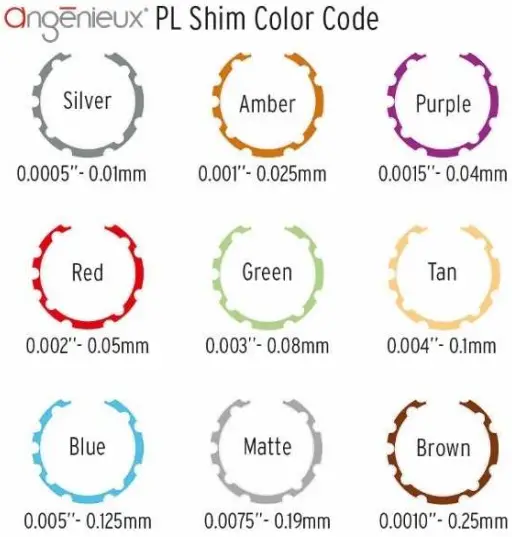
Optimo Ultra Compact is set with the 52mm industry PL flange distance and delivered with a color shim set. If you need to adjust the back focus flange to fit more accurately to the position of the sensor on the camera, you need to modify the rear color shim thickness. Please proceed as follow; any possible combination of shims can be used to achieve the required thickness and therefore the required flange focal distance. Please keep the rear filter (1) in place and be sure it is well-fitted when doing the back-focus adjustment.
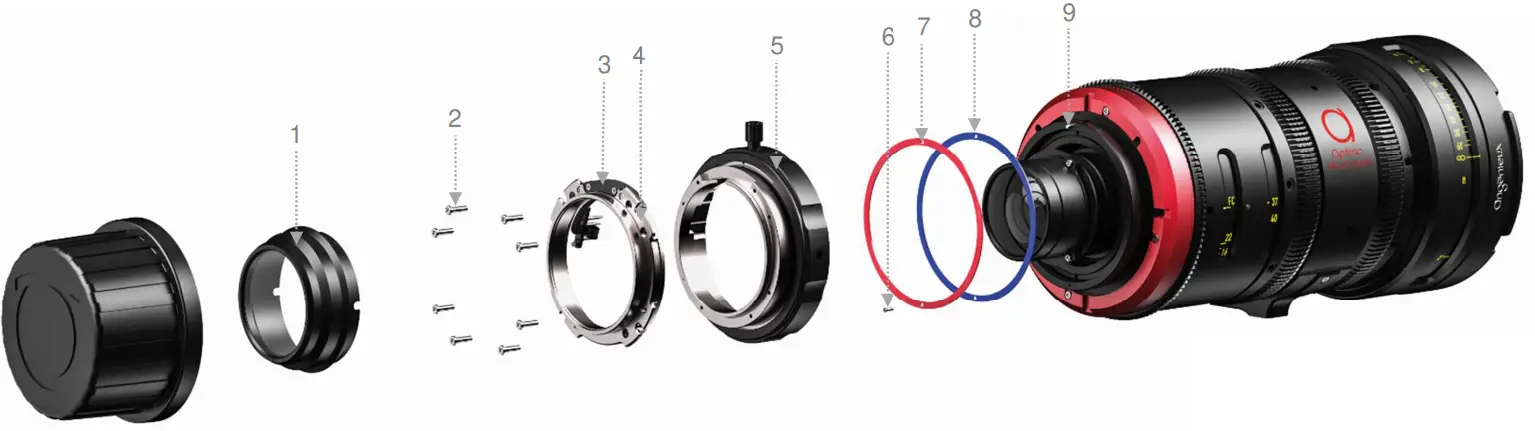
- Unscrew the PL retainer (5) anticlockwise
- Remove the PL sub-assembly (1, 2, 3, 4, and 5)
- Unscrew the screws (6) then remove the aluminum installed shims (7) and the installed colors shimmed (8) by using a flat-bladed screwdriver or a pair of tweezers.
- Determine the total thickness of the shims already installed. Increase or decrease the total shim thickness according to your needs
- Put back all elements in reverse order
CAUTION: always put back the aluminum factory shim (7) on the color shims. Be sure the color shims and the aluminum shims are in place with the indexation pin (9)
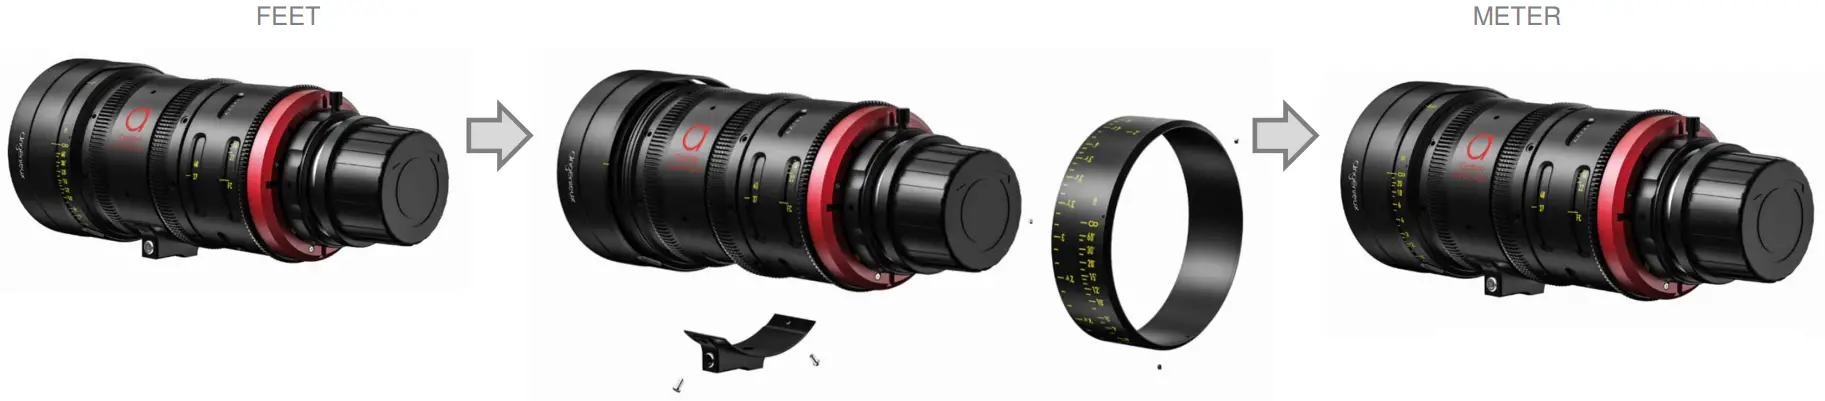
FEET TO METER AND METER TO FEET SWAP
You have the possibility to buy another focus engraved ring in meter or in feet for your Optimo Ultra Compact. The swap of the focus scale from one system to the other must be done with cautious in a clean environment to prevent dust or particles pollution inside the lens. If your focus ring needs to be replaced please contact your local reseller or our service team at [email protected] providing the serial number of the lens.
Parts numbers into brackets are referring to the next pages:
CAUTION: After swapping the scale, please do always check the focus ring functioning. If you notice a mechanical play on the focus ring, tighten more the three screws (1) uniformly. If the focus torque is stiff or uneven, release and tighten more uniformly the three screws (1).
TIP: To help re-installing the focus scale, go to the infinity focus end-stop and put a pencil mark on the front engraved ring (5) in front of the infinity position. When installing the focus ring, align the infinity engraving with the mark made. After installing the focus ring, check if the marks are correctly aligned by using a collimator, projector or camera. Proceed to a final accurate adjustment if necessary.
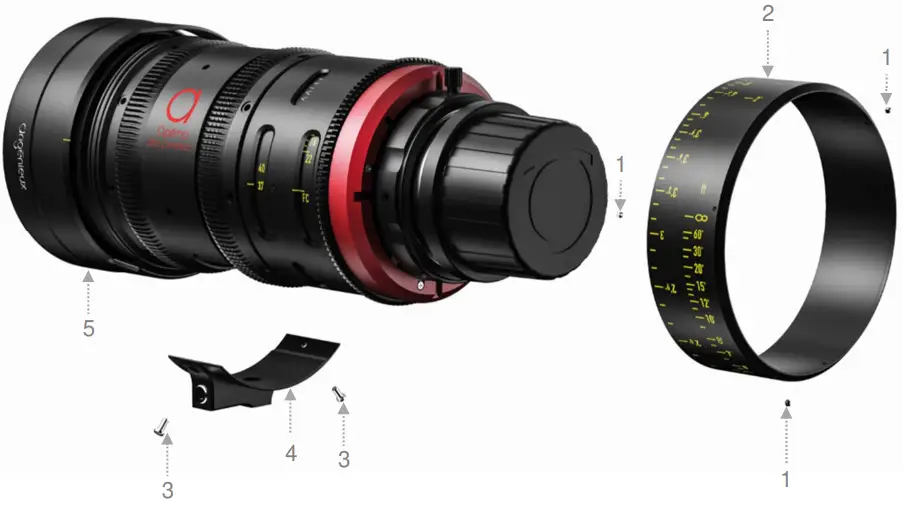
- Unscrew and remove the two screws (3) holding the lens bracket (4)
CAUTION: the lens bracket is integrated with electronic parts - Disconnect the connector between the lens and the lens bracket (4)
- Unscrew and remove the three 120° screws (1) holding the engraved focus ring (2)
- Pull out the engraved focus ring (2)
- Replace the new engraved focus ring (2) for feet or meter use and put the three screws (1) in contact
- Re-connect the connector to the lens bracket
- Tighten the two screws (3) on the lens bracket (4)
- Check and adjust the focus ring position to match the engraved distances and tighten uniformly the three screws (1)
- Tighten all the screws in contact with a removable thread lock
Maintenance recommendations
CLEANING THE LENSES
For optimum image quality, make sure that your Optimo Ultra Compact lens is cleaned every time you use it. To clean the optics, use an optical cleaning solution and use a soft cloth. For optimum cleaning use an optical cloth and an isopropyl alcohol liquid, start with the center and clean by turning outwards.
LUBRICATION
The focus, zoom, and iris mechanisms are factory lubricated. If you stored an Optimo Ultra Compact lens for a long time or if you are going to use it in a cold environment, move the focus, zoom, and iris rings several times before using it. If you used an Optimo Ultra Compact lens frequently or in extreme conditions, make sure the mechanisms work properly. If necessary, clean and lubricate the mechanism. It is highly recommended to use the grease provided by Angénieux. For any additional information, please contact your local reseller or Angénieux international customer support at: [email protected].
ADVANCED MAINTENANCE
The deep maintenance of the Optimo Ultra Compact lens should only be performed by a certified service center or factory-trained technicians. For more information about where to send your Optimo Ultra Compact lens for service, please contact your local reseller or Angénieux international customer support at: [email protected].
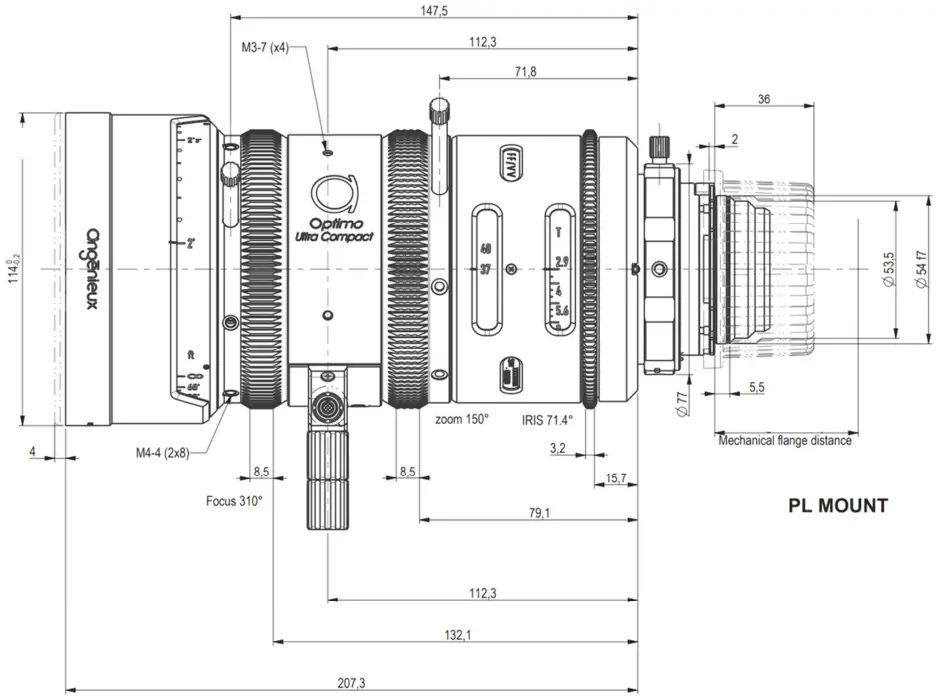
Outline drawings
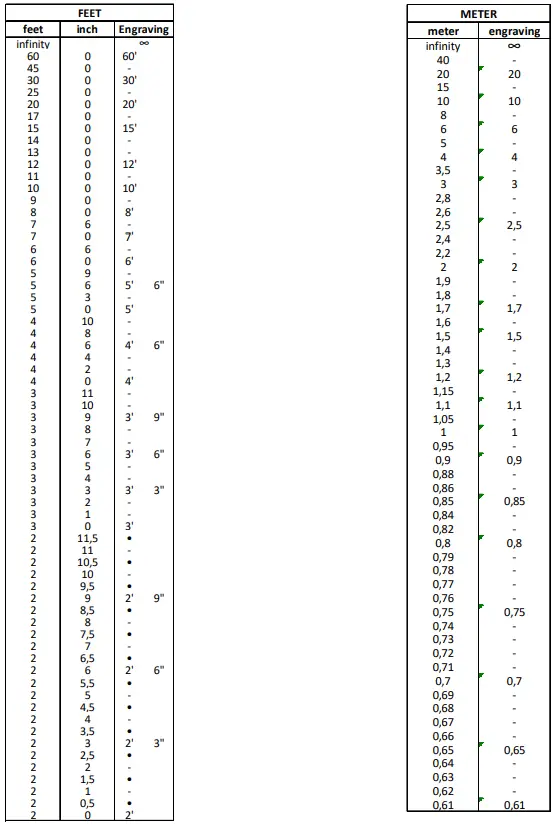
Engraving distances detail
![]()


![Zeiss Compact Prime And Zoom Lenses [cp.2, Cz.2] User Manual](https://static-data1.manualsee.com/1/img/176/20329/2020/12/Zeiss-Compact-Prime-and-Zoom-lenses.png "Zeiss Compact Prime And Zoom Lenses [cp.2, Cz.2] User Manual")


