
![]() YETIJR. CAN-AM Maverick X3 X RS TURBO R RC Car
YETIJR. CAN-AM Maverick X3 X RS TURBO R RC Car
User Manual
www.axialracing.com
YETIJR. CAN-AM Maverick X3 X RS TURBO R RC Car
AXIAL BUMPER TO BUMPER ONE (1) YEAR LIMITED WARRANTY
LIMITED WARRANTY
What this Warranty Covers
Horizon Hobby, LLC, (Horizon) warrants to the original purchaser that the product purchased (the “Product”) will be free from defects in materials and workmanship at the date of purchase.
What is Not Covered
This warranty is not transferable and does not cover (i) cosmetic damage, (ii) damage due to acts of God, accident, misuse, abuse, negligence, commercial use, or due to improper use, installation, operation, or maintenance, (iii) modification of or to any part of the Product, (iv) attempted service by anyone other than a Horizon Hobby authorized service center, (v) Product not purchased from an authorized Horizon dealer, (vi) Product not compliant with applicable technical regulations, or (vii) use that violates any applicable laws, rules, or regulations.
OTHER THAN THE EXPRESS WARRANTY ABOVE, HORIZON MAKES NO OTHER WARRANTY OR REPRESENTATION, AND HEREBY DISCLAIMS ANY AND ALL IMPLIED WARRANTIES, INCLUDING, WITHOUT LIMITATION, THE IMPLIED WARRANTIES OF NON-INFRINGEMENT, MERCHANTABILITY
AND FITNESS FOR A PARTICULAR PURPOSE. THE PURCHASER ACKNOWLEDGES THAT THEY ALONE HAVE DETERMINED THAT THE PRODUCT WILL SUITABLY MEET THE REQUIREMENTS OF THE PURCHASER’S INTENDED USE.
Purchaser’s Remedy
Horizon’s sole obligation and purchaser’s sole and exclusive remedy shall be that Horizon will, at its option, either (i) service, or (ii) replace, any Product determined by Horizon to be defective.
Horizon reserves the right to inspect any and all Product(s) involved in a warranty claim. Service or replacement decisions are at the sole discretion of Horizon. Proof of purchase is required for all warranty claims. SERVICE OR REPLACEMENT AS PROVIDED UNDER THIS WARRANTY IS THE PURCHASER’S SOLE AND EXCLUSIVE REMEDY.
Limitation of Liability
HORIZON SHALL NOT BE LIABLE FOR SPECIAL, INDIRECT, INCIDENTAL, OR CONSEQUENTIAL DAMAGES, LOSS OF PROFITS OR PRODUCTION OR COMMERCIAL LOSS IN ANY WAY, REGARDLESS OF WHETHER SUCH CLAIM IS BASED ON CONTRACT, WARRANTY, TORT, NEGLIGENCE, STRICT
LIABILITY OR ANY OTHER THEORY OF LIABILITY, EVEN IF HORIZON HAS BEEN ADVISED OF THE POSSIBILITY OF SUCH DAMAGES. Further, in no event, shall the liability of Horizon exceed the individual price of the Product on which liability is asserted. As Horizon has no control over use, setup, final assembly, modification, or misuse, no liability shall be assumed nor accepted for any resulting damage or injury. By the act of use, setup, or assembly, the user accepts all resulting liability. If you as the purchaser or user are not prepared to accept the liability associated with the use of the Product, the purchaser is advised to return the Product immediately in new and unused condition to the place of purchase.
Law
These terms are governed by Illinois law (without regard to conflict of law principles). This warranty gives you specific legal rights, and you may also have other rights which vary from state to state. Horizon reserves the right to change or modify this warranty at any time without notice.
WARRANTY SERVICES
Questions, Assistance, and Services
Your local hobby store and/or place of purchase cannot provide warranty support or service. Once assembly, setup or use of the Product has been started, you must contact your local distributor or Horizon directly. This will enable Horizon to better answer your questions and service you in the event that you may need any assistance. For questions or assistance, please visit our website at www.horizonhobby.com, submit a Product Support Inquiry, or call the toll-free telephone number referenced in the Warranty and Service Contact Information section to speak with a Product Support representative.
Inspection or Services
If this Product needs to be inspected or serviced and is compliant in the country you live and use the Product in, please use the Horizon Online Service Request submission process found on our website or call Horizon to obtain a Return Merchandise Authorization (RMA) number. Pack the Product securely using a shipping carton. Please note that original boxes may be included, but are not designed to withstand the rigors of shipping without additional protection. Ship via a carrier that provides tracking and insurance for lost or damaged parcels, as Horizon is not responsible for merchandise until it arrives and is accepted at our facility. An Online Service Request is available at http://www.horizonhobby.com/content/_service-center_render-service-center. If you do not have internet access, please contact Horizon Product Support to obtain an RMA number along with instructions for submitting your product for service. When calling Horizon, you will be asked to provide your complete name, street address, email address and phone number where you can be reached during business hours. When sending the product to Horizon, please include your RMA number, a list of the included items, and a brief summary of the problem. A copy of your original sales receipt must be included for warranty consideration. Be sure your name, address, and RMA number are clearly written on the outside of the shipping carton.
NOTICE: Do not ship LiPo batteries to Horizon. If you have any issues with a LiPo battery, please contact the appropriate Horizon Product Support office.
Warranty Requirements
For Warranty consideration, you must include your original sales receipt verifying the proof-of-purchase date. Provided warranty conditions have been met, your Product will be
serviced or replaced free of charge. Service or replacement decisions are at the sole discretion of Horizon.
Non-Warranty Service
Should your service not be covered by warranty, service will be completed and payment will be required without notification or estimate of the expense unless the expense
exceeds 50% of the retail purchase cost. By submitting the item for service you are agreeing to payment of the service without notification. Service estimates are available upon request. You must include this request with your item submitted for service. Non-warranty service estimates will be billed a minimum of ½ hour of labor. In addition, you will be billed for return freight. Horizon accepts money orders and cashier’s checks, as well as Visa, MasterCard, American Express, and Discover cards. By submitting any item to Horizon for service, you are agreeing to Horizon’s Terms and Conditions found on our website
http://www.horizonhobby.com/content/_service-center_render-service-center.
ATTENTION: Horizon service is limited to Product compliant in the country of use and ownership. If received, a non-compliant Product will not be serviced. Further, the
sender will be responsible for arranging the return shipment of the un-serviced Product, through a carrier of the sender’s choice and at the sender’s expense. Horizon will hold
non-compliant Products for a period of 60 days from notification, after which they will be discarded.
INTERNATIONAL CUSTOMER WARRANTY
Please contact the dealer where the purchase was made. If your Axial product purchase was made through an online retailer, any warranty issues must be taken care of by that retailer. Axial assumes no responsibility for Axial products sold internationally by online retailers outside of your home country/region.
SPECIFICATIONS & DESCRIPTION CHANGES
All information found in this manual is subject to change without notice. Visit Axialracing.com for the latest updates and information regarding your model. Axial maintains no responsibility for inadvertent errors in this manual or on the box art.
FCC STATEMENT
This device complies with part 15 of the FCC rules. Operation is subject to the following two conditions.
![]() (1)This device may not cause harmful interference.
(1)This device may not cause harmful interference.
(2)This device must accept any interference received, including interference that may cause undesired operation.
FCC RF RADIATED EXPOSURE STATEMENT: The equipment complies with FCC Rf radiation exposure limits set forth for an uncontrolled environment. This equipment should be installed and operated with a minimum distance of 20 centimeters between the radiator and your body.
NOTE: THE MANUFACTURER IS NOT RESPONSIBLE FOR ANY RADIO OR TV INTERFERENCE CAUSED BY UNAUTHORIZED MODIFICATIONS TO THIS EQUIPMENT. SUCH MODIFICATIONS COULD VOID THE USER’S AUTHORITY TO OPERATE THE EQUIPMENT.
FCC ID: 2AI3D-SS0001
INDUSTRY CANADA NOTICE
This device complies with Industry Canada license-exempt RSS standard(s).
- Operation is subject to the following two conditions: (1) this device may not cause interference, and (2) this device must accept any interference, including interference that may cause undesired operation of the device.
- Changes or modifi cations not expressly approved by the party responsible for compliance could void the user’s authority to operate the equipment.
This equipment complies with IC radiation exposure limits set forth for an uncontrolled environment. In order to avoid the possibility of exceeding the IC radio frequency exposure limits, Human proximity to the antenna shall not be less than 20cm (8 inches) during normal operation.
Contact Information*
| Country of Purchase | Horizon Hobby | Contact Information | Address |
| United States of America | Horizon Service Center (Repairs and Repair Requests) | servicecenter.horizonhobby.com/RequestForm/ | 1608 Interstate Drive Champaign, Illinois 61822 USA |
| Horizon Product Support (Product Technical Assistance) | [email protected] 877-504-0233 | ||
| Sales | [email protected] 888-959-2306 | ||
| European Union | Horizon Technischer Service Sales: Horizon Hobby GmbH | [email protected] +49 (0) 4121 2655 100 | Hanskampring 9 D 22885 Barsblittel, Germany |
* For the most up-to-date customer service contact information, visit: www.horizonhobby.com/content/service-center-render-service-center
Compliance Information for the European Union![]() EU Compliance Statement: Horizon Hobby, LLC hereby declares that this product is in compliance with the essential requirements and other relevant provisions of the RED and EMC Directive.
EU Compliance Statement: Horizon Hobby, LLC hereby declares that this product is in compliance with the essential requirements and other relevant provisions of the RED and EMC Directive.
A copy of the EU Declaration of Conformity is available online at: http://www.horizonhobby.com/content/support-render-compliance.
Instructions for disposal of WEEE by users in the European Union![]() This product must not be disposed of with other waste. Instead, it is the user’s responsibility to dispose of their waste equipment by handing it over to a designated collection point for the recycling of waste electrical and electronic equipment. The separate collection and recycling of your waste equipment at the time of disposal will help to conserve natural resources and ensure that it is recycled in a manner that protects human health and the environment. For more information about where you can drop off your waste equipment for recycling, please contact your local city offi ce, your household waste disposal service or where you purchased the product.
This product must not be disposed of with other waste. Instead, it is the user’s responsibility to dispose of their waste equipment by handing it over to a designated collection point for the recycling of waste electrical and electronic equipment. The separate collection and recycling of your waste equipment at the time of disposal will help to conserve natural resources and ensure that it is recycled in a manner that protects human health and the environment. For more information about where you can drop off your waste equipment for recycling, please contact your local city offi ce, your household waste disposal service or where you purchased the product.
Cautions
![]() To prevent serious personal injury and/or property damage, operate all remotely controlled models in a responsible manner as outlined herein.
To prevent serious personal injury and/or property damage, operate all remotely controlled models in a responsible manner as outlined herein.
CHOOSE THE RIGHT PLACE TO OPERATE YOUR R/C MODEL.
- Do not run on public streets or highways. This could cause serious accidents, personal injuries, and/or property damage.
- Never run R/C models near people or animals.
- To avoid injury, do not run in confined spaces.
- Do not run where loud noises can disturb others, such as hospitals and residential areas.
- Never run indoors. There is a high risk of fire and/or damage.
INSPECT YOUR MODEL BEFORE OPERATION.
- Make sure that all screws and nuts are properly tightened. It is also a good idea to use a removable thread lock wherever metal screws go into metal, especially for engine mounts and the engine pilot shaft.
- Always use fresh batteries for your transmitter and for your receiver to avoid losing control of the model.
- Always test the brakes and throttle before starting your engine to avoid losing control of the model.
AFTER THE OPERATION OF YOUR R/C MODEL
- Disconnect the battery in the vehicle first, then turn off the transmitter, this will prevent runaways.
- Be careful when handling batteries, they will be hot after running.
- Replace any batteries that have been dented or have frayed wires, short circuits can cause a fire.
- Be sure to keep your R/C model clean and free of excess dirt and grease, this will increase its life.
Trouble Shooting
| problem | cause | remedy |
| Does not move | Batteries are not installed properly in the transmitter. Weak or no battery in the model. Damaged motor. Frayed or broken wiring. ESC is shut down by a heat protection circuit. | Make sure batteries are properly installed. Install the charged battery. Replace with the new motor. Splice and insulate wiring completely. Stop driving immediately, do not drive the car until the Speed Controller cools down. |
| No Control. | The improper antenna on the transmitter or model. Weak or no batteries in transmitter or model. The neutral position or trim is incorrect. Are the receiver and battery connections properly connected? | Install charged or fresh batteries. Fully extend the antenna. Adjust the steering trim. Check receiver and battery connections. |
| Steering and Throttle Function Reversed. | The servo reverse switch is in the wrong position. Please check that the wires from ESC to the motor are connected properly. | Set to correct position. Check to make sure the motor and ESC are properly connected. |
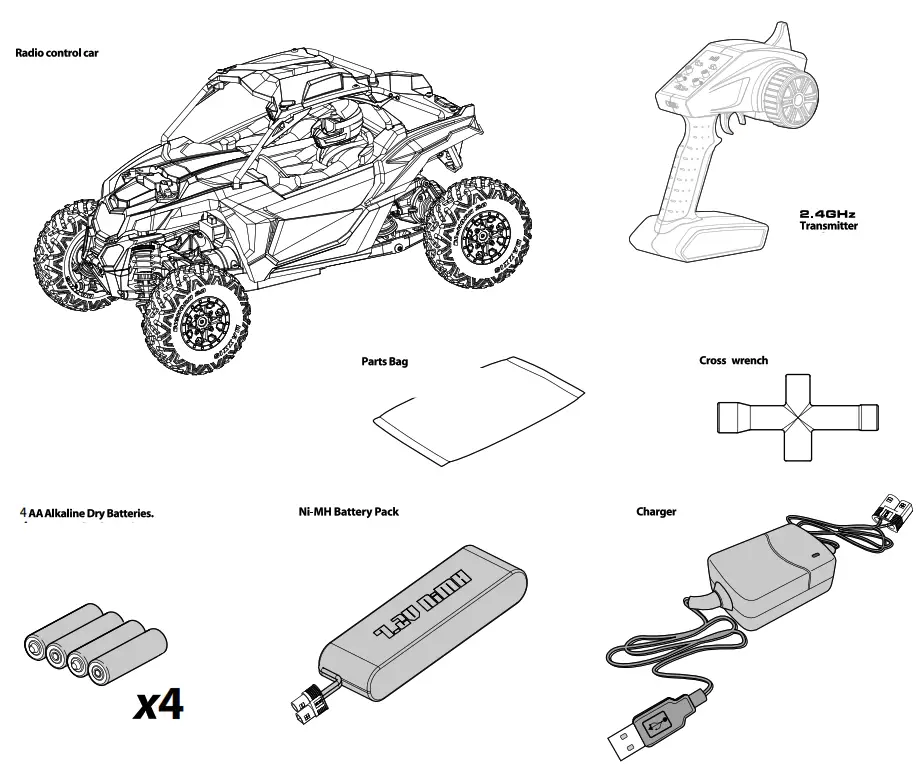
Included items
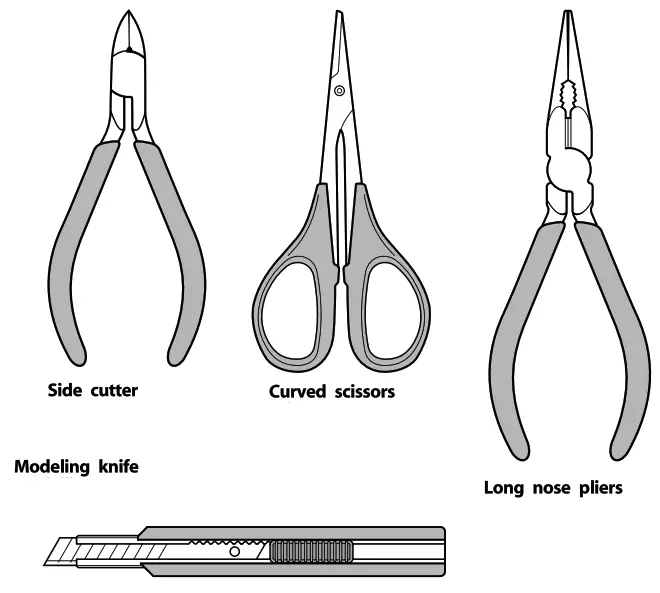
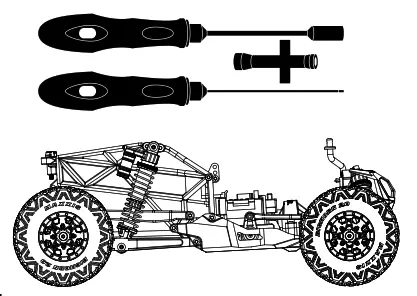
 Tools Recommended
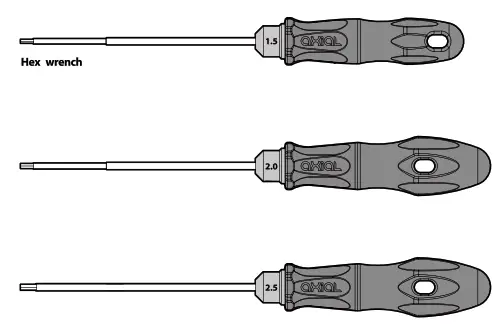
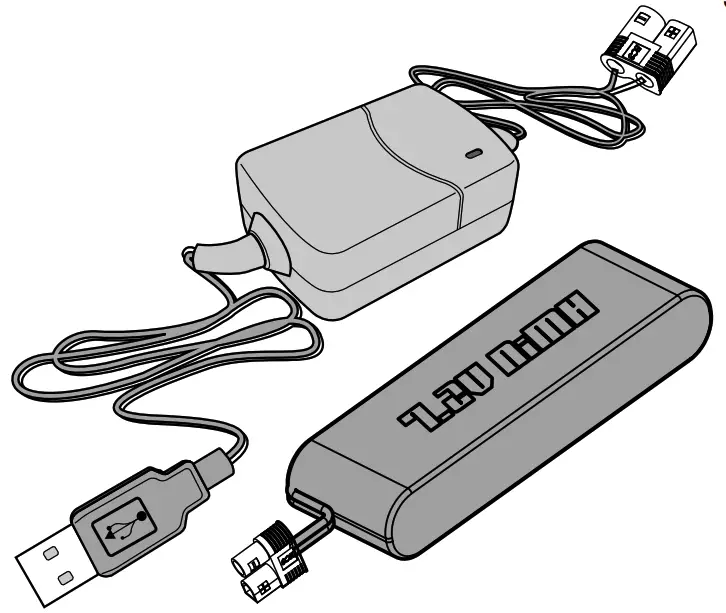
 DYNC1061 USB NiMH Charger and DYNB0112EC Battery Instructions
Before using your factory-assembled RTR, review the entire instruction manual to become familiar with the vehicle.
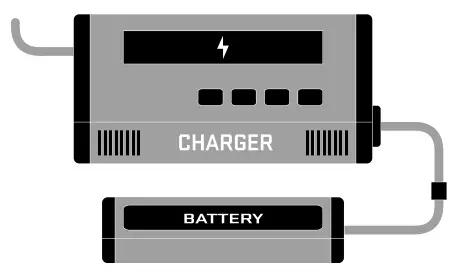
This is a quick start guide for the care and usage of the charger and battery that comes with the vehicle.
DYNC1061 – Dynamite USB Charger NiMH 6C EC3™ Connector
DYNB0112EC – Dynamite NiMH 7.2V 1300mAh 2/3A Flat Mini EC3™ Connector
CAUTION: The DYNC1061 charger is for use with 6-Cell 7.2v NiMH batteries ONLY and should not be used with any other batteries.
CAUTION: Never leave the battery unattended while charging. Always disconnect the battery and unplug the charger when finished charging.
CAUTION HOT!!!
NiMH batteries may become hot while charging.
Allow cooling before handling the battery.
- Remove the battery from the vehicle before charging.
- Place the battery on a fire-resistant surface away from combustible materials.
- Keep the battery and charger away from water and other fluids. Never charge a wet battery.
1. Connect the USB connector to a PC USB port or to a USB AC wall adapter.
2. Connect the battery to the EC3™ connector on the charger.
3. The charger will automatically begin the charger process.
Red LED: Charging
Green LED: Finish Charging
When using the DYNC1061 charger, the DYNB0112EC battery should fully charge in 2-3 hours.
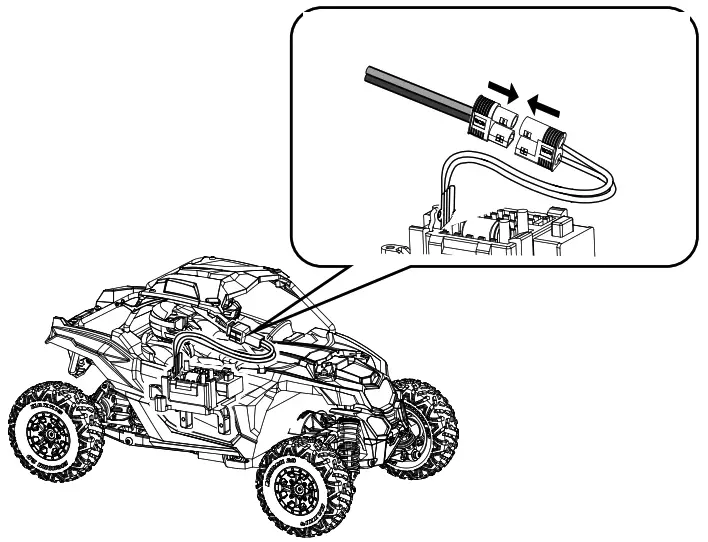
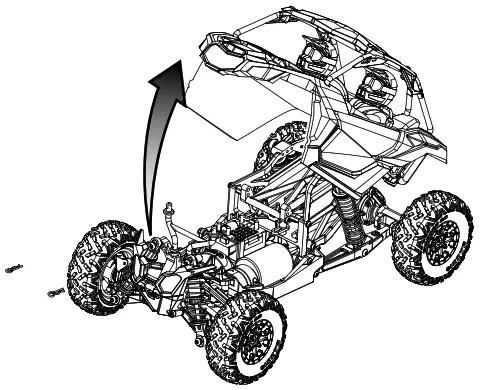
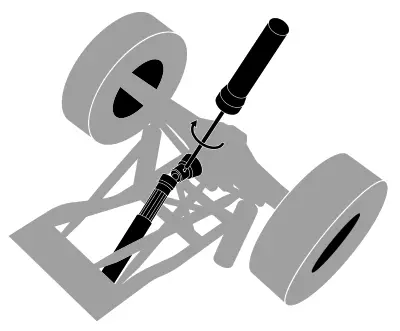
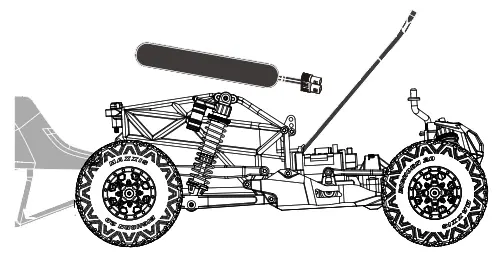
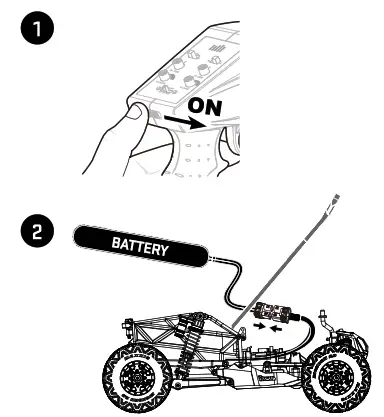
Getting Started
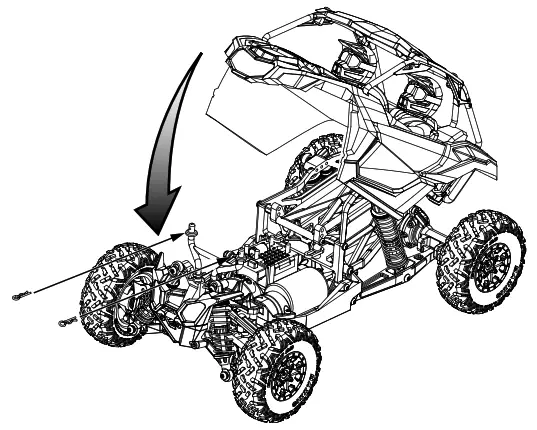
- Remove the body clips and body.

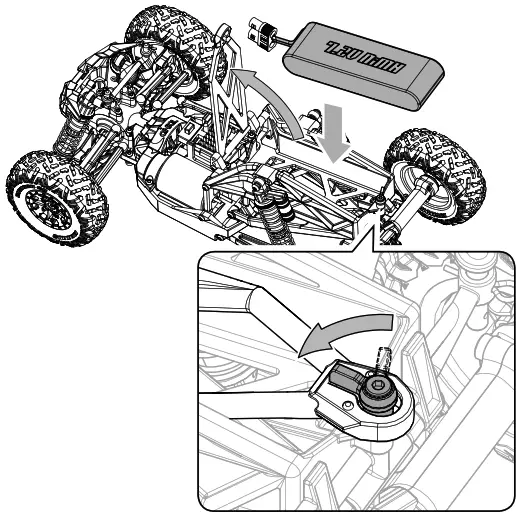
- Install the battery.

- Turn on the transmitter

Note:
Power to the vehicle is controlled by connecting/disconnecting the battery. - Connect the battery to the ESC.

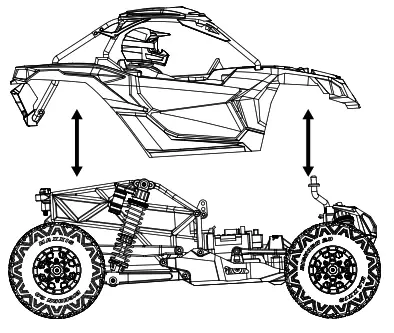
- Install the body and body clips.

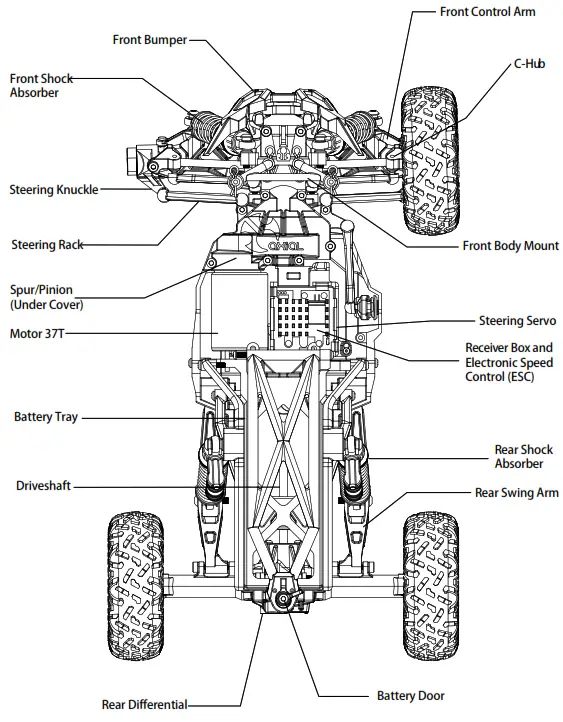
Top View Parts
Getting-Started Checklist
The following checklist is a guide for getting your vehicle running for the first time.
 |  |  |
| Read all warning and safety information in this manual. | Familiarize yourself with the vehicle and its components. | Before vehicle operation, check that all nuts and screws on moving parts are securely tightened. |
 |  |  |
| Charge the battery pack. (Page 14) | Install 4x AA batteries into the Transmitter. (PAGE 18) | Install the battery pack into the vehicle. (Page 14) |
 |  |  |
| Turn on the Transmitter first, then plug in the battery (power ESC) (Page 14) | Check to make sure steering and throttle operation work correctly. (Page 17) | Range check the radio system. (Page 17) |
 |  | 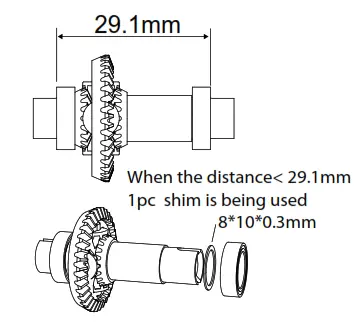 |
| Drive the vehicle, challenge yourself and have fun. | Perform any maintenance as needed. | Note 1pc shim is being used. |
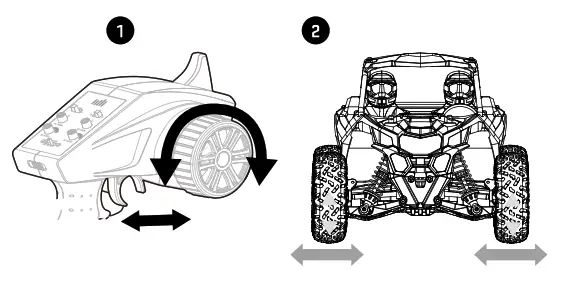
Range-Checking Your Radio System
The radio system should be checked before operating the vehicle to ensure it’s operating properly and has adequate range.
- Turn on the transmitter first and then the vehicle.
- Have a friend hold the vehicle while keeping hands and loose clothing away from moving parts.
- Walk away until you are at the farthest distance you plan to operate the vehicle.
- Steer the vehicle back and forth and throttle both forward and reverse, making sure there is no erratic behavior.
- If any erratic behavior is exhibited, do not operate the vehicle. Call customer service for further assistance.
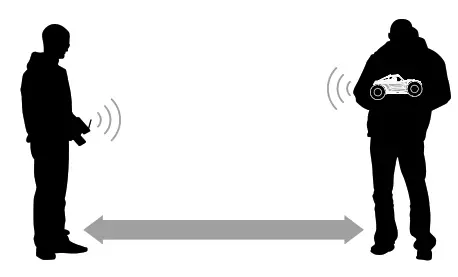
 RANGE-CHECKING FOR DISTANCE
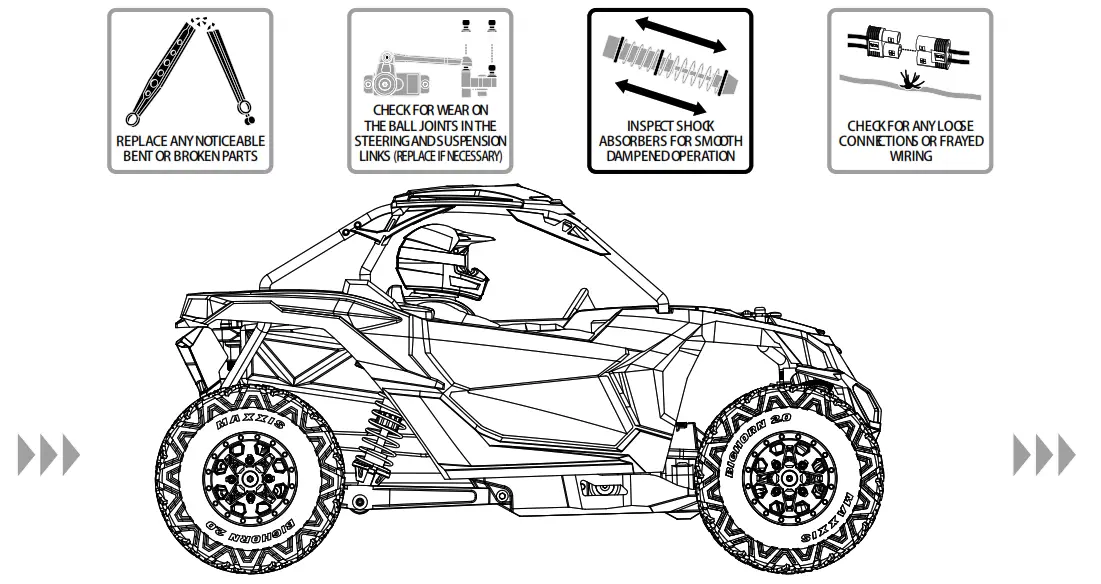
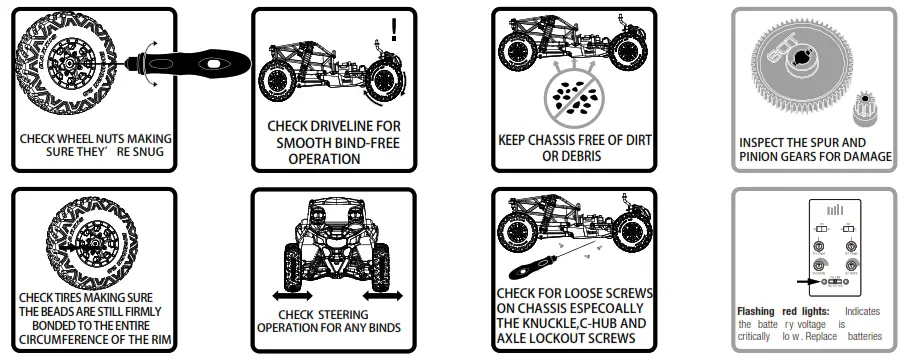
Maintaining Your Vehicle
Just like a full-size car or truck, your RC vehicle must undergo periodic maintenance in order to ensure peak running performance. Preventative maintenance will also help avoid needless breakages, which could result in costly repairs. Below are some suggestions to properly maintain your vehicle.
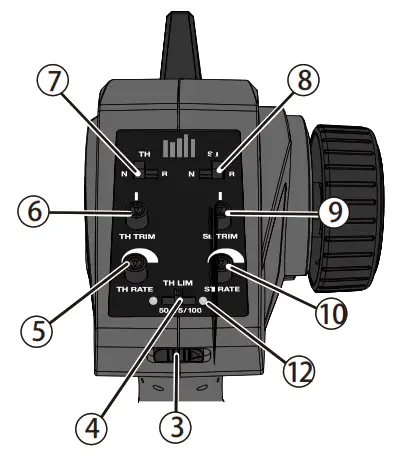
TRANSMITTER CONTROLS
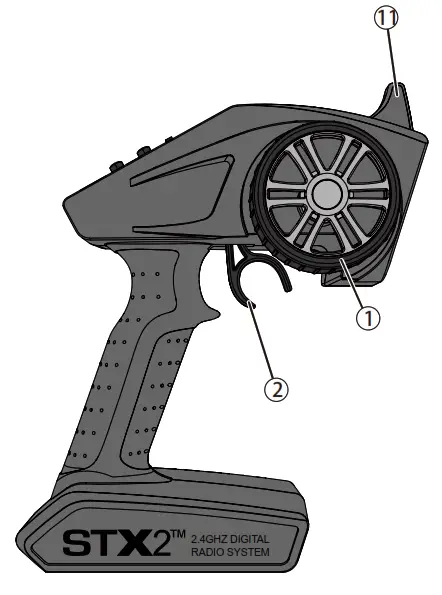
- Steering Wheel
- Throttle Trigger
Controls direction (left/right) of the model
Controls speed and direction(forward/brake/reverse) of the model - The ON/OFF Switch Turns the power for the transmitter
- The throttle Limiting Switch Adjusts the throttle limit from 50%, 75%, and 100%
- TH Rate Adjusts the endpoint of the throttle
- TH Trim Adjusts the throttle neutral point
- TH REV Reverses the function of the speed control when pulled back or pushed forward
- ST REV Reverses the function of the steering When the wheel is turned left or right
- ST Trim Adjusts the steering center point
- ST Rate Adjusts the endpoint of the steering
- The antenna transmits the signal to the model
- Indicator Lights
- Solid red lights—indicates radio connectivity and adequate battery power
- Flashing red lights—indicates the battery voltage is critically low. Replace batteries
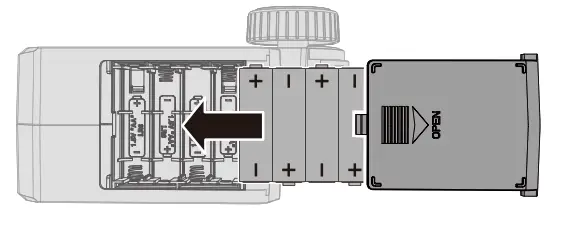
INSTALLING TRANSMITTER BATTERIES
This transmitter requires 4 AA batteries.
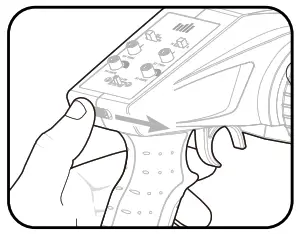
- Remove the battery cover from the transmitter.
- Install the batteries as shown.
- Install the battery cover.
![]() CAUTION: If using rechargeable batteries, charge only rechargeable batteries. Charging non-rechargeable batteries may cause the batteries to burst, resulting in injury to persons and/or damage to property.
CAUTION: If using rechargeable batteries, charge only rechargeable batteries. Charging non-rechargeable batteries may cause the batteries to burst, resulting in injury to persons and/or damage to property.![]() CAUTION: Risk of explosion if the battery is replaced by an incorrect type. Dispose of used batteries according to national regulations.
CAUTION: Risk of explosion if the battery is replaced by an incorrect type. Dispose of used batteries according to national regulations.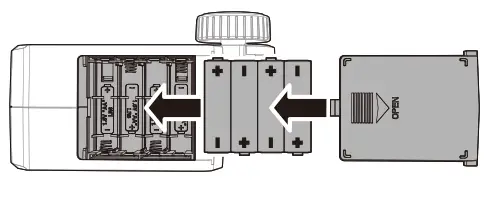
BINDING
Binding is the process of programming the receiver to recognize the GUID (Globally Unique Identifier) code of a single specific transmitter.
- Power of the ESC/Receiver and transmitter.
- Connect a fully charged battery to the ESC/Receiver.
- Power on the ESC/Receiver. It will beep once and the LED will flash rapidly, indicating it is in bind mode.
- To put the STX2 transmitter into bind mode, hold the steering wheel fully to the right while powering on the transmitter. Release the steering wheel after 2 seconds.
- The LED on the ESC/Receiver will go solid and the ESC/Receiver will make a rising tone, indicating the bind is successful. You must rebind when binding the receiver to a different transmitter
NOTICE: Do not attempt to bind the transmitter and receiver if there are other compatible transmitters in bind mode within 400 feet. Doing so may result in unexpected binding.
Water-Resistant Component
Your new Horizon Hobby SRX210 Receiver has a special water-resistant coating on the electronics to ensure reliable performance in higher-than-average moisture conditions this conformal coating can offer mild protection from light drops of water.
- DO NOT submerge this product under water for any period of time If it is submerged, it may result in damage or loss of function.
- DO NOT pour water onto or allow excess water to come in direct contact with the product.
- DO NOT operate this product in heavy rain or snow.
- DO NOT expose this product to salt water (ocean water or water on salt-covered roads), contaminated or polluted water. In case of excess exposure to water, or debris immediately wipe down the SRX200 with a soft cloth and allow it to fully dry before the next use.
NOTICE: Never use a pressure washer to clean your vehicle.
NOTICE: Make sure the other components in your vehicle are waterproof or water-resistant before driving in wet conditions.
CHANGING THE THROTTLE LIMIT
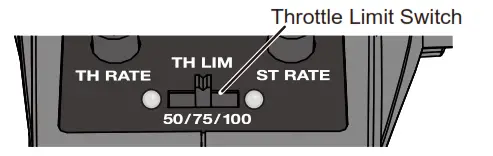
Beginner Mode
Throttle Limiting Switch: 50%
- Best for learning the basic functions of left, right, stop, brake and reverse
- For use in smaller areas
- Longest battery life
Best Overall Performance (Default)
Throttle Limiting Switch: 75%
Great top speed and acceleration
Easier to accelerate in the desired direction, especially on loose surfaces
when compared to the Maximum Speed setup
Run time is greatly increased over Maximum Speed setup with minimal impact to a top speed
Maximum Speed
Throttle Limiting Switch: 100%
- More capable of popping and holding wheelies
- Higher top speeds and maximum acceleration
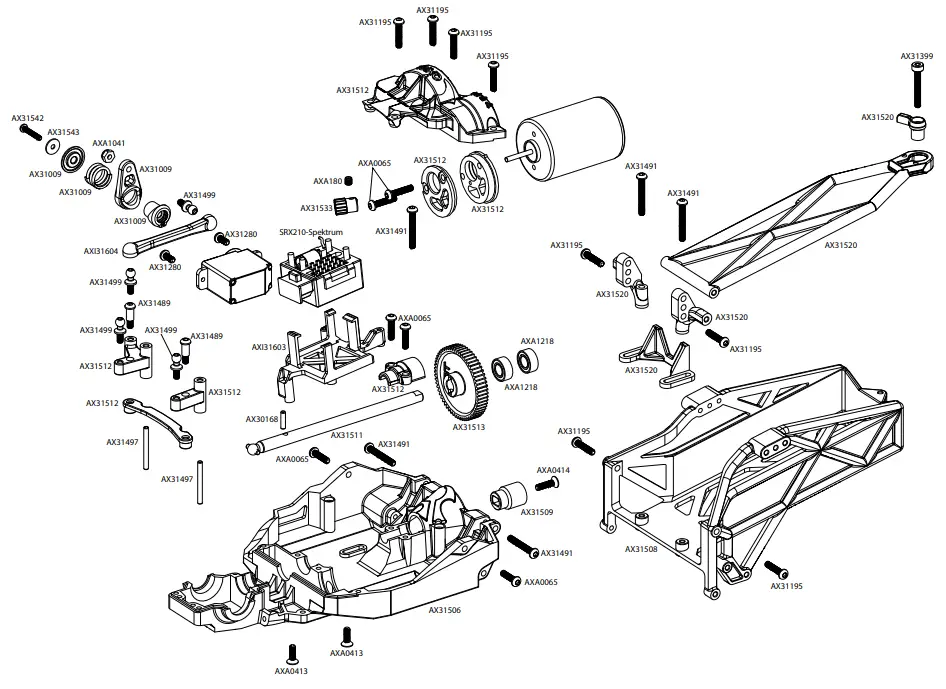
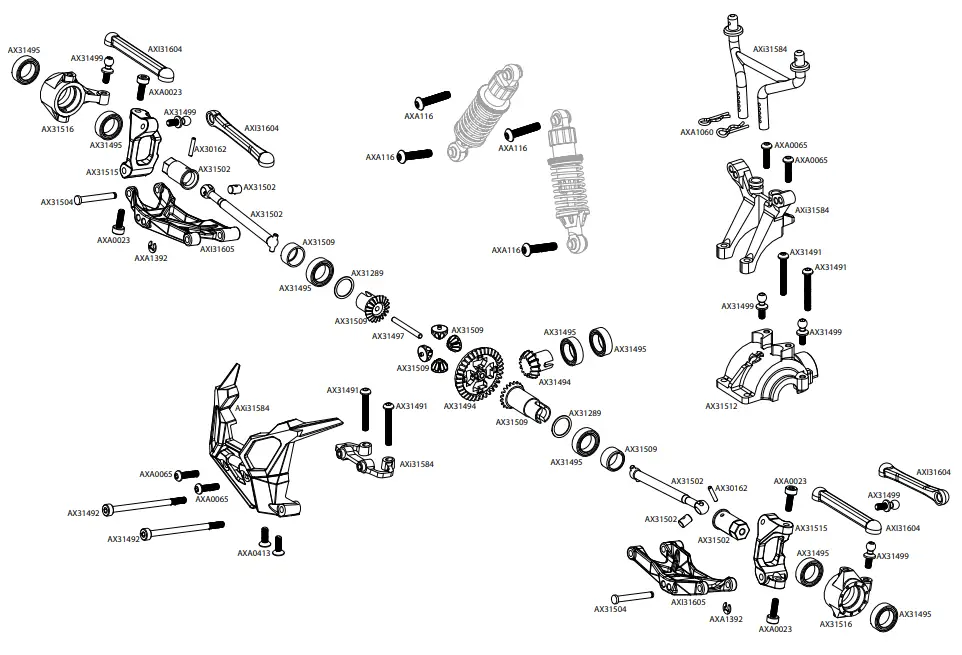
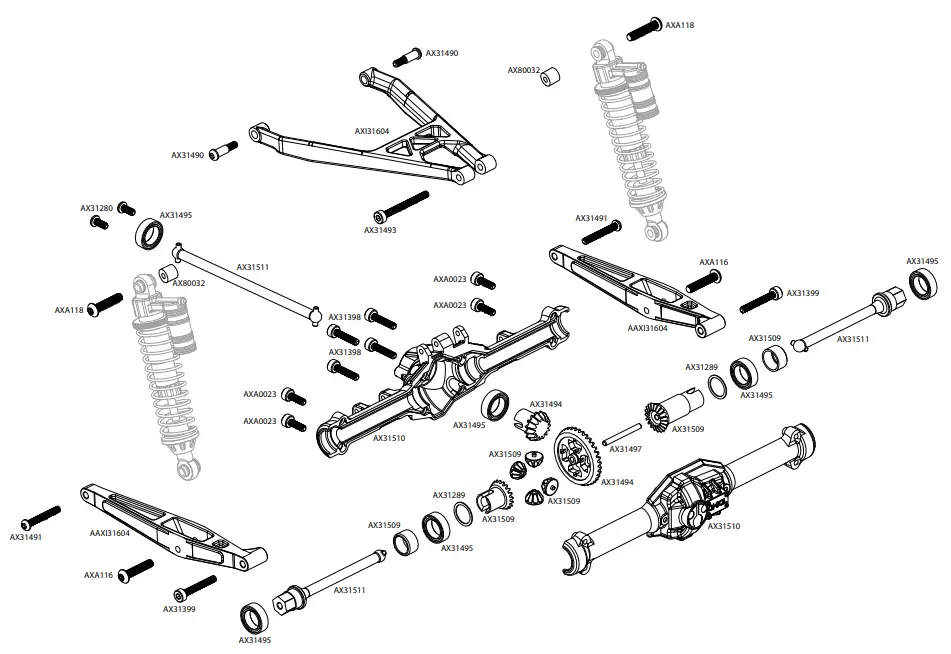
parts Reference
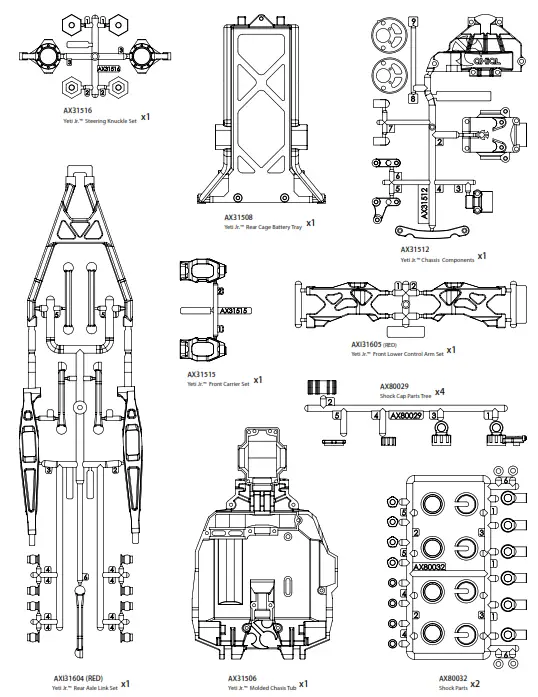
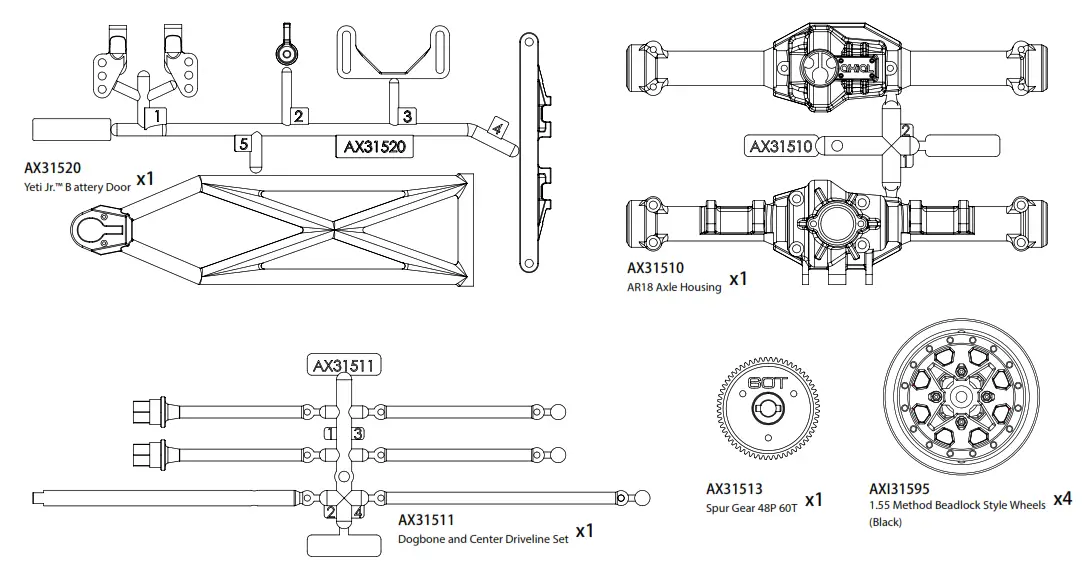
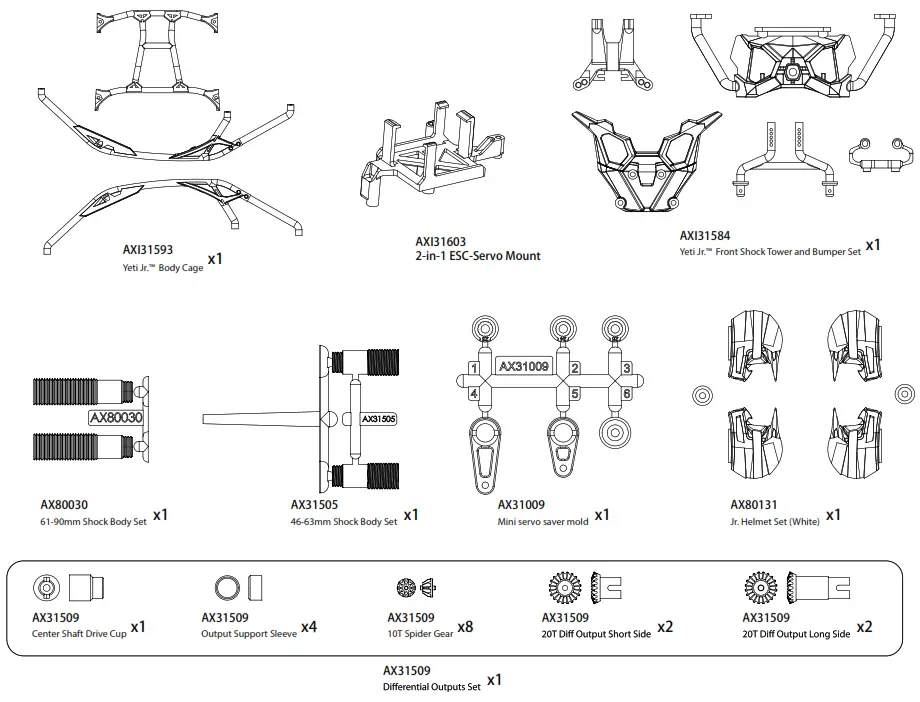
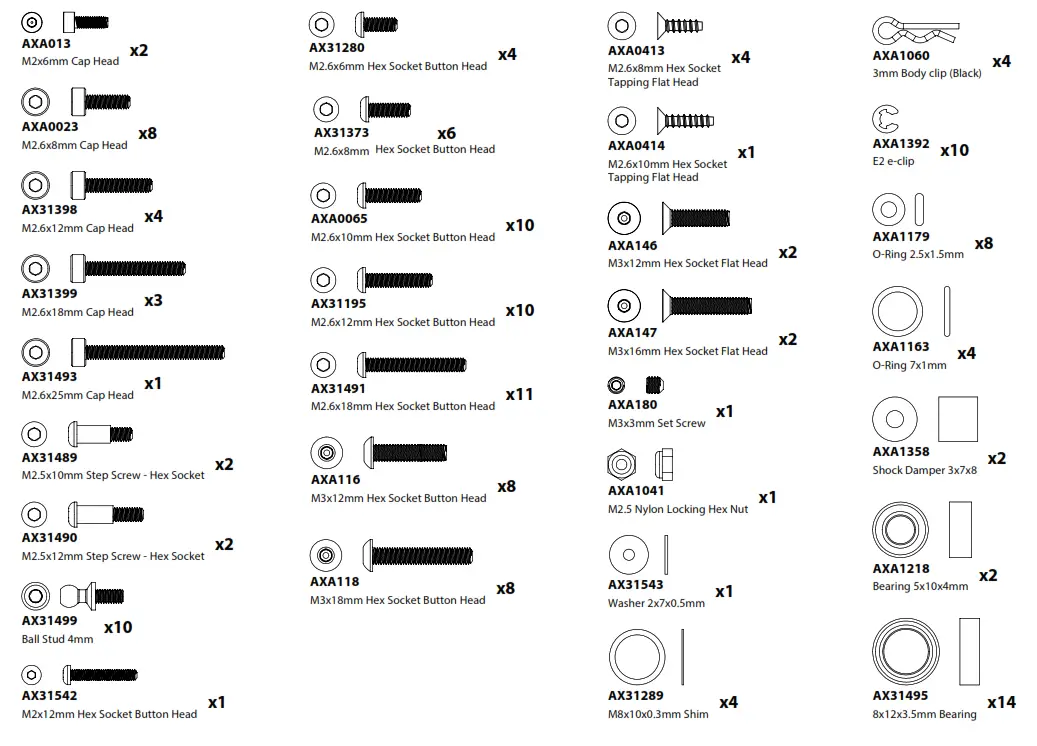
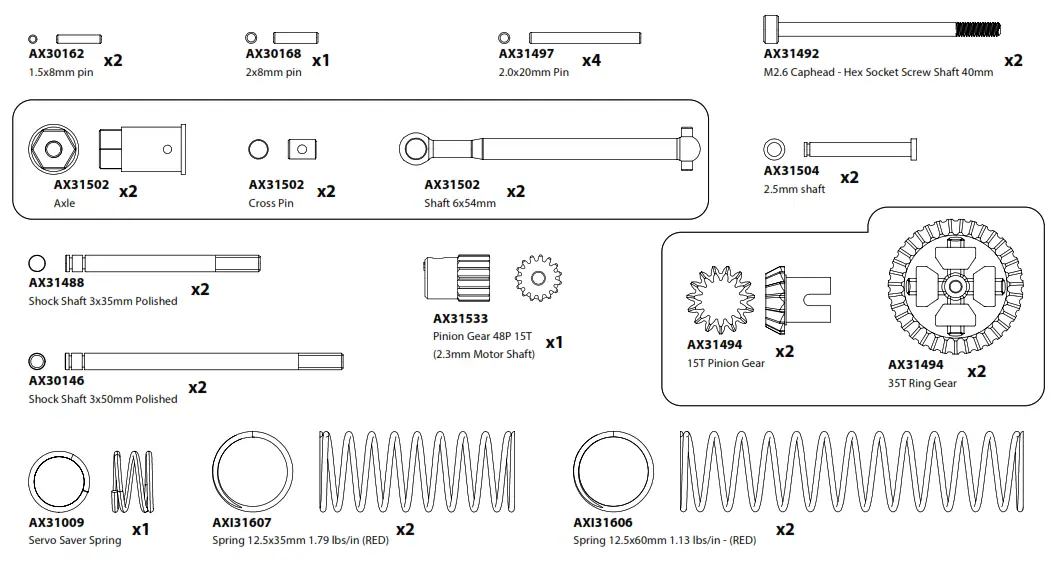
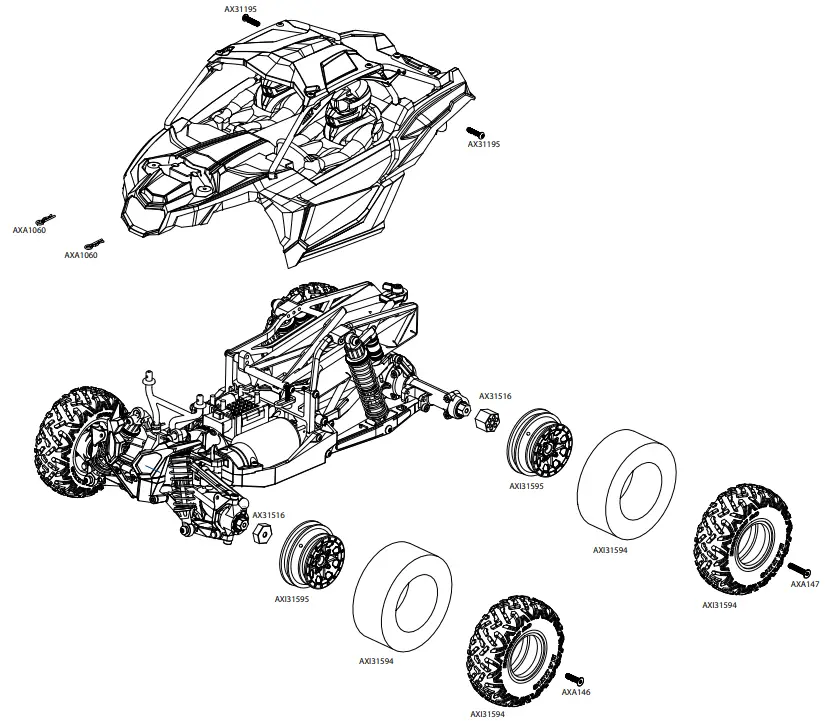
Exploded view
Chassis and Transmission
Front Axle
Rear Axle
Body & Shock Assembly
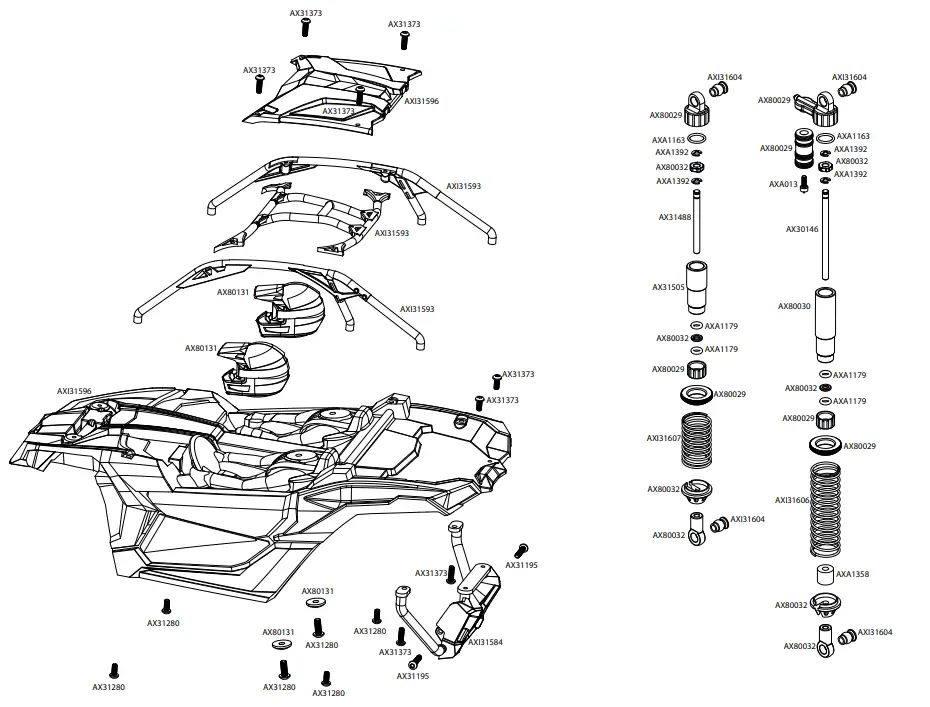
Body & Wheel Assembly
parts list
| part# | description |
| AX30146 | Shock Shaft 3×50 (2pcs) |
| AX30162 | Pin 1.5x8mm (6pcs.) |
| AX30168 | Pin 2x8mm (6pcs.) |
| AX31009 | 2-Speed Hi/Lo Servo Saver Set |
| AX31195 | M2.6x12mm Hex Socket Button Head (Black) (10pcs) |
| AX31280 | M2.6x6mm Hex Socket Button Head (Black) (10pcs) |
| AX31289 | Shim 10x8x0.3mm (6pcs) |
| AX31373 | M2.6x8mm Hex Socket Button Head (Black) (10pcs) |
| AX31398 | M2.6x12mm Cap Head (Black) (10pcs) |
| AX31399 | M2.6x18mm Cap Head (Black) (10pcs) |
| AX31488 | Shock Shaft 3x35mm (2pcs) |
| AX31489 | M2.5x6x10mm Hex Socket Button Head Shoulder Screw (Black) (6pcs) |
| AX31490 | M2.5x6x12mm Hex Socket Button Head Shoulder Screw (Black) (6pcs) |
| AX31491 | M2.6x18mm Hex Socket Button Head (Black) (10pcs) |
| AX31492 | M2.6x40mm Cap Head (Black) (6pcs) |
| AX31493 | M2.6x25mm Cap Head (Black) (6pcs) |
| AX31494 | Bevel Gear Set – 35/15T |
| AX31495 | Bearing 8x12x3.5mm (2pcs) |
| AX31533 | Pinion Gear 48P 15T (2.3 Motor Shaft) |
| AX31497 | Pin 2x20mm (6pcs) |
| AX31499 | Ball Stud 4mm M2.6x5mm (4pcs) |
| AX31502 | Universal Joint Axle Set 48mm (2pcs) |
| AX31504 | Hinge Pin 2.5x19mm (2pcs) |
| AX31505 | 46-63mm Shock Body Set |
| AX31506 | Yeti Jr.™ Molded Chassis Tub |
| AX31508 | Yeti Jr.™ Rear Cage Battery Tray |
| AX31509 | Differential Outputs Set |
| AX31510 | AR18 Axle Housing |
| AX31511 | Dogbone and Center Driveline Set |
| AX31512 | Yeti Jr.™ Chassis Components |
| AX31513 | Spur Gear 48P 60T |
| AX31515 | Yeti Jr.™ Front Carrier Set |
| AX31516 | Yeti Jr.™ Steering Knuckle Set |
| AX31520 | Yeti Jr.™ Battery Door |
| AX31538 | M2.6x10mm Hex Socket Button Head (Black) (10pcs) |
| AX31542 | M2x12mm Hex Socket Button Head (Black) (10pcs) |
| AX31543 | Washer 2x7x0.5mm (10pcs) |
| AX80029 | Shock Cap Parts Tree |
| AX80030 | 61-90 Schock Body Set |
| AX80032 | Shock Parts |
| AX80131 | Helmet Set |
| AXA0023 | M2.6x8mm Cap Head (Black) (10pcs) |
| AXA013 | M2x6 mm Cap Head (Black) (10pcs) |
| AXA0413 | M2.6x8mm Hex Socket Tapping Flat Head (Black) (10pcs) |
| AXA0414 | M2.6x10mm Hex Socket Tapping Flat Head (Black) (10pcs) |
| AXA0467 | M3x16mm Hex Socket Tapping Flat Head (Black) (10pcs) |
| AXA0467 | M3x16mm Hex Socket Tapping Flat Head (Black) (10pcs) |
| AXA1041 | M2.5 Nylon Locking Hex Nut – Silver (10pcs) |
| AXA1059 | 6mm Body clip (Black) (10pcs) |
| AXA114 | M3x8mm Hex Socket Button Head (Black) (10pcs) |
| AXA1163 | O-Ring 7x1mm (10pcs) |
| AXA116 | M3x12mm Hex Socket Button Head (Black) (10pcs) |
| AXA118 | M3x18mm Hex Socket Button Head (Black) (10pcs) |
| AXA1179 | O-Ring 2.5×1.5mm (10pcs) |
| AXA1218 | Bearing 5x10x4mm (2pcs) |
| AXA1358 | Shock Damper 3x7x8 (10pcs) |
| AXA1392 | E2 e-clip (10pcs) |
| AXA146 | M3x12mm Hex Socket Flat Head – Black (10pcs) |
| AXA147 | M3x16mm Hex Socket Flat Head – Black (10pcs) |
| AXA180 | M3x3mm Set Screw (Black) (10pcs) |
| AXI31584 | Yeti Jr.™ Can-Am X3 Bumper and Body Mount |
| AXI31593 | Yeti Jr.™ Can-Am X3 Cage (Red) |
| AXI31594 | 1.2 1.55 Maxxis Bighorn 2.0 – S30 Compound (2pcs) |
| AXI31595 | 1.2 1.55 Can-Am Maverick X3 Wheel (Black) (2pcs) |
| AXI31596 | Yeti Jr.™ Can-Am Maverick X3 Body (Clear) |
| AXI31603 | 2-in-1 ESC-Servo Mount |
| AXI31604 | Yeti Jr.™ Rear Axle Link Set (Red) |
| AXI31605 | Yeti Jr.™ Front Lower Control Arm Set (Red) |
| AXI31606 | Spring 12.5x60mm 1.13lbs -White (2) (Red Springs) |
| AXI31607 | Spring 12.5x35mm 1.79lbs (2) (Red Springs) |
| DYNS1208 | Tazer 380 motor, 37T |
NOTES………………………………..
![]() EXPLORE
EXPLORE

![]()


Facebook.corn/axialinc
instagram.com/axialracing
twitter.com/axialrc
youtube.conVaxialvideos
Flickr.corn/axial
wwvv.axialracing.com
Tne 8Rn. Gen.Am. Flora ad Wrack treOmana, Mang *eons we the
kleauel [many a flonbanen Flonagna Precut Inc an” as ulna inclor
Horizon Hobby, LLC 2904 Research Road Champaign, IL 61822, USA
©2018 Horizon Hobby, LLC.
Horizon Hobby GmbH
Hanekampring 9
D 22885 SarsbUttel, Germany
References
 Axial RC Adventuring | Remote Control Cars, Trucks, and Buggies Plus RC Parts | Axial Adventure
-
Ferngesteuerte Flugmodelle, Autos, Trucks, Hubschrauber, Boote und Fernsteuerungen | Horizon Hobby
 Product Service Center - Request Form
-
RC Airplanes and Helicopters, RC Cars and Trucks, RC Boats, RC Radios | Horizon Hobby
-
RC Airplanes and Helicopters, RC Cars and Trucks, RC Boats, RC Radios | Horizon Hobby
-
RC Airplanes and Helicopters, RC Cars and Trucks, RC Boats, RC Radios | Horizon Hobby
-
Horizon Hobby Service Center
-
Horizon Hobby Compliance Information


