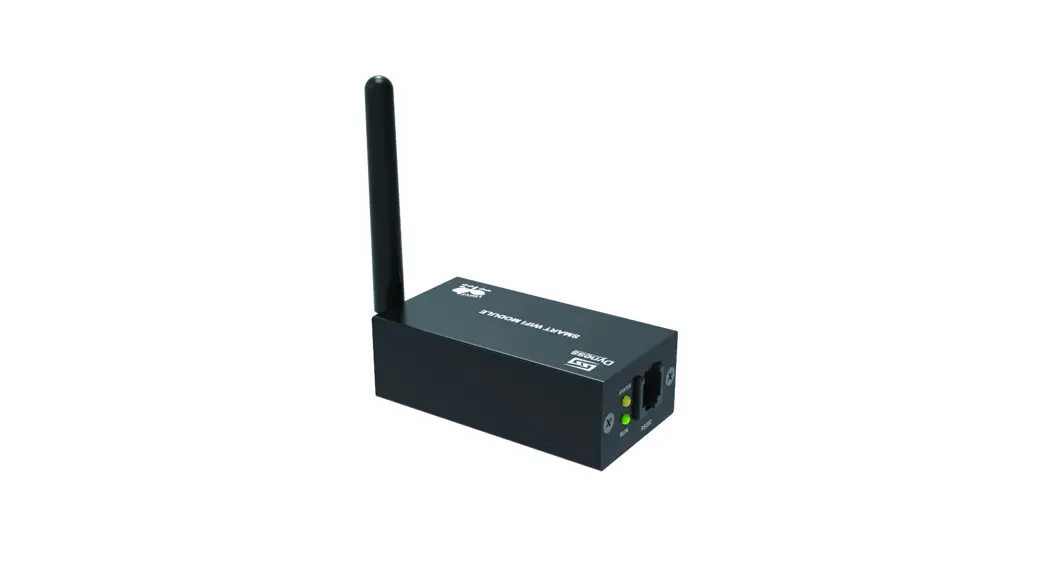
![]() WIFI-M01 For HV system
WIFI-M01 For HV system
WIFI-M01 SYSTEM
USER MANUAL
File version-20230321-V2-EN information might be subject to change without notice during product improving.
Statement of Law
Copyright of this document belongs to Jiangsu Daqing New Energy Technology (Taizhou) Co., Ltd.No part of this documentation maybe excerpted, reproduced, translated, annotated or duplicated in any form or by any means without the prior written permission of Jiangsu Daqing New Energy Technology (Taizhou) Co., Ltd. Infringement will be prosecuted.
This product complies with the design requirements of environmental protection and personal safety. The storage, use and disposal of the products shall be carried out in accordance with the product manual, relevant contract or relevant laws and regulations.
Customer can check the related information on the website of Jiangsu Daqing New Energy Technology (Taizhou) Co., Ltd when the product or technology is updated. Web URL: http://www.dyness-tech.com
Please note that the product can be modified without prior notice.
Revision History
| Revision NO. | Revision Date | Revision Reason |
| 1 | 2023.3.01 | First Published |
Safety Precautions
![]() WARNING
WARNING
- Please do not put the system into water or fire, in case of explosion or any other situation that might endanger your life.
- Please connect wires properly while installation.
- Please do not stab, hit, trample or strike the system in any other way.
- Please use dry powder extinguisher to put out the flame when encountering a fire hazard, liquid extinguisher could result in the risk of secondary disaster.
- For your safety, please do not arbitrarily dismantle any component in any circumstances unless a specialist or an authorized one from our company, device breakdown due to improper operation will not be covered under warranty.
![]() CAUTION
CAUTION
- We have strict inspection to ensure the quality when products are shipped out, however, please contact us if case bulging or another abnormal phenomenon.
- For your safety, device shall be ground connected properly before normal use.
- To assure the proper use please make sure parameters among the relevant device are compatible.
- Please do not mixed-use batteries from different manufacturers, different types and models, as well as old and new together.
- Ambient and storage method could impact the life span and product reliability, please consider the operation environment abundantly to make sure device works in proper condition.
Preface
Manual description
The Wi-Fi module, also known as the serial wi-fi module, belongs to the Transmission layer of the Internet of Things, and its function is to convert the serial port or TTL level into an embedded module that complies with wi-fi wireless network communication standards. It is equipped with ieEE802.11B.G.N protocol stack and TCP/IP protocol stack. Traditional hardware devices embedded with Wi-Fi modules can directly use Wi-Fi to connect to the Internet, which is an important part of the implementation of wireless smart home, M2M and other Internet of Things applications, and is an important component of intelligent hardware.
Dynes WiFI-M01 system is used together with the battery, and the user can monitor the data through the Dynes Smart App, which is more convenient, efficient and intelligent.
This document describes in detail the basic structure, parameters, installation, and operation of the device.
Introduction
Brief Introduction
WiFi-M01 System is a very convenient product. The addition of WiFi System makes the battery more intelligent. The users can monitor the battery data through Dyness Smart APP anytime and anywhere, which is very convenient.
Product Properties
The WIFI-M01 System’s features as below:
- Built-in low power KM4 MCU, can also be used as application processor
- Frequency 100 MHZ, Operating voltage: 4.5V-5.5V
- Wi-Fi / Bluetooth connectivity
- 802.11B/G/N20,channel [email protected] (CH1-11forUS/CA,CH1-13for EU/CN)
- support Bluetooth 4.2 Low Energy
- +20dBm output power in 802.11b mode
- Smart Config (for Android and IOS devices)
- External IPEX FPC antenna
- CE,FCC certification
Product identity definition
 | Be careful with your actions and be aware of the dangers |
| Read the user manual before using | |
| The WIFI Systems cannot be put into the garbage can and must be professionally recycled | |
| After theWIFI-M01 System life is terminated, the WIFI-M01 System can continue to be used after it recycled by the professional recycling organization and do not discard it at will | |
 | This WIFI Systems product meets European directive requirements |
| This WIFI Systems product meets USA directive requirements |
2 Product Specification
Size and Weight
Table 2-1 WIFI-M01 Spec&Size
| Product | Nominal Voltage | Dimension | Weight | Protection Level |
| WIFI-M01 | DC5V | 75mm*25mm*40mm | 200g | IP20 |
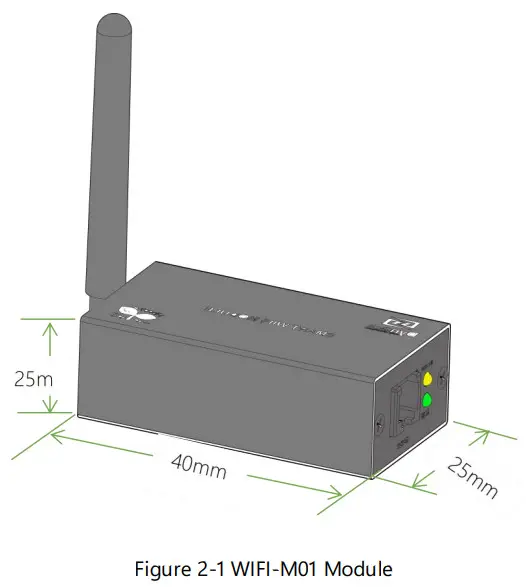
Figure 2-1 WIFI-M01 Module
Performance Parameter
Table 2-2 WIFI-M01 performance parameter
| Nominal Voltage | 5V |
| Operating Voltage Range | 4.5~5.5V |
| Frequency | 100MHZ |
| Connection Type | Wi-Fi/Bluetooth |
| Protocol | 802.11 B/G/N20 |
| Channel | [email protected] (CH1-11 for US/CA, CH1-13 for EU/CN) |
| Output Power | +20dBm |
Interface Definition
WIFI-M01 product panel interface configuration and function.
This section details the interface functions of the front panel of the device.
©Dynes reserves the copyright of this document.
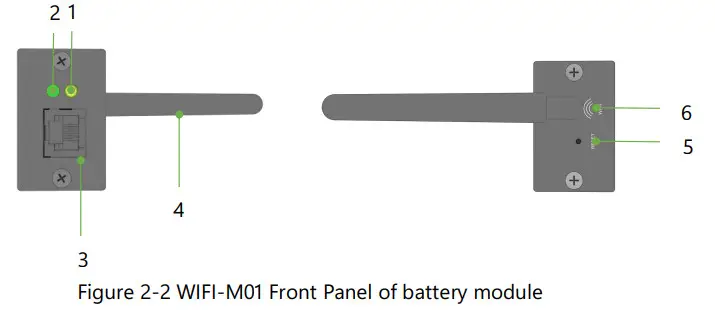
Table 2-3 WIFI-M01 Front Panel of battery module definition
| item | Name | Definition |
| 1 | Power display | Light on means WiFi module works |
| 2 | Distribution network display | If the indicator blinks quickly, the network is ready to be configured. If the indicator blinks slowly, the network is ready to be connected. If the indicator is steady on, the network is configured successfully |
| 3 | RS232 | Communication with the battery’s COM port enables monitoring of battery data and upgrades |
| 4 | WiFi | 2.4g Bluetooth wifi antenna |
| 5 | RESET | Configuration button for network configuration or resetting |
| 6 | Wifi interface | Used to connect wifi antenna rod |
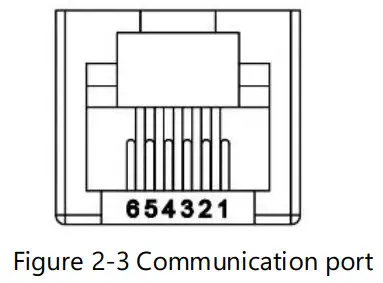
Table 2-4 Pin Definition
| Foot position | Definition |
| PIN1 | 5V |
| PIN2 | GND |
| PIN3 | RXD |
| PIN4 | TXD |
| PIN5 | GND |
| PIN6 | 5V |
Installation and Configuration
Ready for installation
Environmental requirements
- Working temperature:-20°C~+85°C
- Storage temperature:-10°C~+40°C
- Relative humidity:5%~85% RH
- Elevation: no more than 4000m
- Operating environment: Indoor installation, sites avoid the sun and no wind, no conductive dust and corrosive gas.
- And the following conditions are met:Installation location should be away from the sea to avoid brine and high humidity environment;The ground is flat and level;There is no flammable explosive near to the installation places; The optimal ambient temperature is 15~30°C.
- Keep away from dust and messy zones.
Equipment preparation
Equipment that may be used are shown in table 3-1:
Table 3-1
Name
Dynes battery (with WiFi function)
WiFi module network cable (both crystal heads are RJ11(6p6c), wires pin to pin, Dynes supply the cable) mobile phone (the Dynes smart app has been downloaded) WiFi ( 2.4GHz )
Equipment connection
connection preparation
connection preparation
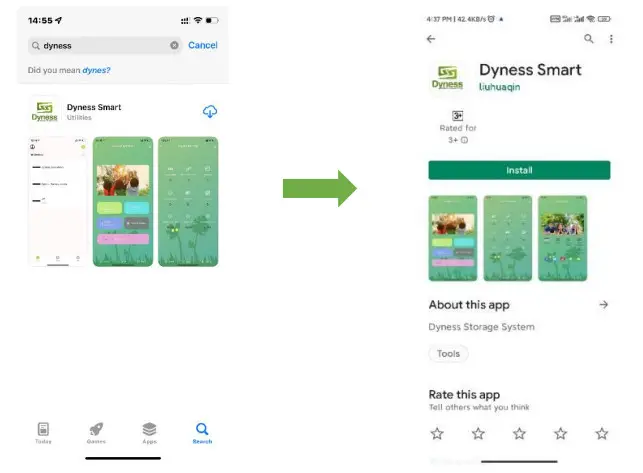
- Download the Dynes Smart App from the App Store or Google Play.

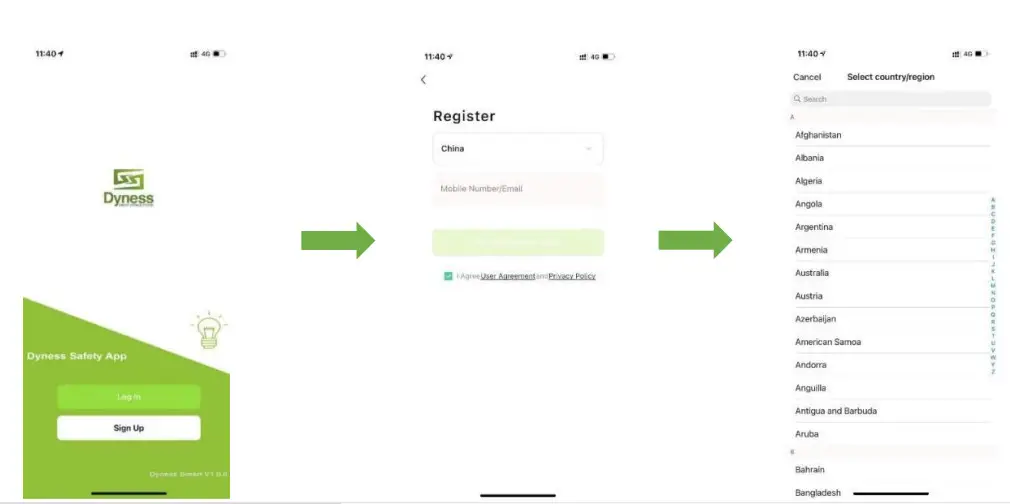
- Register after the APP is installed, click ‘’Sign Up’’, choose ‘’ Local Region’’, Input ‘’Phone number or email address’’, Click ‘’Get Verification Code, nput Verification Code, Registration completed.After registration, use your account and password to Log In.

Steps of connection (AP Mode)
Steps of connection (AP Mode)
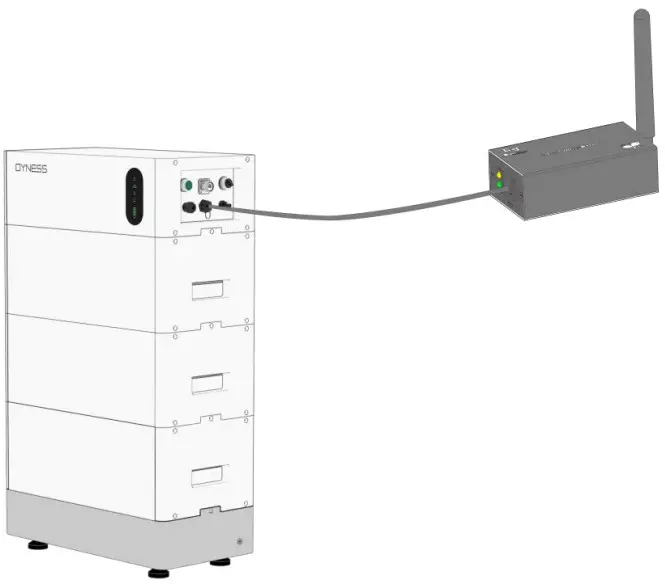
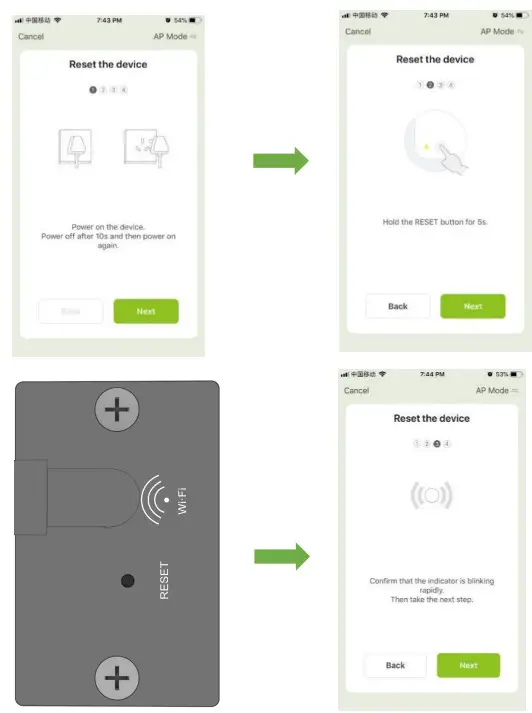
- Connect the WiFi module and battery with the 6p6c network cable. One end of the network cable is connected to the RS232 interface of the battery, and the other end is connected to the RS232 communication port of the WiFi module. Then turn on the battery, and confirm that the yellow LED of the WiFi module is always on.
 2. The mobile phone is connected to the 2.4GHz wireless network ,enter “home page” of the app, then click the” “,
 “Add manually”, “Dynes-HV”.
- Please choose device’s interface of the app in AP Mode, click the RESET Button of the WiFi module once, waiting for the WiFi module green light is blinking rapidly, proceed the next step.
 4. Click the RESET Button of the WiFi module again, waiting for the green light is blinking slowly, click on the “confirm the indicator is blinking slowly” of the APP. Click “Next” to continue…
 5. Enter the WiFi name and password your mobile phone is using, then click “next”. On the page that pops up choose the WiFi which name is SmartLife-XXXX , then click “Go to Connect”.
 6. After connected to the WiFi ” SmartLife-XXXX ” , return to the APP interface and you can see “Adding device…” is displayed. After a while, “Adding device succeeded” is displayed, and the connection is successful.
After the device is added successfully, the following is the operating page,You can user define the device name by click ” ” .
” .

 2. The mobile phone is connected to the 2.4GHz wireless network ,enter “home page” of the app, then click the” “,
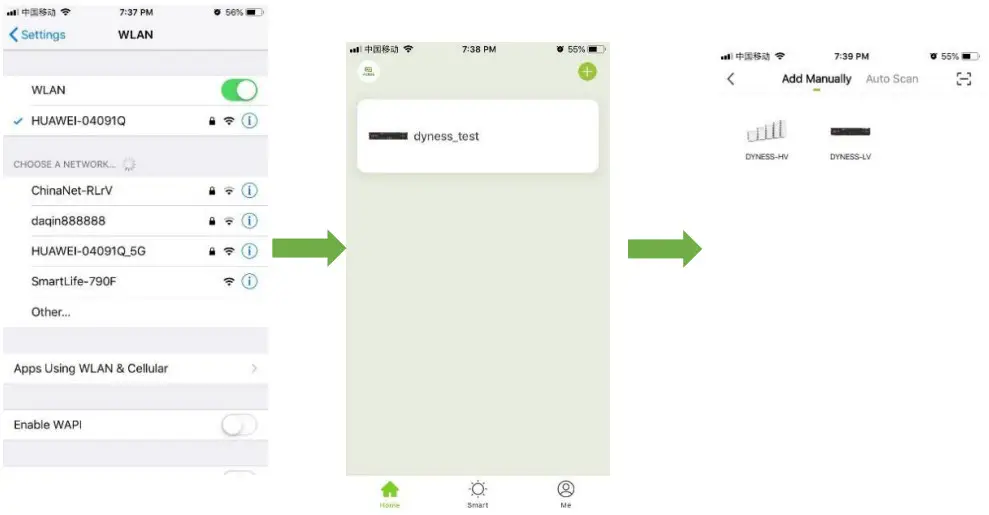
 4. Click the RESET Button of the WiFi module again, waiting for the green light is blinking slowly, click on the “confirm the indicator is blinking slowly” of the APP. Click “Next” to continue…
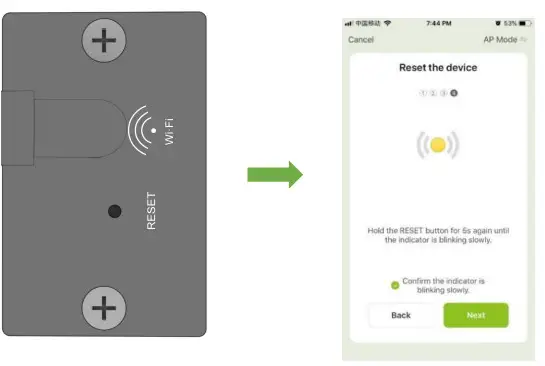 5. Enter the WiFi name and password your mobile phone is using, then click “next”. On the page that pops up choose the WiFi which name is SmartLife-XXXX , then click “Go to Connect”.
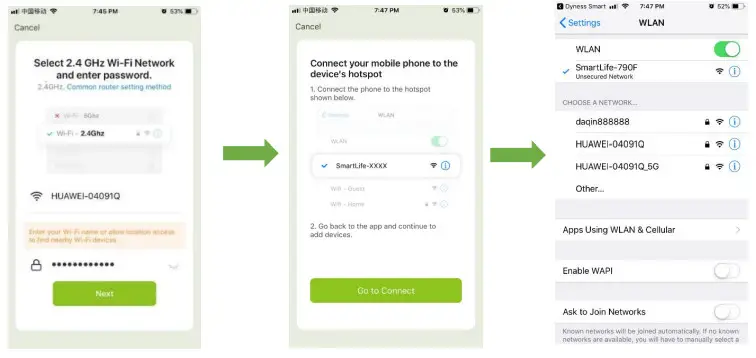 6. After connected to the WiFi ” SmartLife-XXXX ” , return to the APP interface and you can see “Adding device…” is displayed. After a while, “Adding device succeeded” is displayed, and the connection is successful.
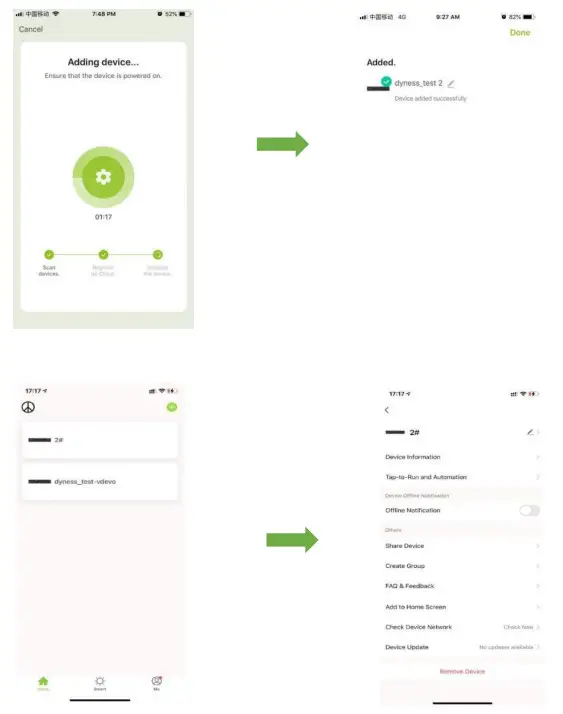

Device Update
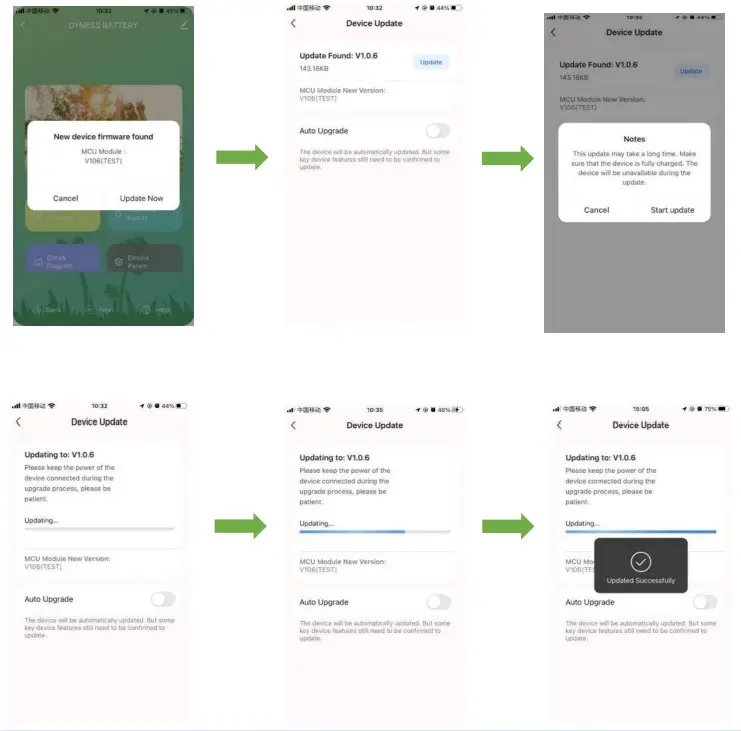
Please contact Dynes engineer before firmware upgrade, Dynes engineer will upload the corresponding files in the background. Then when you open the interface of the mobile app, the window to discover the new device firmware will pop up, click “update”, the “notes” will appear, click “start update” to start the update, and the app will show that the update is in progress. After the update is successful, it will display “Updated successfully”.
Serial Number
The SN code of the WIFI module is shown in the figure below.
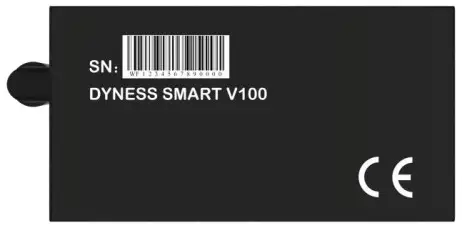 Table 5-1 The SN code of the WIFI module
Troubleshooting
Table 6-1 WIFI-M01 troubleshooting
| Trouble | Indicate | Troubleshooting |
| STATUS LED is dark | WiFi module doesn’t work | Please check the 6p6c network cable and RS232 port |
| The network connection has timed out | the network isn’t configured successfully | Make sure the device is reset, the light is blinking slowly, Whether to connect to a hotspot 3. Verify that the WIFI password is correct |
If you have any technical help or question, please contact DYNESS in time.
Power You Day and Night
 |  |
| https://www.dyness-tech.com/ | https://www.dyness-tech.com/download |
![]() Address:
Address:
No. 511 Chanchiang West Road, Sansui Street, Jiangnan District,
Taizhou City
Email: [email protected]
Tel: +86 400 666 0655
Web: www.dyness-tech.com


