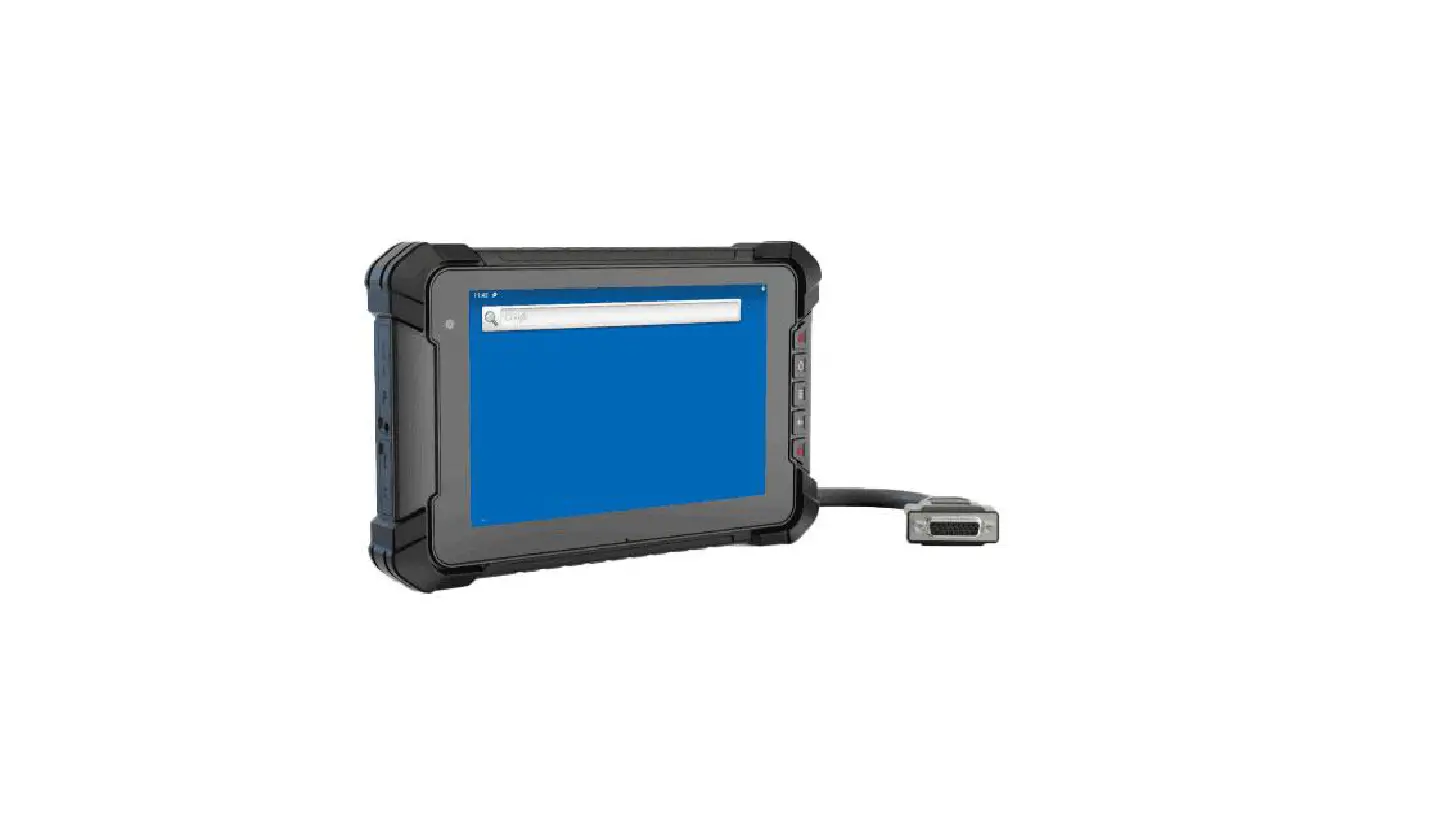
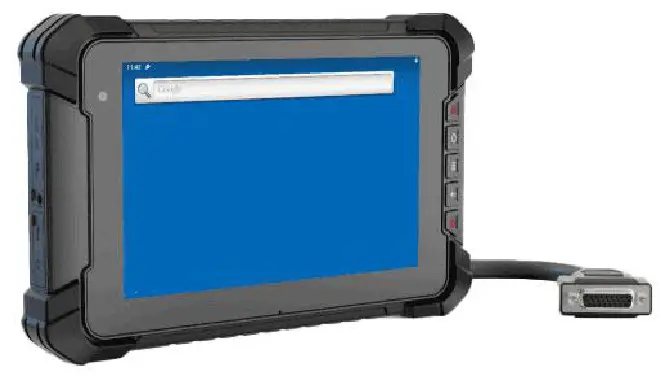
LILLIPUT 7 Inch Android Tablet
Important Safety Instructions
Read these safety instructions carefully:
- It should avoid the humidity and extreme temperature when being used.
- Avoid prolonged exposure of the unit to direct sunlight or strong ultraviolet light.
- Do not drop the unit or let it be in any place with severe shock / vibration.
- Please avoid the collision as the LCD screen is very easy to be scratched. Do not use any sharp object to touch the screen.
- Please turn off the power and unplug the power cable before cleaning the device, then wipe it with a moist and soft cloth.
- Never attempt to disassemble or repair the machine, otherwise the unit may be damaged.
- Do not place your unit or accessories together with other flammable liquids, gases, or other explosive materials, to avoid danger.
- Please unplug the power plug and remove the built-in battery If the device won’t be used for a long time, or under thunder and lightning.
- It is suggested that the built-in battery will be charged once every three months to keep the battery power more than 70%. The battery will be charged and discharged with the three complete cycles to maximize battery performance. (A cycle of a complete charge and discharge means to run out of the battery power and to recharge the battery to full.)
Product Description
Brief Introduction
- 7″ 16:10 capacitive touch wide screen, 1280×800 high resolution, with rich color;
- Comply with IP67 rating Waterproof and Dustproof Standard;
- Android 9.0 operating system;
- Nano SD (TF) card and SIM card storage, reliable data reading and convenient daily expansion;
- Speaker, Microphone;
- RS232×4/RS232×3+RS485×1/RS232×3+RS422×1(Optional)
Optional Functions
- GPS (external / built-in)
- Wi-Fi 802.11 b/g/n/ac (built-in)
- 4G (built-in)
- Bluetooth 5.0 (built-in)
- CAN BUS×1(default one CAN as standard, the another one as optional)
- 3500mAh Li-ion battery (built-in)
- NFC
- Front Camera
Basic Parameters
| Specifications | |
| CPU | NXP i.MX 8M Mini, ARM® Cortex®-A53 Quad-Core 1.6GHz |
| GPU | 3D GPU (1xshader, Open GL®ES 2.0) 2D GPU |
| OS | Android 9.0 |
| RAM+ROM | 2GB LPDDR4+16GB Flash |
| 4GB LPDDR4+64GB Flash (optional) | |
| Video Decode | 1080p60 (H.265, VP9, H.264, VP8) |
| Video Encode | 1080p60 (H.264) |
| Sensors | Light Sensor and Proximity Sensor, Gyroscope, Compass, Gravity, Accelerometer |
| Display | |
| LCD | 7 inch IPS, 1280×800 resolution, 800 nit |
| Touch | Capacitive touch screen |
| Interface | |
| LAN | 1000M |
| GPIO | ×8 (The software is free to define inputs or outputs) |
| CAN | ×1(Default one CAN as standard, the another one as optional) |
|
COM | RS232×4 |
| RS232×3+RS485×1/RS232×3+RS422×1 (optional) | |
| The optional Bluetooth will occupy COM0; optional external GPS will occupy COM2; Optional built-in GPS doesn’t occupy COM2. | |
| Nano SIM Card Slot | ×1 |
| Nano SD Card Slot | ×1 |
| USB | USB Type-C OTG x 1, USB 2.0 Host x1 |
| Earphone Jack | 3.5mm |
| Microphone | Built-in |
| Optional Functions | |
| Cellular Network | 3G / 4G |
| WIFI | IEEE 802.11 a/b/g/n/ac; |
| 2.4GHz / 5GHz | |
| Support MCS 0-7 for HT20 and HT40 | |
| BT | Version:5.0 Standard:GFSK、DQPSK、8DPSK、LE(1Mbps)(2LE2Mbps) Frequency Band:2402~2480 MHZ |
|
GNSS | Installation Method:Built-in or external ◆ untethered dead reckoning (UDR) ◆ Max navigation update rate 30HZ GPS L1C/A, GLONASS L1OF, BeiDou B1I |
| NFC | ×1 |
| ACC | ×1 |
| Camera | 5.0MP (Front camera for optional) |
| WWAN | |
| North America | LTE-FDD:B2/B4/B5/B12/B13/B14/B66 |
| WCDMA:B2/B4/B5 | |
| GNSS:GPS/GLONASS/BeiDou (Compass)/Galileo/QZSS (Optional) | |
|
EMEA/South Thailand/India | LTE-FDD:B1/B3/B5/B7/B8/B20 |
| LTE-TDD:B38/B40/B41 | |
| WCDMA:B1/B5/B8 | |
| GSM/EDGE:B3/B8 | |
| GNSS:GPS/GLONASS/BeiDou (Compass)/ Galileo/QZSS (Optional) | |
| Latin America /Australia/New Zealand | LTE-FDD:B1/B2①/B3/B4/B5/B7/B8/B28 |
| LTE-TDD:B40 | |
| WCDMA:B1/B2/B4/B5/B8 | |
| GSM/EDGE:B2/B3/B5/B8 | |
| GNSS:GPS/GLONASS/BeiDou (Compass)/Galileo/QZSS (Optional) | |
|
Janpan | LTE-FDD: B1/B3/B8/B18/B19/B26 |
| LTE-TDD:B41 | |
| WCDMA:B1/B6/B8/B19 | |
| GNSS:GPS/GLONASS/BeiDou (Compass)/ Galileo/QZSS (Optional) | |
| Power | |
| Power Supply | DC 9-36V (DC 11-36V with built-in battery) |
| Power Consumption | ≤10W (≤18W with built-in battery) |
| Battery(optional) | Built-in 3.7V 3500mAh |
| Others | |
| Speaker | ×1 |
| Dimension | 221×139.7×29.5mm |
| Weight | 910g |
|
Environment | Dust resistance test: IP6x Water resistance test: IPx7 |
| Without battery operating temperature: -20℃~65℃(-4℉~149℉) | |
| 0℃~50℃ (32℉~122℉)(Built-in battery) | |
| Storage temperature:-20℃~70℃(-4℉~158℉) | |
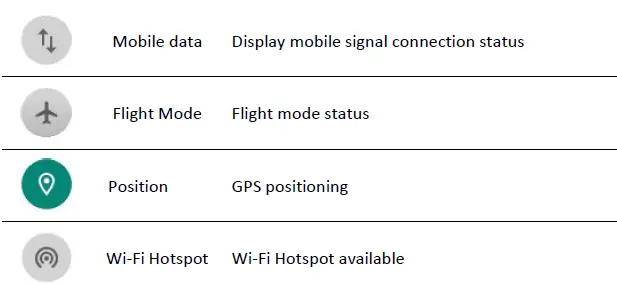
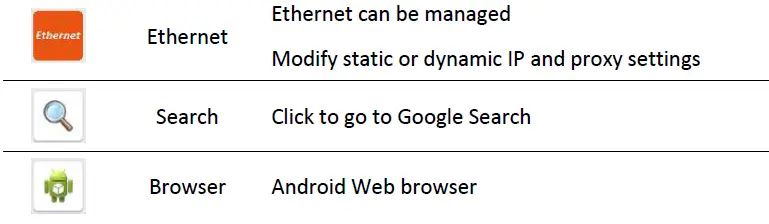
Icon Bar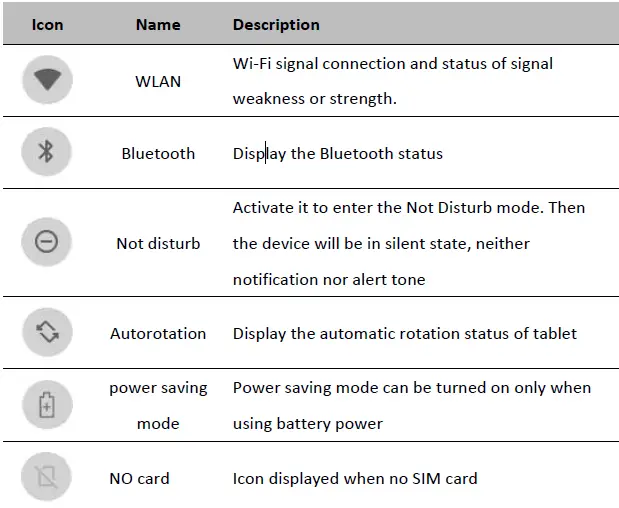
Applied
Swipe up the“ ” icon in the lower left corner of the screen to see all the apps on the device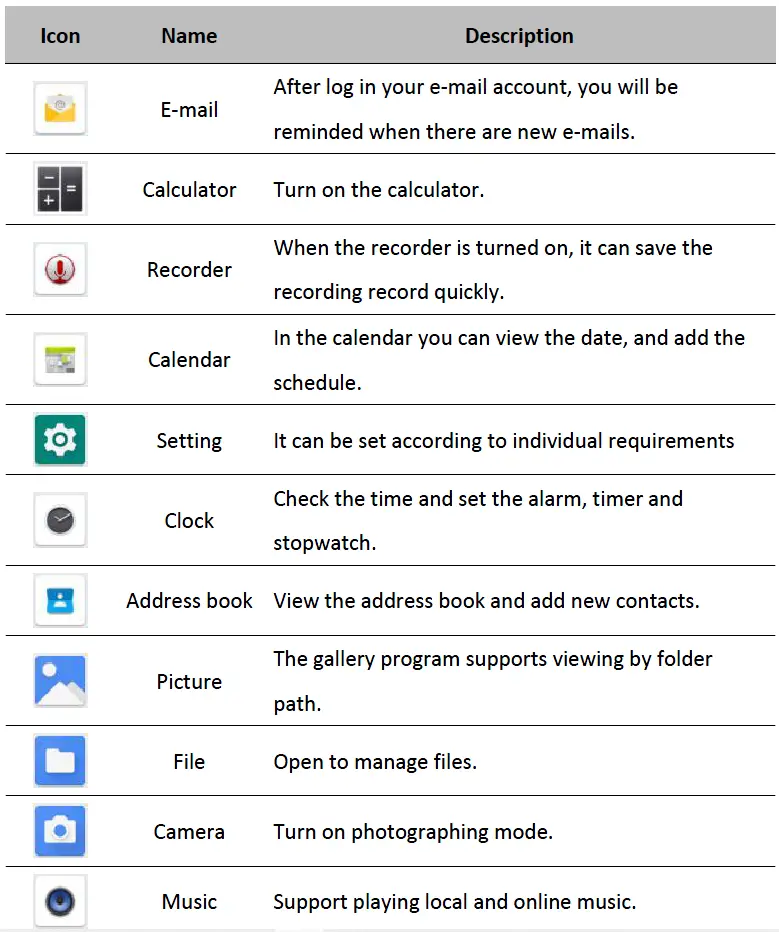
Structure Explanation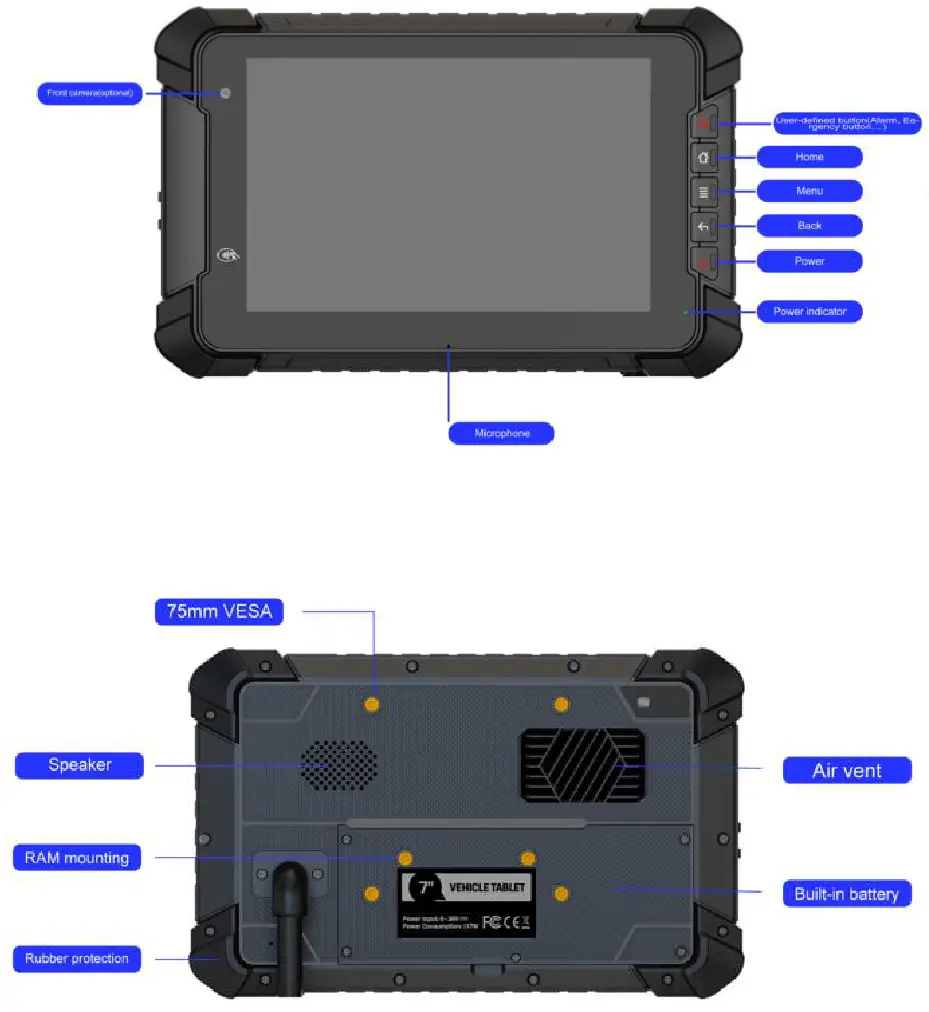

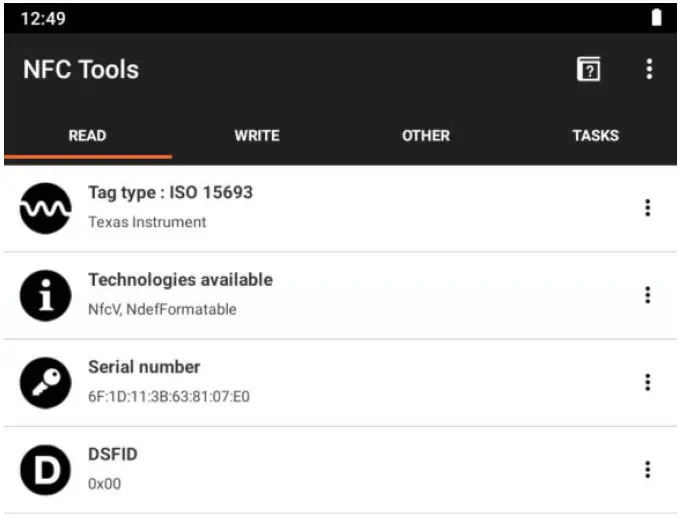
NFC Usage Demo
After activating NFC function, put the NFC card close to the sensing area. If the card is successfully recognized, there will be a beep. If the card contains some information. (such as manufacturer’s information), the interface will pop up, as shown in the figure below. If the card has been recognized, tahe interface will not always pop up, but there will be a beep.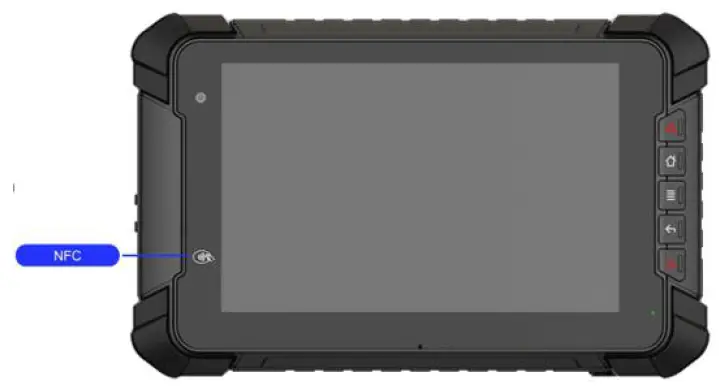
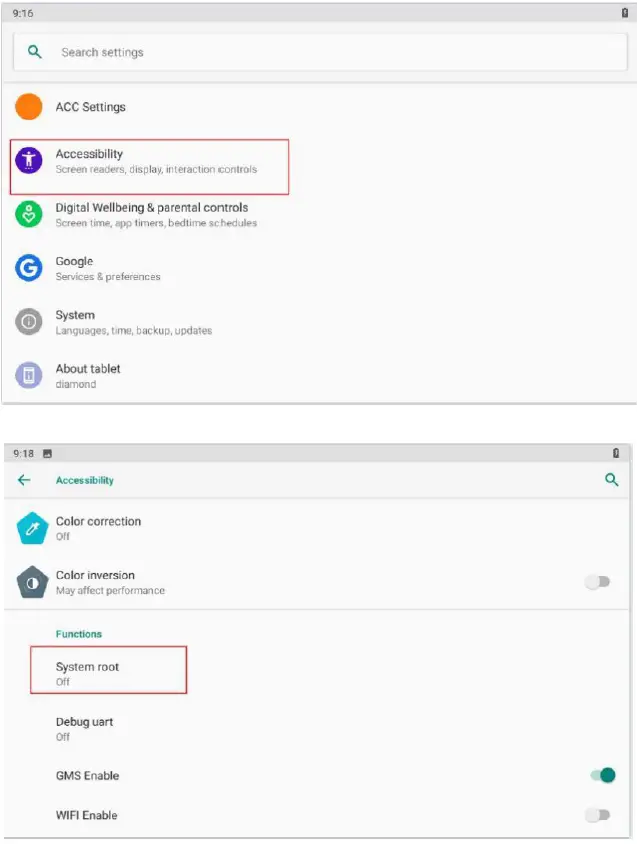
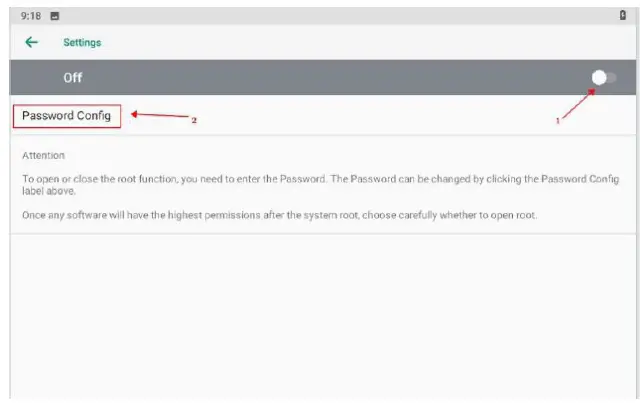
System Root Switch Usage Guide
- Refer to the following figure to enter the Root authority (on/off) function setting interface.

- The root switch setting interface is as follows. In the figure, “1” is the Root permission (on/off) switcher. In the figure, “2” is the dialog for password modify function.

- Please enter the password (The initial password is qwertyuiop).

- Dialog for modifying the password required for the root permission (on/off) status

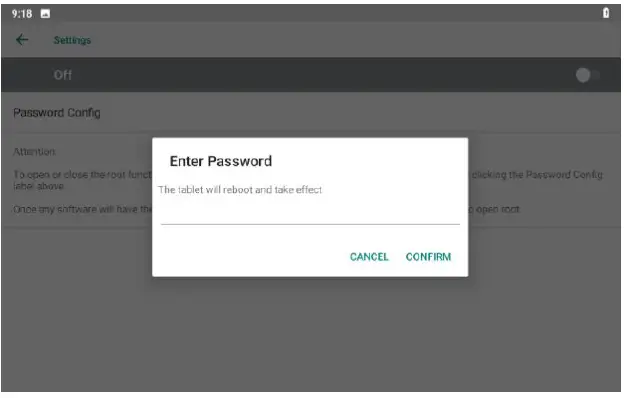
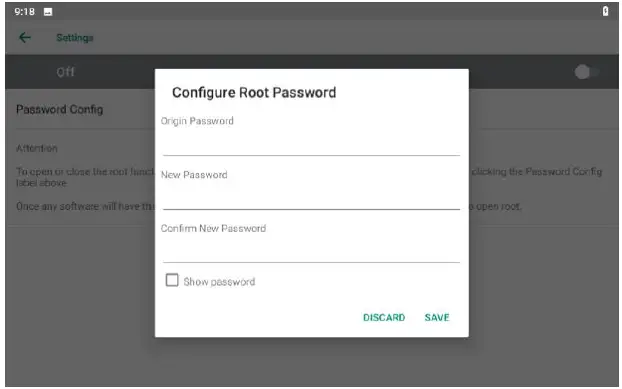
Note! If the device is restored to the factory setting, the state of the root access will be reset to off, and the password will be restored to the initial password.
Extended Cable Definition
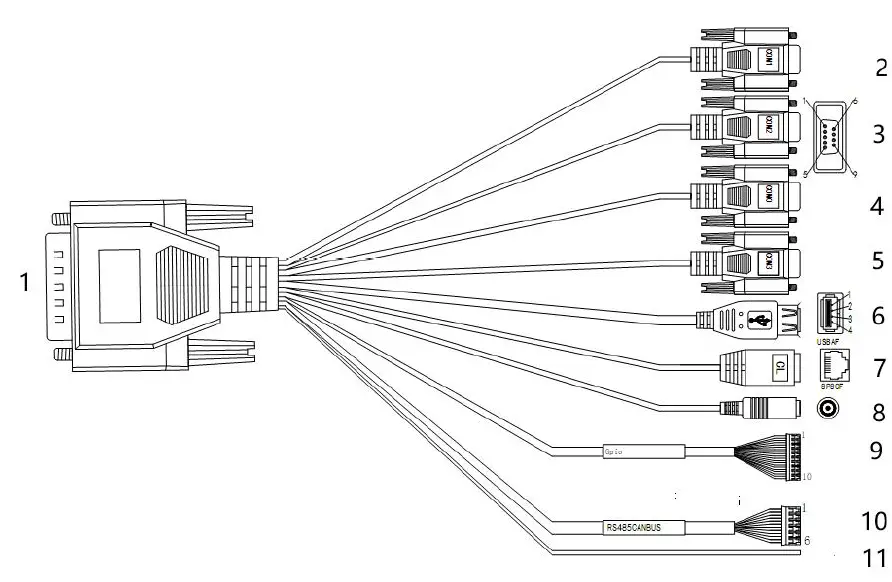
| No. | Item | Specification | ||||
| 1 | Converter | To connect with device cable | ||||
| 2 | COM 1 serial port | RS232/Print port | ||||
| 3 | COM 2 serial port | RS232/External GPS(Optional) | ||||
| 4 | COM 0 serial port | RS232/Bluetooth function | ||||
|
5 | COM 3 serial port | RS232/RS485/RS422,TX–RS422_B,RX–RS422_A(COM3 fails when RS422 and RS485 is available) | ||||
| 6 | USB host port | For data transmission/USB 2.0 | ||||
| 7 | LAN port | For network connection/LAN 1000M | ||||
| 8 | Power | Connect with power adapter/DC 9-36V | ||||
| 9 | GPIO port | 1/Black | 2/Green | 3/Blue | 4/Purple | 5/Grey |
| GND | common | GPIO 8 | GPIO 7 | GPIO 6 | ||
| No. | Item | Specification | |||||
| 6/White | 7/Pink | 8/Light green | 9/Mono | 10/Brown and white | |||
| GPIO 5 | GPIO 4 | GPIO 3 | GPIO 2 | GPIO 1 | |||
|
10 | CANBUS /RS 485
| 1/Green and white |
2/Green | 3/Orange and white |
4/Orange |
5/Blue | 6/Blue and white |
|
CAN1H |
CAN1L |
CAN2H |
CAN2L | RS485+ /RS422 _Z | RS485-/ RS422_ Y | ||
| 11 | ACC | Ignition switch input : Trigger voltage: 6-30V, Non-trigger voltage: 0-3V. | |||||
Introduction Of The Hardware Operation
Manage Device Power Supply
- Power on: Long press the power button, start the system after running the LOGO display. Short press the power button to wake up the system in deep sleep
- Power off: When the device is turned on, in non-sleep state, long press the power button for 2s, the optional menu will pop up. Select “Power off” to shut down the device, and then shut down the screen.
- Restart: When the device is turned on, in non-sleep state, long press the power button for 2s, the optional menu will pop up. Select “Restart” to restart the device, then the device will be shut down and restarted.
- Automatic sleep: Sleep time can be set in Setting; Press short to enter hibernation mode.
- Device Wake up: Short press the power button to wake up the sleeping device.
- The correct operation of the power button will help to ensure the stability of the system, and the color of the indicator light indicates the device status, as shown in the following table:
| Indicator color | Device Status(Charging/Discharging) |
| Green light on | Uncharged or Full charged |
| Red light on | Charging |
Instructions SIM Card &TF Card
Before installing the SIM card, please turn off the device in advance. And insert the required card into the machine in the direction indicated in the figure below. Finally, press the power button to start the machine.
Note! TF card support hot plugging, SIM card doesn’t support.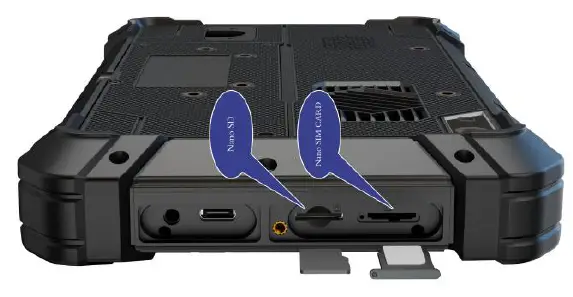
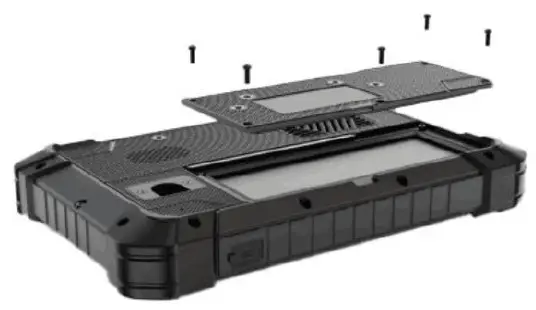
Installing & Replacing The Battery
- Rechargeable Battery for optional
Due to transportation reasons, the battery will be partially depleted when you receive the device. And charging for the first time, be sure to fully charge the battery. Please keep the DC in a charged state when working. DC input power can be used prior to the internal battery when using the device so that the batteries can be stored after being fully charged. This excellent design is very helpful to extend the service life of the equipment battery and ensure safe use. - Replacing the Battery
The tablet battery is installed in a removable way, which greatly facilitates the user’s use of disassembly and installation.
(Note: Please shut down before removing the battery.)
- Installing the battery
To install a new battery, orient the new battery so that the contact pins are aligned correctly, and assemble the battery cover and secure the retaining screws by using a screwdriver with flat head. Note! In order to ensure the life and performance of the battery, if your tablet has been stored in the warehouse for more than three months, it is suggested to charge the battery every three months.
ACC Setting Path
ACC settings are located in ACC options under Android OS Menu Settings. Automatically control screen brightening, hibernation and shutdown after ACC is disconnected. Please refer to below figure.
Click![]() go to Settings and select “ACC Settings” as shown.
go to Settings and select “ACC Settings” as shown.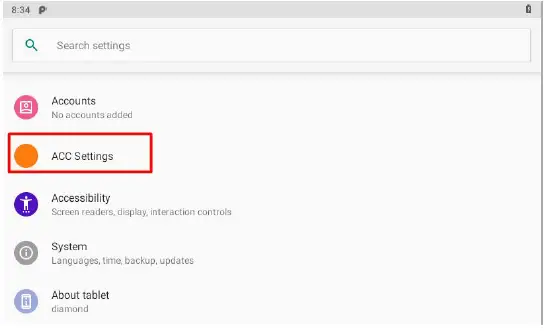
After enter the ACC setting interface, the following options are displayed: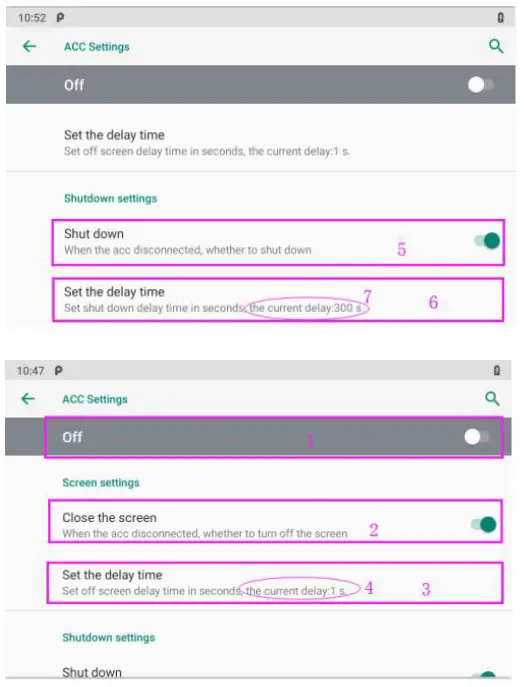
- Mark 1: The main switch of ACC setting, the current ACC function is off.
- Mark 2: The switch of close screen function controlled by ACC.
- Mark 3: Set the screen-off delay time after the ACC is powered off, click to enter the delay setting interface.
- Mark 4: Set the delay time you need, the current delay is 1 s.
- Mark 5: The switch of Trigger to shut down function by ACC outage. Current display is: when the ACC is powered off, the tablet will automatically shut down.
- Mark 6: Set the tablet shutdown delay time.
- Mark 7: You can set the delay time you need, the current delay shown in the figure is 300s
GPIO Setting
GPIO Tail Lines Instruction
Regarding the definition diagram of GPIO interface, please see the details in Chapter three “Extension Cable Define”.
GPIO Typical Connection
The following figure is a typical connection method of GPIO. In order to ensure communicate normally, please connect the GPIO interface of PC-7108 as shown in the following figure.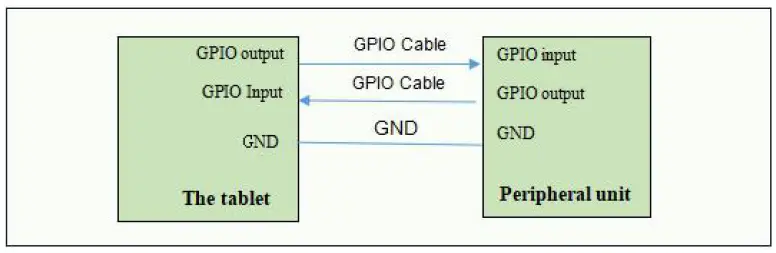
GPIO Interface
Double-click“ ” to enter the GPIO interface:
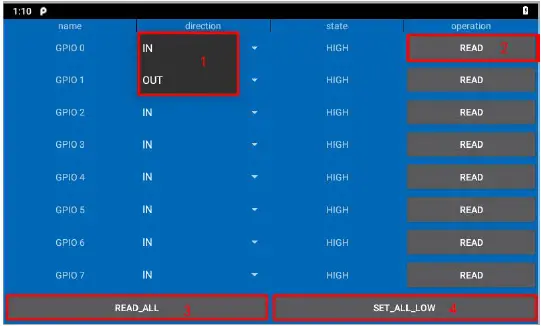
- Name: GPIO pin number.
- Direction: GPIO state. You can choose GPIO as the input state or output state. As shown in figure “1”.
- State: HIGH of high level, LOW of low level
- Operation: Read whether the current mode is high or low, displayed in the status bar.
- READ_ALL: GPIO is the state of the level at input.
- SET_ALL_LOW: GPIO is the state of the level at output.
Note!
- Each port of GPIO1~8 can be set as as an output or input port separately by GPIO APP or other software measures.
GPIO must not be directly connected to the power supply without any current limitation if it has been set as an output port, otherwise the interface will be damaged by overcurrent. - When any port of GPIO1~8 is set as an output port and is connected with a inductive load, an diode of at least one ampere rating current is required to parallel
connected with the external load. - GPIO 0~7 on the software interface correspond to GOIP1~8 in the interface diagram.
Accessories
Standard: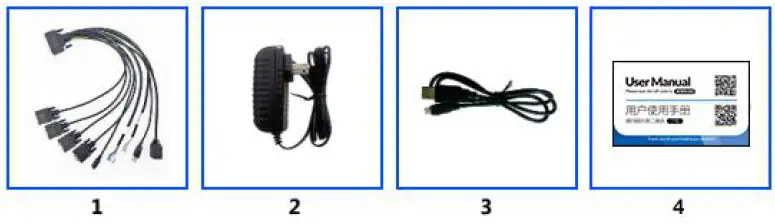
| 1. Extended cable | 1 Piece |
| 2. DC12V adapter | 1 Piece |
| 3. Mini USB cable | 1 Piece |
| 4. User manual | 1 Piece |
Optional: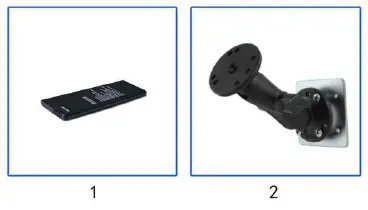
| 1. 3500mAh Li-ion battery | 1 Piece |
| 2. Mounting bracket | 1 Piece |
Trouble Shooting
| Problem | Problem description | Solution |
|
Unable to boot |
Wrong cable connection | Connect Extended cable with device first, and connect the AC end of DC adapter with DC input port of Extended cable, then the other end of DC adapter connect with power plug socket. |
|
Bad connection | Check every connection and socket of power source | |
|
Display Problem | The application reaction time is too long and cannot be activated when clicked. |
Please restart your system if the device has any problem as described. |
| The screen switching process is delayed and stagnant, causing the screen to fail to switch smoothly | ||
| Not picture on screen | ||
|
Blurred display | Check whether there is dust on the surface of the display. If yes, please wipe the dust on the surface with a soft cloth that does not drop cotton chips. |
Due to constant effort to improve products and product features, specifications may change without notice.


