GE AHEK10AC Window Air Conditioner
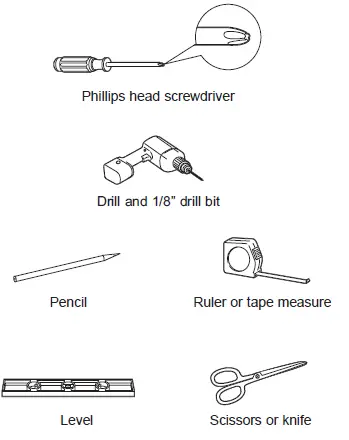
TOOLS YOU WILL NEED
Controls
Features and appearance will vary. Lights beside the touch pads on the air conditioner control panel indicate the selected settings.
- Power Pad
- Turns air conditioner on and off. When turned on, the display will show the Set temperature.
- Display
- Shows the Set temperature or time remaining on the Delay timer. Shows the Set temperature while setting the temperature in Cool or Eco modes.
- Temp and Delay Increase + /Decrease – Pads be set in Cool and Eco mode.
- Mode Pad Fan Only, Cool, or Eco mode.
- Fan Speed Pad
- In Cool or Eco
- Auto, High, Med or Low on the unit.
- In Fan Only High,
- Med, or Low on the unit.
- Delay Pad (set by remote control only)
- Delay ON—When the air conditioner is off, it can be set to automatically come on in 1 to 24 hours at its previous mode and fan settings.
- Delay OFF—When the air conditioner is on, it can be set to automatically turn off in 1 to 24 hours.
How to set:
Press the Delay pad on the remote control. Each touch of the Increase + / Decrease – pads on the remote control will set the timer in 1-hour intervals. To review the remaining time on the Delay timer, press the Delay Increase + / Decrease – pads on the remote control to set a new time if desired. To cancel the timer, press the Decrease pad on the remote control until the set time is zero.
- Sleep Pad (set by air conditioner controls only)
- The SLEEP mode sets the unit to gradually change settings over an 8 hour period to allow for some increased energy efficiency during sleep hours. The SLEEP mode is available only in COOL and FAN only settings. Press the SLEEP mode pad and its light will illuminate. The fan indicator will stay at the same setting but the air conditioner will automatically change the FAN speed to low in either COOL or FAN only mode. In FAN only mode, the fan will stay in the LOW speed setting for 8 hours. After 8 hours, the air conditioner will resume the settings that were in place before the SLEEP mode pad was pressed. In COOL mode, the fan will stay in the LOW speed setting for 8 hours from the time the SLEEP mode pad was pressed. The air conditioner will also raise the set point 2°F in 30 minutes and 2°F more in another 30 minutes where it will remain for the next 7 hours. After 8 hours, the air conditioner will resume the settings that were in place before the SLEEP mode pad was pressed. While the unit is in SLEEP mode, pressing any pad will return it to the settings that were in place before the SLEEP mode pad was pressed.
- Filter Reset Pad
- This feature automatically notifies you that the air filter must be cleaned. The indicator light will come on after 250 hours of operation. Clean the air filter (refer to page 7), place it back in the front panel, and press the Filter Reset pad. The light will go off.
- WiFi Connect Pad
- Enables connection of the air conditioner to the home WiFi. Download App for details at: www.GEAppliances.com/connect.
Using the Air Conditioner
- Do Not Operate in Freezing Outdoor Conditions
- This cool-only air conditioner was not designed for freezing outdoor conditions It must not be used when the outdoor temperature is below freezing (32°F).
- Control Panel Lights On/Off Feature
- This air conditioner has a control panel lights on/off feature where its lights will turn off when there is no activity with the controls for over one minute. To wake up the controls, press any pad on the controls and the lights will come on to show the previous settings
- Remote Control
- To ensure proper operation, aim the remote control at the signal receiver on the air conditioner. The remote control signal has a range of up to 20 feet
- Cool Mode
- An electronic thermostat is used to maintain the room temperature. The compressor will cycle on and off to keep the room at the set level of comfort. Set the thermostat at a lower number and the indoor air will become cooler. Set the thermostat at a higher number and the indoor air will become warmer
- Eco Mode
- ON—The fan will cycle on and off with the compressor. This may result in wider variations of room temperature and humidity.
- Fan Only Mode
- To provide air circulation and filtering without cooling. Since fan-only settings do not provide cooling, a Set temperature cannot be entered. The room temperature will appear in the display
- Auto Fan Mode
- Set to Auto for the fan speed to automatically set to the speed needed to provide optimum comfort settings with the set temperature.
Care and Cleaning
- Grille and Case
- Turn the air conditioner off and remove the plug from the wall outlet before cleaning.
- Air Filter
- The air filter behind the front grille should be checked and cleaned at least every 30 days or more often if necessary
- Outdoor Coils
- The coils on the outdoor side of the air conditioner should be checked regularly. If they are clogged with dirt or soot, they may be professionally cleaned.
Installation Instructions
- Note to Installer – Be sure to leave these instructions with the Consumer.
- Note to Consumer – Keep these instructions for future reference.
- Skill level – Installation of this appliance requires basic mechanical skills.
- Completion time – Approximately 1 hour
- We recommend that two people install this product.
- Proper installation is the responsibility of the installer.
- Product failure due to improper installation is not covered under the Warranty.
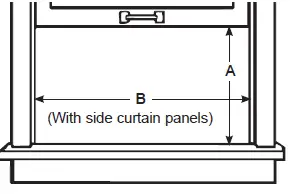
WINDOW REQUIREMENTS
- These instructions are for a standard double-hung window. You will need to modify them for other types of windows.
- The air conditioner can be installed without the side curtain panels if needed to fit in a narrow window. See the window opening dimensions.
- All supporting parts must be secured to firm wood, masonry or metal.
- The electrical outlet must be within reach of the power cord.
- Follow the dimensions in the table and illustration for your model
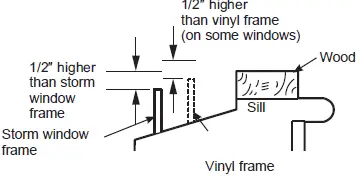
STORM WINDOW REQUIREMENTS
- A storm window frame will not allow the air conditioner to tilt toward the outside, and will keep it from draining properly. To adjust for this, attach a piece of wood to the sill.
- WOOD PIECES
- WIDTH: 2
- LENGTH: Long enough to fit inside the window frame.
- THICKNESS: To determine the thickness, place a piece of wood on the sill to make it 1/2″ higher than the top of the storm window frame or the vinyl frame.
- Attach securely with nails or screws provided by the installer.
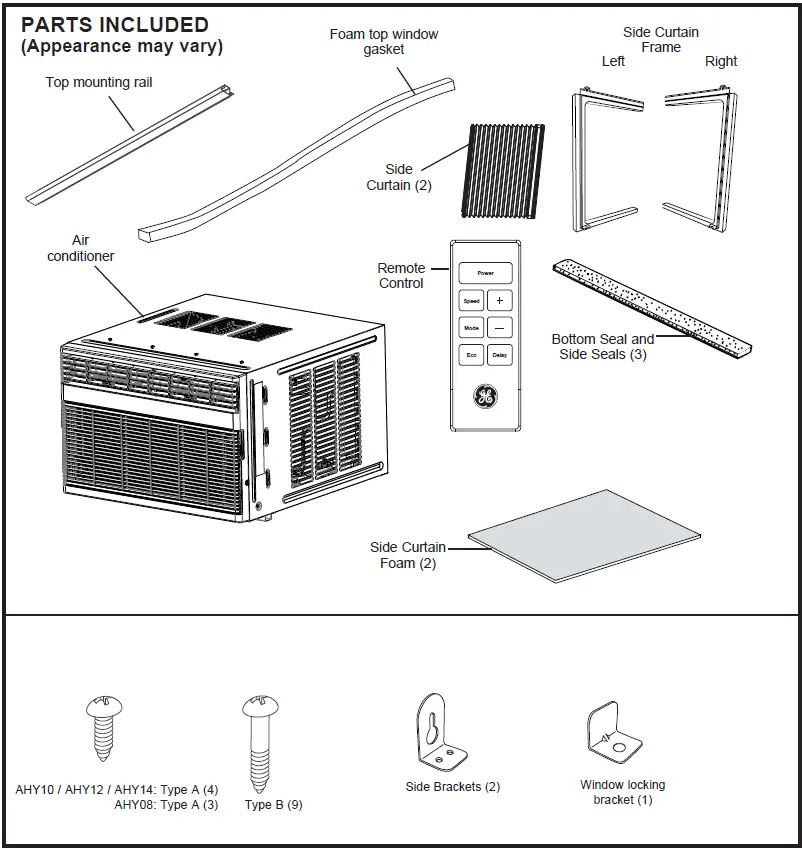
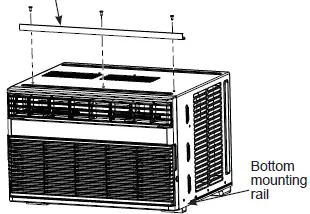
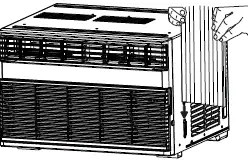
PREPARE THE AIR CONDITIONER
- Install the top mounting rail with 4 Type A screws (AHTK10/ AHTK12/ AHTK14) or 3

- Type A screws (AHTKO8) from the outsidee of the case.

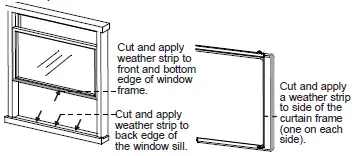
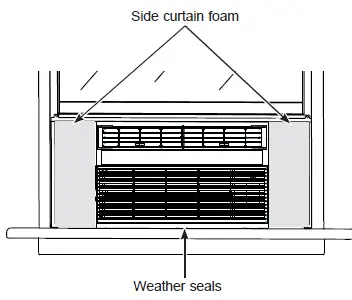
- Apply the weather seals provided to the bottom, top and sides of the window to the seal around the perimeter of the air conditioner

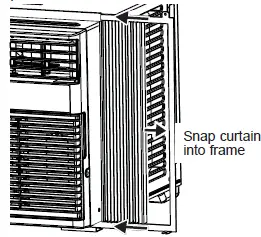
- Slide the side curtain panels into the side panel rails.

- Slide left and right side curtain frames into top and bottom rails. Make sure that side curtains snap into side of the frames.
INSTALL THE AIR CONDITIONER IN THE WINDOW
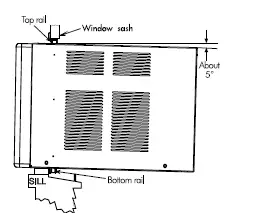
- Mark the center of the window. Set the air conditioner in the window so that is it centered. Place the air conditioner so that front edge of the bottom mounting rail is against the back edge of the sill.

- Bring the window down so that the front edge of the top mounting is in front of the window. Make sure that the air conditioner is level or tilting slightly to the outside.

- Extend the curtain panels until they fill the window. Mark the location of the holes in each corner. Use the drill and 1/8″ drill bit to drill pilot holes. Use 4 type B screws to secure the side panels in place.

SECURE AIR CONDITIONER
- Loosen the screw on the right hand side of the air conditioner near the bottom.
- Slide a side bracket over the screw so that the bracket is resting on the window sill. Tighten the Screw

- Use a 1/8″ drill bit to drill a starter hole into the window sill through the holes in the side bracket. Use 4 type B screws to attach the side bracket to the window sill.
- Repeat the side bracket installation on the left side.

- Measure and cut adhesive foam backed sheet. Apply over side curtain and frame.

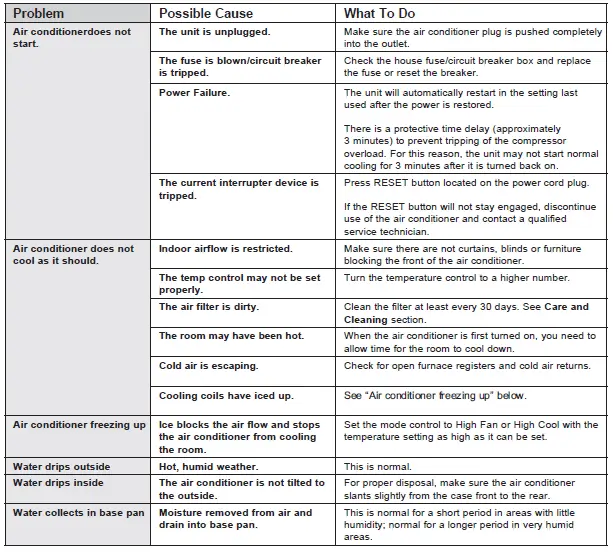
Troubleshooting
Warranty
GE Appliances Air Conditioner Limited Warranty
- Properly pack your unit. We recommend using the original carton and packing materials.
- Return the product to the retail location where it was purchased.
- Locate your original sales receipt and make a note of your model and serial number.
- Visit GEAppliances.com/service to initiate the product replacement process..
- You will be asked to provide your name, address, date of purchase, model and serial number.
- GE Appliances will arrange for a carton to be sent toyour home to recover the product.
- Customer instruction. This owner’s manual provides information regarding operating instructions and user controls.
- Improper installation. If you have an installation the problem, or if the air conditioner is of improper capacity, contact your dealer or installer. You are responsible for
- providing adequate electrical connecting facilities.
- Failure of the product resulting from modifications to the product or due to unreasonable use including failure to provide reasonable and necessary maintenance.
ELECTRICAL REQUIREMENTS
These models require a 115/120-volt AC, 60-Hz grounded outlet protected with a 15-amp time-delay fuse or circuit breaker. The 3-prong grounding plug minimizes the possibility of electric shock hazard. If the wall outlet you plan to use is only a 2-prong outlet, it is your responsibility to have it replaced with a properly grounded 3-prong wall outlet.
Consumer Support
GE Appliances Website
Have a question or need assistance with your appliance? Try the GE Appliances Website 24 hours a day, any day of the year! You can also shop for more great GE Appliances products and take advantage of all our on-line support services designed for your convenience. GEAppliances.com
Register Your Appliance
Register your new appliance on-ine at your convenience! Timely product registration will allow for enhanced communication and prompt service under the terms of your warranty, should the need arise. You may also mailin the pre-printed registration card included in the packing material. GEAppliances.com/register
Parts and Accessories
Individuals qualiied to service their own appliances can have parts or accessories sent directly to their homes (VISA, MasterCard and Discover cards are accepted). Order on-line today 24 hours every day. GEApplianceparts.com or by phone at 877.959.8688 during normal business hours. Instructions contained in this manual cover procedures to be performed by any user. Other servicing generally should be referred to qualified service personnel. Caution must be exercised, since improper servicing may cause unsafe operation.
Contact Us
If you are not satisfied with the service you receive from GE Appliances, contact us on our Website with all the details including your phone number, or rite to. General Manager, Customer Relations GE Appliances, Appliance Park | Louisville, KY 40225 GEAppliances.com/ge/service-and-support/contact.htm
FAQS
Where is the reset button on a GE window air conditioner?
Procedure 2- use the GE window air conditioner reset button
Does a GE air conditioner have a fuse?
The GE 60 Amp 240-Volt Fused (requires 2 fuses installed on the back side of the puller
How often should I drain my window air conditioner?
In high humidity areas, homeowners will have to drain the portable AC every few hours (2 to 8 hours, in general).
Do window AC units need to drain water?
All in all, properly draining your window AC unit is key to preventing water damage and other AC problems
What happens if you don’t vent a window air conditioner?
If you take off the vent hose, though, the AC will just run your room air through a cycle between cool-and-dry and hot-and-humid
How do I keep the debris out of my window air conditioner?
You can place an air conditioner cover over the unit throughout the off-season
What happens if you don’t drain water from air conditioner?
Untimely drainage of air conditioners leads to overflowing of the condensate tank.
Why is there no drain hole in window air conditioner?
There are no drain holes or plugs used to remove the water as was the case with older style window AC units.
Why does my window AC turn on but not blowing air?
If your AC system turns on but doesn’t blow out cold air, ensure all the vents are open and the thermostat is set properly
Is it worth repairing a window air conditioner?
A little maintenance means homeowners can save money on utility and repair bills
Is there a reset button on a window air conditioner?
Most air conditioning units are equipped with a reset button
Do window AC units have a reset button?
Window air conditioner, press the reset button for 5 seconds. If your unit doesn’t have one, unplug the unit and plug it back in after 5 minutes to reset it.
How long do GE air conditioners last?
An air conditioner nearing the end of its life will break down more frequently and draw more energy than necessary.
Should I remove the drain plug from my window air conditioner GE?
Under normal circumstances, this drain plug should not be removed
Why is my GE window air conditioner not blowing cold air?
Your first step should always be to examine the air filter and make sure it’s clean
Why is my GE window air conditioner not turning on?
If your window air conditioner won’t turn on, it may be that the fuse has blown.
VIDEO


