APERA Salt20 Pocket Salinity Tester
Battery Installation
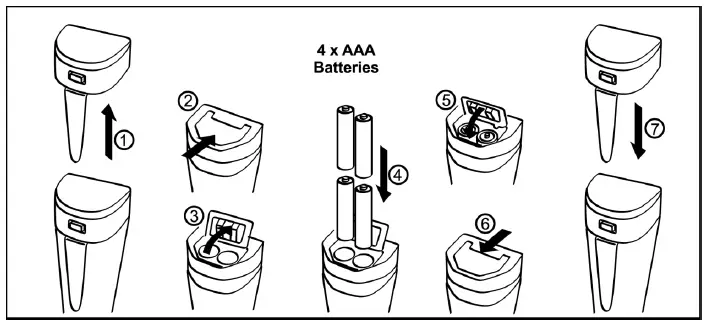
Please install batteries according to the following steps. Please note polarity: “+” (anode) is upward; “-” (cathode) is downward.
Note: This salinity meter measures practical salinity converted from electrical conductivity (NaCl Concentration). It does not measure absolute salinity.
Keypad Functions
- Short press——- < 2 seconds
- Long press——– > 2 seconds
|
|
|
|
|
|


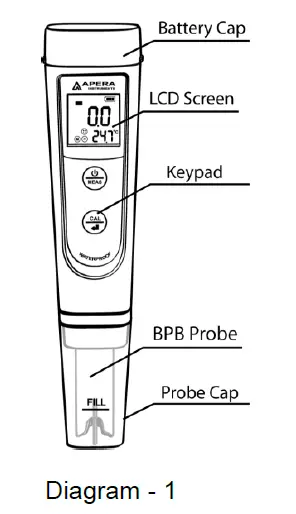
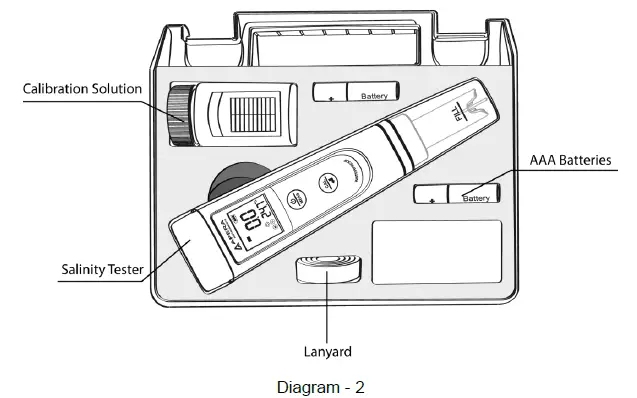
Complete Kit
Calibration
- Rinse the probe in distilled water and dry it. Short press
 to turn on the tester.
 - Long press
 to enter calibration mode; Short press to exit.
 - Dip the probe into the calibration solution. Stir gently, leave it to stand, LCD displays
 , short press to complete 1-point calibration.
The tester returns to measuring mode, and calibration icon appears at the button left of LCD.
Salinity Measurement
- Short press to turn on tester. Rinse probe in distilled water and dry it.
- Stir probe in the sample solution gently, leave it to stand. Get readings after the smile icon comes up and stays.
Notes
- The tester has self-diagnosis functions:
| Symbol | Self-Diagnosis information | How to fix |
| Er1 | Wrong calibration solution, which exceeds the recognizable range of the meter. |
|
| Er2 | is pushed before measurement is stable ( comes up) | Wait for the smile icon to stay, and then short press |
The tester has already been calibrated after manufacture. Usually users can use the tester right away, or test it in the calibration solutions to test its accuracy. When error is large, calibrate it before using.
Parameter Setting
Parameter setting reference chart
| Symbol | Parameter Setting content | Code | Factory Default |
| P1 | Select salinity unit | ppt – g/l | ppt |
| P2 | Select Temperature Unit | ˚C – ˚F | ˚C |
| P3 | Restore to factory default | No – Yes | No |
How to setup parameters
When turned off, long press ![]() to enter setup → short press
to enter setup → short press![]() to switch P1-P2-P3→ Short press
to switch P1-P2-P3→ Short press![]() , parameter flickering→short press
, parameter flickering→short press![]() to choose, short press
to choose, short press![]() to confirm parameter selection→Long press
to confirm parameter selection→Long press![]() to switch off.
to switch off.
Parameter setting notes
- Select salinity unit(P1): Optional units: ppt – g/l, the factory default is ppt.
- P2-Select temperature unit (°C-°F): In P1 mode, press to enter P2, press, °C or °F flickering, press to choose °C-°F, and press to confirm parameter selection. Long press to return to measurement mode.
- Restore to factory default: Select Yes to restore the calibration to the theoretical values and parameter setting to original values. When meter’s calibration or measurement performs abnormally, this function can be adopted so the meter goes back to factory default setting and then users can conduct calibration or take measurements again.
Technical Specifications
|
Salinity | Range | 0 – 10.0 ppt |
| Resolution | 0.1 ppt | |
| Accuracy | ±1% F.S | |
| Calibration points | 1 point auto-calibration | |
| Automatic Temp. Compensation | 0-50˚C | |
| Temp. | Range | 0-50˚C |
| Resolution | 0.1˚C | |
| Accuracy | ±0.5˚C |
Other Functions & Parameters
| Indication of calibration points | H | Auto Power-off | Power-off in 8 minutes if no operation |
| Indication of stable measurements | Waterproof level | IP67, floats on water | |
| Self-Diagnosis information | Er1, Er2 | Power Supply | AAA batteries*4 |
| Low battery reminder | Battery Life | 1000 hours | |
| Dimensions/Weight | Instrument: 40*31*178mm/107g; Carrying case: 190*165*140mm/438g | ||
Warranty
We warrant this instrument to be free from defects in material and workmanship and agrees to repair or replace free of charge, at option of APERA INSTRUMENTS (Europe) GmbH, any malfunctioned or damaged product attributable to responsibility of APERA INSTRUMENTS (Europe) GmbH for a period of two years from the delivery (a six-month limited warranty applies to probes). This warranty does not apply to defects resulting from actions such as misuse (violation of the instructions in this manual or operations in the manner not specified in this manual), improper maintenance, and unauthorized repairs. Warranty period is the time limit to provide free service for the products purchased by customers, not the service life of the tester or probe.
Apera Instruments reserves the right to update the information in this manual without giving notice in advance.
APERA INSTRUMENTS (Europe) GmbH
- Wilhelm-Muthmann-Straße 18 42329 Wuppertal, Germany
- Contact: [email protected]
- Website: www.aperainst.de
- Tel: +49 202 51988998


