Digital Probe Thermometer
063129-004-0000

USER CARE AND INSTRUCTION MANUAL
Thank you for choosing the RICARDO digital probe thermometer. Please read the user manual carefully before using this product.
WARNINGS
- Clean probe with a damp cloth before use.
- Do not place the main unit of the thermometer (part with LCD) into the oven or the BBQ. The main unit must always remain outside the oven and the BBQ or in an environment where the temperature is between 10 °C / 50°F and 50 °C / 122 °F.
- The probe and wire will withstand heat up to 250 °C / 482 °F for short periods only. Never exceed this temperature.
- The heat resistant wire allows usage on an OPEN BBQ only. When in use, always keep the BBQ lid open. Never use on maximum heat setting, use low to medium heat.
- Always keep the wire and the probe away from flames, coals, oven elements, grill or oven racks. Improper use will lead to irreversible damages. The inner insulation could melt and thus prevent the probe from reading temperatures. This use is contrary to the instructions given in this manual and will void the probe warranty.
- Avoid bending or twisting the wire, it may damage the connection inside.
- CAUTION: The probe and wire will become hot while in use. Always wear heat resistant oven mitts when removing the probe from meat.
- Do not pull on the wire, use the rounded part of the probe to remove it from meat.
- For household use only.
BATTERIES
- Use two AAA batteries (not included).
- To maximize batteries life, turn off the thermometer after use by sliding the ON/OFF button on the back to OFF position.
- Replace the batteries when the LCD becomes dim.
- To replace or install the batteries, proceed as follows:
- Open the battery compartment located at the back of the unit following the direction of the arrow.
- Install two AAA batteries according to the polarity sign shown in the battery compartment.
- Slide the battery compartment cover back in place.
LANGUAGE SELECTION
- On the back of the thermometer, select between English or French language by sliding the top button to ENG or FR. The language to be displayed on the screen can be changed anytime during use.
HOW TO USE THE THERMOMETER
- Turn on the thermometer by sliding the right button on the back to ON position.
- Position the left button on the back to COOK mode.
- Connect the wire to the right side of the main unit. The wire is heat resistant up to 250 °C (482 °F). Do not expose the probe and the wire to higher temperatures.
1. MEAT MODE
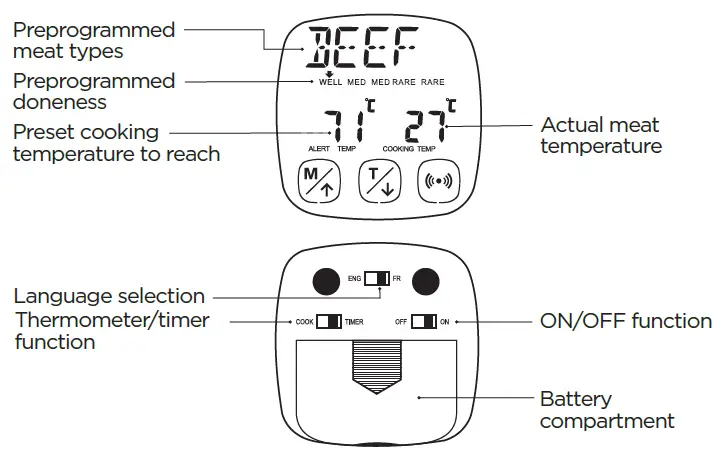
1.1 Touch ![]() to select the type of meat to be cooked. The preset meat types will be displayed as follows:
to select the type of meat to be cooked. The preset meat types will be displayed as follows:

1.2 Touch ![]() to select the desired meat doneness. The preprogrammed temperature to reach for the selected doneness is displayed on the LCD above ALERT TEMP.
to select the desired meat doneness. The preprogrammed temperature to reach for the selected doneness is displayed on the LCD above ALERT TEMP.
1.3 Ensure the wire is connected to the main unit and then insert the stainless steel probe into the food to be cooked.
ATTENTION: For an accurate reading of the internal temperature, insert the probe at least 1.25 inches (3 cm) into middle of the thicker part of the meat. Make sure the probe is away from any bones and is enclosed inside the meat (do not let the probe pass through the meat).
1.4 Once the probe is inserted, the actual meat temperature will be displayed on the LCD above COOKING TEMP and will increase gradually during cooking. The alarm will automatically beep when the probe temperature (COOKING TEMP) reaches the preset cooking temperature (ALERT TEMP), indicating the meat is cooked to the desired doneness.
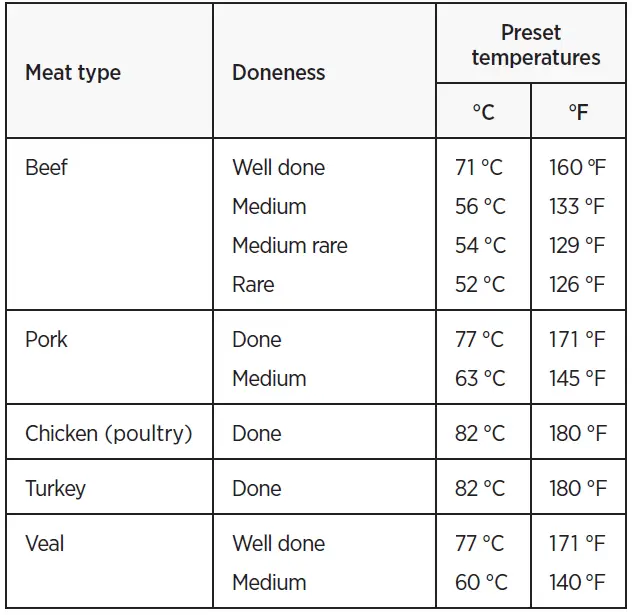
Preset temperatures for each type of meat and doneness:
- It is possible to change the preprogrammed temperature of the selected doneness. To set your own desired temperature, touch and hold simultaneously
 and
and  for 3 seconds. The ALERT TEMP temperature will flash, then touch
  to increase or to decrease the desired temperature. Press to select the displayed temperature, it will automatically stop flashing. Insert the probe into the meat (following the instructions given previously at 1.3). The alarm will automatically sound when the desired internal temperature is reached.
2. PROGRAMMABLE MODE
Programmable mode allows to customize the temperature settings.
- Touch until PROGM is displayed above the screen.
- To set your own temperature, touch and hold simultaneously and for 3 seconds. The ALERT TEMP temperature will flash, then touch to increase or to decrease the desired temperature. Press to select the displayed temperature, it will automatically stop flashing. Insert the probe into the food to be cooked following the previous instructions given at 1.3 and 1.4.
UNIT CONVERSION °C OR °F
- To convert the temperature measurement from Celsius to Fahrenheit, touch and hold for 3 seconds and the temperature reading will automatically change.
HOW TO USE THE TIMER
- Select the timer mode by sliding the left button on the back to TIMER position.
- The display will show 00 (hour) : 00 (minute). Touch to set time in increments of 5 minutes or touch to decrease the settled time in increments of 1 minute. Hold the button for fast adjustment. Maximum timer value is 99 hours 59 minutes.
- To start or stop the timer, touch . The “:” between hours and minutes will flash to indicate that the timer is on.
- To reset the timer, touch and hold and simultaneously.
CLEANING
- The unit is not waterproof. Do not immerse in water or place in the dishwasher. This may cause serious damage to the product. After use, wipe the unit with a soft, slightly damp cloth.
- Clean the probe and the wire thoroughly before and after each use with a damp cloth and warm soapy water. Take care to not immerse the wire connector into water.
- The steel probe and wire will be hot after use. To prevent burning, clean after they have completely cooled down.
If you have any questions regarding this product, please contact our customer service:
- by e-mail: [email protected]
- by phone: 1-833-751-4101


