
COOKING PERFORMANCE GROUP 351030208 Retrofit Thermostat
Thermostat replacement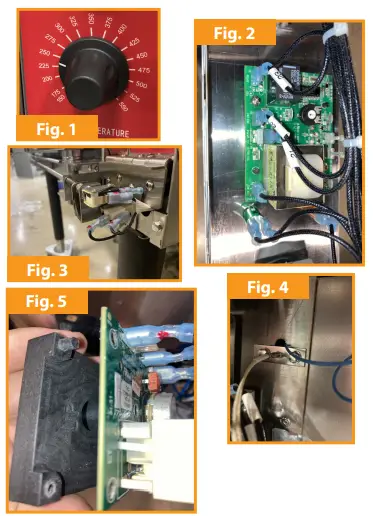
- Turn off oven and disconnect from power supply
- Remove knob from thermostat dial (Fig. 1)
- Remove lower front cover, under the doors, by open-ing the doors and removing screws
- Remove right side panel by removing screws along the back edge of the panel and in the lower right front corner (Fig. 3)
- Remove Phillips screws holding thermostat to control panel
- Remove wiring from thermostat, note locations as they are similar to new replacement thermostat (Fig. 2)
- Remove existing thermostat probe by removing Phillips screws from mount and pull towards you (Fig. 4)
New thermostat = 351030208
New thermostat probe = 351170069
New bracket = 351150756
Temperature dial sticker = 351124365 - Install new thermostat onto new bracket with Phil-lips head screws from old thermostat mounting locations. Note orientation of bracket and thermo-stat (Fig. 5)
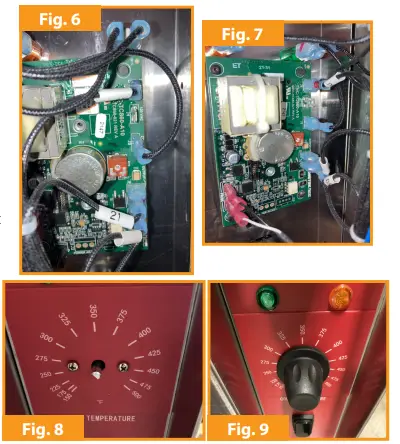
- Install wiring onto new thermostat, ensure locations are correct for power supply, same as old thermostat (Fig. 6 & 7)
- Install new thermostat probe wiring onto new ther-mostat (Fig. 7)
- New thermostat probe is installed the same as the old thermostat probe
- Place new temperature dial sticker onto the front of the control panel, reference the 3 holes for alignment
- Install new thermostat to control panel with Phillips screws (Fig. 8)
- Install knob onto thermostat dial post. Note, you may have to hold the back side of the thermostat to fully seat the knob on the dial post


