![]()
E-Lumen X SERIES
TOPAZ Installation and Operation manual
USER MANUAL
IMPORTANT SAFETY AND INSTALLATION INSTRUCTIONS
Please read the manual carefully before commencing installation. This manual contains important information about the correct installation and operation of TOPAZ lights.
- Only qualified electrician is allowed to carry out the installation of this product.
- Avoid direct contact with electrical power.
- Respect all regulations in effect for preventing accidents.
- All units are required to be disconnected from the main electricity before any operation of maintenance.
- For safe and proper installation, ensure that those parts supplied with the produce are used.
- Never handle with wet hands and feet.
- This unit is design for use only when fully submerged in fresh water, connecting with a safety transformer
- This product should be installed according to your local electrical installation ordinances and regulations.
- Due to the corrosive nature of unbalanced pool chemicals, please keep you pool water is acid-base balanced prior to installation, and ensure the longevity of these lights.
- If the external flexible cable or cord of this luminaire is damaged, it shall be exclusively replaced by the manufacturer or his service agent or a similar qualified person in order to avoid a hazard.
- Check that there is enough cable behind light to allow for servicing above water, preferably at ground-level pool-side.
- Never operate this Underwater Light for more than 1 minute unless it is totally submerged in water.
- You lights require cleaning at any time, be sure to a mild detergent or other ways that don’t damage to the lights.
- Be sure power is off before installing or removing LED plate. Allow LED plate to cool before replacing.
- Maximum Depth for Light installation at 1.2 meter.
- Maximum Water Temperature Range for light operation 0-25°C
For non replacable lightsources: ”The light source of this luminaire is not replaceable; when the light source reaches its end of life the whole luminaire shall be replaced”.
For operation only with safety isolating transformer conforming with AS/NZS 61558 series.
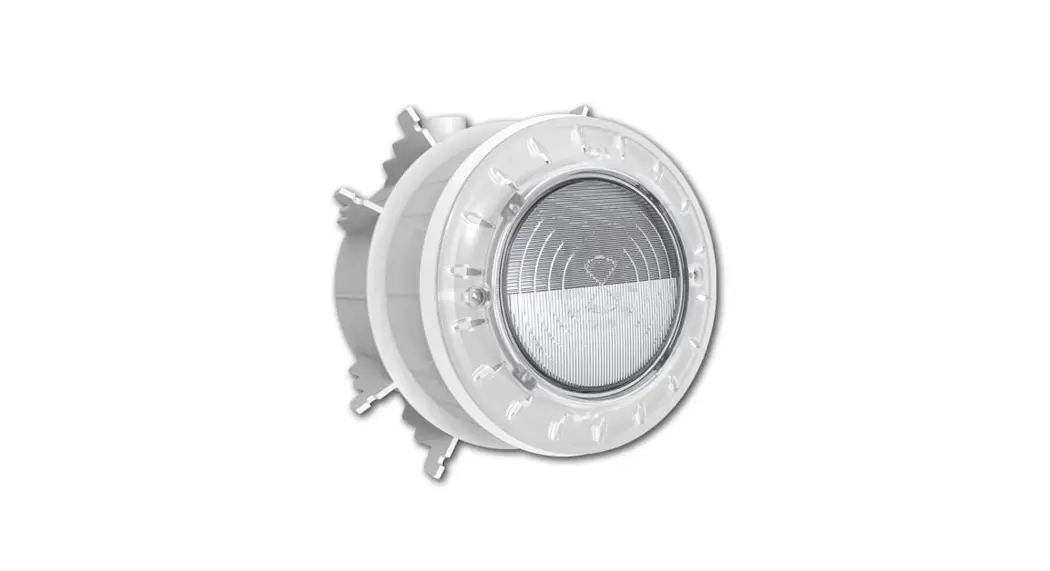
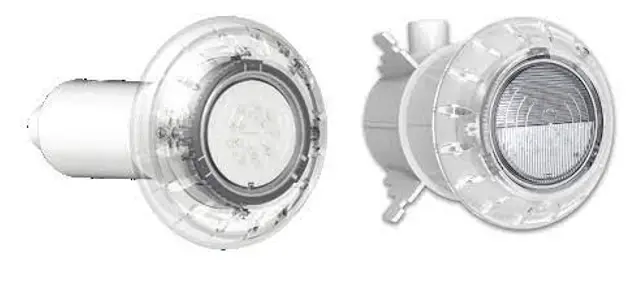
PRODUCT INTRODUCTION
The wall mount retrofit swimming pool underwater light is designed to latest LED lighting technology. There are two 30 second self-determine operating mode which is fully
compatible to 50Hz or 60Hz input voltage frequency. When the lights use the same power source, they will be self-synchronize during color change mode without color alignment reset. The light include RGB color LED, individual warm and cool white, 5 different LED color in total. The two mode can’t be applied at the same time.
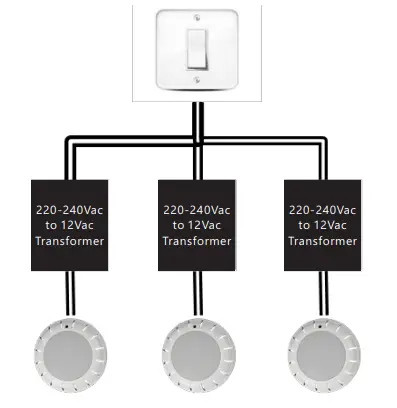
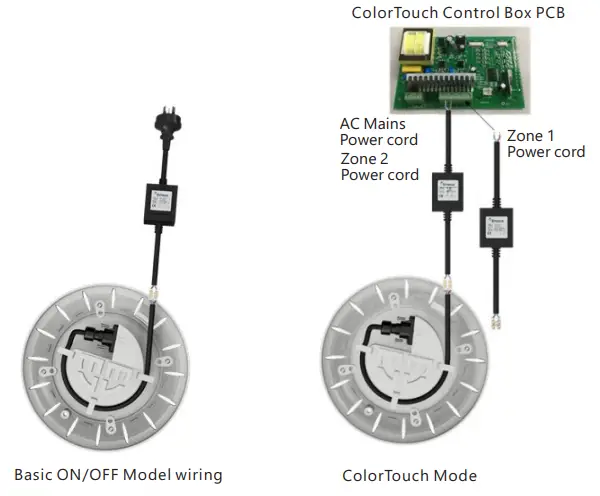
2.1 BASIC ON/OFF MODE
When the light is connected to the transformer directly, to on/off the main switch to controls the color changes.
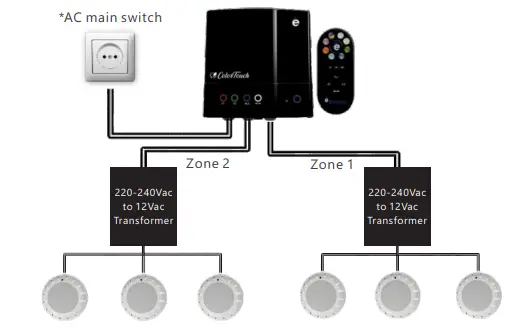
2.2 COLORTOUCH MODE
It need to cooperate with Color Touch Control Box to pick up color directly and adjust brightness. Without this control box, it will be self-determine to basic mode when 12Vac power is connected.
LIGHT SPECIFICATION
3.1 ELECTRICAL
Operation Voltage Range: AC12V (COSφ : 0.8 ,MAX 1.0A)
LED Color: RGB + Warm White (3000K) and Cool White (6500K)
Operation Frequency: 50/60Hz
Max Power Rating: 13W
Mode of operation: ON/OFF Mode or ColorTouch control box
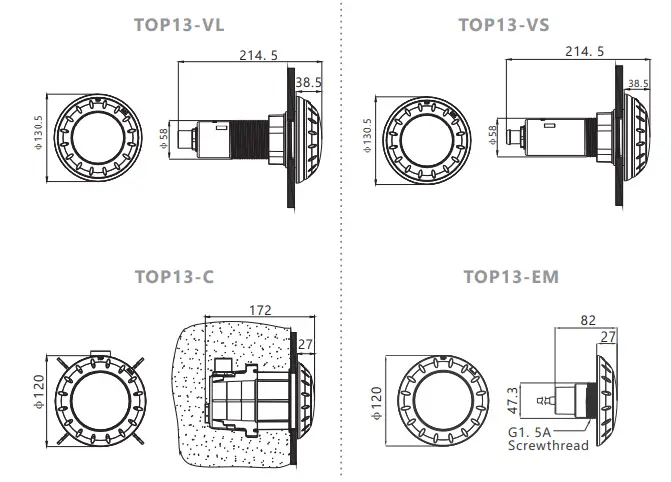
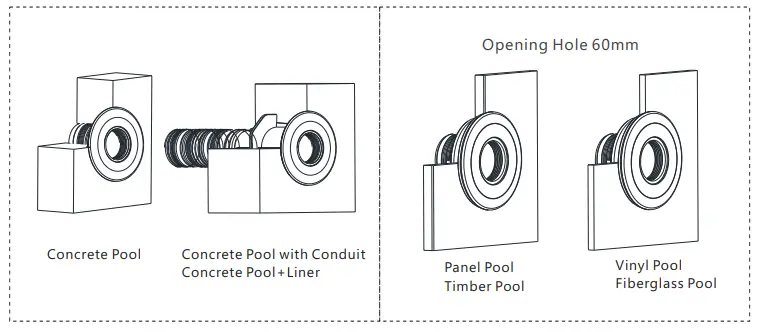
There are three different installation types for TOPAZ lamp:
| TOP13-C | Concrete Pool |
| TOP13-VS | Fiber Glass Pool |
| TOP13-VL | Vinyl Pool |
| TOP13-EM | Concrete Pool / Fiber Glass Pool / Vinyl Pool |
3.2 DIMENSIONS (in mm)
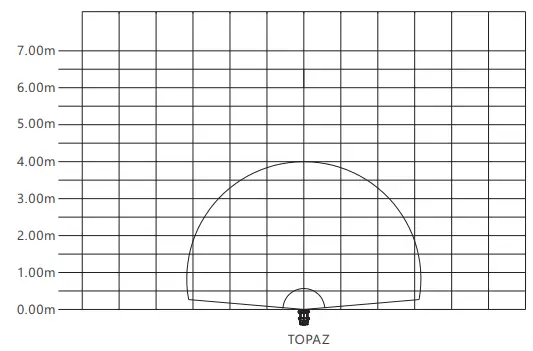
3.2.4 Light Intensive chart
3.3 COLOR MODE
| NO. | Mode |
| 1 | Cool White |
| 2 | Green |
| 3 | Blue |
| 4 | Green+Blue |
| 5 | Red+Green |
| 6 | Red+Green+Blue |
| 7 | Mode A: Blue+Gradual Red |
| 8 | Mode B: Green+Gradual Red |
| 9 | Mode C: Blue+Gradual Green |
| 10 | Mode D: RGB Color Sequence |
| 11 | Mode E: RGB Color Sequence |
| 12 | Mode F: Auto Color Change |
| 13 | Mode G: RGB Color Sequence |
| 14 | Mode H: Rapid Auto Color Change |
| 15 | Warm White |
INSTALLATION
- It is recommended to install a light every 20, the approximate exposure area of each unit. m²
- The lights should be installed in the direction that they will not shine directly into the house.
- For training or competition pools, the lights must be installed on the sides in order to prevent swimmers from seeing any glare.
- Nothing should be placed on the pool side directly above the lights for ease of future maintenance.
- The cables connecting the lights and the transformers must be at least 6mm² and the distance between them must not exceed 30m; otherwise the lights will not function
properly. - Terminal blocks must meet the IEC60988-2-1 standard having the rated connecting capacity of 4,0mm² use of screw-type terminal at least 25A current rating, mounted on junction boxes inside.
4.1 WIRING DIAGRAM
LAMP INSTALLATION
5.1 TOP13-C CONCRETE POOL
Typical vertical and horizontal concrete pool installation layout is illustrated as below diagram for reference.
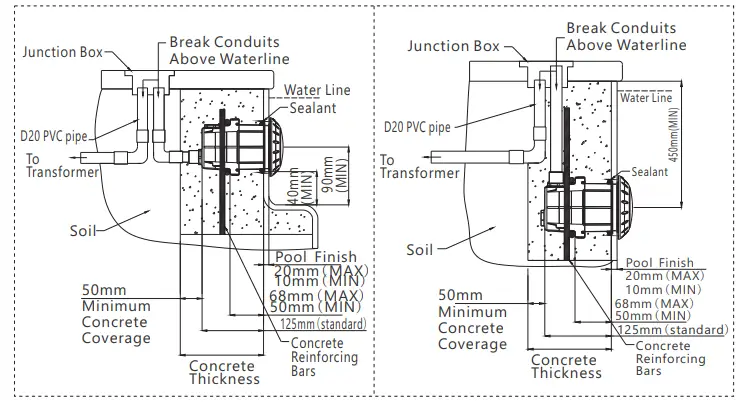
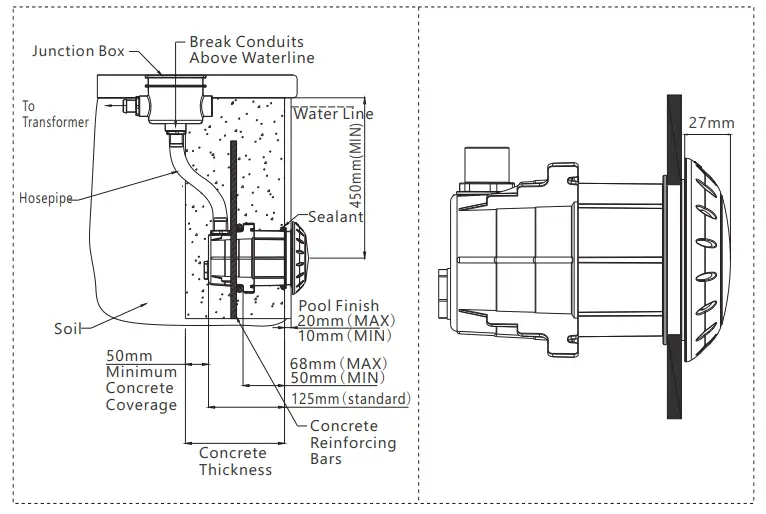
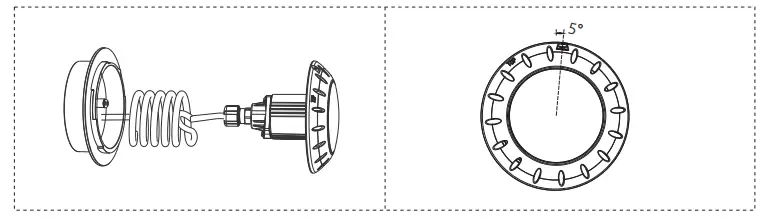
Installation Step:
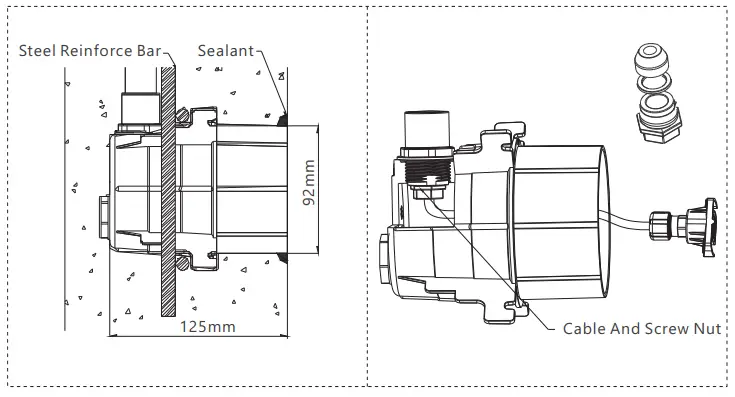
- Mounting the niche on steel reinforced bar.

- The niche and the concrete wall should be seal with sealant to prevent water get inside.
- Lead the power cord with connector through the niche

- Insert the clamp ring into the niche before ceramic is applied. Wrap the power cord few round
- Assemble the power cord

- Screw the Fastener Ring on the clamp ring
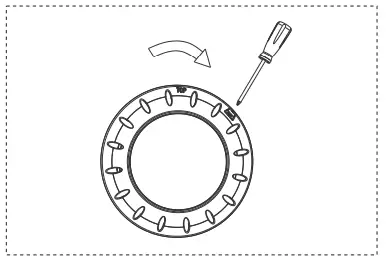
- Rotate the lamp on the fastener ring which is auto locked

- Apply a screw driver push to key hole to release the lamp .
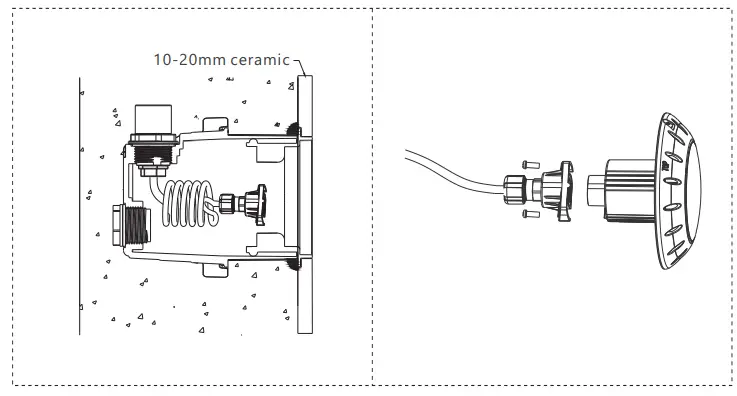
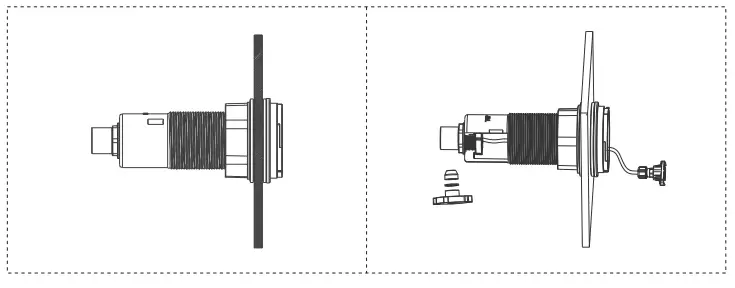
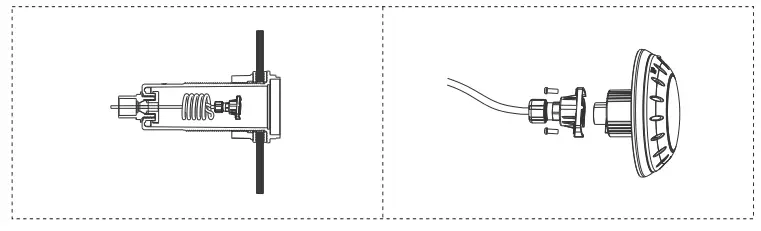
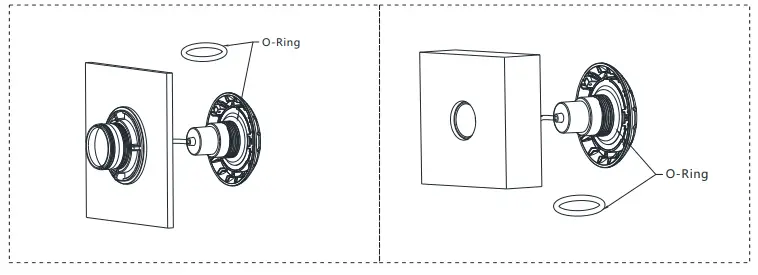
5.2 TOP13-VL
5.3 TOP13-VS
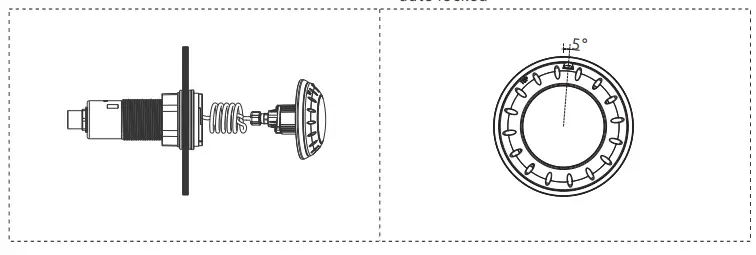
Installation Step:
- Opening Hole
- Insert the light niche through the opening with plastic ring on both face side.

- Screw the nut tight from inside
- lead the power cord with connector though the niche from the front side.

- Warp the power cord few round.
- Screw the connector to the lamp with face plate

- Place the lamp into the niche
- Rotate the lamp on the fastener ring which is auto locked

- Apply a screw driver push to key hole to release the lamp.
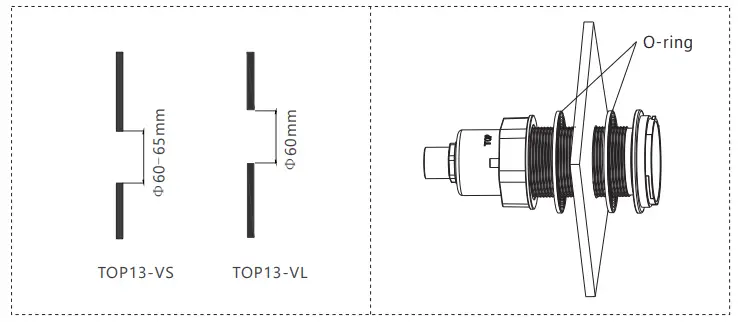

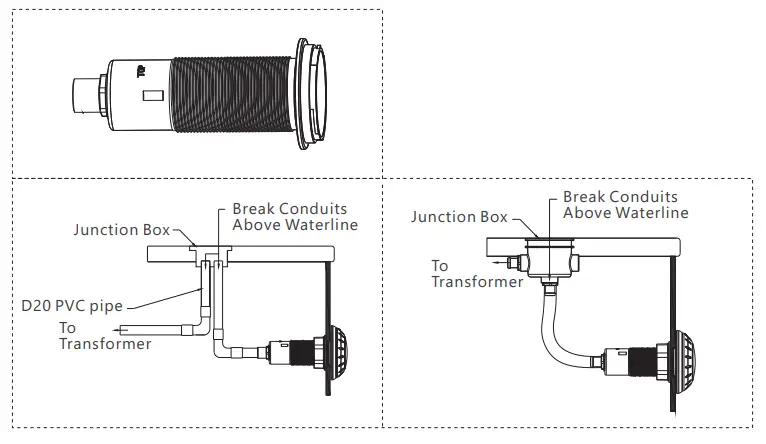
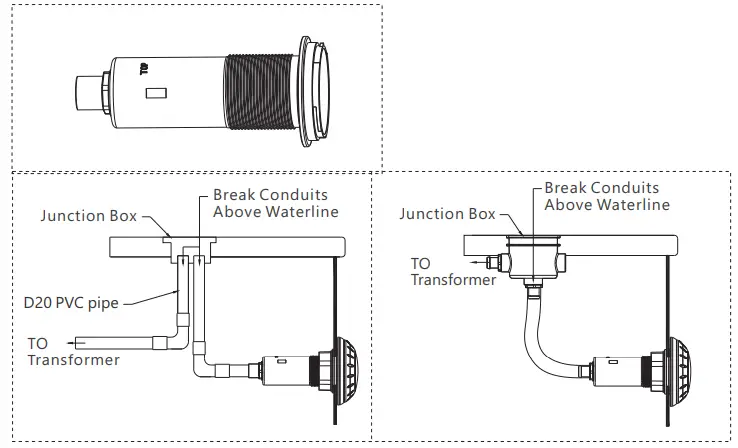
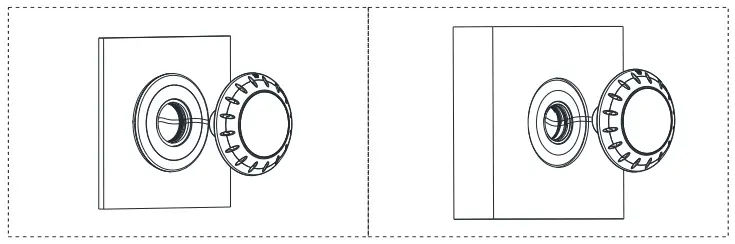
5.4 TOP13-EM
- TOP13-EM(Concrete Pool)
- TOP13-EM(Concrete Pool with Conduit)

- TOP13-EM(Concrete Pool+Liner)
- TOP13-EM(Vinyl Pool/Fiberglass Pool)

- TOP13-EM(Panel Pool/Timber Pool)

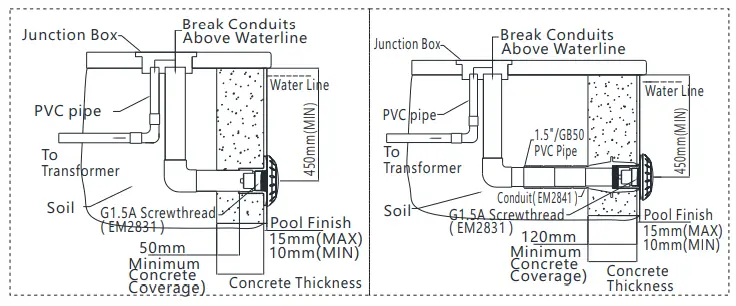
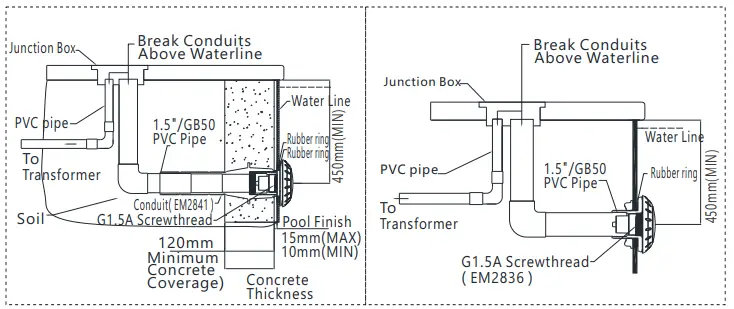
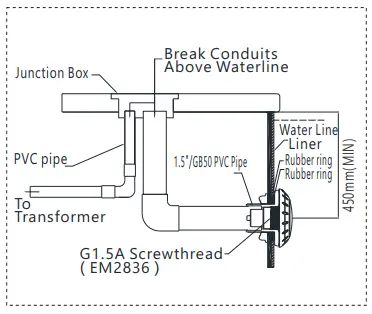
Installation Step:
- Install EM2836/EM2831/EM2841 fitting.

- Check the O-Ring on screwthread.

- The cable through the fitting.

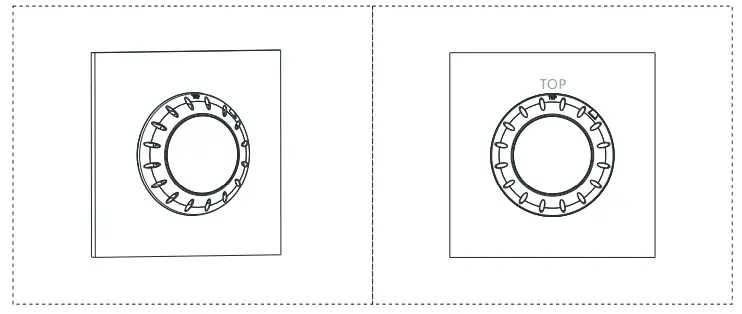
- Screw light,Adjust the tightness by O-Ring,and “TOP” upwards.
MAINTENANCE OF THE LIGHTS
- Do not leave the lights “on” above water for longer than 1 minute.
- Before switching on the lights, check whether the lights are fully submerged underwater and the circuit boxes are running properly.
- This unit does not need any kind of maintenance. If it is not working properly, please contact the authorized dealer where you purchase the unit from.
- Warranty will be voided if the Underwater Light was dismantled by unauthorized personnel.
SPARE PART LIST
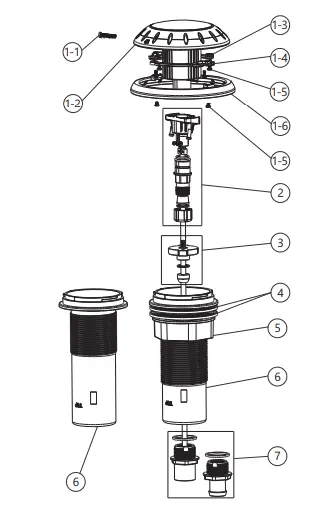
TOP13-C
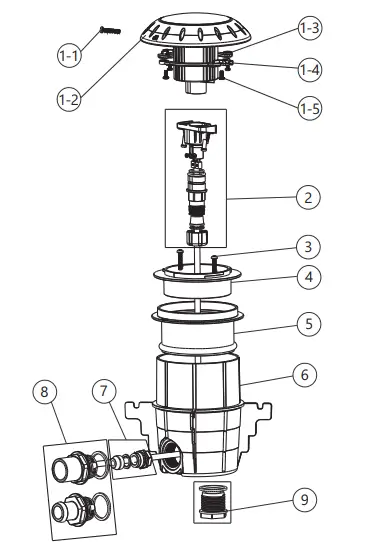
| Key No. | Part No. | Description | QTY |
| 1-1 | 112010111 | Screw M3.18.5(316) | 1 |
| 1-2 | 440547998 | 15 LEDs Panel 13W Color | 1 |
| 1-3 | 440647771 | Fastener Left | 1 |
| 1-4 | 440647772 | Fastener Right | 1 |
| 1-5 | 112362743 | M348 screw 316 | 4 |
| 1 | E042705 | 15 LEDs Panel Suite 13W Color for TOP13-C(Composition of 2-1,2-2,2-3,2-4) | 1 |
| 2 | E042702 | Retro-fit Connector(For TOPAZ,with cable 2.5m) | 1 |
| 105107997 | Cable 2.5m(For TOPAZ) | 1 | |
| 3 | 112010118 | M3*23 screw 316 | 2 |
| 4 | 440647773 | Fastener Ring | 1 |
| 5 | 440427770 | Clamp Ring | 1 |
| 6 | 440087770 | Lights Niche | 1 |
| 7 | E042706 | TOP13-C Water Joint Fittings for Cable | 1 |
| 8 | E042704 | Joint for wire & pipe Suite TOPAZ | 1 |
| 9 | 89041605 | Plug with 0-Ring | 1 |
| Key No. | Part No. | Description | QTY |
| 1-1 | 112010111 | Screw M3*18.5(316) | 1 |
| 1-2 | 440547998 | 15 LEDs Panel 13W Color | 1 |
| 1-3 | 440647771 | Fastener Left | 1 |
| 1-4 | 440647772 | Fastener Right | 1 |
| 1-5 | 112362743 | M3*8 screw 316 | 6 |
| 1-6 | 440517766 | Face Plate | 1 |
| 1 | E042701 | 15 LEDs Panel Suite 13W Color for TOP13-VINS(Composition of 1-1,1-2,1-3,1-4,1-5,1-6) | 1 |
| 2 | E042702 | Retro-fit Connector(For TOPAZ, with cable 2.5m) | 1 |
| 105107997 | Cable 2.5m(For TOPAZ) | 2 | |
| 3 | E042703 | TOP13-VL/VS Water Joint Fittings for Cable | |
| 4 | 2021091 | Rubber Ring | 1 |
| 5 | 440017769 | Nut | 1 |
| 6 | 440087767 | Lights Niche TOP13-VL | 1 |
| 440087768 | Lights Niche TOP13-VS | 1 | |
| 7 | E042704 | Joint for wire & pipe Suite TOPAZ | 1 |
TOP13-EM
| Key No | Part No. | Description | QTY |
| 1 | E042708 | 15 LEDs Panel 13W Color TOP13-EM | 1 |
| 2 | 111040072 | O-Ring (vinyl pool/concrete pool) | 1 |
TERMS OF THE WARRANTY
As original purchaser of this equipment have purchased from the manufacturer, through Authorized International Distributor or Dealer, warrants its products free from defects in materials and workmanship under normal use during warranty period. The warranty period begins on the day of purchase and extends only to the original purchaser. It is not transferable to anyone who subsequently purchases the product from you. It excludes all expendable parts.
During the warranty period, the authorized reseller will repair or replace defective parts with new parts or, at the option of the manufacturer, serviceable used parts that are equivalent or superior to new parts in performance.
This Limited Warranty extends only to products purchased from the authorized reseller. This Limited Warranty does not extend to any product that has been damaged or rendered defective
- as a result of accident, misuse or abuse;
- as a result of an act of God;
- by operation outside the usage parameters stated herein;
- by the use of parts not manufactured or sold by the manufacturer;
- by modification of the product;
- as a result of war or terrorist attack;
- as a result of service by anyone other than the authorized reseller or authorized agent.
EXCEPT AS EXPRESSLY SET FORTH IN THIS WARRANTY, THE MANUFACTURER MAKES NO OTHER WARRANTIES EXPRESSED OR IMPLIED, INCLUDING ANY IMPLIED WARRANTIES OR MERCHANTABILITY AND FITNESS FOR A PARTICULAR PURPOSE. THE MANUFACTURER EXPRESSLY DISCLAIMS ALL WARRANTIES NOT STATED IN THIS LIMITED WARRANTY. ANY IMPLIED WARRANTIES THAT MAY BE IMPOSED BY LAW ARE LIMITED TO THE TERMS OF THIS EXPRESS LIMITED WARRANTY.
EMAUX WATER TECHNOLOGY CO., LTD
ADDRESS FLAT A-D, 20/F., KAI BO 22, 22 WING KIN ROAD,
KWAI CHUNG, HONG KONG
PHONE +852 2832 9880
STRIVE FOR CLEAR WATER
www.emauxgroup.com


