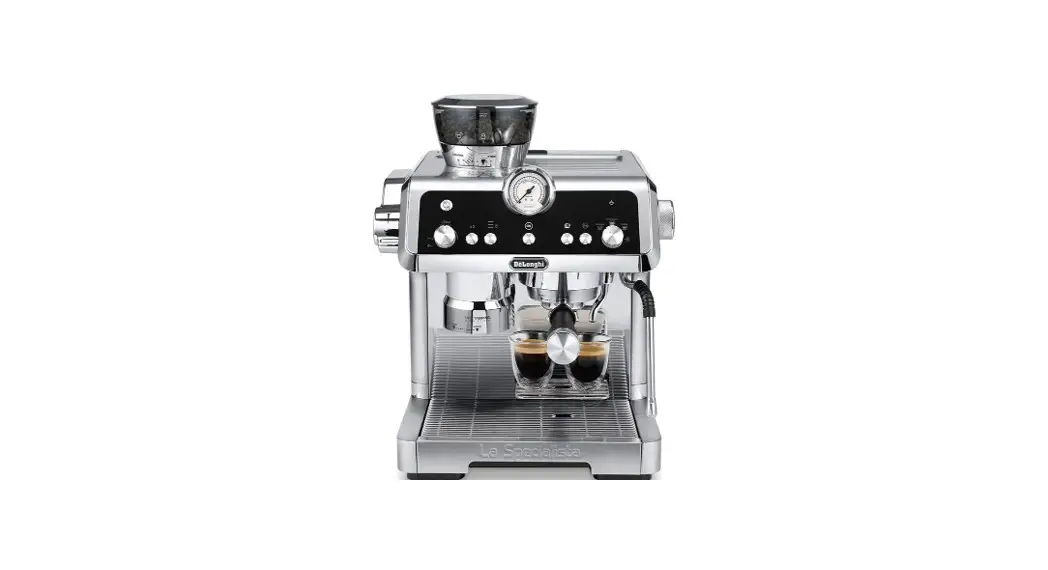
![]() EC935X
EC935X
The Specialist
PRESTIGE
Instruction Manual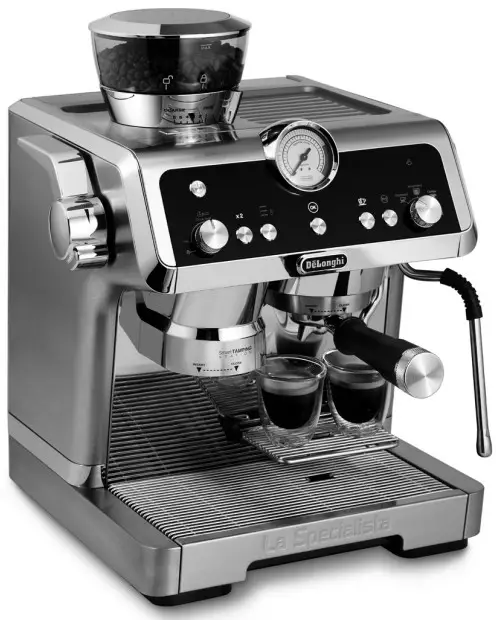
EC935X Coffee Maker
Before using the appliance, always read the safety warnings.
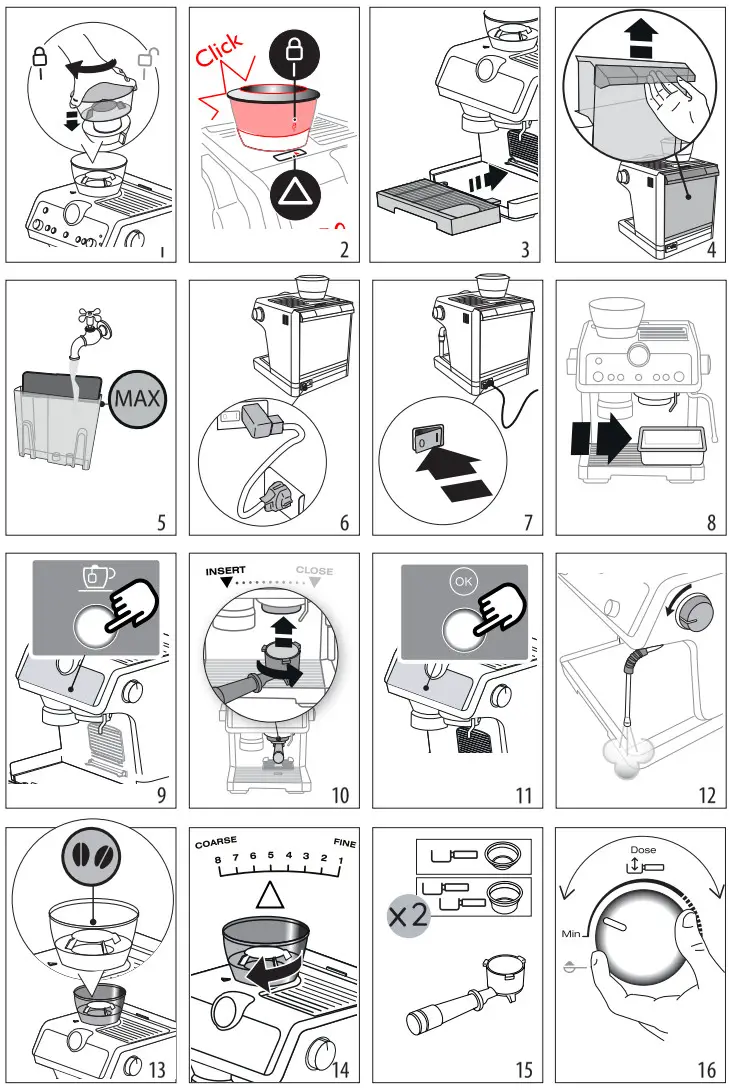
DESCRIPTION
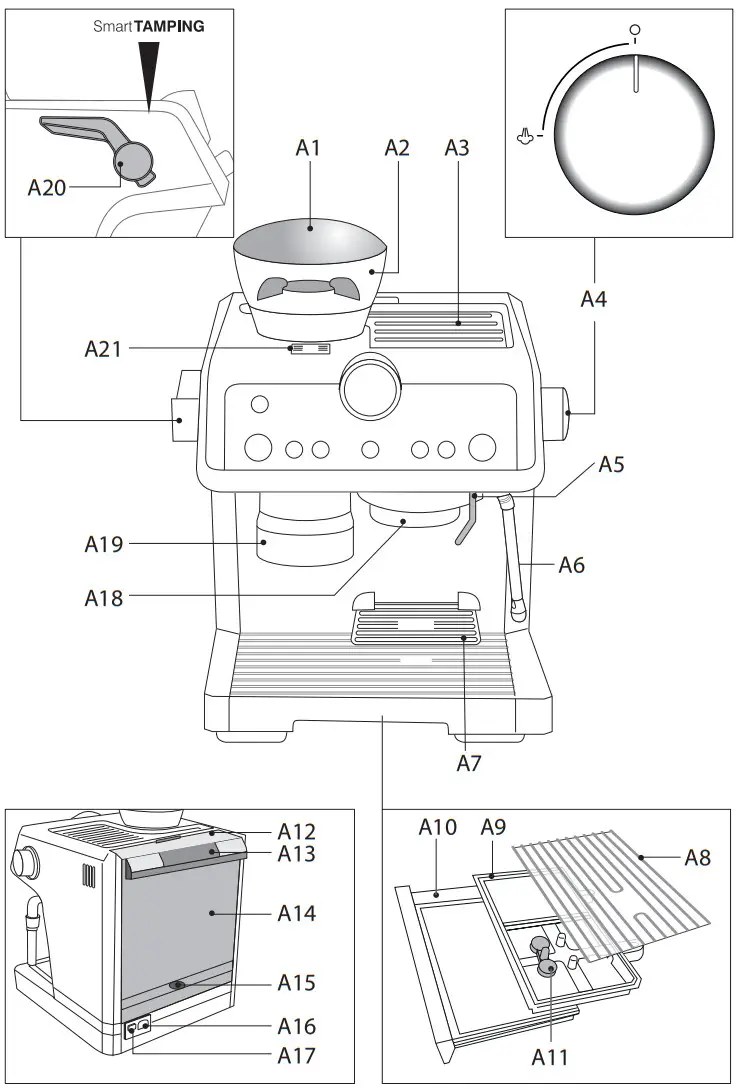
1.1 Description of appliance – A
| A1. Beans container lid A2. Beans container A3. Cup tray A4. Steam dial A5. Hot water spout A6. Steam wand A7. Cup grille for espresso A8. Cup grille for glasses or mugs A9. Drip tray grille A10. Drip tray A11. Drip tray water level indicator | A12. Water tank lid A13. Water tank extraction handle A14. Water tank A15. Water softener filter housing A16. Power cord connector socket A17. Main switch (ON/OFF) A18. Coffee spout A19. Coffee mill outlet (tamping station) A20. Presser lever A21. Cover giving access to coffee mill funnel |
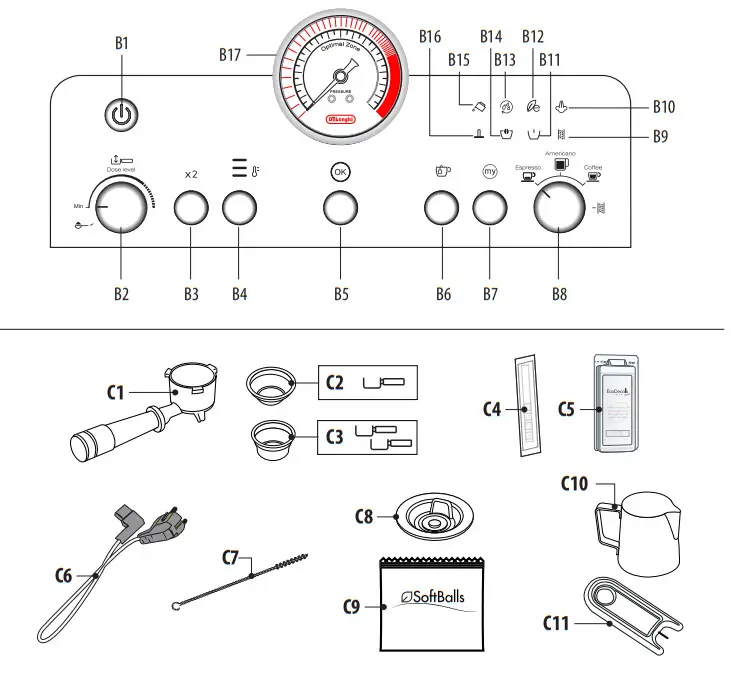
1.2 Description of control panel – B
| B1. ON/Standby button B2. Ground coffee quantity dial B3. “2x” button: selection of 2-coffee filter B4. Coffee temperature button B5. “OK” button: delivery of beverage/confirm B6. Hot water button B7. “My” button: customization of beverage quantity B8. Function selector dial • Espresso • Americano • Coffee • DescaleB1. ON/Standby button B2. Ground coffee quantity dial B3. “2x” button: selection of 2-coffee filter B4. Coffee temperature button B5. “OK” button: delivery of beverage/confirm B6. Hot water button B7. “My” button: customization of beverage quantity B8. Function selector dial • Espresso • Americano • Coffee • Descale | B9. “Descale” light B10. “Steam ready” light B11. “No beans container” light B12. “Energy saving” light B13. “Clean” light (see “8.1 Cleaning of the coffee outlet”) B14. “Beans container empty” light B15. “No water” light B16. “Press” light B17. Pressure gauge |
1.3 Description of accessories – C
| C1. Filter holder C2. 1 cup filter C3. 2 cup filter C4. “Total Hardness Test” paper C5. Descaler C6. Removable power cord | C7. Tube brush C8. Coffee outlet cleaning accessory C9. Softballs C10. Milk jug C11. Steam wand cleaning needle |
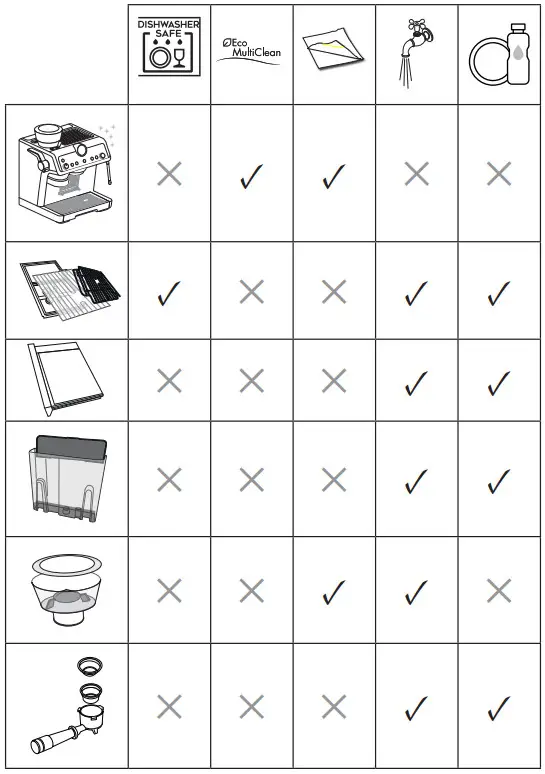
1.4 Optional cleaning accessories recommended by the manufacturer
For more information, visit www.delonghi.com.
 | Cleaning tabs (see “8.1 Cleaning the coffee outlet”) |
 | Cleaner EAN: 8004399333307 |
PREPARING THE APPLIANCE
Wash all accessories with warm water and washing-up liquid, then proceed as follows:
- Locate the beans container in the (A2) coffee mill (fig.
1).The container is correctly in place when the arrow ▲ aligns with the symbol and a “click” is heard (fig. 2).
 - Locate the drip tray (A10) together with the cup grille (A8) and drip tray grille (A9) (fig. 3);
- Take out the water tank (A14) (fig. 4) and fill with fresh clean water, taking care not to exceed the MAX level (fig. 5).
- Put the tank back in the appliance.
Important: Never operate the appliance without water in the tank or without the tank.
Please note: You should customise water hardness as soon as possible following the instructions in section “7. Settings menu”.
SETTING UP THE APPLIANCE
- Plug the power cord connector (C6) into the socket (A16) at the back of the appliance (fig. 6), then plug into the mains socket. Make sure the main switch (A17) at the back of the appliance is pressed and in the I position (fig. 7);
- Place a container of at least 100 ml capacity under the hot water spout (next to the coffee spout (A18)) as illustrated (fig. 8).
- Press the button (B6) next to the
 indicator light (fig. 9): delivery will start and then stop automatically. Empty the container.
Before using the coffee maker, the internal circuits of the machine must be rinsed. Proceed as follows: - Attach the filter holder (C1) complete with filter to the appliance. To attach correctly, align the filter holder handle with “INSERT” (fig. 10), then turn the handle to the right until it is aligned in the “CLOSE” position;
- Place a container under the filter holder and the steam wand (A6);
- Press the OK button (B5): delivery will start (fig. 11);
- When delivery has finished, turn the steam dial (A4) (fig.
12) and release the jet for a few seconds so as to rinse the steam circuit: to ensure best possible results, repeat the operation 3 or 4 times. The purpose of this procedure is to purge any water from the circuit before using steam to prepare a beverage.
The appliance is ready for use.
Please note: We also recommend rinsing the internal circuits if the appliance is not used for a long period.
The first time you use the appliance, you need to make 4-5 cups of coffee before the appliance starts to give satisfactory results.
Pay particular attention to the quantity of pre-ground coffee in the filter ((C2) or (C3)) (see instructions in section “4.1 Step 1 – Grinding”).
Proceed as described in section “The “perfect dose””.
PREPARATION OF COFFEE
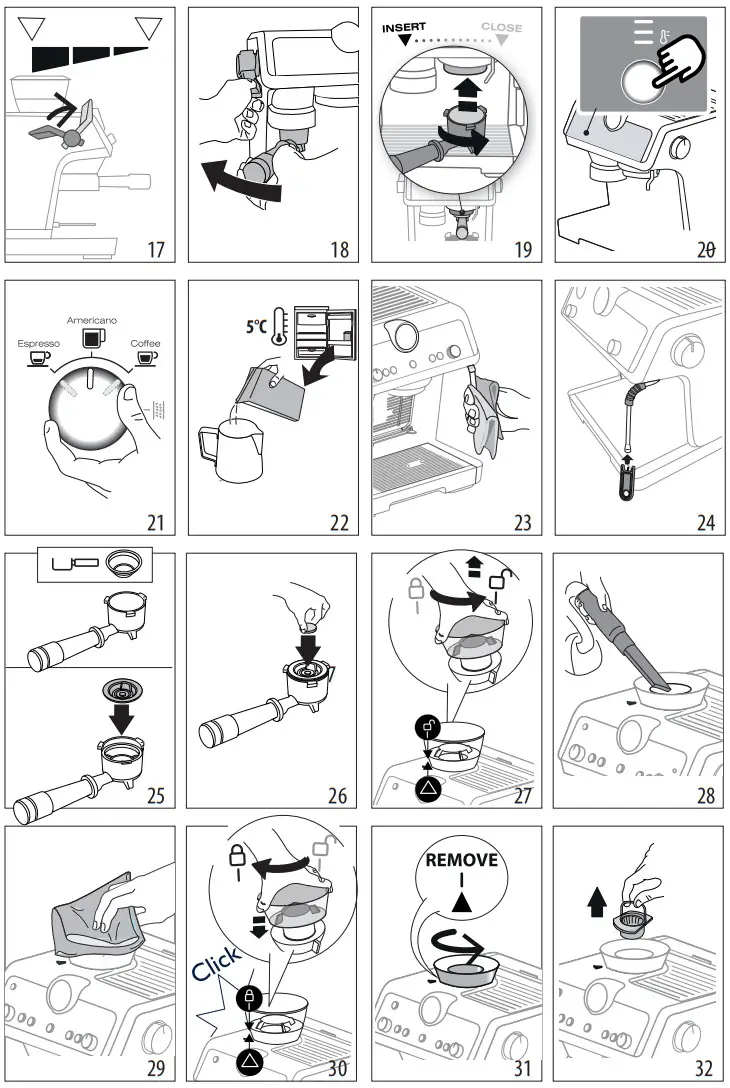
4.1 Step 1 – Grinding
- Put coffee beans in the container (A2) (fig. 13). It is best to grind only a quantity of beans sufficient for immediate use, so that the coffee will always be fresh.
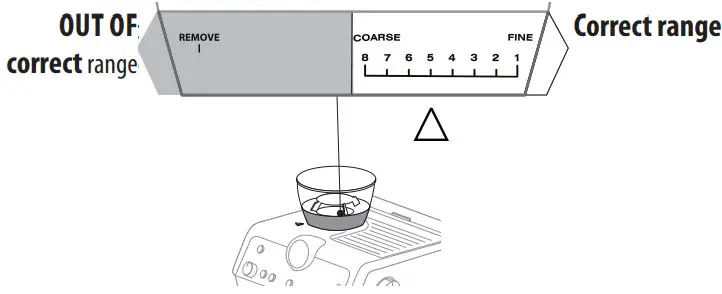
- Select the grinding level (fig. 14). The factory setting is 5 (medium ground). If this is too fine or too coarse, adjust the level according to personal taste and to the type of coffee being used (the adjustment must be made only when the coffee mill is in operation).
Please note: A grinding level between 3 and 6 is recommended for most coffees. A grinding level of 1 or 2 is very fine and should be used with special coffees only (light roasted) - Place the ground coffee filter (C2) or (C3) in the filter holder (C1) (fig. 15); If the 2-cup filter is in use, press the 2x button (B3): this will also double the quantity of espresso coffee delivered from the spout.
- Set the quantity by adjusting the dial (B2), starting from the minimum position (fig. 16).
Refer to the section on “Adjusting the quantity of ground coffee in the filter” for further indications. - Attach the filter holder to the outlet of the coffee mill (A19), aligning it with “INSERT”, then turning it to the right.
Grinding begins when the filter holder reaches the CLOSE position, then stops automatically.
Adjusting the quantity of ground coffee in the filter

Different varieties of coffee bean give different results when ground: consequently, the initial adjustment of the dosage requires special care.
This illustration shows how to regulate the dosage, based on the roast colour: this should be taken as a general guide, given that in practice, the final adjustment can vary according to the composition of the beans.
- Set the dosage starting from the minimum position.
- Looking at the roast colour of your particular beans, turn the dial slowly to find the right adjustment.
4.2 Step 2 – Tamping
- Following the grinding step, bring the tamping lever (A20) down completely (keeping the filter in place under the outlet) (fig. 17). For a perfect result, repeat the step twice.
- Keep the tamping lever fully down when removing the filter holder (fig 18) and then return the lever to its initial position.
- Having checked that the dosage is as required (see “The “perfect dose””), attach the filter holder to the brewer outlet (A18) (fig. 19).
Please note: Coffee left on the edges of the filter after pressing does not in any way compromise the quality of the brewing and therefore the end result.
The “perfect dose”
- A reference mark inside the coffee filters identifies the perfect quantity.
 – Laser marked filters: the perfect quantity corresponds to the top line of the mark.
– Filters with relief mark: the perfect quantity corresponds to the line in relief. - Make sure the coffee is at the right level after tamping. It might be necessary to adjust the level a few times using the dial (B2) before the ideal dosage is achieved.
- If the coffee is extracted too strongly or too weakly even at the ideal dosage, this can be corrected by grinding the beans more finely or more coarsely (see “4.1 Step 1 – Grinding”).
To correct over-extraction (coffee released too slowly), select a coarser setting.
To correct under-extraction (coffee released too quickly), select a finer setting. - Barista tips: Draw the filter holder away from the tamper with the lever (A20) still down, so that the dose of coffee has a perfectly smooth finish.
- When using pre-ground coffee:
– spoon the pre-ground coffee into the filter;
– turn the dial to ;
;
– attach the filter holder to the grinder outlet;
– lower the tamping lever.
 – Laser marked filters: the perfect quantity corresponds to the top line of the mark.
4.3 Step 3 – Brewing
- Select the temperature (fig. 20) (see “Coffee preparation temperature”).
- Select the desired beverage (fig. 21).
- Press OK (B5) to start brewing (fig. 11) (pre-infusion and infusion). Delivery of the coffee will stop automatically.
Coffee preparation temperature
The water temperature is controlled during the entire preparation process to ensure its stability during the extraction step.
The Specialista Prestigio offers 3 infusion temperatures* set in a range between 92 and 96 °C.
The temperature effectively utilized will depend typically on the variety of been and the roast:
Robusta beans require a lower temperature, and Arabica beans a higher temperature.
The same applies for dark roasted beans or for light roasted beans, respectively.
| Temperature level | Corresponding indicator light | Roast colour |
| MIN |  | Dark |
| MED |  | Medium-dark |
| MAX |  | Light – Medium |
* This is the temperature of the water in the thermoblock.
It is therefore not the temperature of the beverage in the cup or the temperature of the beverage at the moment of release from the outlets of the filter holder.
MAKING MILK BEVERAGES
5.1 Frothing the milk
- Fill the jug (C10) with the amount of milk to be warmed/frothed, bearing in mind that the volume of the milk will increase 2- or 3-fold (fig. 22). For a denser and more evenly distributed froth, best results will be achieved using whole cow’s milk at refrigerator temperature (about 5 °C).

- To froth the milk, offer the nozzle of the steam wand (A6) to the surface of the liquid: this will allow air to mix with the milk and steam.
- Keep the steam nozzle just in contact with the surface, taking care not to let in too much air and create unsuitably large bubbles.
- Immerse the nozzle just beneath the surface of the milk: this will create a vortex in the liquid. Once the milk is heated to the desired temperature, turn off the steam and wait for the flow to stop completely before removing the milk jug from the machine.

Barista tips:
- Fresh milk is best. Always use fresh milk straight from the fridge.
- For best results, always replace the milk jug in the fridge when not in use.
- Whole milk ensures optimum results. The appearance and texture of froth depending on the nature of the dairy milk or vegetable beverages utilized.
- After frothing the milk, eliminate unwanted bubbles by swirling the jug gently.
Cleaning the steam wand:
- Following use, always wipe the steam wand (fig. 23) with a cloth to remove residual deposits of milk. The recommended procedure for in-depth cleaning is to use Eco MultiClean: this product ensures maximum hygiene by removing milk proteins and fats, and can be used for cleaning the entire machine.
- Release steam for a few seconds to clean the wand (fig. 12).
- Wait until the steam wand has cooled down: to ensure the wand works efficiently over time, use the special cleaning tool (C11) to free the 3 holes (fig. 24) of any obstruction.
CUSTOMISING THE QUANTITY OF COFFEE BEVERAGES WITH THE  BUTTON (B7)
- Prepare the appliance to deliver 1 or 2 cups of the coffee beverage you want to make, as far as attaching the filter holder (C1) complete with the (C2) or (C3) filter and ground coffee.
- Turn the dial (B8) to select the beverage being programmed.
- Press the button: the light associated with the button blinks.
- Press the OK button to start delivery. The lights associated with the Ok and buttons blink.
- When the required quantity is reached, press OK. If the beverage includes another ingredient, the machine will start delivering this one as well: once the required quantity
has been reached, press OK. - Press the button to save. The appliance is now ready again for further use and the light remains on.
If there is no wish to save the new setting, simply press any other button.
Please note:
- Coffee beverages can be programmed, but the delivery of steam and hot water can not.
- Programming changes the quantity of beverage delivered, but not the quantity of ground coffee
- “2x” beverages can be programmed separately.
- To restore the default factory settings, press and hold the button until the light goes off. The selected beverage reverts to the default quantity.
| Coffee recipe | Default quantity | Programmable quantity |
 | 35 ml | from 25 to 90 ml |
 | 70 ml | from 50 to 180 ml |
 | 80 ml | from 50 to 120 ml |
 | 160 ml | from 120 to 240 ml |
 | 120 ml | • espresso: from 25 to 60 ml • water: from 25 to 120 ml |
 | 240 ml | • espresso: from 50 to 120 ml • water: from 50 to 240 ml |
- Enter the menu:
Press together and hold for 5 seconds 2x - Settings selected with dial (B8)

orresponding setting Turn to Adjustments Extra grinding adjustment 
×2 ➡Range 1  ➡Range 2
Water hardness 
×2 ➡ soft ➡ medium ➡ hard/very hard
Auto-off 
×2 ➡ 9 minutes ➡ 1.5 hours ➡ 3 hours - Settings selected with buttons
Energy saving  ➡ Active ➡
  Off
OffDefault values Press the button and hold for at least 5 seconds , until the light remains permanently on - Save the new settings by pressing ON/Standby (B1)


CLEANING THE APPLIANCE
Important!
- Do not use solvents, abrasive detergents or alcohol to clean the coffee machine.
- Do not use metal objects to remove encrustations or coffee deposits as they could scratch metal or plastic surfaces.
- Should the machine remain idle for more than a week, it is advisable to carry out a rinse cycle before preparing any beverages.
Danger!
- Never immerse the coffee maker in water when cleaning: it is an electrical appliance.
- Before commencing any cleaning operation on the outside of the machine, turn it off, unplug it from the mains socket and wait for it to cool down.
8.1 Cleaning the coffee outlet
When ![]() light comes on (orange) (B13), it means that the coffee circuit needs to be cleaned. This requires special cleaning tabs for coffee makers, which must be purchased separately. For more information, visit www.Delonghi.com.
light comes on (orange) (B13), it means that the coffee circuit needs to be cleaned. This requires special cleaning tabs for coffee makers, which must be purchased separately. For more information, visit www.Delonghi.com.
- Insert the 1-cup filter (C2) in the holder (C1) (fig. 25).
- Position the cleaning accessory in the filter (C8) (fig. 25) and press home.
- Place the cleaning tab on the accessory (fig. 26).
- Attach the filter holder to the coffee outlet (A18).
- Fill the tank(A14) with water. Make sure the drip tray (A10) is empty.
- Press and hold the button (B6) until the light
 (B13) comes on. After a few minutes, the cleaning cycle stops automatically.
 - Remove the filter holder and the cleaning accessory.
- Wash the filter holder and the filter under running water.
- Attach the filter holder again and run a rinse cycle by pressing the button: it is advisable to place a container under the filter holder.
- Remove and empty the drip tray.
Please note:
This cleaning cycle can be initiated at any time by pressing the button and holding for a few seconds. To cancel, press and hold the ![]() button for at least 10 seconds.
button for at least 10 seconds.
8.2 Cleaning the beans container housing
- Make sure the beans container (A2) is empty. If in doubt, operate the mill briefly to make certain.
- Release the container by turning it anticlockwise and detach it from the machine (fig. 27).
- Remove coffee residues using a vacuum cleaner (fig. 28).
- Clean the beans container housing with a moist cloth, and wipe dry (fig. 29);
- Reposition the beans container in the coffee mill. The container is correctly in place when the arrow ▲ is aligned with the symbol and a “click” is heard (fig.30).
8.3 Cleaning the burrs
When cleaning the beans container (A2), clean the container housing and the top burr with a moist cloth. If the burrs need to be removed and replaced, contact a service centre.
The burr can be removed in the event of the coffee mill being jammed by the presence of foreign matter. Should this occur, remove the beans container and proceed as follows:
- Attach the filter holder (C1) and operate the mill brieflywithout beans to free the internal duct.
- Turn the appliance off.
- Turn the grinding adjustment dial anticlockwise as far as it will go, which is the “REMOVE” position (fig. 31).
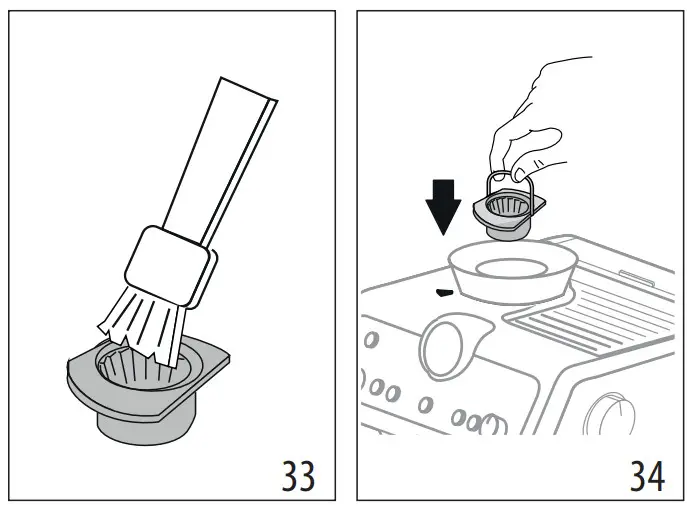
- Gripping the top burr by the handle, pull it up and out of the housing (fig.32).
- Clean the burr with a brush (fig. 33) and remove coffee residues using a vacuum cleaner (fig. 28).

- Replace the burr in the housing (fig. 34);
- Turn the adjustment dial to select the desired grinding level (fig. 14);
Check that the burr is properly seated by pulling on the handle: if it is correctly in place, it will not move.
8.4 Replacing the burrs
When the quantity of ground coffee becomes less than expected, contact a service centre to have the burrs replaced: with the new burrs fitted, adjust the coffee mill by accessing the settings menu (“7.
Settings menu”) and selecting the first range of the “extra grinding adjustment” setting.
Next, turn the ground coffee quantity adjustment dial (B2) to the MIN position and set the dose as for first-time use (see “The “perfect dose””).
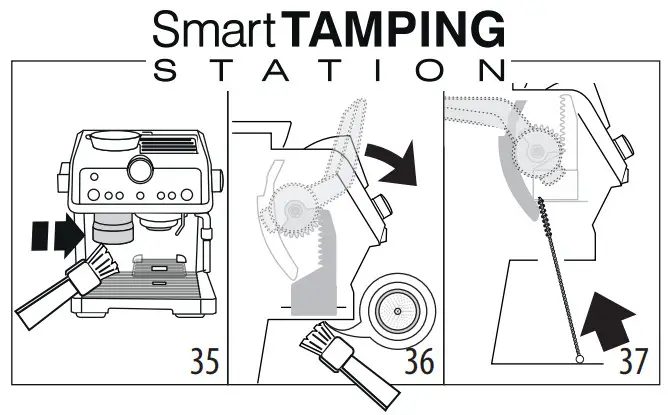
8.5 Cleaning the “Smart tamping station”
- Clean the attachment area with a brush (fig. 35).
- Pull the lever (A20) down completely and clean the tamper with a brush (fig. 36), then release the lever.
- Use the tube brush (C7) to clean the coffee funnel (fig. 37).
WATER HARDNESS
The descale light ![]() (B9) comes on following a predetermined period of operation that depends on a water hardness setting.
(B9) comes on following a predetermined period of operation that depends on a water hardness setting.
The machine can also be programmed according to the actual hardness of the local water supply, in which case descaling may be required less frequently.
- Remove the “TOTAL HARDNESS TEST” indicator paper (C4) from its pack.
- Immerse the paper completely in a glass of water for one second.
- Remove the paper from the water and shake lightly. Set the machine accordingly, as indicated in the section “7. Settings menu”.
Water Hardness Test Result Button Level 
×2 1 soft water 
2 medium water 

3 hard or very hard water - Set the machine accordingly, as indicated in the section “7. Settings menu”.


HOW TO USE SOFTBALLS
Softballs (C9) are an innovative treatment system that prolongs the life of the machine, without altering the properties of the water, while ensuring consistently creamy and aromatic coffee.
To optimize the effectiveness of the treatment, leave Softballs in the water overnight before use.
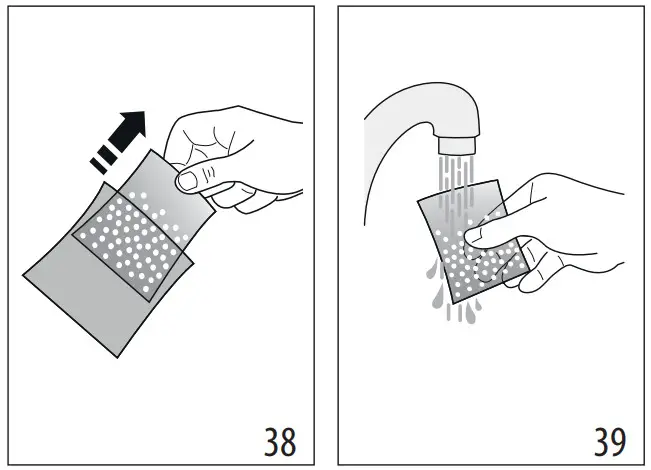
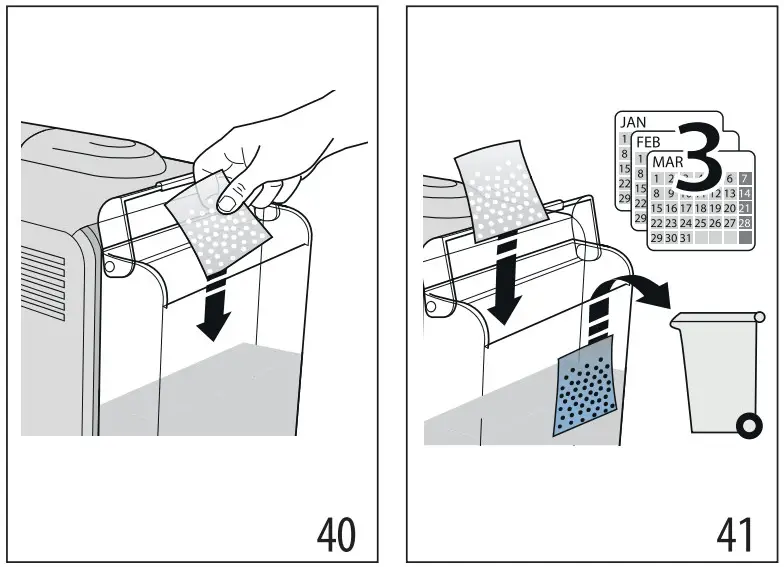
- Take the sachet of Softballs from the wrapper (fig. 38 ).

- Rinse the sachet of Softballs under running water (fig. 39).
- Immerse the sachet in the water tank (A14) (fig. 40).

- Change the sachet of Softballs every 3 months (fig. 41).
DESCALING
Important!
- Before using the descaler, (C5)read the instructions and the labelling on the pack.
- Use De’Longhi descaler only. Using unsuitable descaler products and/or performing the descale procedure incorrectly could give rise to faults not covered by the manufacturer’s guarantee.
- Descaler can cause damage to delicate surfaces. If the product is accidentally spilt, dry immediately.
| To descale | |
| Descaler | De’Longhi descaler |
| Container | Capacity 2 litres |
| Time | ~40min |
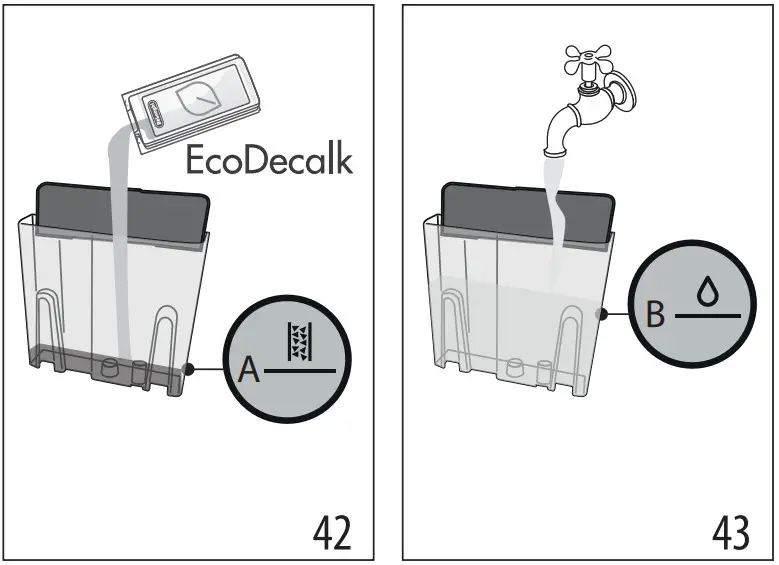
- (REMOVE WATER SOFTENER AND SOFTBALLS, IF PRESENT).
Pour the descaler into the water tank (A14) up to the first level A marked on the inside of the tank (which corre- sponds to the contents of one 100ml pack) (fig. 42).
- Add water up to level
 B (fig. 43). Now reposition the water tank in the machine.
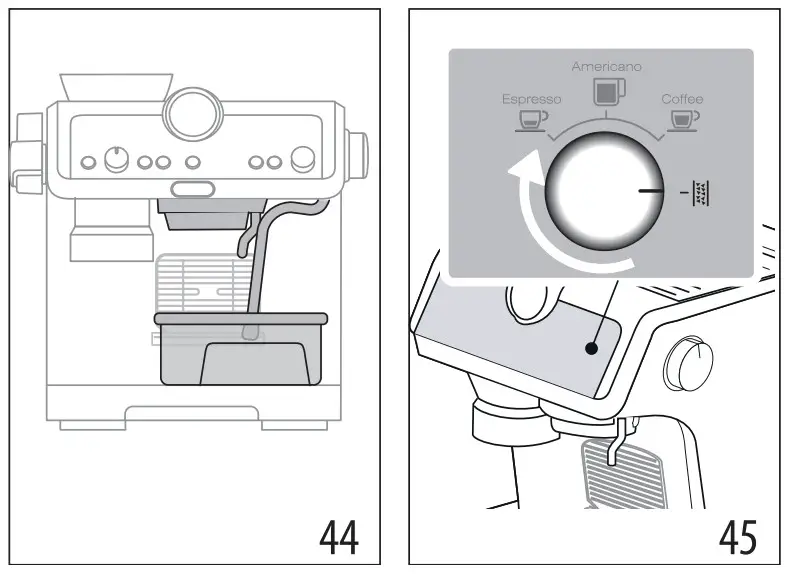
- Make sure that the filter holder (C1) is not attached. Position a container under the coffee outlet and the hot water spout, and another under the steam wand (A6) (fig. 44).
- Turn the knob (B8) to (fig. 45): the OK light comes on, orange in colour and the light blinks.
- Press the OK button: the OK light blinks.
- The descaling programme starts and the descaler liquid comes out of the spouts. The descale programme removes limescale deposits from inside the appliance by automatically performing a series of rinses and pauses until the tank is empty.
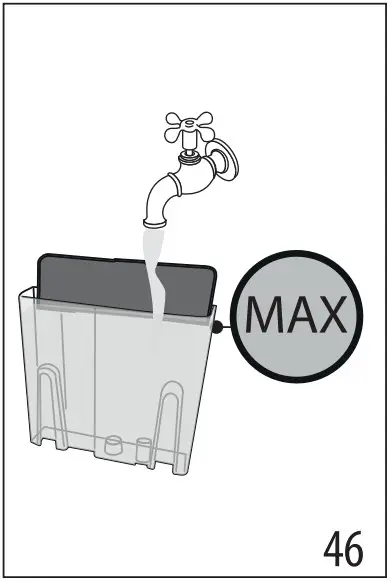
Descaling ceases and the colour of the OK light turns to white. This means that a rinse cycle must be carried out: - Empty the containers used to collect the descaler solution and reposition them under the spouts.
- Remove the water tank, empty out any residual descaler solution, rinse under running water and fill with fresh water up to the MAX level (fig. 46). Put the tank back in its housing.

- Press the OK button: the rinse cycle will start.
- Once the rinse cycle has been completed, water will stop draining out and the machine is ready for use.
- Empty the containers used to collect the rinse water.
- Remove and empty the drip tray, then reposition it in the machine.
- Remove the tank, fill with fresh water, and reposition in the machine.
The machine is now ready for use.
Please note:
- The descaling cycle can be started up at any time (even if the relative light has not yet come on).
- Should descaling be started up by mistake, it can be stopped by pressing the OK button and holding for 10 seconds; the rinse cycle cannot be stopped.
EXPLANATION OF INDICATOR LIGHTS
| LIGHTS | EXPLANATION OF LIGHTS | OPERATION |
| All lights blink briefly | Turning the machine on | Self-diagnosis |
| The machine has been turned on for the first time and the water circuit must be filled | Proceed as indicated in section “3. Setting up the appliance” | |
• • | The machine is ready to deliver fluids | Set up the machine and proceed with prepa- ration of the beverage |
| Energy saving is enabled | Refer to section “7. Settings menu” for in- structions on disabling the function | |
| permanently on | The beans container (A2)is empty | Fill the beans container |
| The grinding function has been se- lected, but the beans container (A2) is empty | Fill the beans container | |
The dial (B2) has been set to the MAX adjustment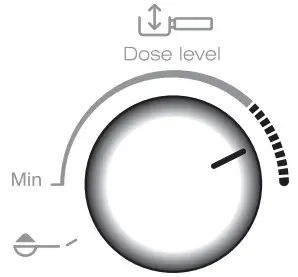 | When the freshly ground coffee in the filter is not sufficient, select a new grinding range as indicated in section “6. Menù settings”. | |
| There is not enough water in the tank (A14) or the tank is not correctly in place | Fill the tank with water, or remove the tank and reposition it correctly |
| LIGHTS | EXPLANATION OF LIGHTS | OPERATION |
| An attempt is being made to prepare a beverage, but with water tank (A14) empty | Fill the tank with water | |
| Because the beans are too finely ground, the coffee is delivered too slowly or not at all | Remove the filter holder (C1) and repeat the coffee-making steps, bearing in the mind the indications given in sections “4.1 Step 1 – Grinding” and “4.2 Step 2 – Tamping” | |
| The coffee filter (C2) or (C3) is obstructed | Rinse the filters under running water | |
| The tank (A14) is not properly in place and the relative valves are not open | Press down lightly on the tank to open the valves | |
| Limescale in the water circuit | Descale as described in section “11. Descaling” | |
| The machine is ready to deliver steam | The machine is at the right temperature to de- liver steam. To deliver steam from the wand, turn the steam dial (A4) | |
| The machine is switched on and energy saving is enabled. The steam dial (A4) is in the steam delivery position | The indicator light blinks to indicate that the machine is preparing to deliver steam. Deliv- ery begins as soon as the steam circuit is up to temperature | |
| The machine is ready to deliver steam | The machine is at the right temperature to provide steam when the light remains per- manently on | |
| The machine is delivering steam | ||
| The beans container is not in place | Position the beans container (A2) correctly, or check that it is correctly in place The con- tainer is correctly in place when the arrow ▲ is aligned with the |
| LIGHTS | EXPLANATION OF LIGHTS | OPERATION |
| The setting of the grinding level adjust- ment selector is incorrect, or beyond the maximum adjustment possible | Return the selector to one of the regular settings (between 1 and 8), remembering that: • The grinding adjustment must be made with the mill in operation • The mill should be adjusted one level at a time, and used at least 5 times between one adjustment and the next | |
 | ||
| The machine calls for tamping | The coffee has just been ground and the filter holder is attached to the coffee mill | |
| The filter holder has been detached from the coffee mill without tamping | Release the filter holder and proceed, tamp-ing the coffee as described in section ‘The “perfect dose’ “When using pre-ground coffee:” | |
| The filter holder has been released with grinding incomplete, or the tamping step has occurred too quickly | Repeat the grinding step | |
| The coffee mill funnel is clogged | Clean as described in section “8.5 Cleaning the “Smart tamping station””. If the problem persists, access the funnel by opening the relative cover and clear the blockage using the tube brush | |
| The burrs are jammed by foreign matter | Remove the foreign matter and clean the burrs as indicated in section “8.3 Cleaning the burrs”. | |
| Descaling is required | Carry out descaling as described in section “11. Descaling” | |
| Descaling is in progress | Complete the operation as described in section “11. Descaling” | |
| Rinsing is required | ||
| LIGHTS | EXPLANATION OF LIGHTS | OPERATION |
| Rinsing is in progress following comple- tion of the descale cycle | ||
| The coffee outlet requires cleaning | See section “8.1 Cleaning the coffee outlet” | |
| Cleaning of the coffee outlet is in progress | ||
| All indicator lights blink | General alarm | Contact Customer Services |
TROUBLESHOOTING
| PROBLEM | CAUSE | SOLUTION |
| There is water in the drip tray (A10) | This water comes from the internal cir- cuits of the machine and is a normal con- sequence of their operation | Empty and clean the drip tray on a reg- ular basis |
| The machine fails to produce espresso coffee | No water in the tank (A14) | Fill the tank |
| The | Press | |
| Blockage in the coffee filter (C2) or (C3) | Rinse the filters under running water | |
| The tank (A14)is not properly in place and the valves at the bottom are not open | Press down lightly on the tank to open the valves at the bottom | |
| Limescale in the water circuit | Descale as described in section “11. Descaling” | |
| Coffee ground too finely | Remove the filter holder (C1) and repeat the coffee-making steps, bearing in the mind the indications given in sections “4.1 Step 1 – Grinding” and “4.2 Step 2 – Tamping” | |
| The filter holder cannot be attached to the coffee outlet | The ground coffee has not been tamped or the quantity is excessive | Repeat the grinding step with different settings. Reduce the dosage quantity: check that the filter (C2) or (C3) (1 or 2 cups) and the grinding dosage are cor- rectly matched (2x button (B3) selected or otherwise) |
| The espresso coffee drips from the edges of the filter holder (C1) instead of from the holes | The filter holder is not properly attached | Attach the filter holder correctly and ro- tate firmly as far as it will go |
| The seal of the coffee outlet (A18) has lost flexibility or is dirty | Have the coffee outlet seal replaced by a Service Centre | |
| Blockage in the coffee filter (C2) or (C3) | Rinse the filters under running water |
| PROBLEM | CAUSE | SOLUTION |
| The espresso cream is too white (deliv- ered from the spout too fast) | The machine settings need to be reappraised | Remove the filter holder and repeat the coffee-making steps, bearing in the mind the indications given in sections “4.1 Step 1 – Grinding” and “4.2 Step 2 – Tamping” |
| The espresso cream is too dark (delivered from the spout too slowly) | The machine settings need to be reappraised | Remove the filter holder (C1) and repeat the coffee-making steps, bearing in the mind the indications given in sections “4.1 Step 1 – Grinding” and “4.2 Step 2 – Tamping” |
| On completion of the descale cycle, the machine calls for a further rinse | During the rinse cycle, the water tank has not been filled to the MAX level | Repeat the rinse cycle (see section “11. Descaling”) |
| The machine does not grind the coffee | Foreign matter has found its way into the coffee mill | Clean the burrs as described in section “8.3 Cleaning the burrs”, making sure you remove all the beans from the beans container (A2) before extracting it. Be- fore putting the burr back, vacuum all residues from the housing |
| The beans container (A2) is not correctly positioned | The container is correctly in place when the arrow ▲ is aligned with the | |
| Changing to a different type of coffee | All beans currently in the machine must first be removed | • Empty the beans container (A2) (oper- ating the coffee mill without beans or removing any beans still present with a vacuum cleaner) • Attach the filter holder (C1) and op- erate the mill a few times without beans to free the internal duct: now attach the filter holder to the coffee mill outlet (A19) aligning it with the INSERT mark, and turn it to the right. Grinding begins when the filter holder reaches the CLOSE position, then stops automatically. Repeat until the filter is empty • Fill the container (A2) with the new variety of coffee beans • If the amount of ground coffee does not give the perfect dose, proceed to set up the machine as for first-time use |
| PROBLEM | CAUSE | SOLUTION |
| After grinding, the coffee filter (C2) or (C3) is empty | The funnel of the coffee mill is clogged em persists, access the funnel by open | Clean as described in section”8.5 Cleaning the “Smart tamping station'”‘. If the probling the relative cover (A21) and clear the blockage using the tube brush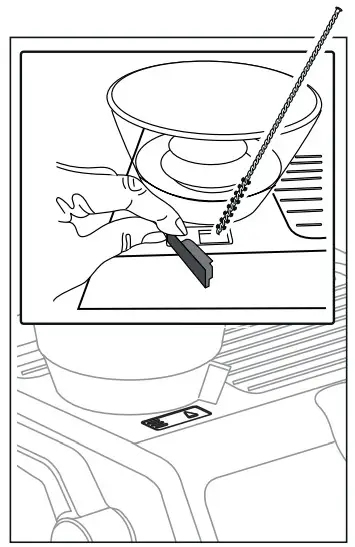 |
| Aer grinding, there is too much coffee After in the filter | ||
| After grinding, the amount of coffee in the filter (C2) or (C3) does not give the “perfect dose” | The “Smart Tamping Station” needs cleaning | Clean as described in section”8.5 Cleaning the “Smart tamping stations”; then repeat the grinding step |
| The quantity of ground coffee needs adjusting | Adjust the quantity of coffee with the dial (B2), following the instructions in section “The”perfect dose'”‘. If the dial is already in the max. position, proceed as described in section “7. Settings menu” – “Extra grinding adjustment” | |
| Over time the burrs wear down | Have the burrs replaced as indicated in section”8.4 Replacing the burrs”. |
 5713248871_00_0321
Register Now![]()
www.delonghi.com/register
De’Longhi Appliances via Seitz, 47 31100 Treviso Italia
www.delonghi.com


