 TriVision JH06 Home Security Cameras Wireless
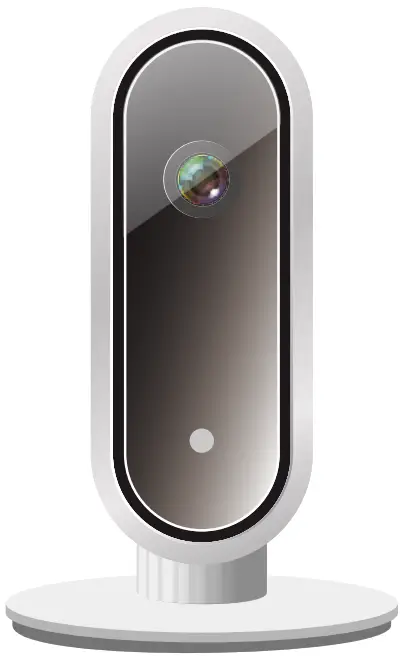
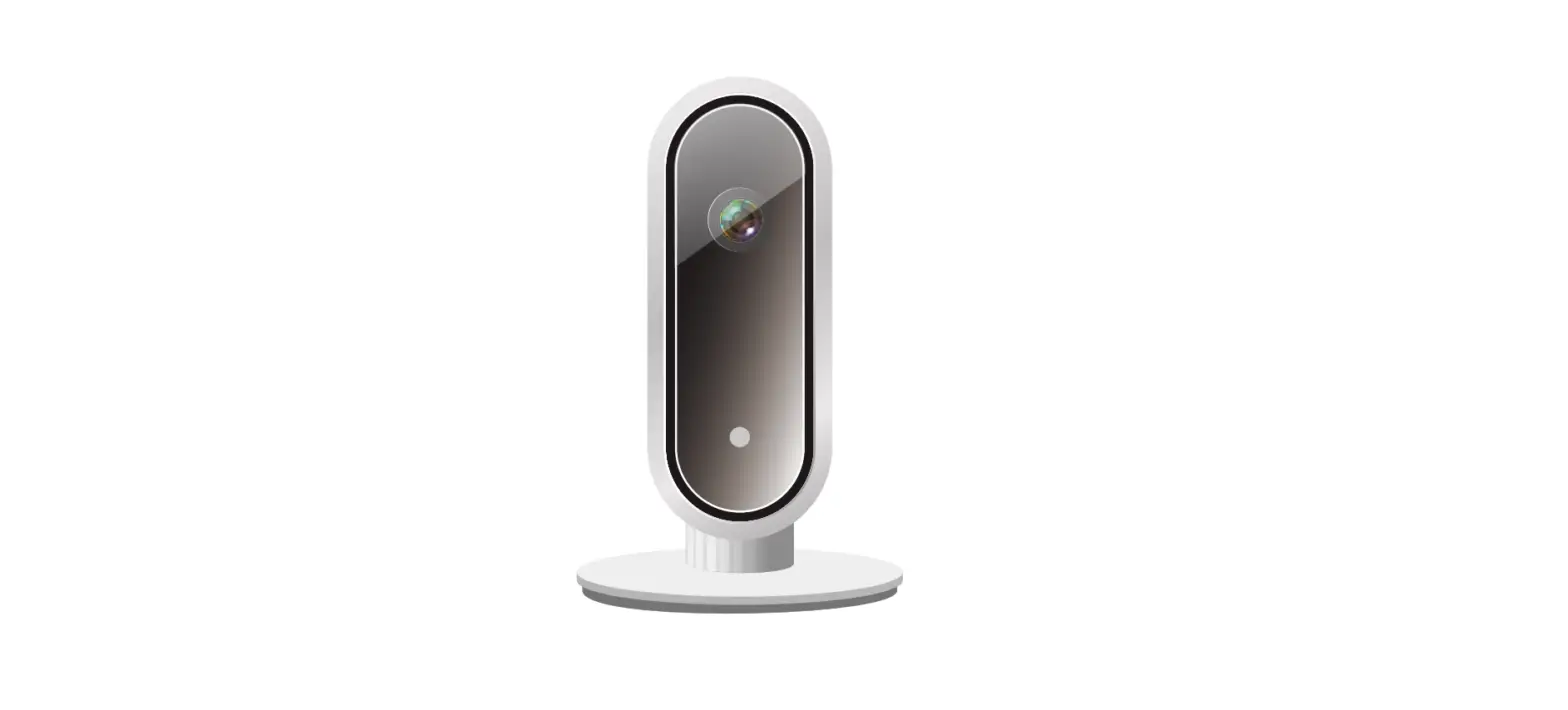
PRODUCT OVERVIEW

Box contents
- Security Wi-Fi Camera *1
- Mounting bracket*1
- USB cable*1
- Wall screws*3
- Screw anchors*3
- User manual
- Magnet base (Optional)
Getting to know your device
- Product Feature:
- View live streaming video / security monitoring
- Records Video up to 1080P HD
- Camera view angle 110°
- Automatic switch to night vision mode
- 2-way audio function
- Built-in motion detection sensor can record/notify when detect somebody move
- Built-in audio detection sensor can record/notify when detect loud sound
- Control camera from “JIMI IOT CAM” App
- Easy installation – Set up your camera in minutes
- Use the device as an audio monitor
When network connected, press WIFI to enter AP mode. Reboot the device and it will connect to the WIFI hotspot automatically. If no WIFI, the mobile phone can connect the device and monitor in AP mode.
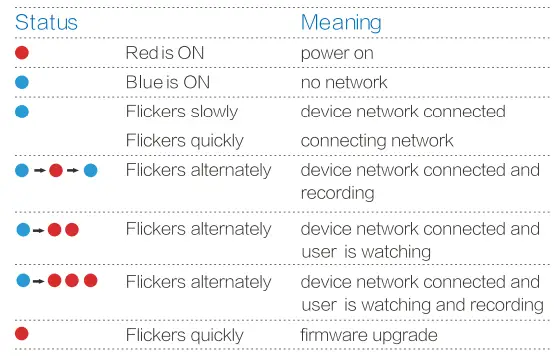
LED indicator status  Trivision camera set-up
 Trivision camera set-up
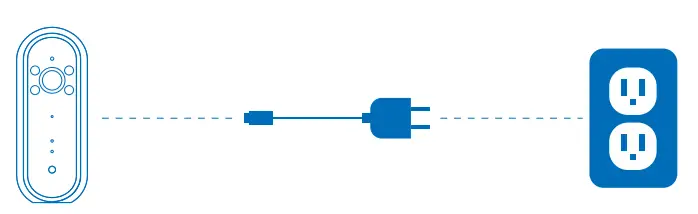
- Connect to the power supply
Connect your camera to the power supply, of the device. turn on.
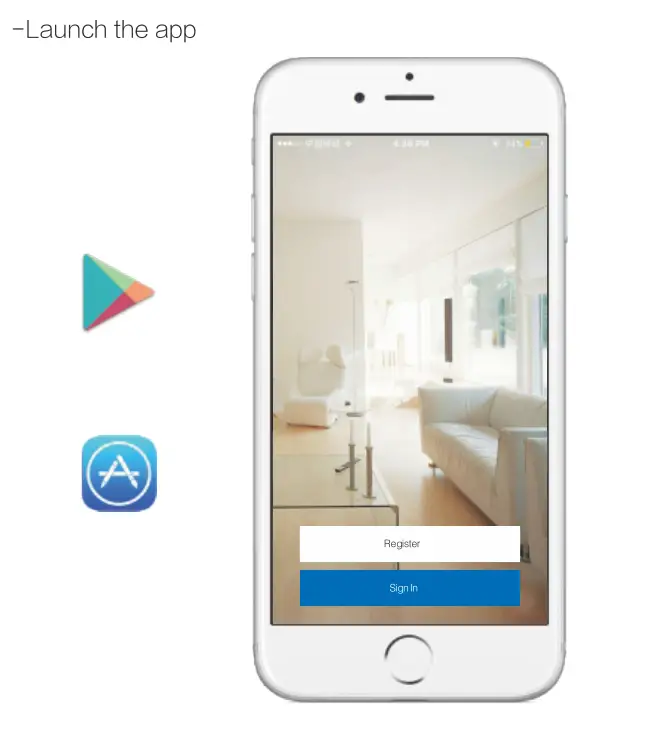
- Install APP
- Enable Wi – Fion your Phone and make sure to connect to the same router over 2.4GHz, not 5GHz, that your cameras will connect to
- Download and install the” JIMI IOT CAM “App from the iPhone Apple Store or Google Play
- Launch the app

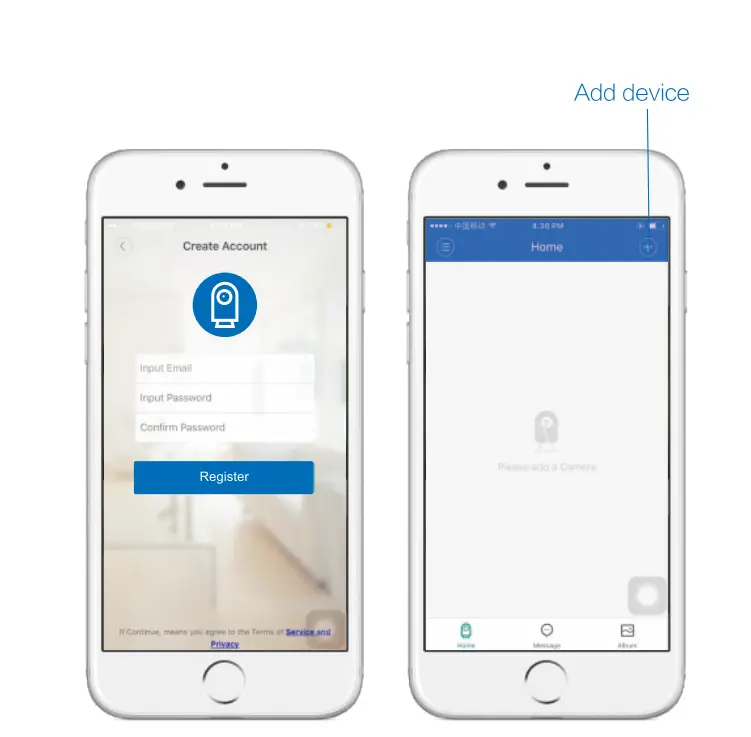
- Create an account
- Press-Register.
- Add your email address and password and press Register.
- Go to your email and confirm the registration email.
* You will get a green message: ‘Complete registration” - Go back to the App and sign in

- Add device
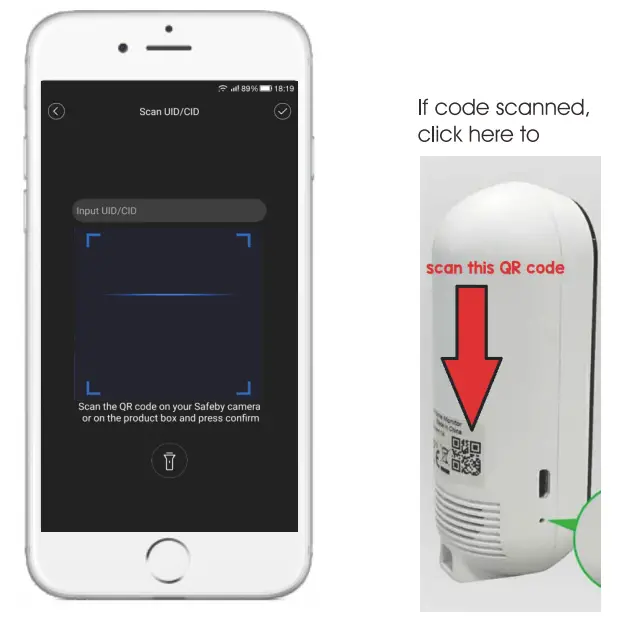
On the top right corner, press Add a device. - Scan the QR code on your Trivision camera or on the product, box and press confirm
* Make sure to allow the ” JIMI IOT CAM “App privacy permissions to use your phone camera.
You will get a message about user privacy permissions when you open the app for the first time,
if you don’t confirm it you need to allow JIMI IOTCAM App to use your camera in your phone’s privacy settings.
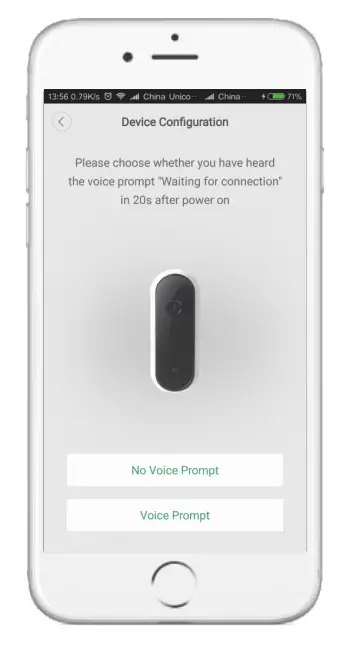
- Click “Voice prompt”

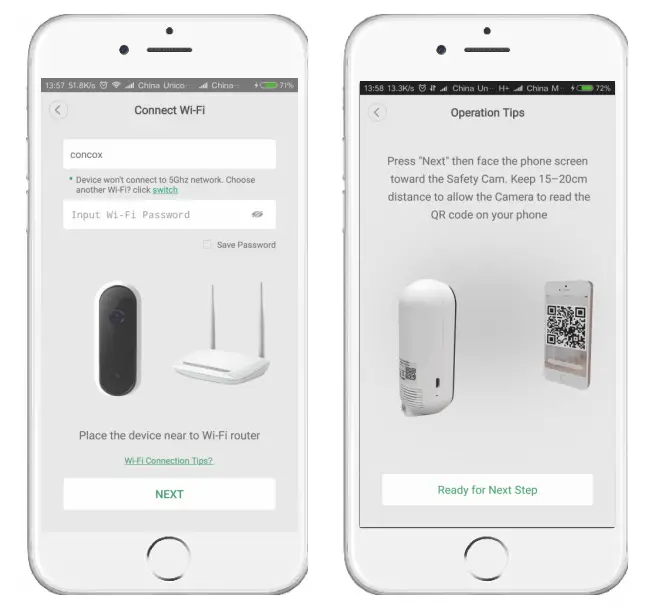
- Choose WiFi network
- Select your WiFi network, Enter the WiFi password and press Next
* For security reasons You must have a password on your WiFi network to use Trivision camera
Press: Ready for Next Step
- Select your WiFi network, Enter the WiFi password and press Next
- Binding camera
Face the QR code on the phone screen in front of your Trivision camera, When the camera set up complete you will hear”Binding successful you can start using the camera” - Press “Start Using”

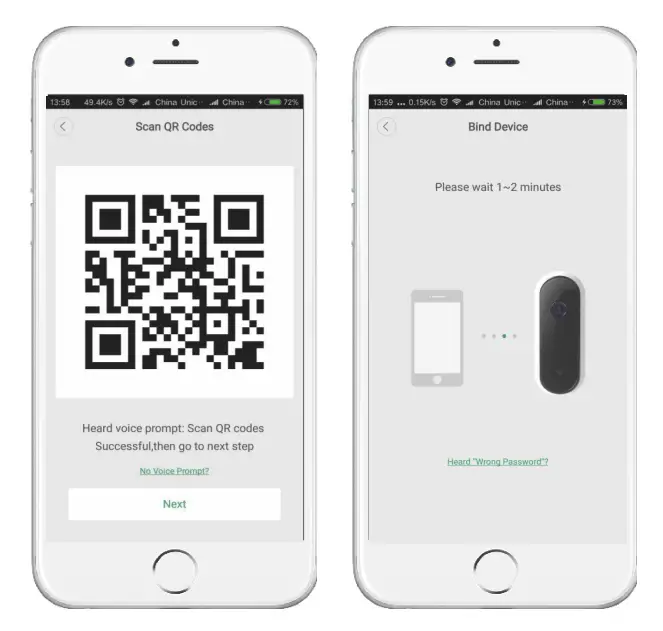
Press “Start Using” to explore more
Installation
Put the device on a flat surface with the magnetic base (optional) or install it on the wall or the ceiling.
Notice
- Before installation, please make sure the device is close to the power socket.
- Before securing the pin and the screw, please drill holes on a flat and solid surface.
Desk stand connection 
Wall mount installation
Remove the pin from the wall mount
Drill holes
Drill holes on the wall according to the position of the pin holes
Secure the pin to the wall
Place 3 screw anchors into the holes, then secure the pin to the. wall with the 3 screws.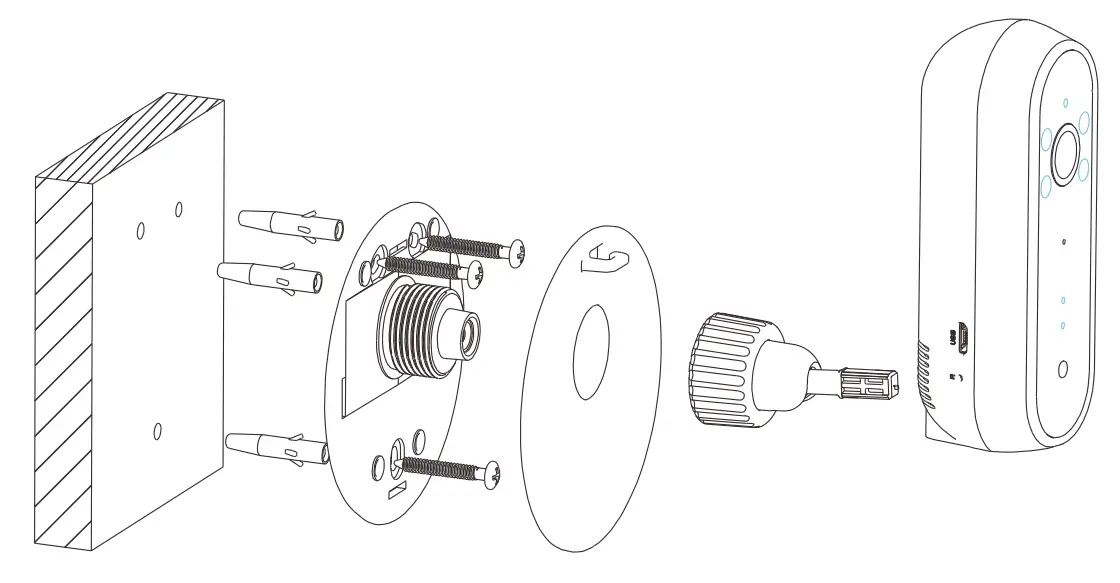
Specifications
| Image sensor | 1/2.7″ color CMOS sensor |
| Image resolution | HD1080P(1920*1080),WVGA(854*4 |
| Camera lens | Aperture F1.8,110° |
| Video compression format | H.264 |
| Wireless connection | WiFi(IEEE802.11b/g/n) |
| Memory | (Max 32GB)Micro SD card |
| Video format | AVI |
| Mobile terminal | iOS/Android |
| assword typeP | WPA2-AES |
| oPwer input | 5V/1A,USB interface |
| Net weight | 65g |
| Dimensions | 104.00*42.00*37.00mm |
Common Problems and solutions
- For the best video and audio signal make sure your phone connects the same WiFi as your camera connec’Tea’To. (The camera WiFi is the WiFi that you choose on your camera Setup)
- If you having some problem with one of the setup steps Use a Thimble (sim card eject tool), Long press for about 6 seconds on the reset hole, You will hear ‘Reset successful’, start the Set-Up process again.
Still can’t set up the monitor?
Disconnect the camera from the power outlet for 30 seconds and Plug it back, Press the reset button for 6 seconds, When you hear ‘Reset successful’ start the Set-Up process again.
* For security reasons You must have a password on your WiFi network to use the camera.
* The camera will work only on 2.4GHZ routers
All hardware is covered by a one-year limited warranty if purchased on line directly from T riVision or from authorized resellers.
While no electronics manufacturer’s warranty covers damage due to vandalism, lightning strikes, power surges, or improper installation, be sure to contact us with details if you encounter any problems and one of our customer service representatives will advise on the next step.
For further information and the name of the nearest authorized TRIVISION service facility contact
TriVision Technology., LLC
25752 W 143rd Street
Plainfield, IL 60544
United States
For any questions, please contact us
[email protected]
We pledge that we will not let you fail.
Contact us with any questions, no matter how simple or how complicated.
FAQS
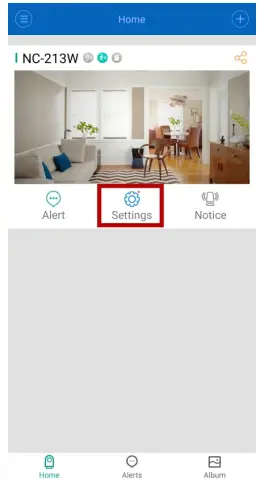
How to delete a camera?
- Access the camera Home page, click on “Settings”
- scroll down to the bottom to select “Delete Device”
- Enter Password
(Account password, Keep the login password safe. If you forgot the login password, then sign out the app, and get back the login password through your registered Email or Phone number)
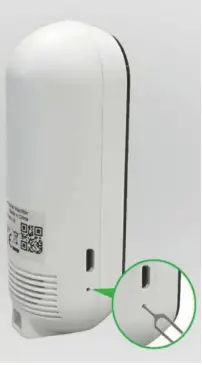
Resetting the Camera back to Factory Settings?
For the NC-213W camera, the reset hole is next to the Micro USB power jack.
Insert the tip of a paper clip in the hole at the side of the camera to press the reset switch.
You’ll feel the click when the switch engages.
Hold the switch down for 3-5 seconds, then you’ll hear “reset successful”, then let go.
A few seconds later the camera will restart and is now at factory settings.
Of course, after reset, you need to delete the camera from the app and start the initial setup again to set up the camera with your network.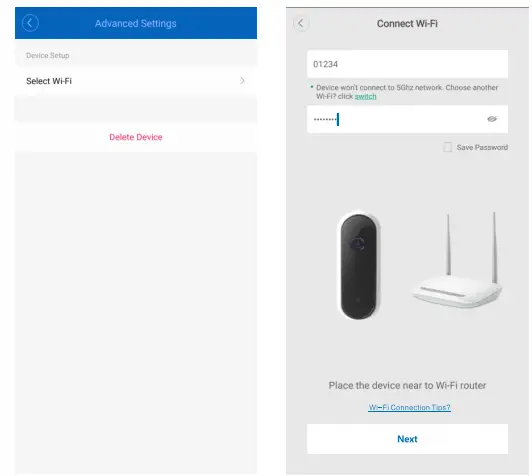
Wireless cameras don’t connect (Router Changed, WiFi Password Changed, WiFi Disconnection …. )?
If you know the exact spelling of your previous Wi-Fi network name and password you can ask your internet provider to assist with setting up your new router just like the previous one, so that the Wi-Fi information in your new router matches what you previously set up for the cameras.
If you don’t know what Wi-Fi name and password the cameras were set up with then it would be like trying to connect to someone else’s cameras and this isn’t supposed to work. In this case, there are two options for your reference.
- You can hardware reset the camera back to the default factory settings, then delete the camera from the app and start the initial setup again to set up the camera with your new network.
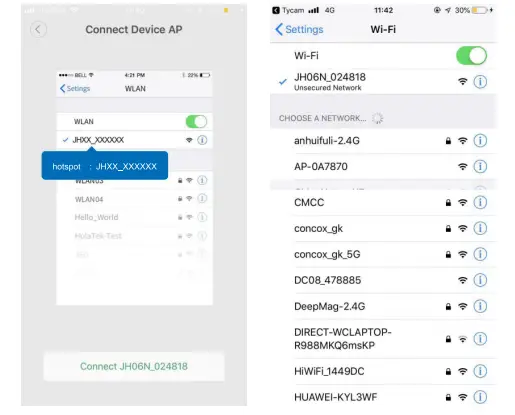
- Utilize AP setting mode to set up the camera with your new network.
- Enable Wi – Fi on your Phone and make sure to connect to the same router that your camera(s) are connected to. Go to Settings, then click on “Network Settings” Wi-Fi, then select the Wi-Fi network that your camera would join and enter the Wi-Fi password, then click on “Next”.
- Follow the onscreen instructions from the JIMI IOT CAM App and go to your mobile machine gear icon “Settings”, click on “Wi-Fi” Network Settings, then choose the camera’s Wi-Fi SSID JH06N XXXX to bind the camera Wi-Fi to your router’s Wi-Fi network ( it takes about a minute for the network binding till the camera SSID name pops up in the Wi-Fi list ).
- Tap back to the JIMI IOT CAM App otter Wi-Fi JH06N _ XXXX connected, you will get a voice prompt “connecting and connect successful”.Congratulations! Your camera is connected to the new Wi-Fi network successfully.
How to set up alarm recording and cloud storage?
- Install a Micro SD card(Max 32GB) and format the Micro SD card with the format tool in the opp.
- Refine the Alert Type, Record Schedule, and Duration ( 5s-l 5s ) . Max
- video clips in l minutes and Max 15 seconds for every alarm recording.
- Automatic storage uploading from the Micro SD card to the Cloud for backup to avoid the risk of losing footage from a memory card, ensure all your videos are safe, secure and protected

What is the testing club?
It’s a program for community members who, well, love testingr Basically, we’ II give you free product samples, and you test and review them.Your reviews can be videos on YouTube,text reviews on the community or social media,or something completely creative and different . To participate in this program , just follow the steps below:
How to enter?
- Access the website: http://www.trivisionsecurity.com and sign in with your community account ( make a free account if you haven’t yeti).
- Read the Testing Club rules.
- Find the product you want to test.
- Fill out the application and email http://www.trivisionsecurity.com us and wait for us to get back to you.
Selection Criteria
Applicants who meet some of the criteria below will be prioritized. However, you don’t have to meet all the criteria to be chosen.
- Provide a complete personal profile, including your social media (we will only use this information to screen your application and we will never share it).
- Be specific in your testing plan (include where you will post your review, what form your review will take, and specifically how you plan to put the product through its paces).
- Contribute product reviews in the community or the Motivational video Product Review section (upload the video or just share the link in the Product Review section!).
- Complete the survey (not every product has a survey).
- Copying others ‘testing plans or failing to submit a review link will result in disqualification from future Testing Club programs.
- You can sign up for multiple products at the same time,but you will be chosen for only one product at one time.
Tester Announcements
We’ II announce our testers on the Completed Testing page. Selected testers will be contacted by us directly to confirm participaÂtion and provide shipping information.
Sample Delivery
Samples will be sent out to selected testers as soon as they reply to our email confirming their participation and submitting their shipping address . We will try in all cases to ship product samples in a timely manner, no more than two weeks after the tester announcement.
HOW TO Review Submission?
- You are not required to post your review to a specific website, but you could share your review on social media (Facebook, Twitter, Instagram etc.), YouTube, TriVision Community, blogs, forums, deal websites, or other online spaces.
- If you ‘ ‘re sharing your review on social media, don’t forget to add hashtag # TriVision and tag our official account to increase the chances of being reposted.
- Once you have finished your review , you also need to submit your review link in the community within two weeks.If you haven’t submitted a review link after two weeks,you will be disqualified for future Testing Club programs.(Please email us [email protected] a private message in advance if extenuating circumstances will prevent you from making the deadline.)
- If you are selected as a tester, you will not be able to sign up for other ongoing tests until you finish the review submission process.
- Please note it usually takes up to 3 days to approve your submitted review link and for it to show up on the community. Incorrect or broken links will not be approved.
- Once you have submitted your review, TriVision reserves the right to use, edit, and repost your submitted content.
- Creating a post in the forum will get you a coupon.
- High-quality reviews will have the chance of being pinned to the homepage to get more views. If your review gets pinned,you’ll get an extra coupon.


