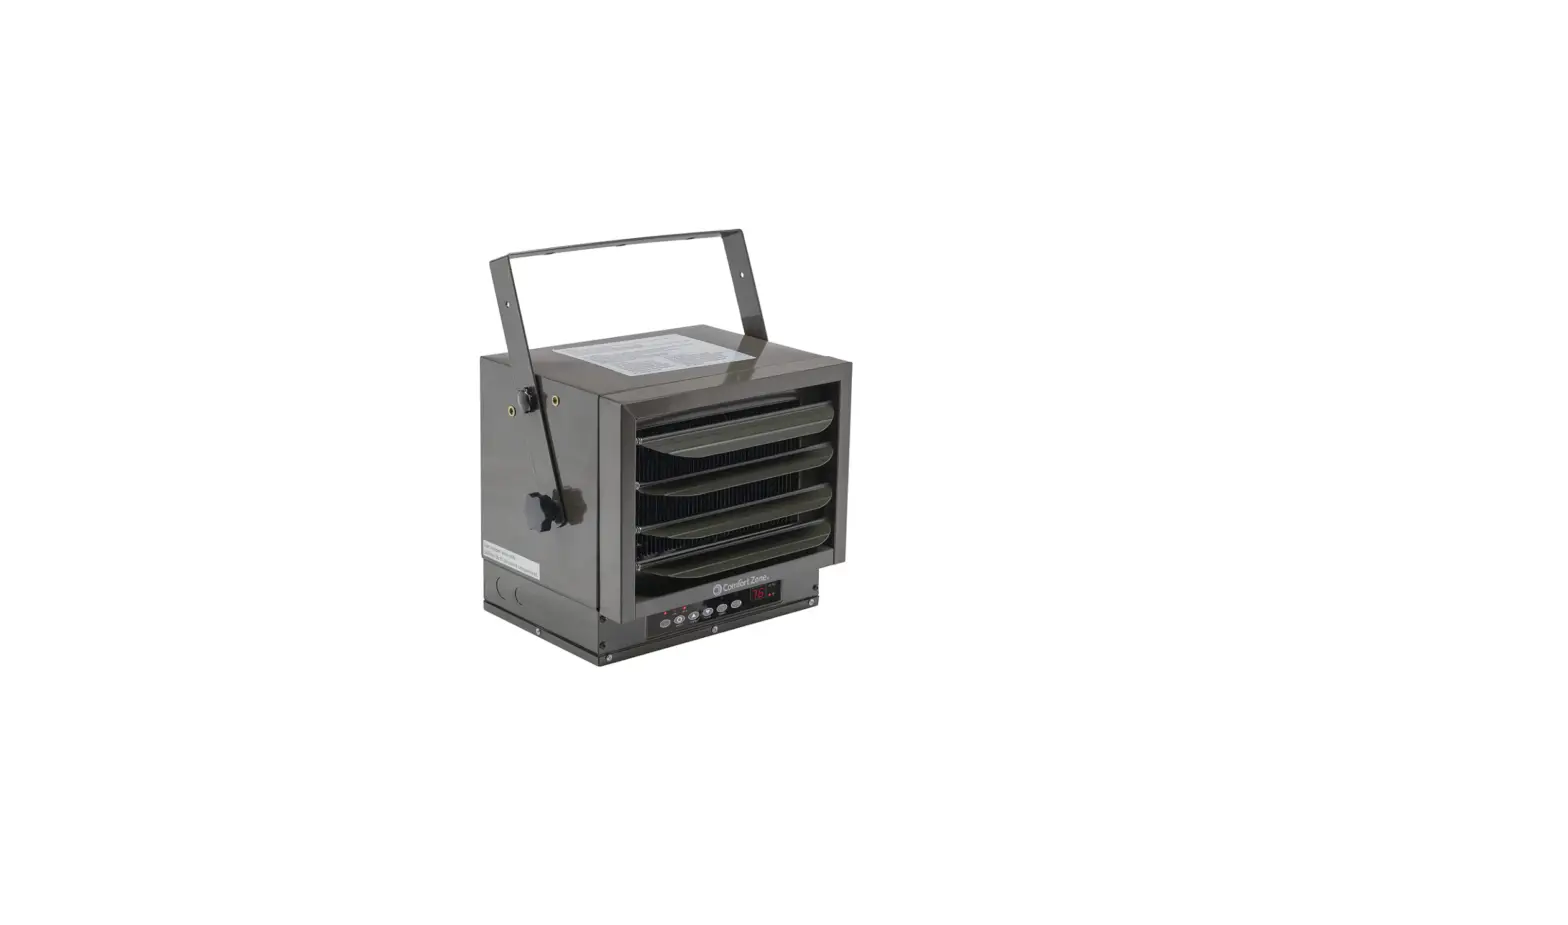
 Comfort Zone CZ230ER 7500-Watt Digital Thermostat
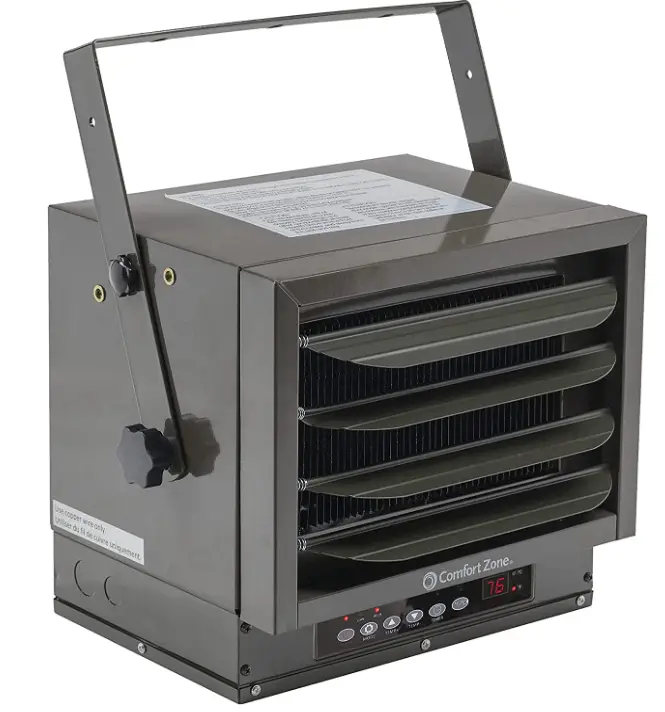
In a crowded warehouse, garage, or storage room, the fan-forced heater’s hard-wired installation and ceiling mounting conserve important floor space. The commercial heater’s body is made of strong gauge steel, which withstands temperature changes in inadequately insulated spaces well. The fan-forced design aids in evenly distributing the airflow throughout the space while louvres and a variable mounting angle direct it where it is most needed. With the help of a remote control, you can easily alter the settings from a distance while the digital thermostat lets you set the temperature to the ideal level for your room. When the interior of the ceiling mount heater overheats, a built-in sensor recognizes this and instantly turns the heater off.
DESCRIPTION
Electric utility heaters are designed to meet a variety of heating requirements. Heat output ranges from to 21,331 BTUs per hour to 25,589 BTUs per hour. Features horizontal and vertical flow, built-in thermostat and high limit thermal cutout.
SPECIFICATIONS

GENERAL SAFETY INFORMATION
WARNING
Read and understand installation and operation instructions and observe all safety instructions before using this heater.
- Use copper wire only for supply connections. The wire should be properly sized and insulated. Do not use aluminum wire with this installation. Wires should be suitable for at least 167°F (75°C)
- Heater air flow must be directed parallel to, or away from adjacent wall.
- Observe wall, floor, and ceiling clearance requirements.
- All wiring must conform to national and local electrical codes in the United States and the heater must be grounded as a precaution against possible electrical shock. Heater circuit must be protected with proper fuses.
- This heater is hot when in use. To avoid burns, do not let bare skin touch hot surfaces. Keep combustible materials, such as furniture, pillows, bedding, papers, clothes, etc. and curtains at least 3 feet (0.9 m) from the front of the heater and keep them away from the sides and rear.
- Do not use outdoors.
- This heater is not intended for use in bathrooms, laundry areas and similar indoor locations.
- Extreme caution is necessary when any heater is used by or near children or invalids and whenever the heater is left operating and unattended.
- Do not operate any heater after it malfunctions. Disconnect power at service panel and have heater inspected by a reputable electrician before reusing
- Do not insert or allow foreign objects to enter any ventilation or exhaust opening as this may cause an electric shock or fire, or damage the heater.
- To prevent a possible fire, do not block air intakes or exhaust in any manner.
- Use this heater only as described in this manual. Any other use not recommended by the manufacturer may cause fire, electric shock, or injury to persons.
- The Mounting structure and the anchoring hardware must be capable of reliably supporting the weight of the heater and, if used, the mounting bracket.
- All electrical power must be disconnected and the main service box must be locked before inspection, cleaning or servicing the heater. This is a precaution to prevent shock.
- This heater is not suitable for use in hazardous locations as defined by the national fire protection association (NFPA) in the United States. This heater has hot and arcing (sparking) parts inside. Do not use in areas where gasoline, paint, or flammable liquids are used or stored.
- This heater is not suitable for use in corrosive atmosphere Such as marine, greenhouses or chemical storage areas.
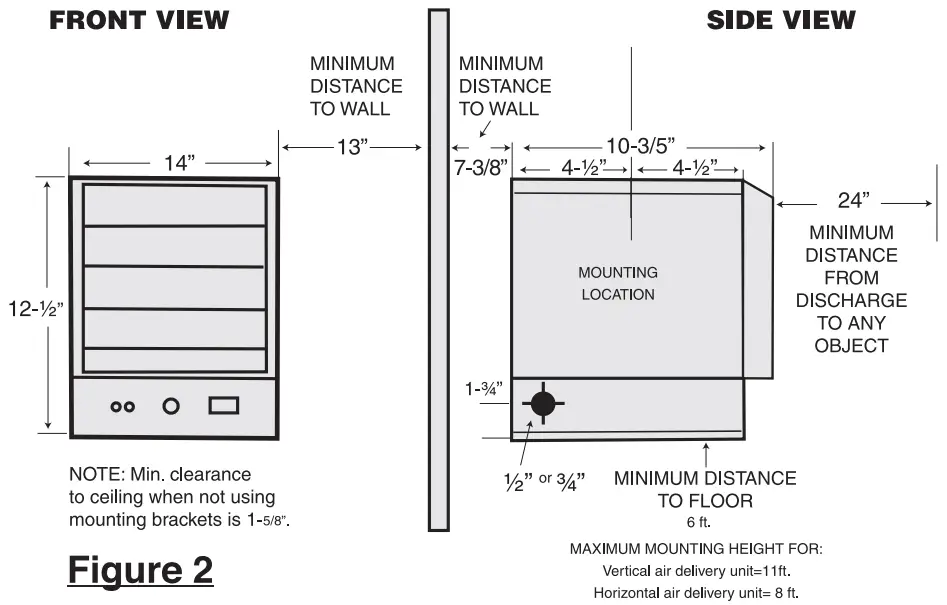
- Do not install closer than 8 inches to a vertical surface. Do not install less than 6 feet from the floor.
- SAVE THESE INSTRUCTIONS
WARNING Improper installation or failure to follow the procedures outlined in this instruction manual can result in serious electrical shock.
LOCATING HEATER
Install heater out of traffic areas maintaining clearances stated in figure 2. The direction of air flow should not be restricted (i.e.: by columns or machinery) and the air flow should wipe exposed walls, rather than blowing directly at them. When more than one heater is used in an area, the heaters should be arranged so that the air discharge of each heater supports the air flow of the others to provide best circulation of warm air, as indicated in figure 3.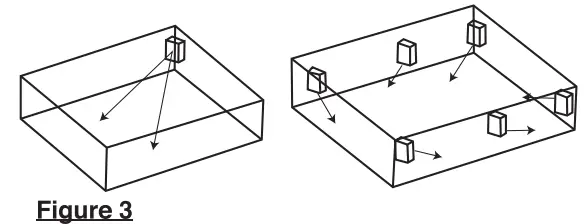
INSTALLATION
MOUNTING THE BRACKET
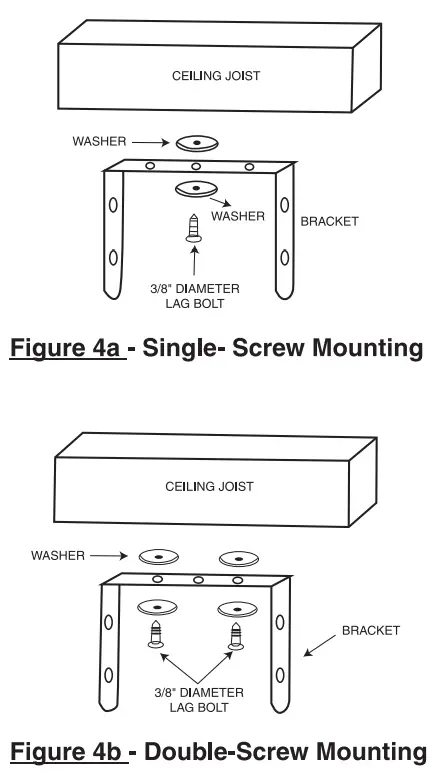
Refer to Figure 4a and 4b.
- Locate a stud in the ceiling joist.
- Remove the mounting bracket from the heating unit by loosening bracket thumb screws.
- Drill a 4″ pilot hole in ceiling joints. Place a washer on screws before inserting through the holes in the mounting bracket, and screw them securely into a ceiling joist.
NOTE: If you want to swivel the heater either to the right or left, adding a washer to both sides of the bracket is recommended. A longer Lag bolt may be required to properly secure the unit (see 4a). - Tighten screws enough to securely hold heating unit with air flow pointed in proper direction.

HANGING THE HEATER
- Attach the heating unit to the mounting bracket.
- Lift the heater up and into the mounting bracket.
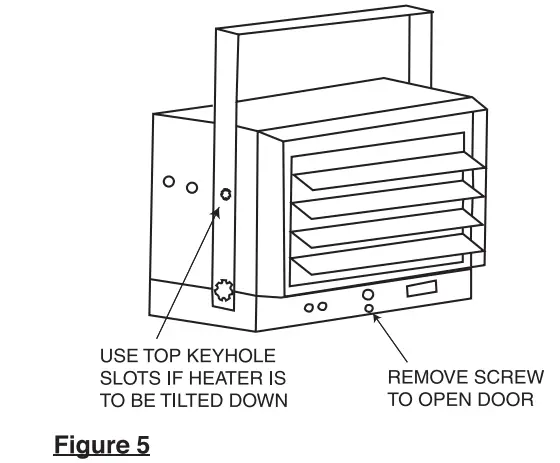
- Align the bracket screws with the keyholes slots in the mounting bracket.
- If the heater is to be tilted, It must be positioned in the keyholes slots (see figure 5)
- Tighten the bracket screws with a wrench so the unit is securely suspended horizontal or vertical level.

CONNECTING THE POWER
- Remove the screw from the front of the unit to connect the power to the heater.
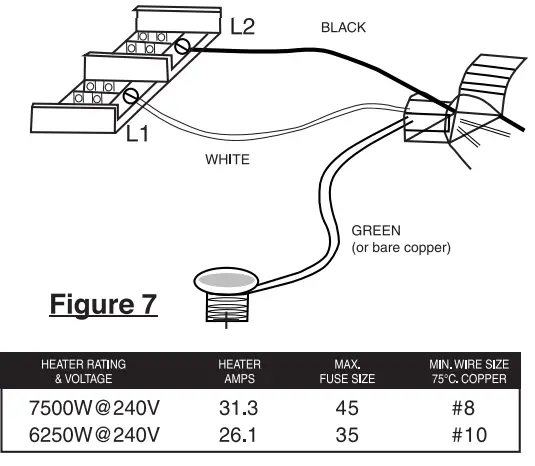
- Attach the cable connectors to the unit (See Figure 6) and slide the 10 gauge wire through the cable connector.
NOTE: This appliance must be grounded.
NOTE: Proper size fuses and circuit breakers in accordance with the National Electric Code must be used.
NOTE: The appliance must connect to a current protection circuit or device at 50Amp or less before connecting to power supply.
NOTE: For certain applications, conduit may be required (See figure 6). Check local electrical codes. If you run the wiring in conduit and wish to be able to turn the heater be sure to purchase enough flexible conduit to allow the heater to be turned.
- Pull the enough properly sized wire through cable connector and connect the wire to the power block located in the base of the heater (see Figure 7).
- Turn on the power at the main service.
OPERATION
SETTING THE THERMOSTAT
- Rotate thermostat knob clockwise to high position.
- After room reaches desired comfort level, rotate thermostat knob counter-clockwise until the thermostat clicks off.
NOTE: Heater will cycle on and off to maintain room temperature. The first time you operate the unit, it may smoke slightly. This is due to residual cleaning agents used to clean the element When the heater is manufactured. This is normal and does not indicate a problem with the unit. This condition will stop after the heater has been in operation for a few minutes
THERMAL CUTOUT
The heater are equipped with a thermal cutout which will automatically shut off the heater and a RED light illuminate on the face of the heater in the event of overheating. The heater will turn on when the abnormal temperature returns to normal. Should the unit overheat and cause the thermal cutout to cycle the cause of the overheating should be determined and corrective action taken before further operation
ADJUSTING AIR FLOW DIRECTION
- Turning the unit of the unit has been installed with a single lag bolt, as shown in the figure 4a, simply turn the entire unit as needed to adjust air flow.
- Tilting the unit -Loosen the bracket screws (see figure 5).
NOTE: TO tit the heater it must be mounted in bottom keyhole slots of mounting brackets to maintain adequate clearance and prevent possible overheating - Adjusting the louvers to the desired position.
NOTE: The louvers are designed so they can’t be completely closed. Do not attempt to defeat this feature, damage to the unit can result.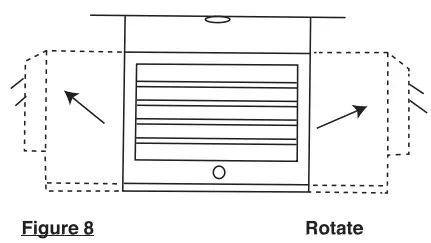
SAFETY INSTRUCTIONS
This heater is hot when in use. To avoid burns, do not let bare skin touch hot surfaces. If provided, use handles when moving this heater. Keep combustible materials, such as furniture, pillows, bedding, papers, clothes, and curtains at least 3 feet (0.9 m) from the front of the heater and keep them away from the sides and rear.
This heater is not intended for use in bathrooms, laundry areas and similar indoor occasions. Never locate heater where it may fall into a bathtub or other water container. This heater is designed to be directly wired to 240 volt electric power. Never use with an extension cord or relocatable power tap (outlet/power strip).
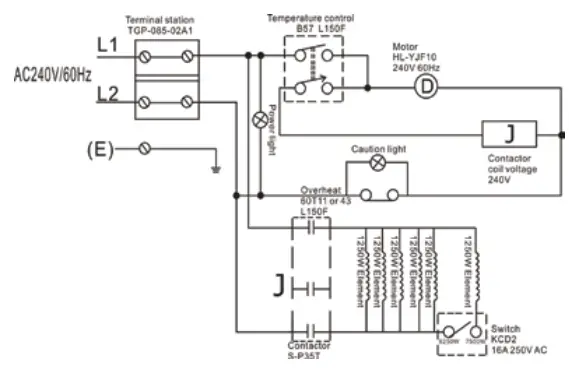
WIRING DIAGRAM
MAINTENANCE
Because of its rugged design, superior engineering, and high quality craftsmanship, the heater requires little maintenance, With proper care, your electric heater should last a lifetime, but seasonal cleaning is recommended to maintain the efficiency of the heater.
CLEANING THE HEATING ELEMENT
WARNING
To Prevent possible electric shock, all power must be shut off at the main service before inspecting or cleaning. To clean the heating element, loosen (but do not remove) the four Phillips head screws located behind the louvers in the corners of the louver housing on both sides, lift up, and pull out (see Figure 10). This provides access to the heating element. Remove dust or lint with a soft brush or a vacuum cleaner. Replace the louver housing and tighten the Philips head screws.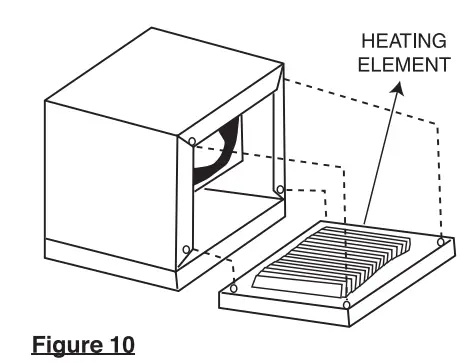
WARNING
Use care to prevent damage to internal heater wiring when cleaning element. make sure all connections remain tight and all wiring is routed away from element fins when reassembling the unit. Allowing wiring to touch the element fins could result in a fire hazard.
CLEANING THE FAN AND MOTOR
WARNING
To prevent possible electric shock, all power must be shut off at the main service before inspecting or cleaning. Remove the protective grill from the rear of the heater. This provides access to the fan and motor. Wipe off the fan and the motor with a soft cloth or brush. The fan motor does not require lubrication. Replace protective grille (see Figure 11).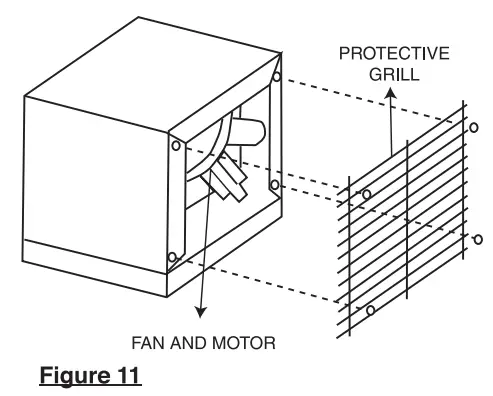
FAQs
Does it come with hardware? If not, what size lag bolt is appropriate for ceiling stud?
Unit comes with ceiling mount bracket. 1, 3/8″x2″ Lag bolt through center mounting bracket hole, is sufficient for ceiling mount, provided material lag bolt is installed in a solid wood or better material.
Will it start and stop based on the thermostat? Not sure why a timer is needed if it shuts off when temp is reached.
Yes, it will. However, be aware that the internal thermostat housed within the unit will read a temperature that is higher than the room temperature and thus will shut off prior to the room reaching the set temperature. This could be remedied by wiring a room thermostat.
Can you set it to run continuously without the timer turning it off?
Yes
How long does it take to ship? Cold season almost over.
It fairly quickly and we love it
How many amp service do I need?
40 amp breaker. You only want to be at about 80% of total available power to keep things running smooth. The book on this unit actually recommends 50 amp but that’s an overkill.
What gauge wire does it require?
30 amp X 240v =7200 watts that’s running at max allowed. You should only be running at about 80%. 80% of 7200 =5760. This heater on low runs at 6250. So, no you need 40 amp breaker with 8/2 Romex wire
What is the dimensions of this heater? And could I install a plug on it instead of hard wiring it?
Mine has a dryer plug on the end and I plug into an outlet on the wall near the ceiling where the heater is mounted.
Does the 7500 watt have high medium low settings like the 5000 watt?
It has high setting at 7500w and low at 6250w
Would a double pole 30 amp be the same as 60 amp?
No, the wire gauge would be rated by the requirements you need to wire for the required device. You would need a double pole (240 volt) 40 amp breaker and assure the wire gauge used is #8 copper. Double pole 30 amp is under rated for this installation and double pole 60 amp is over rated.
My shop is 1200sq ft. with 20ft ceilings. I was looking at a 12,000 watt unit but would I be better with two of these 7500 watt units?
If it is of any help I have one 7500 watt unit in my 1800 sf insulated garage/shop with a 10 ft ceiling in NE Oregon. Very pleased so far with this heater. I have only used it on the 5000 watt setting and it does a good job of heating my shop. Seems a ceiling fan or two might be helpful.
What kind of plug does it come with or does it have to be hard wired?
Hard wired
Can you set this unit to a certain temp and have it keep the area that temp all winter without fussing with it?
This answer is for the manual control CZ220 with a dial. Someone else will have to speak for the CZ230. The answer for the CZ220 is: Well – kind of yes. While there is no specific temperature selection…. I was able to figure out by turning the dial.
Can you use this on the floor? I want to just set it down on a concrete floor.
This heater should have a minimum distance of 13 inches from a wall, and 6 feet from any floor.
I have a wood working shop. Would dust be problem for this heater.
This heater has hot and arcing parts inside and could be a fire hazard in a woodworking shop if placed in an area with a lot of wood dust.
I have a 30 amp hookup in the garage. Is this enough for this heater?
I sure a 30 amp dedicated circuit would work.


