![]()
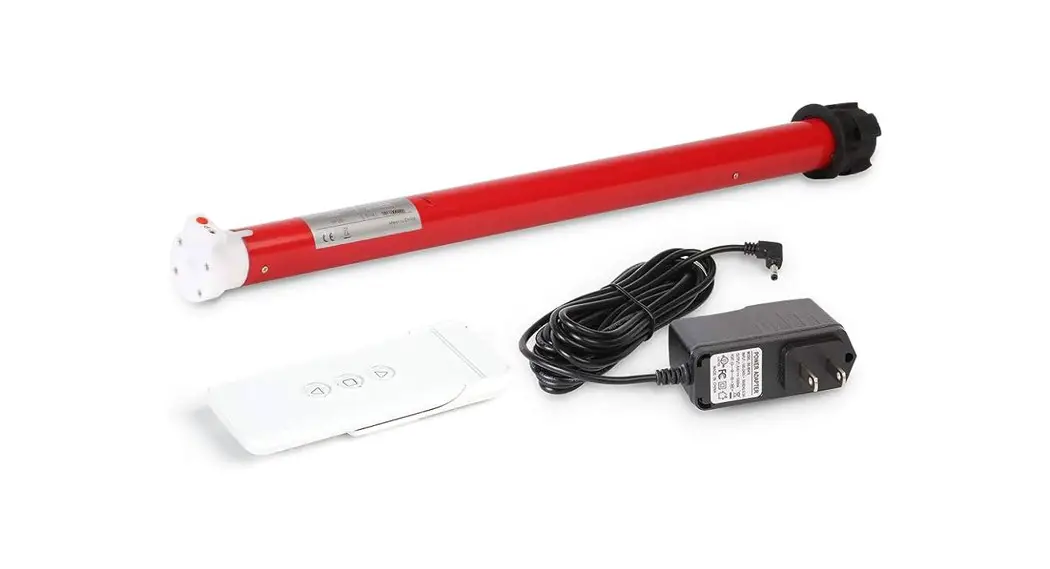
MOTION CM-01/02 LI-ION TUBULAR MOTOR
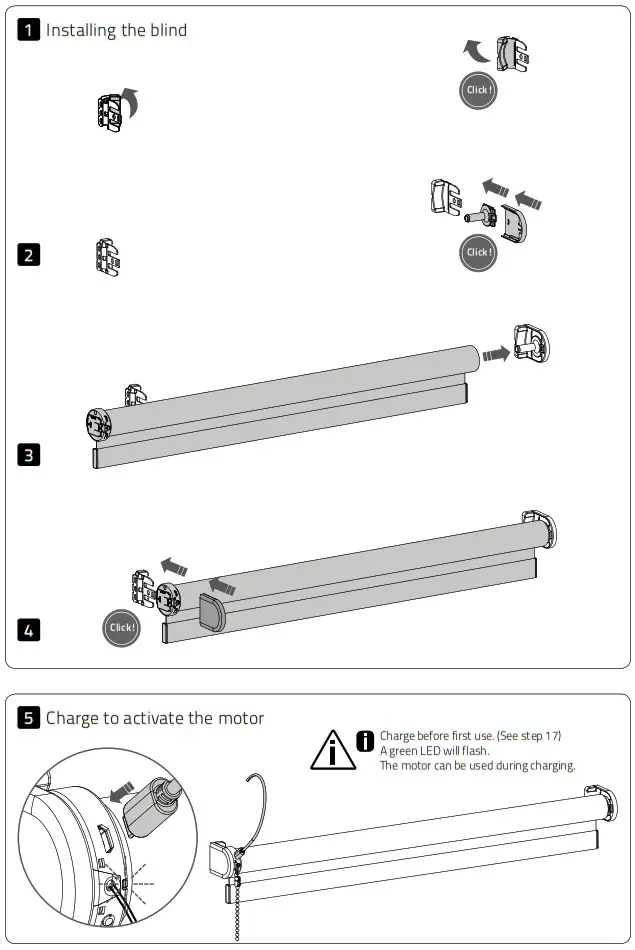
Do NOT remove band around shade until installed
Pull Wand Motorization
Li-ion battery powered tube motors with pull operation
MOTION
MOTION CM-01/02 LI-ION TUBULAR MOTOR
CM-01/02
Tube motor
Li-ion battery powered tube motors with pull operation
![]()
CM-01 Li-ion Battery Powered Tube Motors
Motor features
| Li-ion Battery Integrated lithium-ion battery | USB Rechargeable Rechargeable with micro USB | Wireless Cable free installation | Happy Programming Dummy proof programming using pull control | Favorite Position Preset a favorite position |
Control options
| Pull Control Operate with pull control |
Support

Video
How to install, program and operate rtube.nl/red983
![]() WARNING
WARNING
Read the instructions carefully before assembling and using the product. Assembly can be completed by nonprofessionals.
For indoor use only.
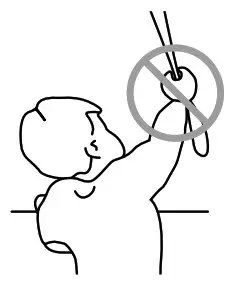
- Young children can strangle themselves with the loop of pull cords, chains and tapes, and cords that operate window coverings.
- To avoid strangulation and entanglement, keep cords out of reach of young children.
- Cords may ensnare a child’s neck.
- Move beds, cots and furniture away from window covering cords.
- Do not tie cords together.
- Make sure cords do not twist together and form a loop.
Cleaning
Follow these general rules when cleaning the outside of the device and its components:
- Use a damp, soft, lint-free cloth. Avoid getting moisture in openings.
- Do not use aerosol sprays, solvents, alcohol, or abrasives.
Service & Support
Do not perform repairs yourself. Do not attempt to open the device or disassemble it. You run the risk of electric shock and voiding the limited warranty. No user-serviceable parts are inside.
Warranty Service
First follow the advice in this manual. If the product appears to be damaged or does not function properly, go to your local dealer for instructions on how to obtain warranty service.
![]()
Important Safety instructions
WARNING: To reduce the risk of severe injury or death, it is important to follow these instructions for personal safety. Save these instructions.
- Read and follow all installation instructions.
- This appliance can be used by children aged 8 years and above and persons with reduced physical, sensory or mental capabilities or lack of experience and knowledge if they have been given supervision or instruction concerning use of the appliance in a safe way and understand the hazards involved. Children should not play with the appliance. Cleaning and user maintenance should not be performed by unsupervised children.
- Do not allow children to play with fixed controls.
Keep remote controls away from children. - Frequently examine the installation for imbalance and signs of wear or damage to cables and springs. Do not use if repair or adjustment is necessary.
- This instruction manual is also available on the website.
- The drive shall be disconnected from its power source during cleaning, maintenance and when replacing parts.
- The A-weighted emission sound pressure level of the drive is equal to or less than 70dB(A).
- Indoor and household use only.
- Disconnect the drive from the supply or switch off the automatic controls when maintenance, such as window cleaning, is being carried out in the vicinity.
- When operating a biased switch, make sure that other persons are kept away.
- Do not operate when maintenance, such as window cleaning, is being carried out in the vicinity.
- The tube motor must only be supplied with safety extra low voltage corresponding to the marking on the appliance.
- This appliance contains batteries that are nonreplaceable.
Important Installation instructions
WARNING: Important safety instructions. Follow all instructions, since incorrect installation can lead to severe injury.
- This motor can only be used with soft material for driven parts.
- Hazardous unprotected moving parts of the drive must be installed higher than 2.0m above the floor or any other level surface that could provide access to it.
- Install the actuating member of a manual release at a height less than 1.8m.
- The actuating member of a biased switch is to be located within direct sight of the driven part but away from moving parts. It is to be installed at a minimum height of 1.5m and not accessible to the public.
- The mass and the dimension of the driven part must be compatible with the rated torque and rated operating time.
- Fixed controls have to be clearly visible after installation.
- The driven part must be compatible with the rated torque (0.2N.m/0.65N.m) and rated operating time (12min).
- Minimum tube diameter: Ø25mm.
- The drive is intended to be installed at a height of at least 2.0m above the floor or any other accessible level surface.
- All-pole disconnection switches must be incorporated in the fixed wiring in accordance with the wiring rules.
Frequently Asked Questions
| Problem | Cause | Solution |
| Motor is not responding. | Motor is in transport mode. | Activate the motor. See step 18. |
| Motor battery is empty. | Charge the motor. See step 17. | |
| Motor LED flashes red. | The battery of the motor is empty. | Charge the motor. See step 17. |
| Motor is not charging. | Charger is not plugged in or does not work. | Try a different charger or make sure the charger is plugged into the outlet. |
| Blind lowers too far. | End limits are programmed incorrectly | Reprogram end limits. See step 6 – 9. |
| Unable to program end limits. | End limits have already been programmed. | Reset the motor and reprogram end limits. See step 16 and step 6-9. |
![]()
Wireless Pull Wand
Li-ion battery powered tube motors
with pull and remote operation
 MOTION
MOTION CM-03/05 LI-ION TUBULAR MOTOR
CM-03/05
Li-ion battery powered tube motors with
pull and remote operation
![]()
Motor features
| Li-ion Battery Integrated lithium-ion battery | USB Rechargeable Rechargeable with micro USB | Wireless Cable free installation | Speed Control Consistent rolling speed | Bi-directional Two-way communication for real-time response |
Control options
| Pull Control Operate with pull control | Remote Control Operate with a remote control | App Control Operate with the MOTION app | Connectivity Compatible with home and building automation |
Support
 |  |  |
| Video How to install, program and operate rtube.nl/red980 | App Store Download the MOTION app rtube.nl/red981 | Google Play Download the MOTION app rtube.nl/red982 |
![]() WARNING
WARNING
Read the instructions carefully before assembling and using the product. Assembly can be completed by nonprofessionals. For indoor use only.
- Young children can strangle themselves with the loop of pull cords, chains and tapes, and cords that operate window coverings.
- To avoid strangulation and entanglement, keep cords out of reach of young children.
- Cords may ensnare a child’s neck.
- Move beds, cots and furniture away from window covering cords.
- Do not tie cords together.
- Make sure cords do not twist together and form a loop.
Cleaning
Follow these general rules when cleaning the outside of the device and its components:
- Use a damp, soft, lint-free cloth. Avoid getting moisture in openings.
- Do not use aerosol sprays, solvents, alcohol, or abrasives.
Service & Support
Do not perform repairs yourself. Do not attempt to open the device or disassemble it. You run the risk of electric shock and voiding the limited warranty. No user-serviceable parts are inside.
![]()
Important Safety instructions
WARNING: To reduce the risk of severe injury or death, it is important to follow these instructions for personal safety. Save these instructions.
- Read and follow all installation instructions.
- This appliance can be used by children aged 8 years and above and persons with reduced physical, sensory or mental capabilities or lack of experience and knowledge if they have been given supervision or instruction concerning use of the appliance in a safe way and understand the hazards involved. Children should not play with the appliance. Cleaning and user maintenance should not be performed by children without supervision.
- Do not allow children to play with fixed controls.
- Keep remote controls away from children.
- Frequently examine the installation for imbalance and signs of wear or damage to cables and springs. Do not use if repair or adjustment is necessary.
- This instruction manual is also available on the website.
- The drive must be disconnected from its power source during cleaning, maintenance and when replacing parts.
- The A-weighted emission sound pressure level of the drive is equal to or less than 70dB(A).
- Indoor and household use only.
- Disconnect the drive from the power supply or switch off the automatic controls when maintenance, such as window cleaning, is being carried out in the vicinity.
- When operating a biased switch, make sure that other persons are kept away.
- Do not operate when maintenance, such as window cleaning, is being carried out in the vicinity.
- The tube motor must only be supplied with safety extra low voltage corresponding to the marking on the appliance.
- This appliance contains batteries that are nonreplaceable.
Important Installation instructions
WARNING: Important safety instructions. Follow all instructions, since incorrect installation can lead to severe injury.
- This motor can only be used with soft material for driven parts.
- Hazardous unprotected moving parts of the drive must be installed higher than 2.5m above the floor or any other level surface that could provide access to it.
- Install the actuating member of a manual release at a height less than 1.8m.
- The actuating member of a biased switch is to be located within direct sight of the driven part but away from moving parts. It is to be installed at a minimum height of 1.5m and not accessible to the public.
- The mass and the dimension of the driven part must be compatible with the rated torque and rated operating time.
- Fixed controls have to be clearly visible after installation.
- The driven part must be compatible with the rated torque (1.1N.m/2.2N.m) and rated operating time (12min).
- Minimum tube diameter: Ø25mm.
- The drive is intended to be installed at a height of at least 2.5m above the floor or any other accessible level surface.
- All-pole disconnection switches must be incorporated in the fixed wiring in accordance with the wiring rules.
FCC Manual
This device complies with Part 15 of the FCC Rules.
Operation is subject to the following two conditions:
- this device may not cause harmful interference, and
- this device must accept any interference received, including interference that may cause undesired operation.
FCC ID: ZY4CM03
FCC ID: ZY4CM05
Regulatory Information
1 FCC Information for User
This product does not contain any user serviceable components and is to be used with approved antennas only. Any product changes or modifications will invalidate all applicable regulatory certifications and approvals.
2 FCC Electronic Emission Notices
This device complies with part 15 of the FCC Rules.
Operation is subject to the following two conditions:
- This device may not cause harmful interference
- This device must accept any interference received, including interference that may cause undesired operation.
3 FCC Radio Frequency Interference statement
This equipment has been tested and found to comply with the limits for a class B digital device, pursuant to Part 15 of the FCC Rules. These limits are designed to provide reasonable protection against harmful interference when the equipment is operated in a commercial environment. This equipment generates, uses and can radiate radio frequency energy and, if not installed and used in accordance with the instructions, may cause harmful interference to radio communications. Operation of this equipment in a residential area may cause harmful interference, in which case the user will be required to correct the interference at their own expense.
If this equipment does cause harmful interference to radio or television reception, which can be determined by turning the equipment off and on, the user is encouraged to try to correct the interference by one or more of the following measures:
- Reorient or relocate the receiving antenna
- Increase the distance separating the equipment and receiver
- Connect the equipment to an outlet on a circuit different from that to which the receiver is connected
- Consult the dealer or an experienced radio/TV technician for help
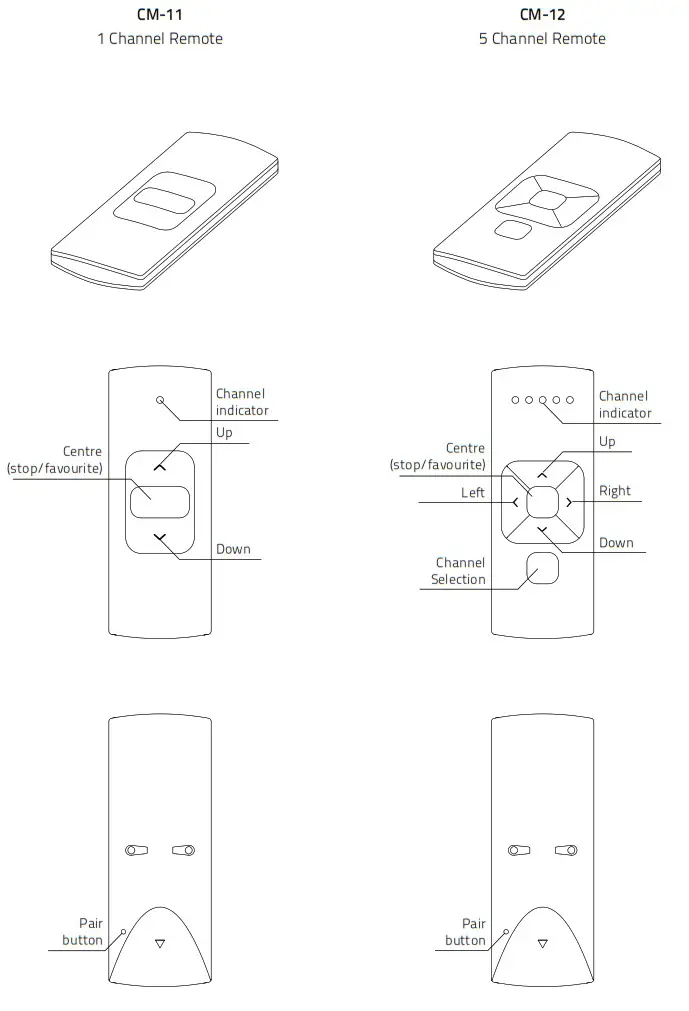
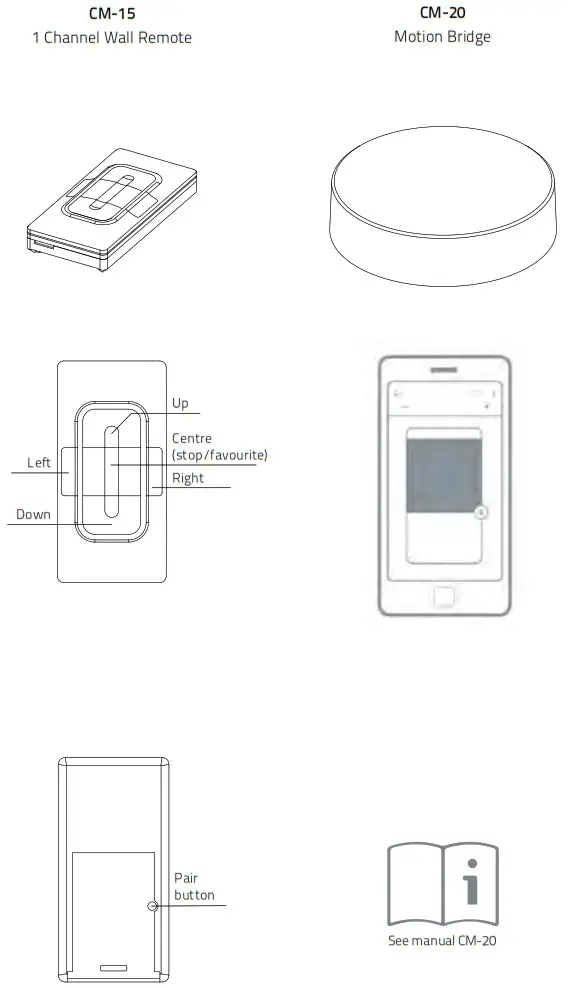

6 Pair a remote![]() Pair a remote control that is able to program blinds. See pages 4 and 5 for remote control details. In this manual, CM-12 is displayed.
Pair a remote control that is able to program blinds. See pages 4 and 5 for remote control details. In this manual, CM-12 is displayed.
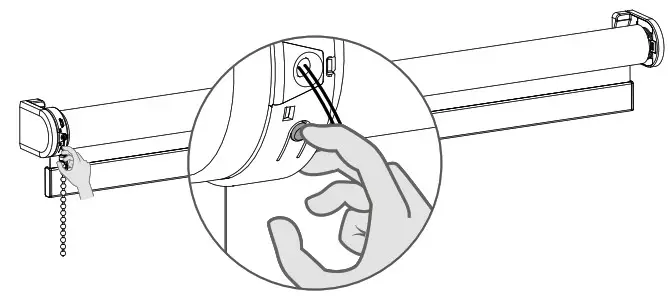
6.1 Shortly press the program button on the motor. The blind will start stepping, indicating that program mode has been activated. (The blind keeps stepping until the program mode is deactivated.)
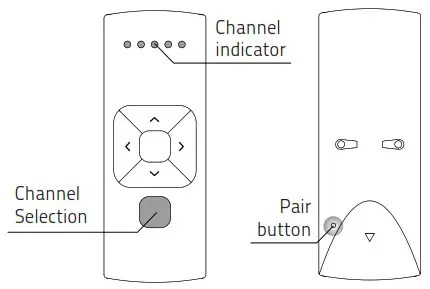
6.2 Select a desired channel for the blind using the channel selection button on the remote control.
6.3 Press the pair button on the back of the remote control to pair the blind with the selected channel. The blind will shortly stop stepping, indicating that the remote has been paired to the blind.![]() Repeat steps 6.1 – 6.3 to remove a blind from a channel.
Repeat steps 6.1 – 6.3 to remove a blind from a channel.
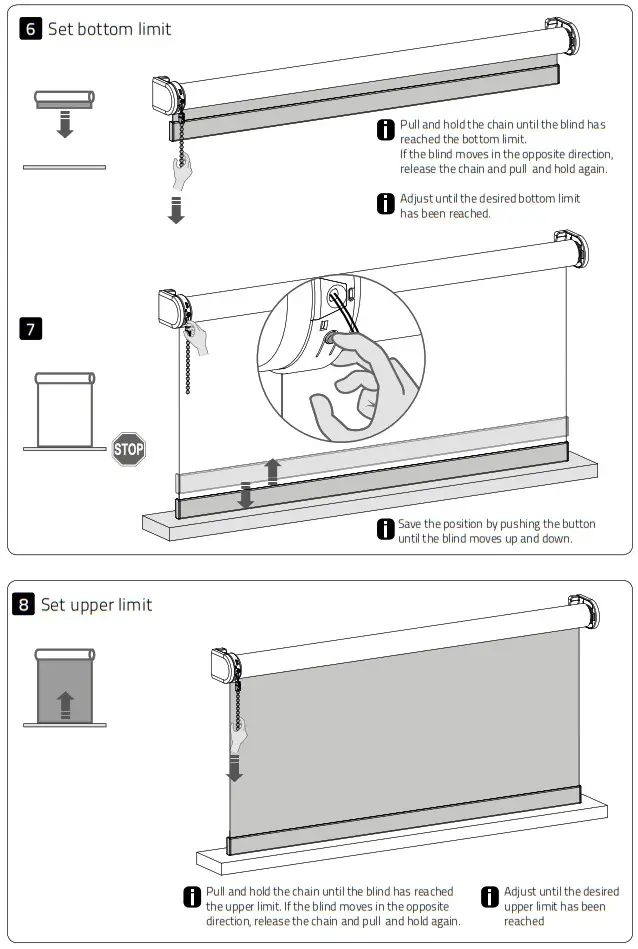
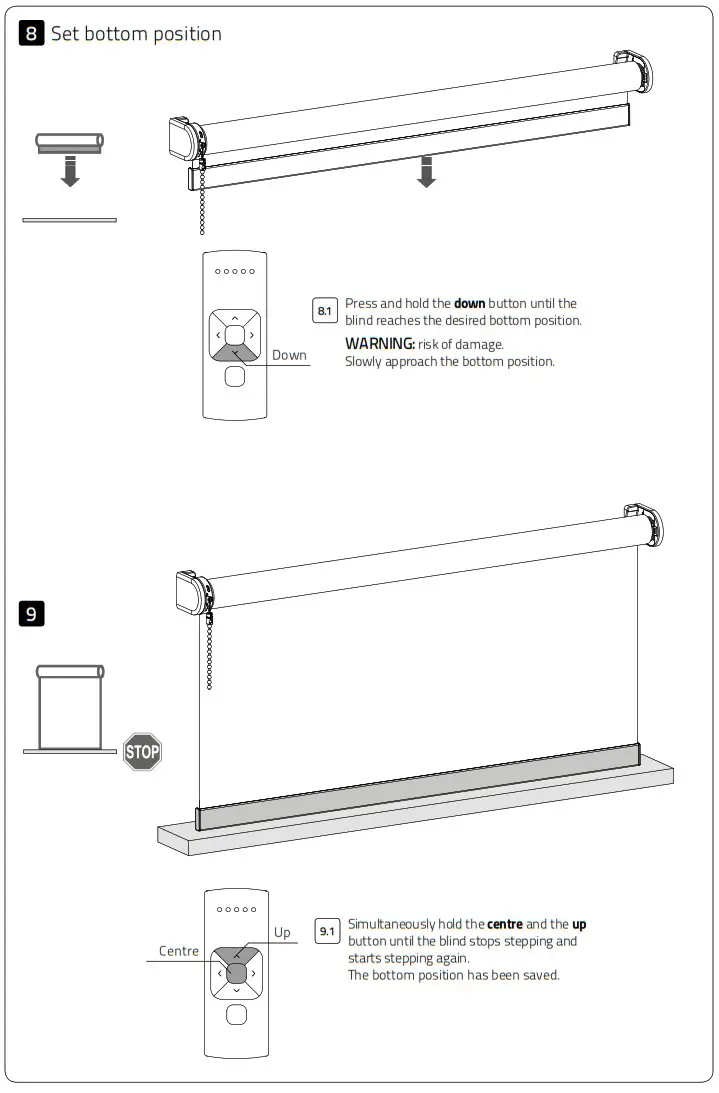
![]() End limits must be programmed to use a blind properly and to prevent it from being damaged.
End limits must be programmed to use a blind properly and to prevent it from being damaged.
Proceed to step 12 if end limits are already set.
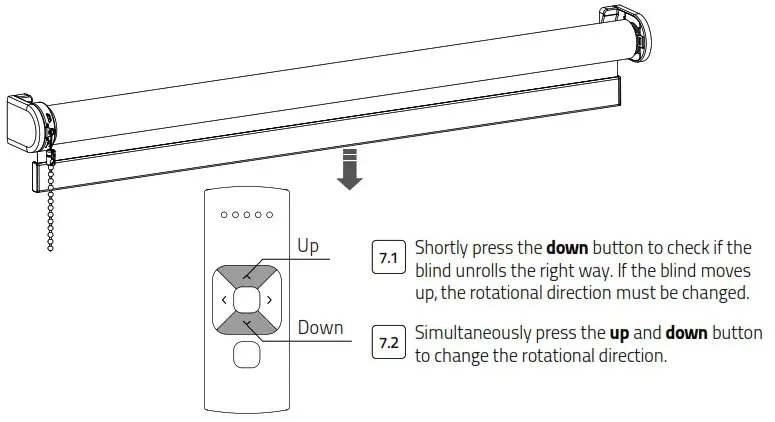
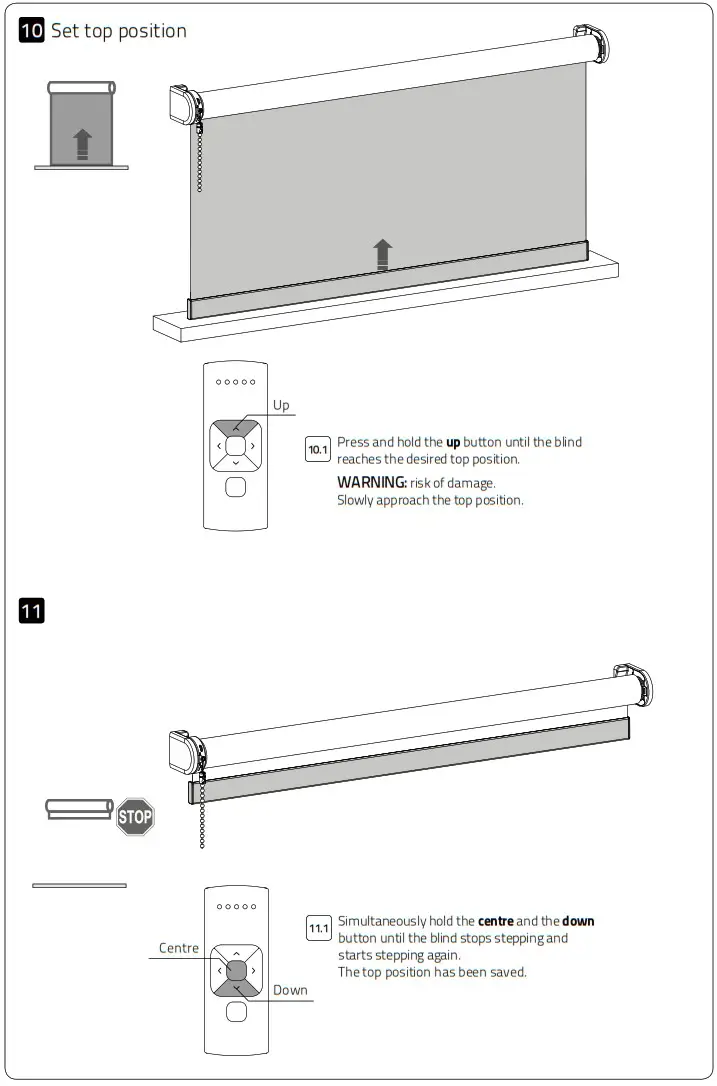
7 Check rotational direction![]() WARNING: risk of damage.
WARNING: risk of damage.
Stop the blind before reaching the end positions.
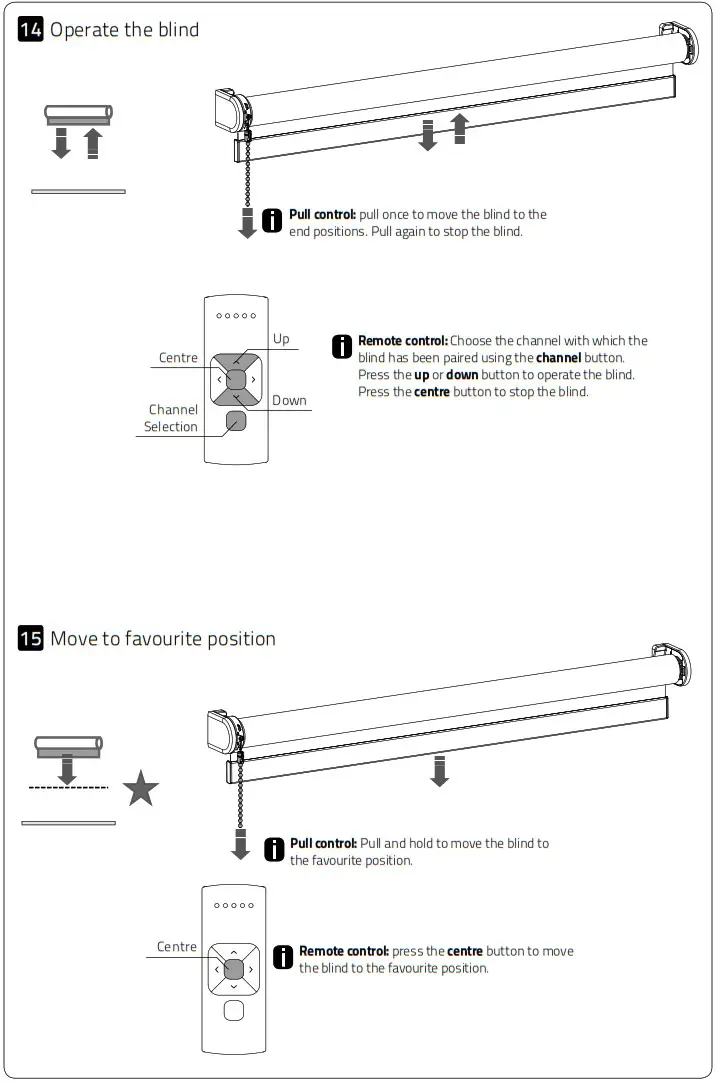
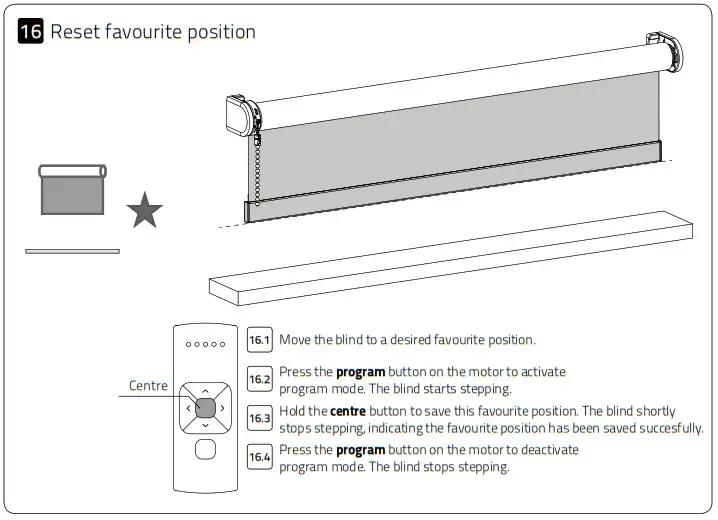
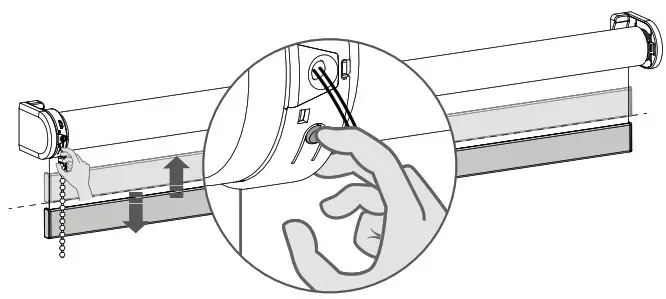
17 Deactivate direct control![]() When pressing the up or down button on the remote control, the blind directly moves to its end positions (direct control). To operate the blind with smaller steps using the up and down button, direct control can be deactivated. Now, the blind only directly moves to its end positions when the up or down button is held longer than two seconds.
When pressing the up or down button on the remote control, the blind directly moves to its end positions (direct control). To operate the blind with smaller steps using the up and down button, direct control can be deactivated. Now, the blind only directly moves to its end positions when the up or down button is held longer than two seconds.
17.1 Press the program button on the motor to activate program mode. The blind starts stepping.
17.2 Hold the program button until the blind stops stepping (approximately 5 seconds) to deactivate or reactivate direct control.
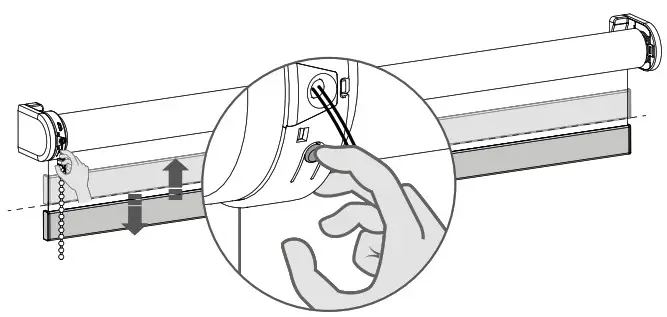
18 Reset the blind![]() It is possible to only delete end limits or to do a factory reset.
It is possible to only delete end limits or to do a factory reset.
Factory reset will delete the end limits and remove the connection to any paired remote.
18.1 Press the program button on the motor to activate program mode.![]() Delete end limits: to delete the end limits of the blind, hold the program button until the blind stops stepping for the first time, and keep holding the button until the blind stops stepping for the second time. (approximately 10 seconds)
Delete end limits: to delete the end limits of the blind, hold the program button until the blind stops stepping for the first time, and keep holding the button until the blind stops stepping for the second time. (approximately 10 seconds)![]() Factory reset: to reset the blind to factory defaults hold the button for at least 20 seconds. The blind will stop stepping twice. After the second stop the blind will give one extra step to confirm factory reset.
Factory reset: to reset the blind to factory defaults hold the button for at least 20 seconds. The blind will stop stepping twice. After the second stop the blind will give one extra step to confirm factory reset.
![]() Advanced options
Advanced options
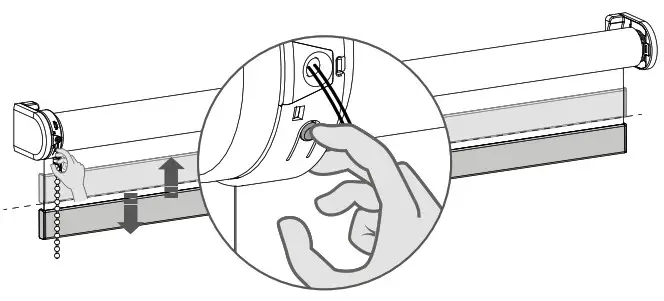
20 Manual control![]() In case there is no remote control or pull control, the blind can be operated with the program button on the motor.
In case there is no remote control or pull control, the blind can be operated with the program button on the motor.
20.1 Hold the program button to manually operate the blind. The blind will move as long as the button is being pressed. (max. 15 sec.)
20.2 To move the blind in opposite direction, release the program button and repeat step 20.1.
21 Single select 5 channel remote
Single select makes it possible to activate program mode on a single blind through a remote control, without having to physically press the program button on the blind.
| 21.1 To activate Single select, simultaneously hold the centre button and press the pair button. | 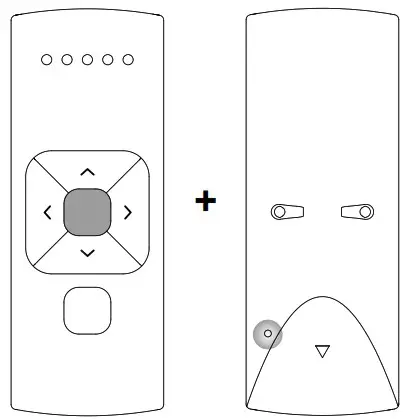 |
| 21.2 The remote starts searching for blinds (search mode). This is indicated by the LEDs flashing from left to right. | 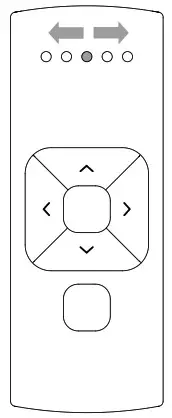 |
| 21.3 Once a blind is found, the channel LED will flash and the blind starts stepping, indicating that program mode has been activated. The blind can now be (un)paired to the remote and/or programmed. | 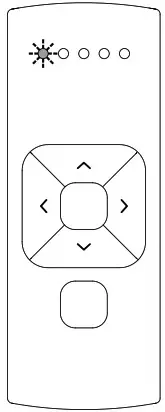 |
| 21.4 To search for the next blind, press the right button. Search mode will be activated. To find the previous blind, press the left button. |  |
| 21.5 To exit Single select, press the right button during search mode. | 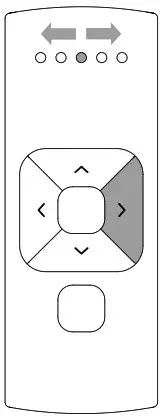 |
22 Single select 15 channel remote![]() Single select makes it possible to activate program mode on a single blind through a remote control, without having to physically press the program button on the blind.
Single select makes it possible to activate program mode on a single blind through a remote control, without having to physically press the program button on the blind.
| 22.1 To activate Single select, simultaneously hold the centre button and press the pair button. | 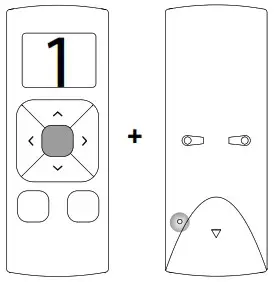 |
| 22.2 The remote starts searching for blinds (search mode). This is indicated by the horizontal bars on the remote. | 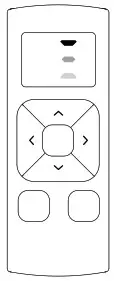 |
| 22.3 Once a blind is found, the channel number will flash and the blind starts stepping, indicating that program mode has been activated. The blind can now be (un) paired to the remote and/or programmed. | 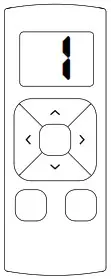 |
| 22.4 To search for the next blind, press the right button. Search mode will be activated. To find the previous blind, press the left button. | 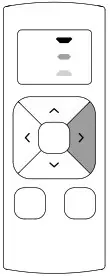 |
| 22.5 To exit Single select, press the right button during search mode. The display shows the letter O. | 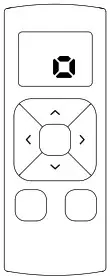 |
23 Channel select 5 channel remote
Channel select makes it possible to copy blinds in between channels/remotes without having to physically press the program button on the motors.
| 23.1 Select the channel from which the blinds must be copied. | 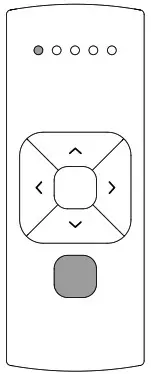 |
| 23.2 To activate channel select, simultaneously hold the channel selection button and press the pair button. | 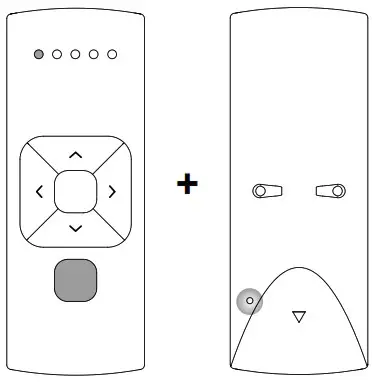 |
| 23.3 All blinds in the selected channel will start stepping, indicating program mode has been activated. All blinds can be copied to a new channel on the same remote or a different remote. Select a new channel on the (new) remote. | 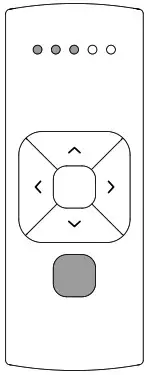 |
| 23.4 Press the pair button on the (new) remote to pair the blinds with the new channel. 23.5 To exit channel select, go back to the channel selected at step 23.1 and repeat step 23.2 | 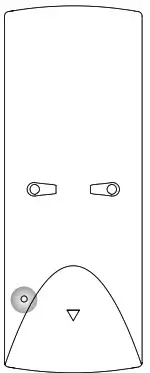 |
24 Channel select 15 channel remote![]() Channel select makes it possible to copy blinds in between channels/remotes without having to physically press the program button on the motors.
Channel select makes it possible to copy blinds in between channels/remotes without having to physically press the program button on the motors.
| 24.1 Select the channel you would like to copy. | 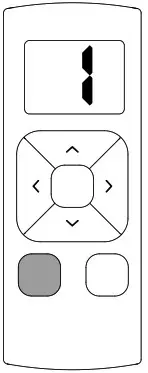 |
| 24.2 To activate channel select, simultaneously hold the channel selection button and press the pair button. | 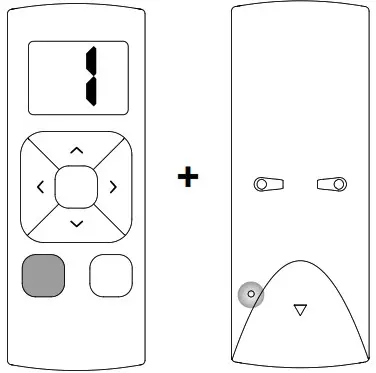 |
| 24.3 All blinds in the selected channel will start stepping, indicating program mode has been activated. All blinds can be copied to a new channel on the same remote or to different remotes. Select a channel on a (new) remote. | 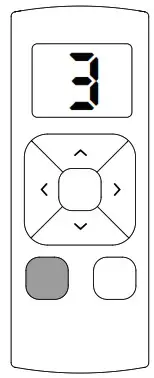 |
| 24.4 Press program button on the (new) remote to pair the blinds with the (new) remote. 24.5 To exit channel select, choose the channel you selected at step 24.1 and repeat step 24.2 | 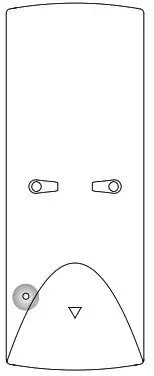 |
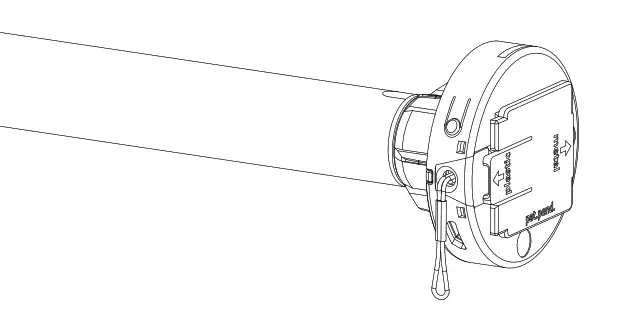
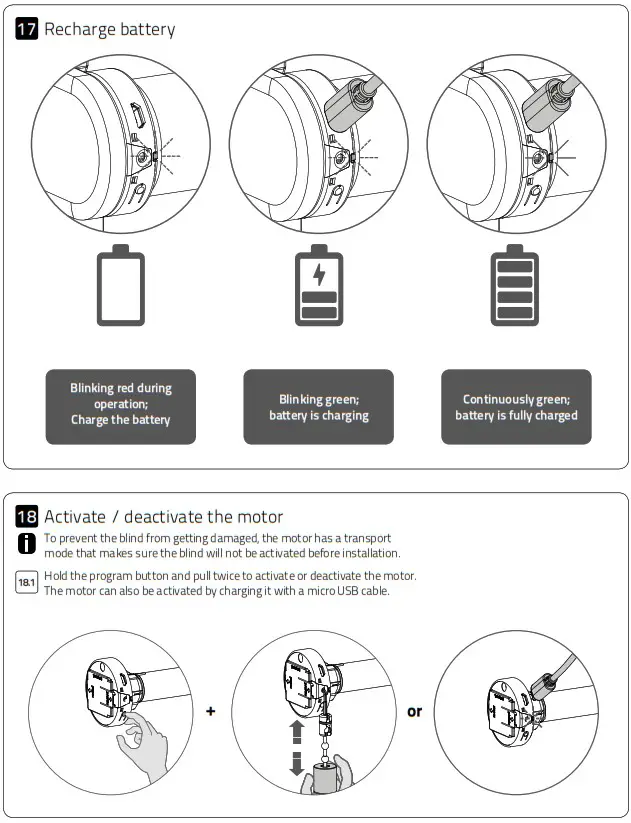
25 Activate / deactivate the motor![]() To prevent the blind from getting damaged, the motor has a transport mode that makes sure the blind will not be activated before installation.
To prevent the blind from getting damaged, the motor has a transport mode that makes sure the blind will not be activated before installation.
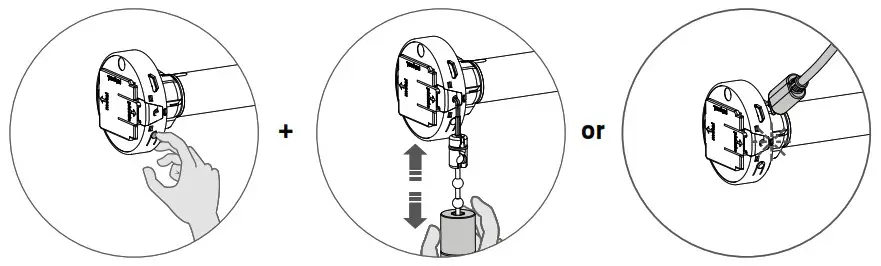
25.1 Hold the program button and pull twice to activate or deactivate the motor.
The motor can also be activated by charging it with a micro USB cable.
Frequently Asked Questions
| Problem | Cause | Solution |
| Blind does not work. | Motor is in transport mode. | Activate the motor. See step 25. |
| Motor battery is empty. | Charge the motor. See step 19. | |
| Remote battery is empty. (LEDS of remote are flashing rapidly.) | Replace the battery in the remote. See the manual of the remote. | |
| Remote battery is inserted incorrectly. | Replace the battery in the remote. See the manual of the remote. | |
| Radio-frequency interference | Make sure that the antenna of the motor is out of the way of metal objects. | |
| The distance from the remote to the motor is too far. | Move closer to the motor. | |
| The remote is not connected to the blind. | Pair the remote with the motor. See step 6. | |
| Motor LED flashes red. | The battery of the motor is empty. | Charge the motor. See step 19. |
| Blind is not charging. | Charger is not plugged in or does not work. | Try a different charger or make sure the charger is plugged in the outlet. |
| Multiple blinds respond to a remote. (Unable to program a single blind) | Multiple blinds are paired with a single channel. | Pair the blind with a free channel to program or use single select to program the blind. |
| Blind moves in small steps. | 1)No end limits are programmed. 2)Direct control is deactivated. | 1)Program end limits. See step 8 – 11. 2)Activate direct control. See step 17. |
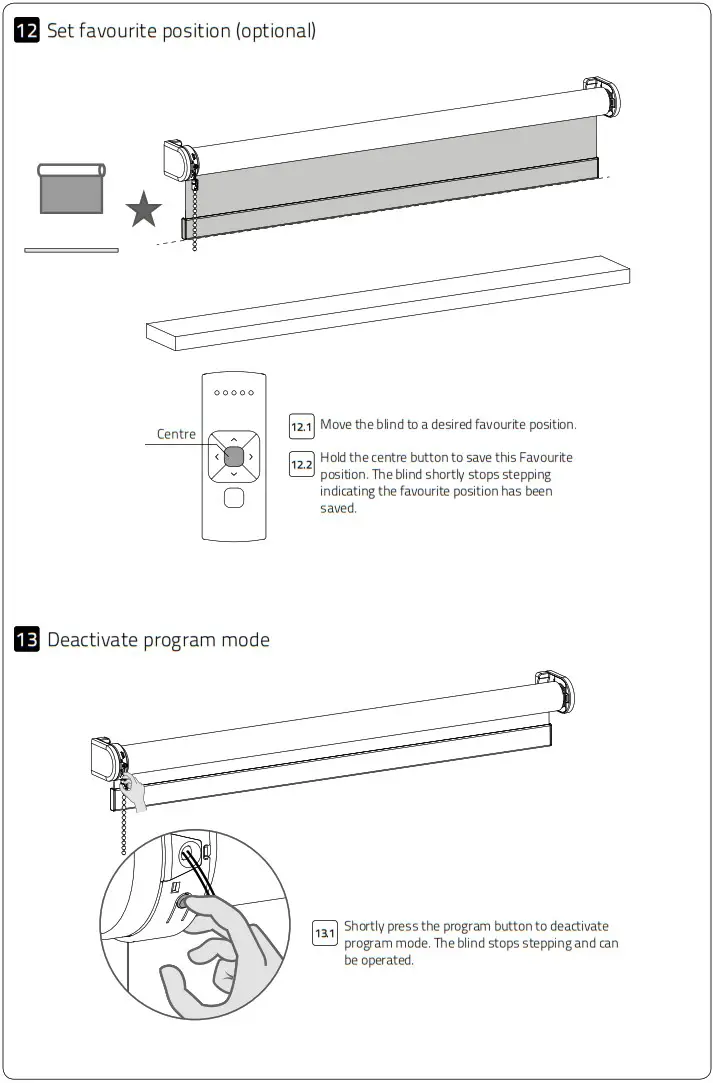
| Favourite position can not be programmed. | No end limits are programmed. | Program end limits. See step 8 -11. |
| Blind lowers too far. | End limits are programmed inrormrtly | Reprogram end limits. See step 8 -11. |
| Blind moves in the opposite direction. | The rotational direction has been set incorrectly. | Change the rotational direction. See step 7. |
| The blind keeps moving up and down. | The blind is in program mode. | Press the program button on the motor to exit program mode. |
![]()
MANUAL CM-20
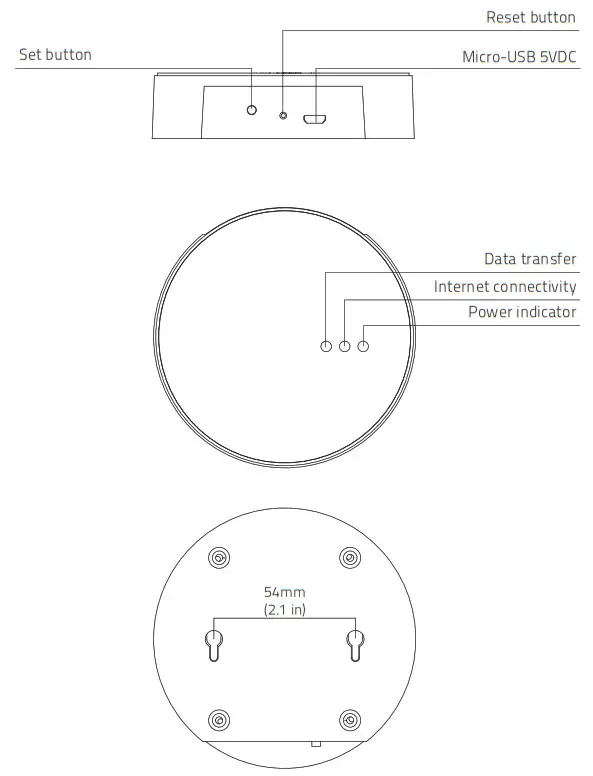
MOTION Wi-Fi bridge
![]()
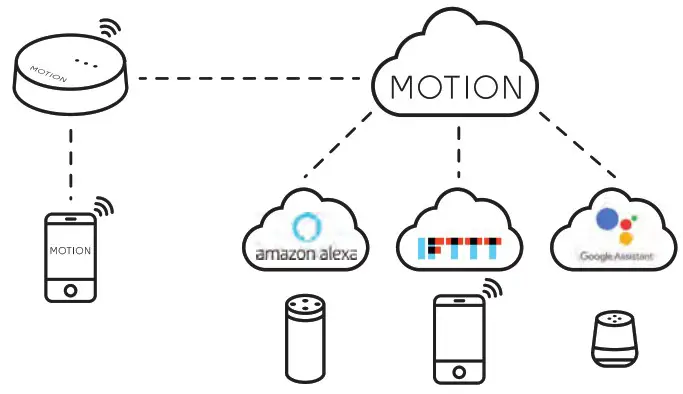
The MOTION Wi-Fi bridge is the heart of your automated blinds network at home.
The bridge unlocks endless possibilities to operate blinds with the MOTION app.
Cloud connections with leading smart home applications enable voice control and a variety of smart automation options.
| Max. blinds | Scenes | Timers | Frequency | Range radio | Power supply | Length | Height | Certificates |
| 30 | 20 | 20 | 433 MHz 2.4 GHz | 30 m | Micro USB DC 5V 1A | 100 mm ø | 25 mm |
This box includes the following items:

For the latest information and updated manuals, visit rtube.nl/cm-20
FCC Manual I FCC ID: ZY4CM20
Regulatory Information
- FCC Information for User
This product does not contain any user-serviceable components and is to be used with approved antennas only. Any product changes or modifications will invalidate all applicable regulatory certifications and approvals. - FCC Electronic Emission Notices
This device complies with part 15 of the FCC Rules.
Operation is subject to the following two conditions:- This device may not cause harmful interference
- This device must accept any interference received, including interference that may cause undesired operation.
- FCC Radio Frequency Interference Statement This equipment has been tested and found to comply with the limits for a class B digital device, pursuant to Part 15 of the FCC Rules. These limits are designed to provide reasonable protection against harmful interference when the equipment is operated in a commercial environment. This equipment generates, uses and can radiate radio-frequency energy and, if not installed and used in accordance with the instructions, may cause harmful interference to radio communications. Operation of this equipment in a residential area may cause harmful interference, in which case the user will be required to correct the interference at their own expense.
- FCC Radio Frequency Interference Statement
This equipment has been tested and found to comply with the limits for a class B digital device, pursuant to Part 15 of the FCC Rules. These limits are designed to provide reasonable protection against harmful interference when the equipment is operated in a commercial environment. This equipment generates, uses and can radiate radio-frequency energy and, if not installed and used in accordance with the instructions, may cause harmful interference to radio communications.
Operation of this equipment in a residential area may cause harmful interference, in which case the user will be required to correct the interference at their own expense.
If this equipment does cause harmful interference to radio or television reception, which can be determined by turning the equipment off and on, the user is encouraged to try to correct the interference by one or more of the following measures:
- Reorient or relocate the receiving antenna
- Increase the distance separating the equipment and receiver
- Connect the equipment to an outlet on a circuit different from that to which the receiver is connected
- Consult the dealer or an experienced radio/TV technician for help
Safety
WARNING: Important safety instructions. Follow all instructions, since incorrect installation can lead to severe injury.
- Do not let children play with the blind and/or remote control.
- Take care that the blind can move freely and is not blocked by any objects.
- Do not paint the device.
- Keep the device dry.
- Do not drop, knock, or shake the device. Rough handling can break internal circuit boards.
Cleaning
Follow these general rules when cleaning the outside of the device and its components:
- Use a damp, soft, lint-free cloth. Avoid getting moisture in openings.
- Do not use aerosol sprays, solvents, alcohol, or abrasives.
Service & Support
Do not perform repairs yourself.
Do not attempt to open the device or disassemble it. You run the risk of electric shock and voiding the limited warranty. No user-serviceable parts are inside.
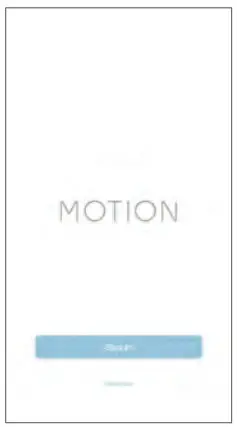
1. Download the app and create an account![]() The MOTION Wi-Fi bridge needs to be set up with the MOTION Blinds app before installation on the wall or ceiling. Download the MOTION Blinds app from the App Store or Google Play with your smartphone or tablet. Open the MOTION app and create an account.
The MOTION Wi-Fi bridge needs to be set up with the MOTION Blinds app before installation on the wall or ceiling. Download the MOTION Blinds app from the App Store or Google Play with your smartphone or tablet. Open the MOTION app and create an account.
 |  |
| App Store Download the MOTION Blinds app rtube.nl/red981 | Google Play Download the MOTION Blinds app rtube.nl/red982 |
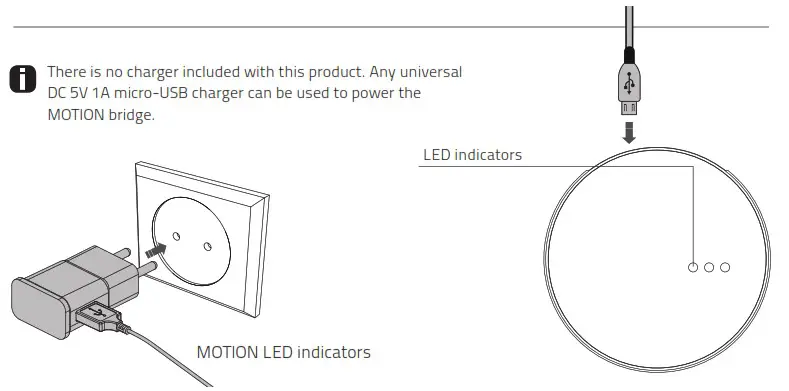
2 Power the bridge![]() There is no charger included with this product. Any universal DC 5V 1A micro-USB charger can be used to power the MOTION bridge.
There is no charger included with this product. Any universal DC 5V 1A micro-USB charger can be used to power the MOTION bridge.
| LED | Color | Status |
| Right | Solid Red | Bridge is powered on |
| Center | Blinking purple | Bridge connecting mode |
| Center | Blinking red | Not connected to Wi-Fi |
| Center | Solid Yellow | Connected to Wi-Fi, not connected to MOTION cloud |
| Center | Solid Blue | Connected to Wi-Fi Connected to MOTION cloud |
| Left | Blinking purple | Pairing blind with bridge |
| Left Center | Blinking green Solid blue | Bridge firmware update |
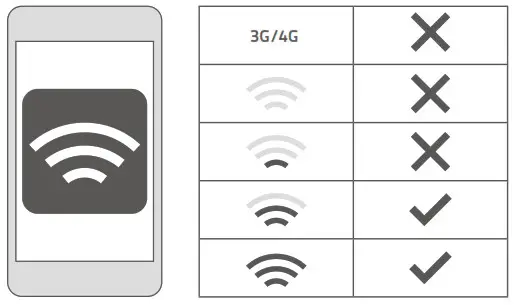
3 Connect the bridge to a Wi-Fi network![]() An active internet connection is required to add the MOTION bridge to your home Wi-Fi network.
An active internet connection is required to add the MOTION bridge to your home Wi-Fi network.
Choose a location for the MOTION bridge in your home. Connect your smartphone or tablet to your home Wi-Fi network to check the strength of the Wi-Fi signal at this location.
To avoid interference please make sure the MOTION bridge is located at least one meter away from any other Wi-Fi devices, including your router.

Video
MOTION app: how it works
rtube.nl/red1074
 | 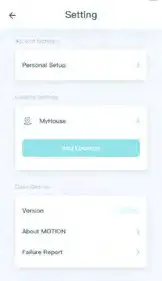 | 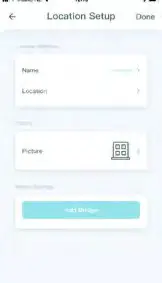 |
| 3.1 Choose ‘Edit’ at the top right of your screen and open ‘Settings’. | 3.2 Click on your location (My House) to add the MOTION bridge to this location. The MOTION Blinds app allows to create 5 different locations. Up to 3 bridges can be added per location. | 3.3 Press ‘Add Bridge’ and follow the installation wizard to setup your bridge. |
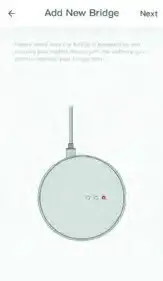 | 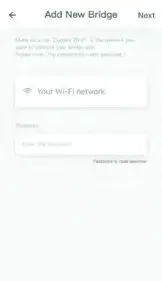 | 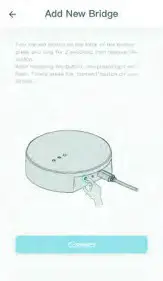 |
| 3.4 Make sure the MOTION bridge is powered ON. Open the Wi-Fi settings of your mobile device and connect to the Wi-Fi network you want to connect the MOTION bridge with. | 3.5 Return to the MOTION Blinds app and enter the password of the Wi-Fi network. | 3.6 Press and hold the ‘Set’ button on the MOTION bridge until the LED on top of the bridge starts to flash purple. Go to the app and press ‘Connect’. Now a MOTION Wi-Fi network is created by the bridge. |
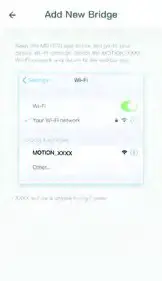 | 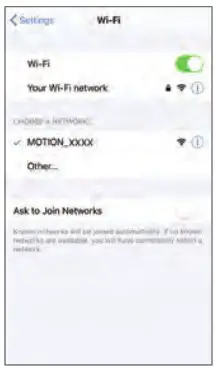 | 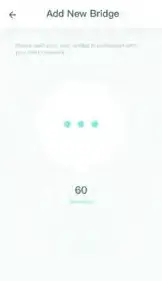 |
| 3.7 Keep the MOTION Blinds app running on the background, while opening the Wi-Fi settings of your mobile device. | 3.8 Choose the MOTION_ XXXX network to connect with the bridge. Return to the MOTION Blinds app to finish the installation wizard. | 3.9 The bridge automatically connects to your Wi-Fi network. The middle LED on the bridge first turns yellow and then blue. Now the bridge is connected to your Wi-Fi network and the MOTION cloud. |
4 Add a blind
 | 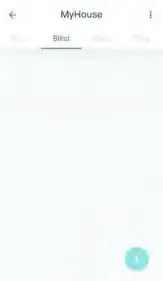 | 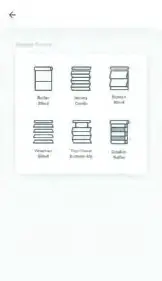 |
| 4.1 Go back to the start screen in the app and open your location. | 4.2 Navigate to ‘Blind’ and press the ‘+’ button to add a new blind. (Make sure your blind has a top and bottom position programmed. If your blind does not have end positions please program first.) | 4.3 Choose the blind type and follow the setup wizard. |
![]() Before adding a blind to the MOTION bridge, the end positions of the blind must be programmed with a remote control.
Before adding a blind to the MOTION bridge, the end positions of the blind must be programmed with a remote control.
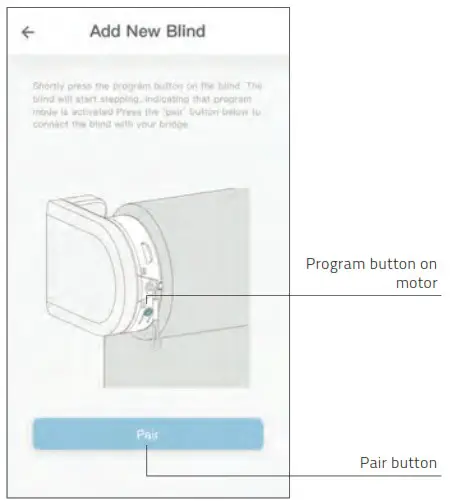
4.4 Shortly press the program button on the blind. (Please see the manual of your motor to see where the program button is located.) The blind will start stepping, indicating that program mode is activated. Press the ‘pair’ button to connect the blind with your bridge.
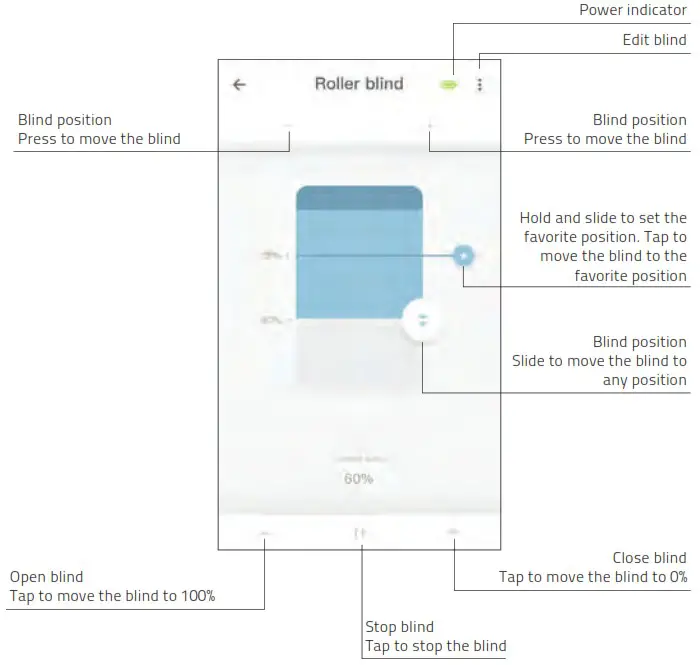
5 Roller/ Honeycomb/ Roman blind control
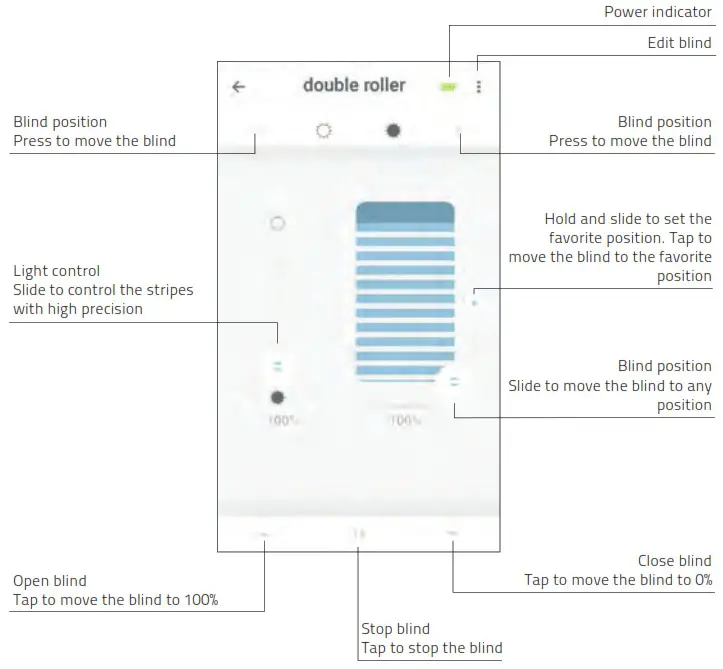
6 Double roller control
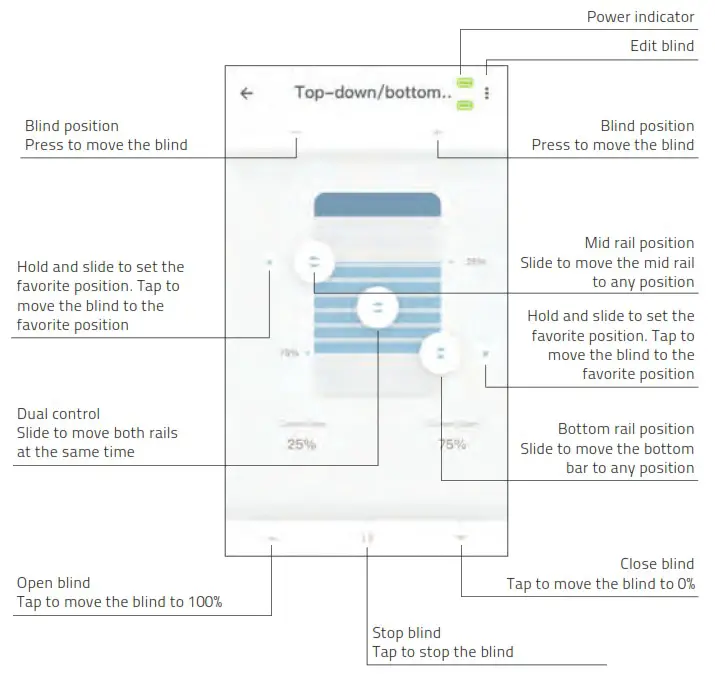
7 Top-down/Bottom-up control
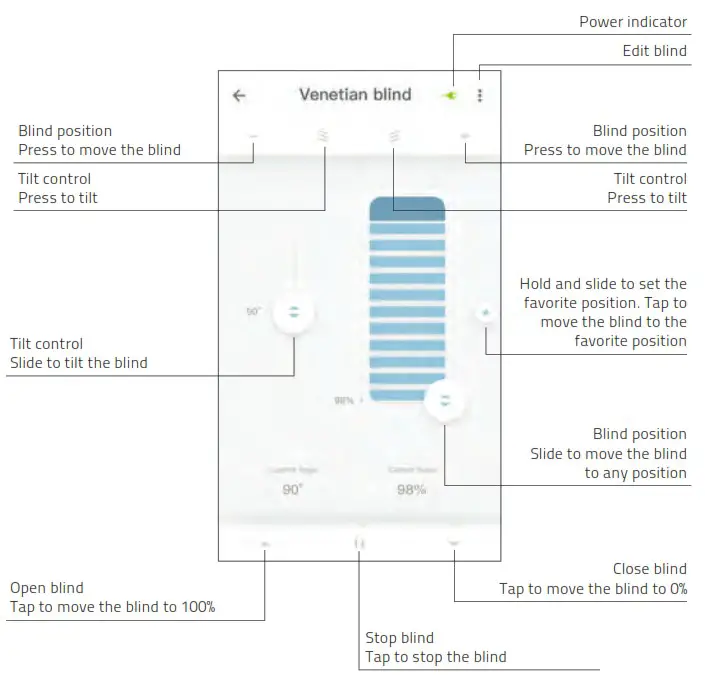
8 Venetian control
9 Create a room![]() Add blinds to a room to control individual blinds or all blinds in a room at the same time. Shortly click on a room to see/control all the blinds in this room
Add blinds to a room to control individual blinds or all blinds in a room at the same time. Shortly click on a room to see/control all the blinds in this room
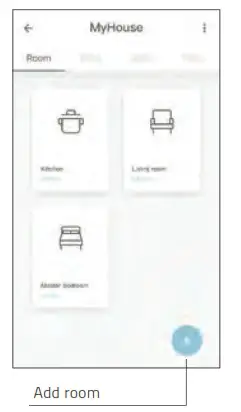 | 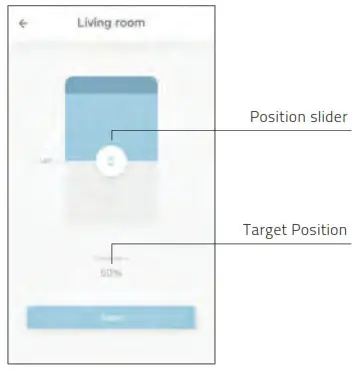 |
| 9.1 Press the ‘+’ button to add a new room. | 9.2 Click and hold on a room and control all the blinds to a certain postion. |
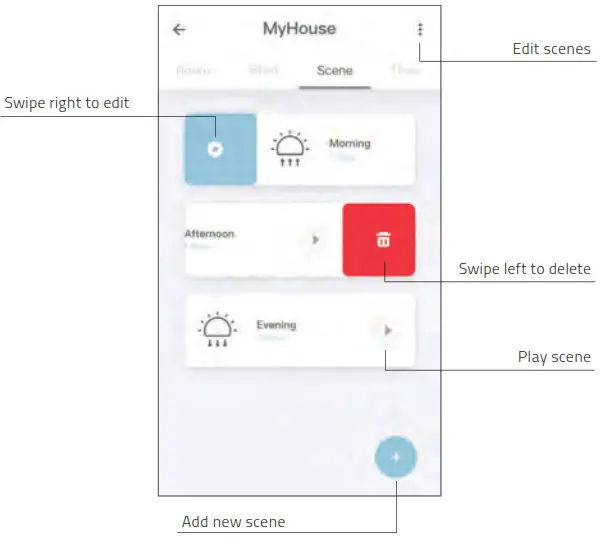
10 Create a scene![]() Scenes can be created to move your blinds to preset positions.
Scenes can be created to move your blinds to preset positions.
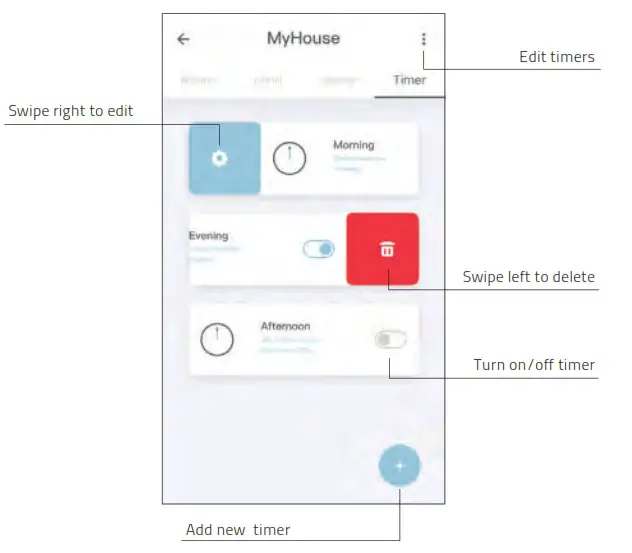
11 Create a timer
![]() Timers can be created to automate blinds and scenes to make the home seem inhabited.
Timers can be created to automate blinds and scenes to make the home seem inhabited.
12 Connect to third party![]() The MOTION bridge allows to seamlessly connect motorised blinds to smart home applications. Scan the QR code below to discover the third party connections.
The MOTION bridge allows to seamlessly connect motorised blinds to smart home applications. Scan the QR code below to discover the third party connections.
Third party Discover third party connections for MOTION blinds rtube.nl/red1062

13 Frequently Asked Questions
| Problem | Cause | Solution |
| Blind is not responding | Motor battery is empty | Charge the motor. See the manual of your motor |
| Radio interference / shielding | Make sure that the bridge/antenna of the motor is out of the way from metal objects | |
| The distance from the bridge to the motor is too far | Move the bridge closer to the blind | |
| The bridge is turned off | Power the bridge | |
| Can not pair your bridge | Wrong password | Start the setup wizard again and use the right password. The password is case sensitive |
| Router does not give an IP address to the bridge | Press and hold the reset button for 10 seconds. The center LED indicator will be RED. Retry to add the bridge |
CM20 Motion Wi-Fi bridge 115×115.indd 22
18-10-18 16:27


