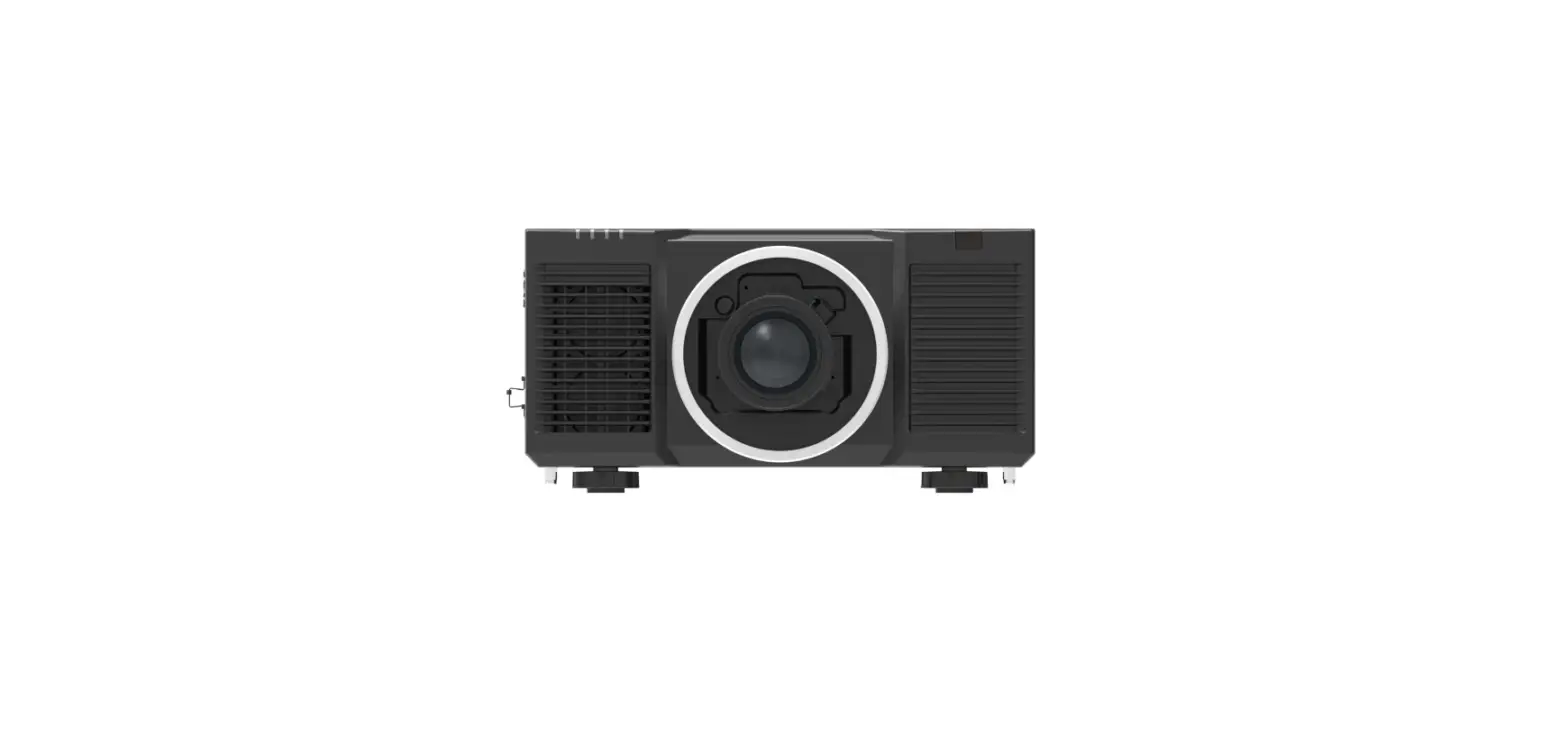
DU9900Z-BK Remote Communication Projector
Product Information
The DU9900Z DLP Projector Remote Communication Manual provides information on how to control the projector using RS-232 serial commands. The manual lists the available menu options, which are INPUT, PICTURE, ALIGNMENT, CONTROL, and SERVICE. It also provides communication parameters that need to be set up before using the serial control command. The manual includes a list of operation commands that can be used to query current setups, set up brightness, input signal source, and reset projection lens.
Product Usage Instructions
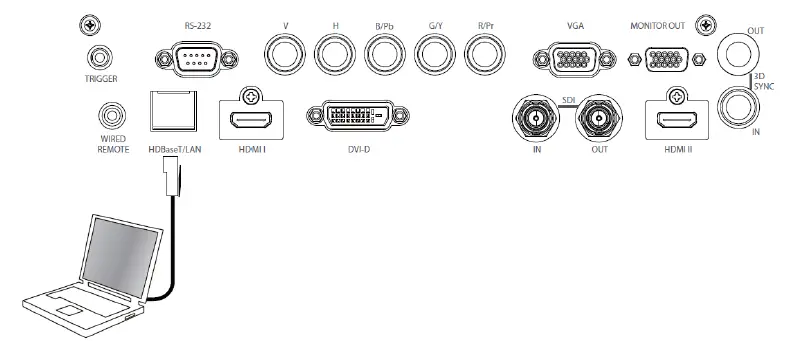
- Connect the RS-232 cable to the projector’s RS-232 port.
- Connect the other end of the RS-232 cable to the computer.
- Open a Windows client terminal software, such as Hyper Terminal.
- Set up the communication parameters for the terminal software as follows:
- Bit per Second: 9600 bps
- Data Bit: 8-bit
- Parity: None
- Stop Bit: 1
- Flow Control: None
- Port: 7000
- Use the serial control command to input commands for projector control or retrieve its operational data through the terminal software with ASCII characters.
- Prefix an operation command by typing “op” followed by control commands and settings separated by a space blank [SP]. End each command with a carriage return pair CR and ASCII hex 0D.
- To query current setups, use the question mark “?” symbol.
- To set up brightness, use the “op bright = [value]” command.
- To set up input signal source, use the “op input.sel = [value]” command. Replace [value] with the appropriate input source number. For example, “op input.sel = 0” sets the input signal source to HDMI.
- To reset projection lens to center position, use the “lens.center” command.
- Make sure to receive the return message of the last command before sending out the next one when sending multiple commands.
The Serial Interface RS-232 Command
This projector supports to control by RS-232 command, there exist two types of RS-232 serial commands:
- Operation command: Available menu options are INPUT, PICTURE, ALIGNMENT, CONTROL and SERVICE.
- Simulated IR remote controller commands: Controls projector via RS-232 command, the commands simulate IR remote controller and its control keys.
Communication parameter
You can use the serial control command to input commands for projector control or retrieve its operational data through Windows client terminal software, e.g. Hyper Terminal, with ASCII characters. You need to set up the following communication parameters in advance:
| Item | Parameter: |
| Bit per Second | 9600 bps |
| Data Bit | 8-bit |
| Parity | None |
| Stop Bit | 1 |
| Flow Control | None |
| Port | 7000 |
Note
- The terminal software does not return every command input character
- The transmission performance varies with the length of RS-232 cable
Operation commands
Operation command syntax
An operation command is prefixed by character “op”, followed by control commands and settings separated by space blank [SP], and ended by carriage return pair “CR” and “ASCII hex 0D”.Syntax of serial control commands:
op[SP]<operation command>[SP]<Setting Value>[CR]
- op: A constant indicating this is an operation command.
- [SP]: Indicate one blank space.
- [CR]: Indicate the command ending carriage return pair “CR” and “ASCII hex 0D”.
- Setting value: Settings of operation command
Types of setup strings
Query current setup Setup Increase setup order of adjustment items Decrease setup order of adjustment items Execute operation command
Examples:
- Control items
- Query current brightness
- Set up brightness
- Set up input signal source to
- HDMI
- Reset projection lens to
- center position
Description
Question mark “?” indicates querying current setup Syntax: Symbol “=” suffixed with setup values Some settings are changed in steps. Symbol “+” indicates changing one step up Some settings are changed in steps. Symbol “-” indicates changing one step down Certain operation commands execute after input without further setting or regulators.
Note: When sending the multiple commands, make sure the return message of the last command is received before sending out the next one.
List of operation commands
| OSD Function | Operation command | Settings/Return Values | Note | |
| Input Select | input.sel | ? = | 0 = HDMI 1 1 = HDMI 2 2 = VGA 3 = Component / BNC 4 = DVI 5 = 3G-SDI 6 = HDBaseT | Not applicable when the project is at below status. w Standby mode w When the blank function is activated |
| PIP/PIP Option | pip.mode | ? = | 0 = Off 1 = On | Not applicable when the project is at below status. Standby mode When PIP is off |
| PIP/PIP Input | pip.sel | ? = | 0 = HDMI 1 1 = HDMI 2 2 = VGA 3 = Component / BNC 4 = DVI 5 = 3G-SDI 6 = HDBaseT | Not applicable when the project is at below status. Standby mode When PIP is off |
| PIP/ Position | pip.pos | ? = | 0 = Top Left 1 = Top Right 2 = Bottom Left 3 = Bottom Right 4 = PBP | Not applicable when the project is at below status. Standby mode When PIP is off |
| Auto Source | auto.src | ? = | 0 = Off 1 = On | Not applicable when the projector is in standby mode. |
| Color Space | color.space | ? = | 0 = Auto 1 = YPbPr (Rec. 709) 2 = YcbCr (Rec. 601) 3 = RGB-PC (0-255) 4 = RGB-Video (16-235) | Not applicable when the project is in standby mode or the input signal is not yet locked. |
| Aspect Ratio | aspect | ? = | 0 = 5:4 1 = 4:3 2 = 16:10 3 = 16:9 4 = 1.88 5 = 2.35 6 = LetterBox 7 = Source 8 = Native | w Not applicable when the project is in standby mode or the input signal is not locked yet. w When the Zoom function is set to Zoom in, the Unscaled function is disabled. |
| Overscan | zoom | ? = | 0 = Off 1 = Crop 2 = Zoom | w Not applicable when the project is in standby mode or the input signal is not locked yet. w When the Zoom function is set to Zoom in, the Unscaled function is disabled. |
| OSD Function | Operation command | Settings/Return Values | Note | |
| VGA Setup/H Total | h.total | ? = + – | 0-200 | w Not applicable when the project is in standby mode or the input signal is not locked yet. w Apply for VGA and Component signal input. |
| VGA Setup/H Start | h.pos | ? = + – | 0-200 | w Not applicable when the project is in standby mode or the input signal is not locked yet. w Apply for VGA and Component signal input. |
| VGA Setup/H Phase | h.phase | ? = + – | 0-200 | w Not applicable when the project is in standby mode or the input signal is not locked yet. w Apply for VGA and Component signal input. |
| VGA Setup/V Start | v.pos | ? = + – | 0-200 | w Not applicable when the project is in standby mode or the input signal is not locked yet. w Apply for VGA and Component signal input. |
| Test Pattern | pattern | ? = | 0 = Off 1 = White 2 = Black 3 = Red 4 = Green 5 = Blue 6 = Checkboard 7 = CrossHatch 8 = V Burst 9 = H Burst 10 = Color Bar | Not applicable when the project is in standby mode. |
| 3D/3D Format | 3d.format | = ? | 0 = Off 1 = Auto 2 = Side-By-Side (Half) 3 = Top-And-Bottom 4 = Frame Sequential | Not applicable when the project is at below status. Standby mode |
| 3D/Eye Swap | 3d.swap | = ? | 0 = Normal 1 = Reverse | Not applicable when the project is at below status. Standby mode |
| 3D/DLP Link | 3d.dlplink | = ? | 0 = Off 1 = On | Not applicable when the project is at below status. Standby mode |
| 3D/Dark Time | 3d.darktime | = ? | 0 = 0.65 ms 1 = 1.3 ms 2 = 1.95 ms | Not applicable when the project is at below status. Standby mode |
| 3D/sync delay | 3d.syncdelay | = ? | 1 – 60 | Not applicable when the project is at below status. Standby mode |
| 3D/Sync Reference | 3d.syncref | = ? | 0 = External 1 = Internal 2 = Auto | Not applicable when the project is at below status. Standby mode |
PICTURE
| OSD Function | Operation command | Settings/Return Values | Note | |
| Picture Mode | pic.mode | ? = | 0 = High Bright 1 = Presentation 2 = Video | Not applicable when the project is in standby mode. |
| Brightness | bright | ? = + – | 0-200 | Not applicable when the project is in standby mode or the input signal is not locked yet. |
| Contrast | contrast | ? = + – | 0-200 | Not applicable when the project is in standby mode or the input signal is not locked yet. |
| Saturation | saturat | ? = + — | 0-200 | w Apply for YUV signal input w Not applicable when the project is in standby mode or the input signal is not locked yet. |
| Hue | tint | ? = + – | 0-200 | w Apply for YUV signal input w Not applicable when the project is in standby mode or the input signal is not locked yet. |
| Sharpness | sharp | ? = + – | 0-20 | Not applicable when the project is in standby mode or the input signal is not locked yet. |
| Color Temperature | color.temp | ? = | 0 = 5400K 1 = 6500K 2 = 7500K 3 = 9300K 4 = Native | Not applicable when the project is in standby mode or the input signal is not locked yet. |
| Gamma | gamma | ? = | 0 = 1.0 1 = 1.8 2 = 2.0 3 = 2.2 4 = 2.35 5 = 2.5 6 = S-Curve | Not applicable when the project is in standby mode or the input signal is not locked yet. |
| Input Balance /Red Offset | red.offset | ? = + – | 0-200 | Not applicable when the project is in standby mode or the input signal is not locked yet. |
| Input Balance /Green Offset | green.offset | ? = + – | 0-200 | Not applicable when the project is in standby mode or the input signal is not locked yet. |
| Input Balance /Blue Offset | blue.gain | ? = + – | 0-200 | Not applicable when the project is in standby mode or the input signal is not locked yet. |
| OSD Function | Operation command | Settings/Return Values | Note | |
| Input Balance /Red Gain | red.gain | ? = + – | 0-200 | Not applicable when the project is in standby mode or the input signal is not locked yet. |
| Input Balance /Green Gain | green.gain | ? = + – | 0-200 | Not applicable when the project is in standby mode or the input signal is not locked yet. |
| Input Balance /Blue Gain | blue.gain | ? = + – | 0-200 | Not applicable when the project is in standby mode or the input signal is not locked yet. |
| HSG/Red Gain | hsg.r.gain | ? = + – | 0-200 | Not applicable when the project is in standby mode or the input signal is not locked yet. |
| HSG/Green Gain | hsg.g.gain | ? = + – | 0-200 | Not applicable when the project is in standby mode or the input signal is not locked yet. |
| HSG/Blue Gain | Hsg.b.gain | ? = + – | 0-200 | Not applicable when the project is in standby mode or the input signal is not locked yet. |
| HSG/Cyan Gain | hsg.c.gain | ? = + – | 0-200 | Not applicable when the project is in standby mode or the input signal is not locked yet. |
| HSG/Magenta Gain | hsg.m.gain | ? = + – | 0-200 | Not applicable when the project is in standby mode or the input signal is not locked yet. |
| HSG/Yellow Gain | Hsg.y.gain | ? = + – | 0-200 | Not applicable when the project is in standby mode or the input signal is not locked yet. |
| HSG/Red/Saturation | hsg.r.sat | ? = + – | 0-200 | Not applicable when the project is in standby mode or the input signal is not locked yet. |
| HSG/Green/Saturation | hsg.g.sat | ? = + – | 0-200 | Not applicable when the project is in standby mode or the input signal is not locked yet. |
| HSG/Blue/Saturation | Hsg.b.sat | ? = + – | 0-200 | Not applicable when the project is in standby mode or the input signal is not locked yet. |
| HSG/Cyan/Saturation | hsg.c.sat | ? = + – | 0-200 | Not applicable when the project is in standby mode or the input signal is not locked yet. |
| HSG/Magenta/Satura ti on | hsg.m.sat | ? = + – | 0-200 | Not applicable when the project is in standby mode or the input signal is not locked yet. |
| OSD Function | Operation command | Settings/Return Values | Note | |
| HSG/Yellow/Saturation | Hsg.y.sat | ? = + – | 0-200 | Not applicable when the project is in standby mode or the input signal is not locked yet. |
| HSG/Red/Hue | hsg.r.hue | ? = + – | 0-200 | Not applicable when the project is in standby mode or the input signal is not locked yet. |
| HSG/Green/Hue | hsg.g.hue | ? = + – | 0-200 | Not applicable when the project is in standby mode or the input signal is not locked yet. |
| HSG/Blue/Hue | Hsg.b. hue | ? = + – | 0-200 | Not applicable when the project is in standby mode or the input signal is not locked yet. |
| HSG/Cyan/Hue | hsg.c. hue | ? = + – | 0-200 | Not applicable when the project is in standby mode or the input signal is not locked yet. |
| HSG/Magenta/Hue | hsg.m. hue | ? = + – | 0-200 | Not applicable when the project is in standby mode or the input signal is not locked yet. |
| HSG/Yellow/Hue | Hsg.y. hue | ? = + – | 0-200 | Not applicable when the project is in standby mode or the input signal is not locked yet. |
| HSG/White/Red Gain | hsg.wr.gain | ? = + – | 0-200 | Not applicable when the project is in standby mode or the input signal is not locked yet. |
| HSG/White/Green Gain | hsg.wg.gain | ? = + – | 0-200 | Not applicable when the project is in standby mode or the input signal is not locked yet. |
| HSG/White/Blue Gain | Hsg.wb.gain | ? = + – | 0-200 | Not applicable when the project is in standby mode or the input signal is not locked yet. |
| HSG Reset | hsg.reset | (execute) | Not applicable when the project is in standby mode or the input signal is not locked yet. | |
| Noise Reduction | nr | ? = + – | 0-3 (Noise Reduction) | Not applicable when the project is in standby mode or the input signal is not locked yet. |
| Dynamic Black | dblack | ? = | 0 = Off 1 = On | Not applicable when the projector is in standby mode. |
| Freeze | freeze | ? = | 0 = Off 1 = On | Not applicable when the projector is in standby mode |
Alignment
| OSD Function | Operation command | Settings/Return Value | Note | |
| Lens control | zoom.in | (execute) | The Lens control command does not apply when the projector is in standby mode. | |
| Lens control | zoom.out | (execute) | The Lens control command does not apply when the projector is in standby mode. | |
| Lens control | focus.near | (execute) | The Lens control command does not apply when the projector is in standby mode. | |
| Lens control | focus.far | (execute) | The Lens control command does not apply when the projector is in standby mode. | |
| Lens control | lens.up | (execute) | The Lens control command does not apply when the projector is in standby mode. | |
| Lens control | lens.down | (execute) | The Lens control command does not apply when the projector is in standby mode. | |
| Lens control | lens.left | (execute) | The Lens control command does not apply when the projector is in standby mode. | |
| Lens control | lens.right | (execute) | The Lens control command does not apply when the projector is in standby mode. | |
| Lens Type | lens.type | ? = | 0 = non-UST 1 = UST lens | Not applicable when the project is at below status. Standby mode |
| Lens Memory / Load Memory | lens.load | ? = | 1-10 set of lens memory (Load) | Not applicable when the project is at below status. Standby mode |
| Lens Memory / Save Memory | lens.save | ? = | 1-10 set of lens memory (Save) | Not applicable when the project is at below status. Standby mode |
| Lens Memory / Clear Memory | lens.clear | ? = | 1-10 set of lens memory (Save) | Not applicable when the project is at below status. Standby mode |
| Center Lens | lens.center | (execute) | The Lens control command does not apply when the projector is in standby mode. | |
| Digital Zoom / Digital Zoom | digi.zoom | = ? | 0 – 100 | Not applicable when the project is in standby mode or the input signal is not locked yet. |
| Digital Zoom / Digital Pan | digi.pan | = ? | -320 – 320 (depend on input timing; use “op digi.pan ?” to query current setting) | Not applicable when the project is in standby mode or the input signal is not locked yet. |
| Digital Zoom / Digital Scan | digi.scan | = ? | -200 – 200 (depend on input timing; use “op digi.scan.?” to query current setting | Not applicable when the project is in standby mode or the input signal is not locked yet. |
| Digital Zoom / Reset | digi.zoom.rst | (execute) | Not applicable when the project is in standby mode or the input signal is not locked yet. | |
| OSD Function | Operation command | Settings/Return Value | Note | |
| Warp / Keystone H | h.keystone | = ? | Horizontal -600 ~ + 600 | Not applicable when the project is at below status. Standby mode |
| Warp / Keystone V | v.keystone | = ? | Vertical -400 ~ + 400 | Not applicable when the project is at below status. Standby mode |
| Warp / Rotation | rotation | = ? | -100 ~ +100 | Not applicable when the project is at below status. Standby mode |
| Warp / H Pin/Barrel | h.pin.barrel | = ? | -150 ~ + 300 | Not applicable when the project is at below status. Standby mode |
| Warp/ V Pin/Barrel | v.pin.barrel | = ? | -150 ~ + 300 | Not applicable when the project is at below status. Standby mode |
| Warp/ Top Left Corner/Horizontal | 4corner.ulx | = ? | -192 ~+192 | Not applicable when the project is at below status. Standby mode |
| Warp/ Top Left Corner/Vertical | 4corner.uly | = ? | -120 ~+120 | Not applicable when the project is at below status. Standby mode |
| Warp/ Top Right Corner/ Horizontal | 4corner.urx | = ? | -192 ~+192 | Not applicable when the project is at below status. Standby mode |
| Warp/ Top Right Corner/ Vertical | 4corner.ury | = ? | -120 ~+120 | Not applicable when the project is at below status. Standby mode |
| Warp/Bottom left Corner/ Horizontal | 4corner.llx | = ? | -192 ~+192 | Not applicable when the project is at below status. Standby mode |
| Warp/Bottom left Corner/ Vertical | 4corner.lly | = ? | -120 ~+120 | Not applicable when the project is at below status. Standby mode |
| Warp/Bottom Right Corner/ Horizontal | 4corner.lrx | = ? | -192 ~+192 | Not applicable when the project is at below status. Standby mode |
| Warp/Bottom Right Corner/ Vertical | 4corner.lry | = ? | -120 ~+120 | Not applicable when the project is at below status. Standby mode |
| Blanking / Top | blanking.top | = ? | 0 ~ 360 | Not applicable when the project is at below status. Standby mode |
| Blanking / Bottom | blanking.bottom | = ? | 0 ~ 360 | Not applicable when the project is at below status. Standby mode |
| Blanking / left | blanking.left | = ? | 0 ~ 534 | Not applicable when the project is at below status. Standby mode |
| Blanking / Right | blanking.right | = ? | 0 ~ 534 | Not applicable when the project is at below status. Standby mode |
| OSD Function | Operation command | Settings/Return Value | Note | |
| Blanking / Reset | blanking.reset | (execute) | Not applicable when the project is at below status. Standby mode | |
| Edge Blend | eb.stat | = ? | 0 = Off 1 = On | Not applicable when the project is at below status. Standby mode |
| Edge Blend / Align Pattern | eb.adl | = ? | 0 = Off 1 = On | Not applicable when the project is at below status. Standby mode |
| Edge Blend / White Level | eb.top | = ? | 0 100~500 | Not applicable when the project is at below status. Standby mode |
| Edge Blend / White Level | eb.bottom | = ? | 0 100~500 | Not applicable when the project is at below status. Standby mode |
| Edge Blend / White Level | eb.left | = ? | 0 100~500 | Not applicable when the project is at below status. Standby mode |
| Edge Blend / White Level | eb.right | = ? | 0 100~500 | Not applicable when the project is at below status. Standby mode |
| Edge Blend / Black Level | eb.blu.top | = ? | 0 ~ 32 | Not applicable when the project is at below status. Standby mode |
| Edge Blend / Black Level | eb.blu.bottom | = ? | 0 ~ 32 | Not applicable when the project is at below status. Standby mode |
| Edge Blend / Black Level | eb.blu.left | = ? | 0 ~ 32 | Not applicable when the project is at below status. Standby mode |
| Edge Blend / Black Level | eb.blu.right | = ? | 0 ~ 32 | Not applicable when the project is at below status. Standby mode |
| Edge Blend / Black Level | eb.all | = ? | 0 ~ 32 | Not applicable when the project is at below status. Standby mode |
| Edge Blend / Black Level | eb.red | = ? | 0 ~ 32 | Not applicable when the project is at below status. Standby mode |
| Edge Blend / Black Level | eb.green | = ? | 0 ~ 32 | Not applicable when the project is at below status. Standby mode |
| Edge Blend / Black Level | eb.blue | = ? | 0 ~ 32 | Not applicable when the project is at below status. Standby mode |
| Edge Blend / Reset | eb.reset | (execute) | Not applicable when the project is at below status. Standby mode | |
| OSD Function | Operation command | Settings/Return Value | Note | |
| Screen Format | screen.format | = ? | 0 = 16:10 1 = 16:9 2 = 4:3 | Not applicable when the project is at below status. *Standby mode |
CONTROL
| OSD Function | Operation command | Settings/Return Values | Note | |
| Language | lang | ? = | 0 = English 1 = French 2 = Spanish 3 = German 4 = Portuguese 5 = Chinese Simplified 6 = Chinese Traditional 7 = Japanese 8 = Korean | Not applicable when the project is at below status. Standby mode |
| Projection mode | orientation | = ? | 0 = Front 1 = Ceiling + Front 2 = Rear 3 = Ceiling + Rear 4 = Auto | Not applicable when the project is in standby mode |
| Cooling Condition | cooling.condition | = ? | 0 = Front 1 = Ceiling + Front 2 = Freetilt 3 = Auto | Not applicable when the project is in standby mode |
| Altitude | altitude | ? = | 1 = On 2 = Auto | Not applicable when the project is in standby mode |
| Auto Power Off | auto.powoff | ? = | 0 = Off 1 = On | Not applicable when the project is in standby mode |
| Auto Power On | auto.powon | ? = | 0 = Off 1 = On | Not applicable when the project is in standby mode |
| Network/ Standby Power | net.power | = ? | 0 = Off 1 = On | Not applicable when the project is in standby mode |
| Network/DHCP | net.dhcp | ? = | 0 = Off 1 = On | Not applicable when the project is in standby mode |
| Network/IP Adress | net.ipaddr | ? = | <string> | Not applicable when the project is in standby mode |
| Network/Subnet Mask | net.subnet | ? = | <string> | Not applicable when the project is in standby mode |
| Network/Gateway | net.gateway | ? = | <string> | Not applicable when the project is in standby mode |
| Network/DNS | net.dns | = ? | <string> | Not applicable when the project is in standby mode |
| OSD Function | Operation command | Settings/Return Values | Note | |
| Light Power | laser.mode | ? = | 0 = Eco Mode 1 = Normal Mode 2 =custom Power Mode | Not applicable when the project is in standby mode
Not applicable when the project is in cooling or lighting up status. |
| Customer Power Level | laser.power | ? = | 20-100 Adjust range: 20%-100% | w Not applicable when the project is in standby mode w The command is available when Light Power is set to Custom Power Level (laser.mode=2) |
| Background | no.signal | ? = | 0 = Logo 1 = Black 2 = Blue 3 = White | Not applicable when the project is in standby mode |
| Startup Logo | startup.logo | ? = | 0 = Off 1 = On | Not applicable when the project is in standby mode |
| Remote Sensor | ir.enable | ? = | 0 = Off (Disable) 1 = On (Enable) | Not applicable when the project is in standby mode |
| ID Control Enable | Id.control.enable | ? = | 0 = Disable 1 = Enable | |
| Control ID Number | Control.id | ? = | 0 – 99 | ID Control Enable function has to be enabled before setting the number. |
| Trigger | trig.1 | ? = | 0 = Off 1 = Screen 2 = 5:4 3 = 4:3 4 = 16:10 5 = 16:9 6 = 1.88 7 = 2.35 8 = LetterBox 9 = Source 10 = Native | Not applicable when the projector is in standby mode. |
| OSD Settings/ Menu Position | osd.menupos | = ? | 0 = Top Left 1 = Top Right 2 = Bottom Left 3 = Bottom Right 4 = Center | Not applicable when the project is in standby mode |
| OSD Settings/ Menu Transparency | osd.trans | = ? | 0 = 0% 1 = 25% 2 = 50% 3 = 75% | Not applicable when the project is in standby mode |
| OSD Settings/ Time Out | osd.timer | = ? | 0 = Always On 1 = 10 Seconds 2 = 30 Seconds 3 = 60 Seconds | Not applicable when the project is in standby mode |
| OSD Settings/ Message Box | osd.msgbox | = ? | 0 = Off 1 = On | Not applicable when the project is in standby mode |
SERVICE
| OSD Function | Operation command | Settings/Return Values | Note | |
| Model | model | ? | <String> | Not applicable when the project is in standby mode standby mode |
| Serial Number | ser.no | ? | <String> | Not applicable when the project is in standby mode |
| Software Version | sw.ver | ? | <String> | Not applicable when the project is in standby mode |
| Active Source | act.source | ? | Not applicable when the project is in standby mode | |
| Signal format | signal | ? | <string> | Not applicable when the project is in standby mode |
| H Refresh Rate | h.refresh | ? | <number> | Not applicable when the project is in standby mode or the input signal is not locked yet. |
| V Refresh Rate | v.refresh | ? | <number> | Not applicable when the project is in standby mode or the input signal is not locked yet. |
| Pixel Clock | pixel.clock | ? | <number> | In unit of MHz
|
| Light Time | laser.hours | ? | <number> | Not applicable when the project is in standby mode |
| Factory Reset | fact.reset | (execute) | ||
Others
| Function | Operation command | Settings/Return Values | Note | |
| Power On | power.on | (execute) | ||
| Power Off | power.off | (execute) | ||
| Projector Status | status | ? | 0 = Standby 1 = Warm Up 2 = Imaging 3 = Cooling 4 = Error | Not applicable when the Network Standby is set to Off (less 0.5W) |
| Blank | blank | = ? | 0= Disable 1= Enable | Not applicable when the project is in standby mode |
| Error Detection | errcode | ? | <string> | |
| System Temperature – Ti | ti | ? | <number> | Not applicable when the project is in standby mode |
| System Temperature – Ti2 | ti2 | ? | <number> | Not applicable when the project is in standby mode |
| System Temperature – Tc | tc | ? | <number> | Not applicable when the project is in standby mode |
| System Temperature – Tb1 | tb1 | ? | <number> | Not applicable when the project is in standby mode |
| System Temperature – Tb2 | tb2 | ? | <number> | Not applicable when the project is in standby mode |
Simulated IR remote controller commands
This control command simulates the IR remote controller and its control keys. It shares the same syntax of operation command. It begins with characters “ky”, followed by control commands and settings separated by space blank [SP], and ended by carriage return pair “CR” and “ASCII hex 0D”.Control command syntax:
ky[SP]<operation command>[CR]
Examples:
- Power On: ky power.on [CR]
- Power Off: ky power.off [CR]
List of simulated IR remote controller commands
| Item | Function | Operation command | Description |
| 1 | Power On | power.on | Power On |
| 2 | Power Off | power.off | Power Off |
| 3 | Menu | menu | Display OSD menu |
| 4 | Exit | exit | Exit |
| 5 | Enter | enter | ENTER key |
| 6 | Up | up | Move cursor upward or change upward |
| 7 | Down | down | Move cursor downward or change downward |
| 8 | Left | left | Move cursor to the left or change to the left |
| 9 | Right | right | Move cursor to the right or change to the right |
Control the Projector Through a Network
This machine supports the following methods in remotely controlling the projector through a network:
- Control projector through web browser.
- Control projector with RS-232 control or simulated IR commands via TCP/IP communication protocol.
Cable connection
You may connect the projector to a PC or to an external integrated video and control signal transmission box through LAN for remote control.
Connect the projector to a PC
See figure below for connecting the projector to a PC in RJ-45 cable for control. For connection through LAN, connect the hub through to the projector’s HDBaseT/LAN port.
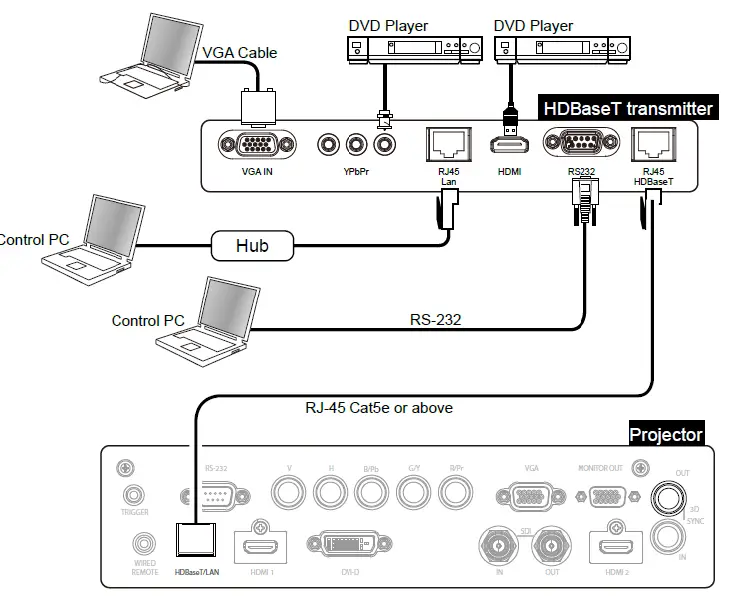
Connect with an external integrated video and control signal transmission box
You may connect the projector to an external integrated video and control signal transmission box with RJ-45 cable for concurrent video and networking control signal transmission. Please connect the PC to the transmission box with one RJ-45 cable or RS-232 cable, then connect the transmission box to the HDBaseT/LAN terminal of the projector by one RJ-45 cable, please refer to below illustration.
Set up the projector for networking
Before performing projector control by network, please configurate the network setting and make sure Standby Power is set to On.

- Network Mode: Switch network mode for projector control or service, the default setting is Projector Control.
- Projector Control: Switch Network Mode for projector control.
- Service: Switch Network Mode for service, the network configuration is changed to default setting for service.
- Note: this option is for firmware update in service only.
Standby Power: Select the standby power consumption option
- On: This is highest standby power consumption option for enabling projector control via RS-232 and LAN. Please select this option if you would like to control the projector via Ethernet.
- Off: the standby power consumption is kept under 0.5W, RS-232 and network control are turned off
Caution:
Network and RS-232 control are disabled if Standby Power is set to off for reducing the standby power consumption (less 0.5W). Please make sure Standby Power is set to On before controlling the projector via RS-232 or LAN.
- DHCP: Enable or disable the DHCP service. When DHCP is set to ON, the DHCP server of the domain will assign an IP address to the projector. The IP address will appear in the IP address window and you don’t need to set the IP address. Otherwise, the domain does not or cannot assign any IP address, and 0. 0. 0. 0 is shown on the IP address window.
- IP Address: Set DHCP “OFF” and specify an IP address manually. Use the ◄► button to select the number in the address to change. Use the ▲▼ button to increase or decrease the number in the IP address.
- Subnet Mask: Set the sub mask. The input method is the same as the setting for IP address.
- Gateway: Set the gateway. The input method is the same as the setting for IP address.
- DNS: Set the DNS. The input method is the same as the setting for IP address.
- MAC Address: Show projector’s MAC Address.
Caution: Search DHCP or IP address, it will take the projector several seconds to apply network configuration.
Control the projector through a network
Control the projector through a web browser Open the web browser of your control PC, type the projector’s IP address. The left of the web page shows below four options:
- Projector Status: Display current projector settings.
- Projector Control: This page provides power buttons, input options and Lens control button for the control. Crestron RoomView: Display Crestron web control page.
- Network Setup: Setting for projector link.
- Alert Mail Setup: Settings for projector abnormality email reminders. In case of any abnormality the project sends emails to preset users.
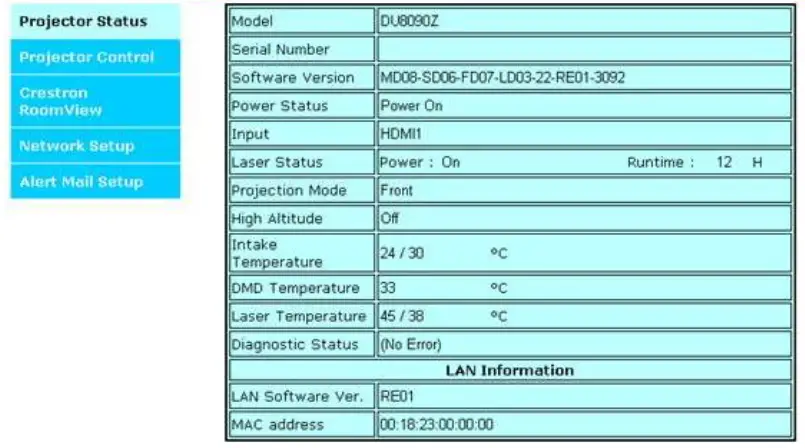
Projector Status
This page shows the current status of the projector.
- Model: Projector model name
- Software Version: The version of the software installed in the projector
- Power Status: Current projector startup status
- Input: Display the current input source.
- Laser status: Display current light source status and the usage.
- Projection Mode: Display current projection mode
- High Altitude: Display current High Altitude setting.
- Intake Temperature: Display detected temperature of intake air.
- DMD Temperature: Display detected temperature by the sensor near DMD chip.
- Laser Temperature: Display detected temperature by the sensor on laser module.
- Diagnostic Status: Indicate self-diagnosis message by the projector.
Network control setup message (RJ-45 Version)
- LAN Version: Network control software version number
- MAC address: Projector MAC address setup
Projector Control
This page provides the control buttons for power, blank, Input Selection and Lens control.
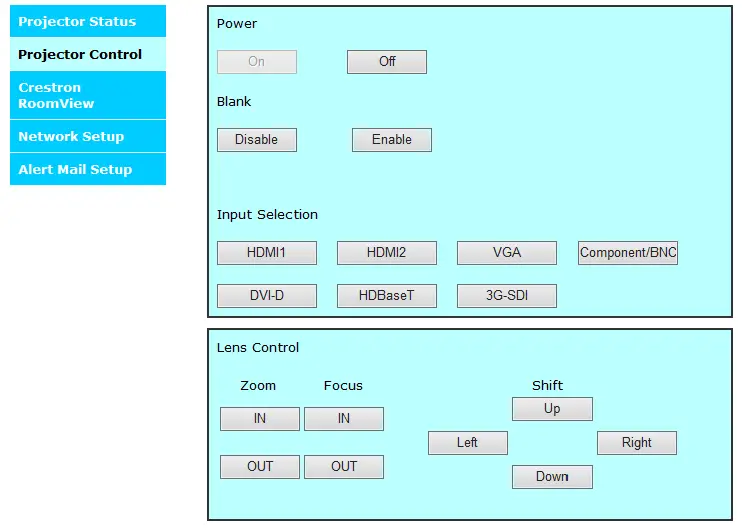
- Power : Projector power on/off control.
- Blank : Interrupt the projection temporarily or start the projection again.
- Input Selection : Select the input source by pressing the buttons.
- Lens Control : Select the button to adjust Zoom, Focus or Lens position
Crestron RoomView
This page shows Crestron control page for projector control, the available options are as below options.
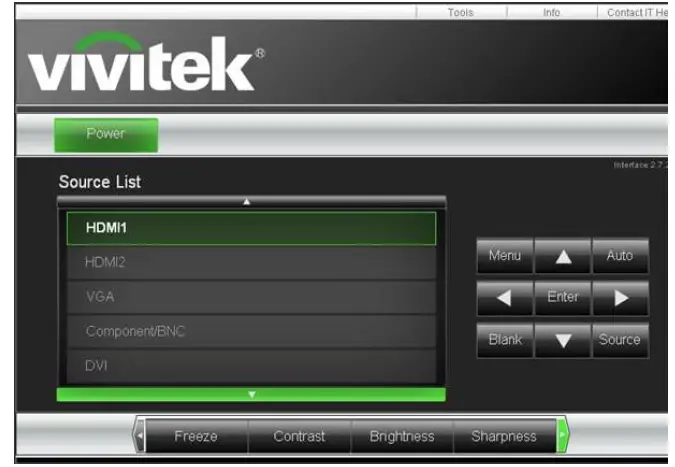
- Power: Press this button to turn power on or off.
- Source List: Switch projector input sources. Press the ▲ or ▼ arrow key to scroll through the dropdown list of available input sources
Image adjust options
Press the or arrow key to scroll through available adjustment options.
- Freeze: Freeze current projection screen. The projection screen prompts the “Still open” message after the freeze function enabled. Press the Freeze button again to unfreeze the screen.
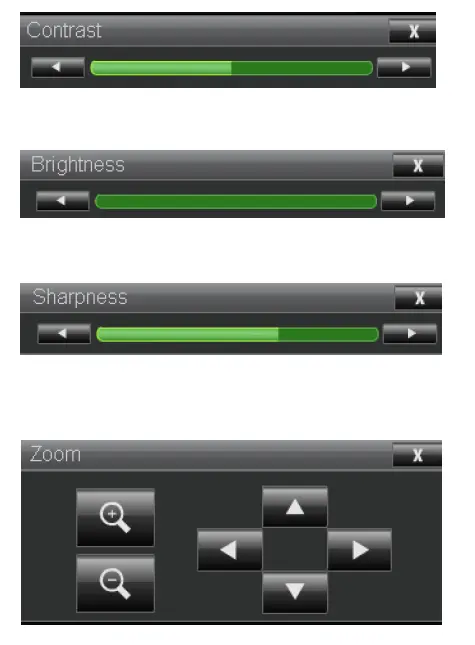
- Contrast: Click this button and the adjustment window displays. Click the arrow keys to adjust contrast.
- Brightness: Click this button and the adjustment window displays. Click the arrow keys to adjust brightness.
- Sharpness: Click this button and the adjustment window displays. Click the arrow key to adjust sharpness.
- Zoom: Zoom the projection image. Click the “+” key to zoom in and “-” to zoom out. You may click the four arrow keys in the window to move the zoomed projection image.
Control key window
This window simulates keys on the remote controller and control panel.
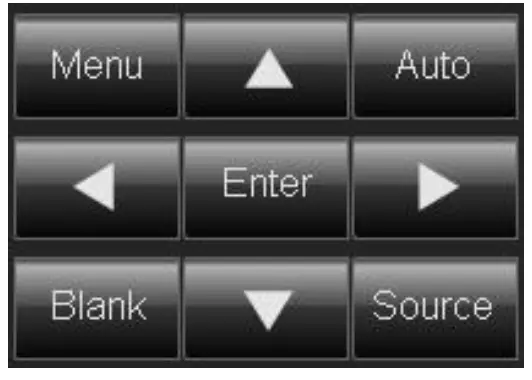
- Enter: Confirm and select function options
- Menu: Press to display OSD menu. Press again to exit it.
- Auto: Run the auto image adjustment function.
- Blank: Pause the image projection, i.e. the projection image is masked. Press again to resume the projection.
- The signal source menu displays. Press to display signal source in the projection screen.
- Tools: Check Crestron equipment for its setup
- Info: Display current projector status and Crestron setup.
Network Setup
This page allows you to configure network setting of the projector.
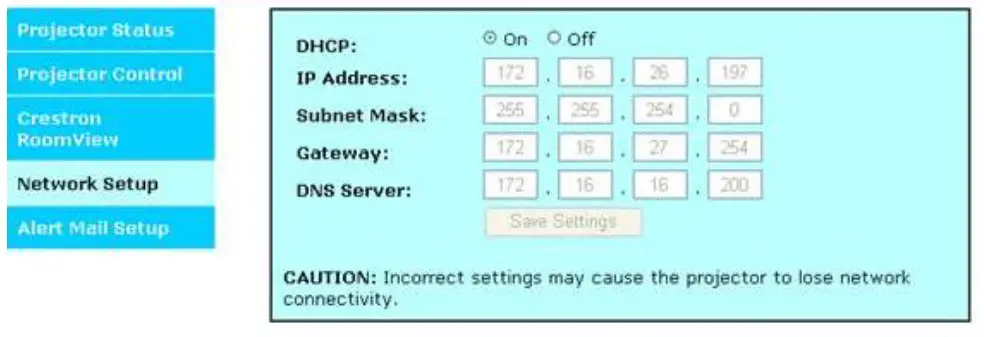
- DHCP: The DHCP server of the domain will assign an IP address to the projector automatically if DHCP is set to On, otherwise network configuration need to be set manually.
- IP Address: Input the IP address of the projector.
- Subnet Mask: Configure the subnet mask.
- Gateway: Configure the gateway DNS Server Set the address of DNS server
- Save Setting: Click the button to confirm the change if any change is made.
Note: that current connection is interrupted after change the network settings, please connect the projector again by new network setting
Alert Mail Setup
This projector can send emails with projector abnormality messages to preset users. Set up the projector before enabling this function:
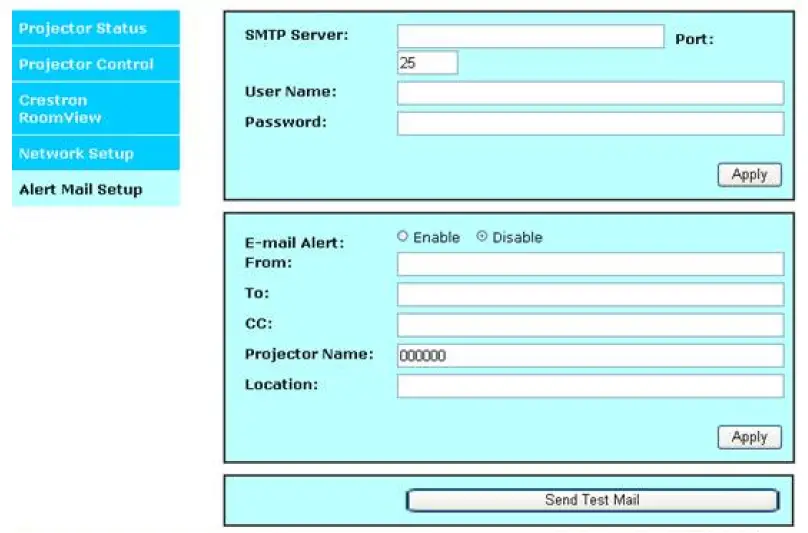
- SMTP Server: Set up SMTP server name.
- Port: Set up port name.
- User Name: Input user name for the projector to send the reminding message through a SMTP server
- Password: Input password.
- E-mail Aler: Enable or Disable reminding message
- From: Set up sender’s email address
- To: Set up receiver’s email address
- CC: Set up email address of the email send a copy of a business letter or an e-mail to someone
- Projector Name: Set up projector name or ID.
- Location: Set up projector installation location.
- Apply: Press this button to confirm changes you have made.
- Send Test Mail: Send test email. Press this button to validate email settings after setup is completed.
Control projector with TCP/IP communication protocol
This projector supports TCP/IP communication protocol which enables you to send RS-232 operation commands or Simulated IR commands to control projectors connected with RJ45 cable via terminal connection application software, e.g. Tera Term. Please set up IP address and port number with the terminal connection application software before controlling your projector with TCP/IP communication protocol:
- IP Address: IP address of projector
- Port: Please set transmission port number to 7000
See the section on serial interface RS-232 control commands for details on RS-232 operation commands or simulated IR commands.
About Vivitek Support
If you cannot find solutions from this user guideline, please contact us using the contact information below:
North and Central America
VIVITEK USA
15700 Don Julian Road, Suite B, City of Industry, CA 91745, U.S.A.
- General Enquiries: [email protected]
- Service & Support Enquiries: [email protected]
- Telephone: 1-855-VVK-BEST (1-855-885-2378)
Europe, Middle East and Africa
VIVITEK EMEA
Zandsteen 15, 2132 MZ Hoofddorp, The Netherlands
- General Enquiries: [email protected]
- Service & Support Enguiries: [email protected]
- Tel: +31 20 655 0960
ASIA
VIVITEK ASIA
4F, No. 186, Ruey Kuang Road, Neiho, Taipei 11491, Taiwan R.O.C.
- General Enquiries: [email protected]
- Service & Support Enquiries: [email protected]
- Tel: +886 2 8797 2088
CHINA
VIVITEK CHINA
Cimic Plaza, No. 1090 Shiji Boulevard, Pudong Shanghai, 201209, China
- General Enquiries: [email protected]
- Service & Support Enquiries: [email protected]
- Tel: +86-21-5836-0088
INDIA
VIVITEK INDIA
Plot No. 43, Sector – 35, HSIDC, GURGAON – 122001 (Haryanaa), India
- General Enquiries: [email protected]
- Service & Support Enquiries: [email protected]
- Tel: +91 124-4874900
TAIWAN
VIVITEK TAIWAN
4F, No. 186, Ruey Kuang Road, Neiho, Taipei 11491, Taiwan R.O.C.
- General Enquiries: [email protected]
- Service & Support Enquiries: [email protected]
- Tel: +886 2 8797 2088


