![]() GLM 50 C
GLM 50 C
Professional Laser Distance Measurer
Instruction Manual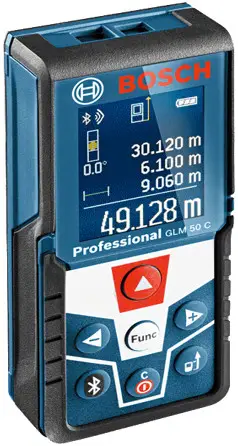
GLM 50 C Professional Laser Distance Measurer
 |  |
 |  |
 |  |
http://qr.bosch-professional.com/d/198466
Safety Notes
![]() All instructions must be read and observed in order to work safely with the measuring tool. The integrated protections in the measuring tool may be compromised if the measuring tool is not used in accordance with the instructions provided. Never make warning signs on the measuring tool unrecognizable. STORE THESE INSTRUCTIONS IN A SAFE PLACE AND INCLUDE THEM WITH THE MEASURING TOOL WHEN GIVING IT TO A THIRD PARTY.
All instructions must be read and observed in order to work safely with the measuring tool. The integrated protections in the measuring tool may be compromised if the measuring tool is not used in accordance with the instructions provided. Never make warning signs on the measuring tool unrecognizable. STORE THESE INSTRUCTIONS IN A SAFE PLACE AND INCLUDE THEM WITH THE MEASURING TOOL WHEN GIVING IT TO A THIRD PARTY.
- Caution – The use of other operating or adjusting equipment or the application of other processing methods than those mentioned here can lead to dangerous radiation exposure.
- The measuring tool is provided with a warning label (marked with the number 12 in the representation of the measuring tool on the graphics page).

- If the text of the warning label is not in your national language, stick to the provided warning label in your national language over it before operating for the first time.
 Do not direct the laser beam at persons or animals and do not stare into the direct or reflected laser beam yourself, not even from a distance. You could blind somebody, cause accidents or damage your eyes.
 - If laser radiation strikes your eye, you must deliberately close your eyes and immediately turn your head away from the beam.
- Do not make any modifications to the laser equipment.
- Do not use the laser viewing glasses as safety goggles. The laser viewing glasses are used for improved visualization of the laser beam, but they do not protect against laser radiation.
- Do not use the laser viewing glasses as sunglasses or in traffic. The laser viewing glasses do not afford complete UV protection and reduce color perception.
- Has the measuring tool been repaired only through qualified specialists using original spare parts? This ensures that the safety of the measuring tool is maintained.
- Do not allow children to use the laser measuring tool without supervision. They could unintentionally blind other persons or themselves.
- Do not operate the measuring tool in explosive environments, such as in the presence of flammable liquids, gases, or dust. Sparks can be created in the measuring tool which may ignite the dust or fumes.
- Caution! When using the measuring tool with Bluetooth®, interference with other devices and systems, airplanes and medical devices (e.g., cardiac pacemakers, hearing aids) may occur. Also, the possibility of humans and animals in direct vicinity being harmed cannot be completely exempt. Do not use the measuring tool with Bluetooth® in the vicinity of medical devices, petrol stations, chemical plants, areas where there is a danger of explosion, and areas subject to blasting. Do not use the measuring tool with Bluetooth® in airplanes. Avoid operation in the direct vicinity of the body over long periods.
The Bluetooth® word mark and logos are registered trademarks owned by Bluetooth SIG, Inc. and any use of such marks by Robert Bosch GmbH is under license.
Product Description and Specifications
Please unfold the fold-out page with the representation of the measuring tool and leave it unfolded while reading the operating instructions.
Intended Use
The measuring tool is intended for measuring distances, lengths, heights, clearances, and inclines, and for calculating areas and volumes.
The measuring results can be transferred to other devices via Bluetooth®.
Technical Data
Digital Laser Measure | GLM 50 C |
| Article number | 3 601 K72 C. |
| Measuring range (typical) | 0.05-50 mA) |
| Measuring range (typical under unfavorable conditions) | 20 m B) |
| Measuring accuracy (typical) | +1.5 mm A) |
| Measuring accuracy (typical under unfavorable conditions) | ±3.0 mmB) |
| Lowest indication unit | 0.1 mm |
| Indirect Distance Measurement and Vial | |
| Measuring range | 0°-360° (4×90°) |
| Inclination measurement | |
| Measuring range | 0°-360° (4×90°) |
| Measuring accuracy (typical) | + 0.2° CVD)/1) |
| Lowest indication unit | 0.1° |
| General | |
| Operating temperature | —10°C…-‘-45 °CE) |
| Storage temperature | —20 °C…+ 70 °C |
| Relative air humidity, max. | 90% |
| Laser class | 2 |
| Laser type | 635 nm, < 1 mW |
| Laser beam diameter (at 25 °C) approx. — at a 10 m distance — at a 50 m distance | 9 mm D) 45 mm D) |
| Automatic switch-off after approx. — Laser — Measuring tool (without measurement) | 20 s 5 min H) |
| Weight according to EPTA-Procedure 01:2014 | 0.10 kg |
| Dimensions | 106 x 45 x 24 mm |
| Degree of protection | IP 54 (dust and splash proof) F) |
| Batteries Rechargeable batteries | 2 x 1.5 V LRO3 (AAA) 2 x 1.2 V HRO3 (AAA) |
| Battery life, approximately — Individual measurements — Continuous measurement | 10000″) 2.5 h”) |
| Setting the unit of measure | . m, ft, in |
| Data transmission | |
| Bluetooth® | Bluetooth® 4.0 (Classic and Low Energy) G) |
A) For measurements from the rear measuring tool edge, weak backlighting and 25 °C operating temperature are applicable for high reflectivity of the target (e.g. a white-painted wall). In addition, a deviation influence of ± 0.05 mm/m must be taken into account.
B) For measurements from the rear measuring tool edge, applies to the high reflectivity of the target (e.g. white cardboard), strong backlighting, and – 10 °C to +45 °C operating temperature. In addition, a deviation influence of ±0.15 mm/m must be taken into account.
C) After calibration at 0 ° and 90 ° with an additional grade error of ±0.01 °/degree to 45 ° (max.).
D) At 25 °C operating temperature
E) In the continuous measurement function, the maximum operating temperature is +40 °C.
F) except battery compartment
G) For Bluetooth® low energy devices, establishing a connection may not be possible, depending on the model and operating system. Bluetooth® devices must support the SPP profile.
H) Bluetooth® deactivated
I) The left-hand side of the measuring tool serves as the reference level for grade measurement.
The measuring tool can be clearly identified with serial number 11 on the type plate.
Declaration of Conformity ![]()
We declare under our sole responsibility that the product described under “TechnicaData” complies with all applicable provisions of the directives 1999/5/EC and 2011/65/EU including their amendments and is in conformity with the following standards: EN 61010-1: 2010-10, EN 60825-1: 2014-08,
EN 300 328 V1.8.1: 2012-06, EN 301 489-1 V1.8.1: 2008-04,
EN 301 489-1 V1.9.2: 2011-09, EN 301 489-17 V2.2.1: 2012-09,
EN 62479: 2010-09, EN 50581: 2012.
Technical documents at:
Robert Bosch Power Tools GmbH, PT/ECS, 70538 Stuttgart, GERMANY
Henk Becker
Executive Vice President
Engineering
Helmut Heinzelmann
Head of Product Certification
PT/ETM9
Robert Bosch Power Tools GmbH 70538 Stuttgart, GERMANY Stuttgart, 01.01.2017
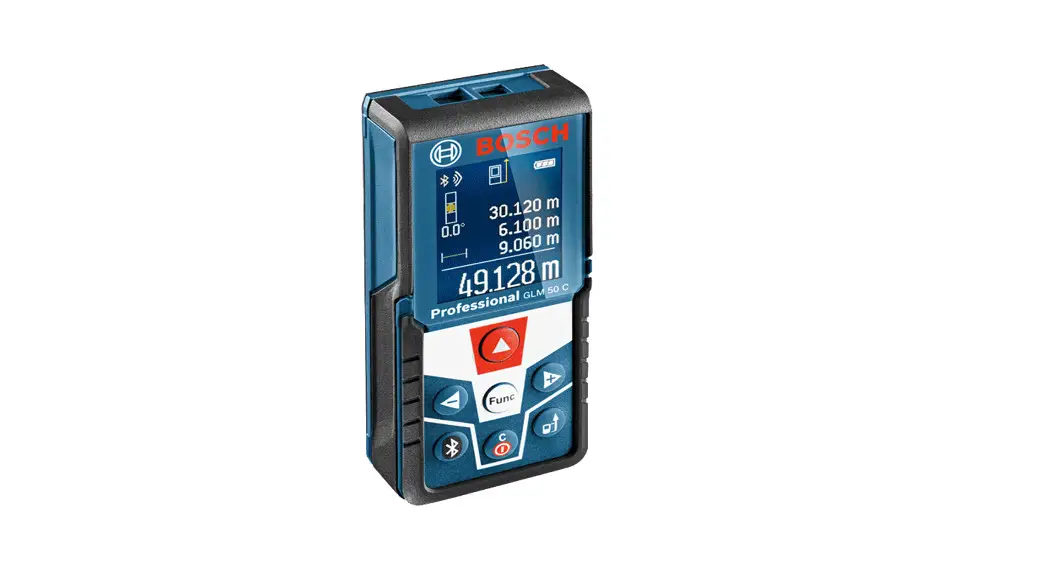
Product Features
The numbering of the product features shown refers to the illustration of the measuring tool on the graphic page.
- Display
- Measuring button[
 ]
] - Plus button[+]
- Button for selection of the reference level
- On/Off button[
 ]
] - Bluetooth® button
- Function button[Func]
- Minus button[–]
- Battery lid
- The latch of the battery lid
- Serial number
- Laser warning label
- 1/4″- Tripod socket
- Reception lens
- Laser beam outlet
- Protective pouch
- Laser target plate*
- Laser viewing glasses*
- Tripod*
* The accessories illustrated or described are not included in standard delivery.
Display elements (selection)
a Status Bluetooth®![]() Bluetooth® activated, no connection established
Bluetooth® activated, no connection established![]() Bluetooth® activated, connection established
Bluetooth® activated, connection established
b Measurement reference level
c Battery indicator
d Measured-value lines
e Result line
f Measuring functions
g Display tilt angle
h Status bar
i Basic configurations
Assembly
Inserting/Replacing the Batteries
Using alkali-manganese or rechargeable batteries is recommended for the operation of the measuring tool. With 1.2-V-rechargeable batteries, fewer measurements could be possible than with 1.5-V-batteries. To open the battery lid 9, press the latch 10 and remove the battery lid. Insert the batteries/rechargeable batteries. When inserting, pay attention to the correct polarity according to the representation on the inside of the battery compartment. When the empty battery symbol appears on the display, then approx. 100 measurements are still possible. When the battery symbol is empty and flashes red, no further measurements are possible. Change the batteries or rechargeable batteries. Always replace all batteries/rechargeable batteries at the same time. Do not use different brands or types of batteries/rechargeable batteries together.
Remove the batteries/rechargeable batteries from the measuring tool when not using them for longer periods. When storing for longer periods, the batteries/rechargeable batteries can corrode and self-discharge.
Operation
Initial Operation
- Do not leave the switched-on measuring tool unattended and switch the measuring tool off after use. Other persons could be blinded by the laser beam.
- Protect the measuring tool against moisture and direct sunlight.
- Do not subject the measuring tool to extreme temperatures or variations in temperature. As an example, do not leave it in vehicles for a long time. In case of large variations in temperature, allow the measuring tool to adjust to the ambient temperature before putting it into operation. In case of extreme temperatures or variations in temperature, the accuracy of the measuring tool can be impaired.
- Avoid heavy impact on or falling down the measuring tool. After severe exterior effects on the measuring tool, it is recommended to carry out an accuracy check (see “Accuracy Check of the Distance Measurement”, page 43) each time before continuing to work.
Switching On and Off
- To switch on the measuring tool and the laser, briefly press the measuring button 2 [].
- To switch on the measuring tool without the laser, briefly press the On/Off button 5 [].
- Do not point the laser beam at persons or animals and do not look into the laser beam yourself, not even from a large distance.
To switch off the measuring tool, press and hold the On/Off button 5 [].
The measured values and device settings in the memory are retained when you switch the tool off.
Measuring Procedure
Once switched on, the measuring tool is in the length measurement function. For a different measuring function, press button 7 [Func]. Select the desired measuring function with buttons 3 [+] or button 8 [–] (see “Measuring Functions”, page 35). Activate the measuring function with button 7 [Func] or with measuring button 2 [![]() ].
].
After switching it on, the rear edge of the measuring tool is preset as the reference level for the measurement. To change the reference level, see “Selecting the Reference Level”, page 34.
Place the measuring tool against the desired starting point of the measurement (e.g. a wall).
Note: If the measuring tool has been switched on using the On/Off button 5 [![]() ], briefly press the measuring button 2 [
], briefly press the measuring button 2 [ ![]() ] to switch the laser on.
] to switch the laser on.
To initiate the measurement, briefly press the measuring button 2 [![]() ]. Then the laser beam is switched off. For further measurement, repeat this process.
]. Then the laser beam is switched off. For further measurement, repeat this process.![]() Do not point the laser beam at persons or animals and do not look into the laser beam yourself, not even from a large distance.
Do not point the laser beam at persons or animals and do not look into the laser beam yourself, not even from a large distance.
Note: The measured value typically appears within 0.5 s and no later than approx.
4 s. The duration of the measurement depends on the distance, the lighting conditions, and the reflective properties of the target surface. Upon completion of the measurement, the laser beam is automatically switched off.
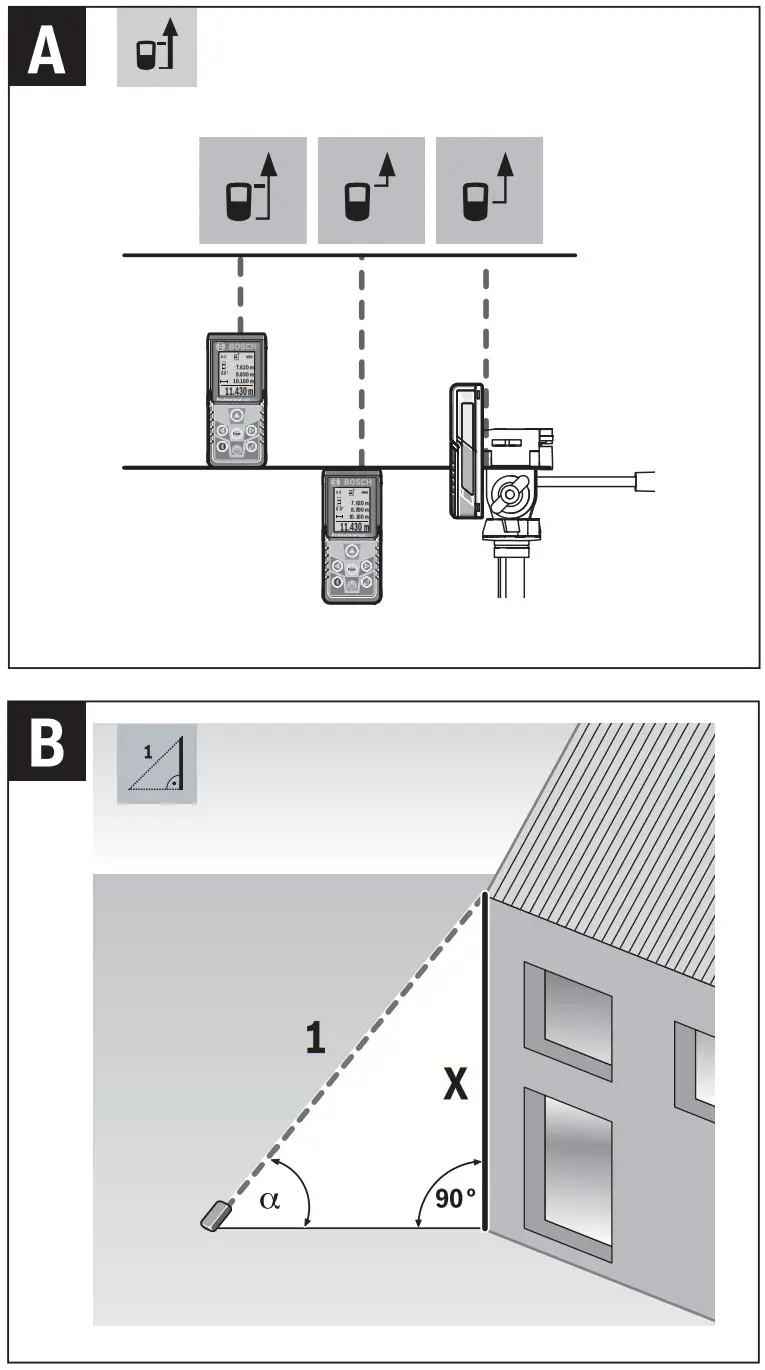
Selecting the Reference Level (see figure A)
For the measurement, you can select between three different reference planes:
- the rear measuring-tool edge (e.g. when measuring onward from a wall),
- the front measuring-tool edge (e.g. when measuring onward from a table edge),
- the center of thread 13 (e.g. for tripod measurements).
To select the reference level, press button 4. Use button 3 [+] or button 8 [–] or button 4 to select the desired reference level. The rear edge of the measuring tool is preset as the reference level every time the measuring tool is switched on.
“Basic Settings”
To enter the “basic configurations” menu (i) press and hold button 7 [Func].
Select the respective basic configuration and your setting.
To exit the “basic configurations” menu, press the On/Off button 5 [ ![]() ] again.
] again.
Display Illumination
The display illumination is continuously switched on. When no button is pressed, the display illumination is dimmed after approx. 20 seconds to preserve the batteries/rechargeable batteries.
Measuring Functions
Length Measurement
Select the length measurement ![]() .
.
To switch on the laser beam, briefly press the measuring button 2 [[].
To measure, briefly press the measuring button 2 [ ]. The measured value will be
shown at the bottom of the display.![]() Repeat the above-mentioned steps for each subsequent measurement.
Repeat the above-mentioned steps for each subsequent measurement.
The last measured value is at the bottom of the display, the penultimate measured value is above it, and so on.
Continuous Measurement (Tracking)
For continuous measurements, the measuring tool can be moved relative to the target, whereby the measuring value is updated approx. every 0.5 seconds. In this manner, as an example, you can move a certain distance away from a wall, while the actual distance can always be read.
Select the continuous measurement![]()
To switch on the laser beam, briefly press the measuring button 2 [![]() ].
].
Move the measuring tool until the required distance value is indicated at the bottom of the display.![]() Briefly pressing the measuring button 2 [
Briefly pressing the measuring button 2 [ ![]() ], interrupts the continuous measurement. The current measured value will be shown at the bottom of the display. The maximum and minimum measured values appear above it. Pressing the measuring button 2 [
], interrupts the continuous measurement. The current measured value will be shown at the bottom of the display. The maximum and minimum measured values appear above it. Pressing the measuring button 2 [ ![]() ] once more restarts the continuous measurement.
] once more restarts the continuous measurement.
Continuous measurement automatically switches off after 5 mins.
Area Measurement
Select the area measurement ![]() .
.
Then measure the width and length one after the other as with a length measurement.
The laser beam remains switched on between the two measurements. The distance to be measured flashes in the indicator for area measurement ![]() .
.![]() The first measured value is shown at the top of the display. After the second measurement has been completed, the area will be automatically calculated and displayed. The end result is shown at the bottom of the display, while the individual measured values are shown above it.
The first measured value is shown at the top of the display. After the second measurement has been completed, the area will be automatically calculated and displayed. The end result is shown at the bottom of the display, while the individual measured values are shown above it.
Volume Measurement
Select the volume measurement![]() .
.
Then measure the width, length, and depth one after the other as with a length measurement.
The laser beam remains switched on between the three measurements. The distance to be measured flashes in the indicator for volume measurement![]() .
.![]() The first measured value is shown at the top of the display. After the third measurement has been completed, the volume will be automatically calculated and displayed. The end result is shown at the bottom of the display, while the individual measured values are shown above it.
The first measured value is shown at the top of the display. After the third measurement has been completed, the volume will be automatically calculated and displayed. The end result is shown at the bottom of the display, while the individual measured values are shown above it.
Indirect Distance Measurement
For indirect length measurements, three measuring modes are available. Each measuring mode can be used for determining different distances. The indirect distance measurement is used to measure distances that cannot be measured directly because an obstacle would obstruct the laser beam or no target surface is available as a reflector. This measuring procedure can only be used in the vertical direction. Any deviation in the horizontal direction leads to measuring errors.
Note: Indirect distance measurement is always less accurate than direct distance measurement. Depending on the application, greater measuring errors are possible than with direct distance measurement. To improve the measuring accuracy, we recommend using a tripod (accessory).
The laser beam remains switched on between the individual measurements.
a) Indirect height measurement (see figure B)
Select the indirect height measurement ![]() .
.
Ensure that the measuring tool is at the same height as the lower measuring point.
Then tilt the measuring tool around the reference level and measure the distance “1” for a length measurement (displayed as a red line).![]() Upon completion of the measurement, the result for the sought distance “X” is displayed in the result line e. The measuring values for the distance “1” and the angle “a” are displayed in the measured-value lines d.
Upon completion of the measurement, the result for the sought distance “X” is displayed in the result line e. The measuring values for the distance “1” and the angle “a” are displayed in the measured-value lines d.
b) Double indirect height measurement (see figure C)
The measuring tool can indirectly measure all distances, which lie in the vertical level of the measuring tool.
Select the double indirect height measurement ![]() .
.
Measure distances “1” and “2” in this sequence for length measurement.![]() Upon completion of the measurement, the result for the sought distance “X” is displayed in the result line e. The measuring values for the distances “1”, and “2” and the angle “a” are displayed in the measured-value lines d.
Upon completion of the measurement, the result for the sought distance “X” is displayed in the result line e. The measuring values for the distances “1”, and “2” and the angle “a” are displayed in the measured-value lines d.
Pay attention that the reference plane of the measurement (e.g. the rear edge of the measuring tool) remains exactly at the same location for all individual measurements within a measuring sequence.
c) Indirect length measurement (see figure D)
Select the indirect length measurement![]() .
.
Pay attention that the measuring tool is positioned at the same height as the sought measuring point. Now, tilt the measuring tool around the reference plane and measure distance “1” for length measurement.![]() Upon completion of the measurement, the result for the sought distance “X” is displayed in the result line e. The measuring values for the distance “1” and the angle “α” are displayed in the measured-value lines d.
Upon completion of the measurement, the result for the sought distance “X” is displayed in the result line e. The measuring values for the distance “1” and the angle “α” are displayed in the measured-value lines d.
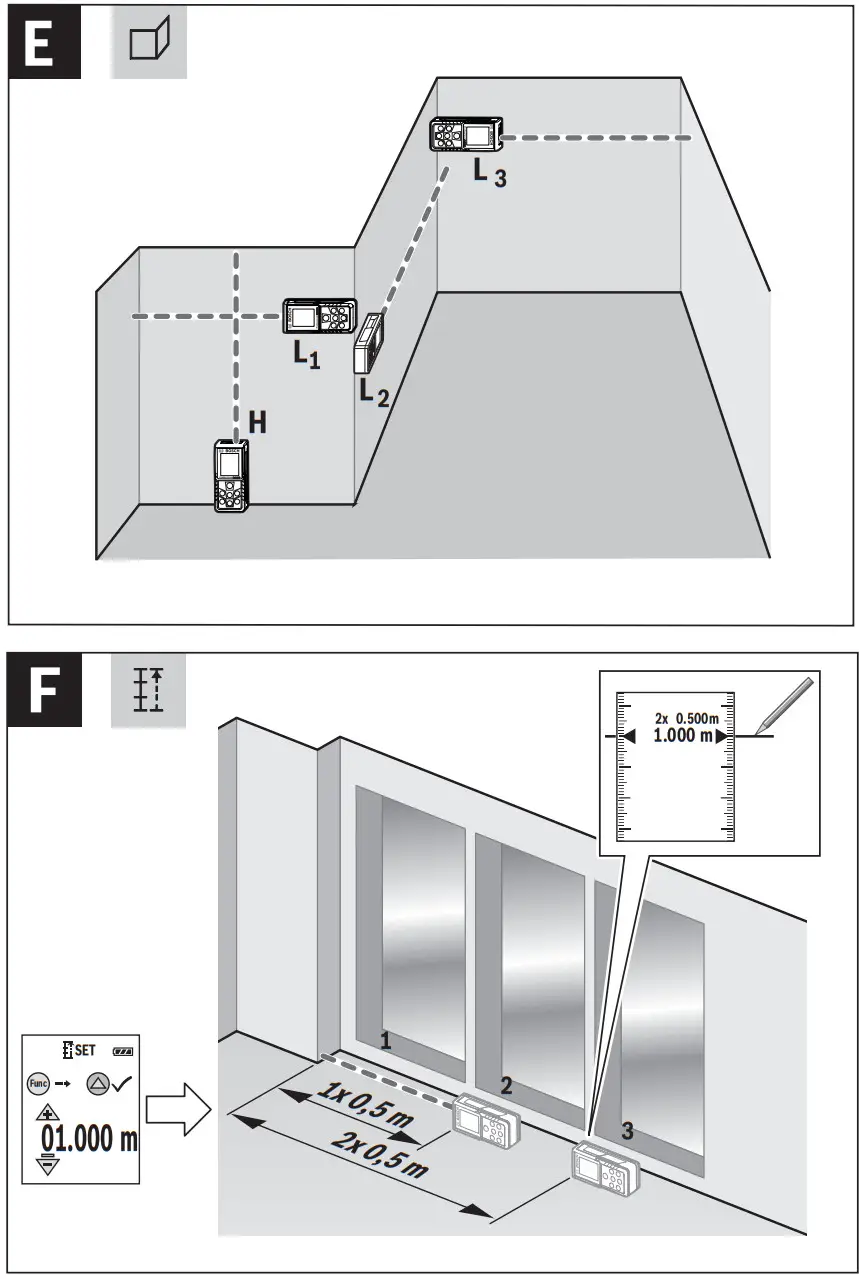
Wall Surface Measurement (see figure E)
The wall surface measurement is used to determine the sum of several individual surfaces with a common height.
In the illustrated example, the total area of several walls should be determined, which have the same ceiling height H, but different lengths L.
Select the wall surface measurement![]() .
.
Measure the ceiling height H as with a length measurement. The measured value is displayed in the top measured-value line. The laser remains switched on.![]() Then measure the length of L1 of the first wall. The surface is automatically calculated and displayed in the result line e. The last length measured value is in the bottom measured-value line d. The laser remains switched on.
Then measure the length of L1 of the first wall. The surface is automatically calculated and displayed in the result line e. The last length measured value is in the bottom measured-value line d. The laser remains switched on.
Now measure the length L2 of the second wall. The individual measured value displayed in the measured-value line d is added to the length L1
The sum of the two lengths (displayed in the middle measured-value line d) is multiplied by the saved height H. The total surface value is displayed in the result line e.
You can measure any number of lengths LX, which will be automatically added and multiplied by the height H.
The requirement for a correct area calculation is that the first measured length (for example the ceiling height H) is identical for all sub-areas.
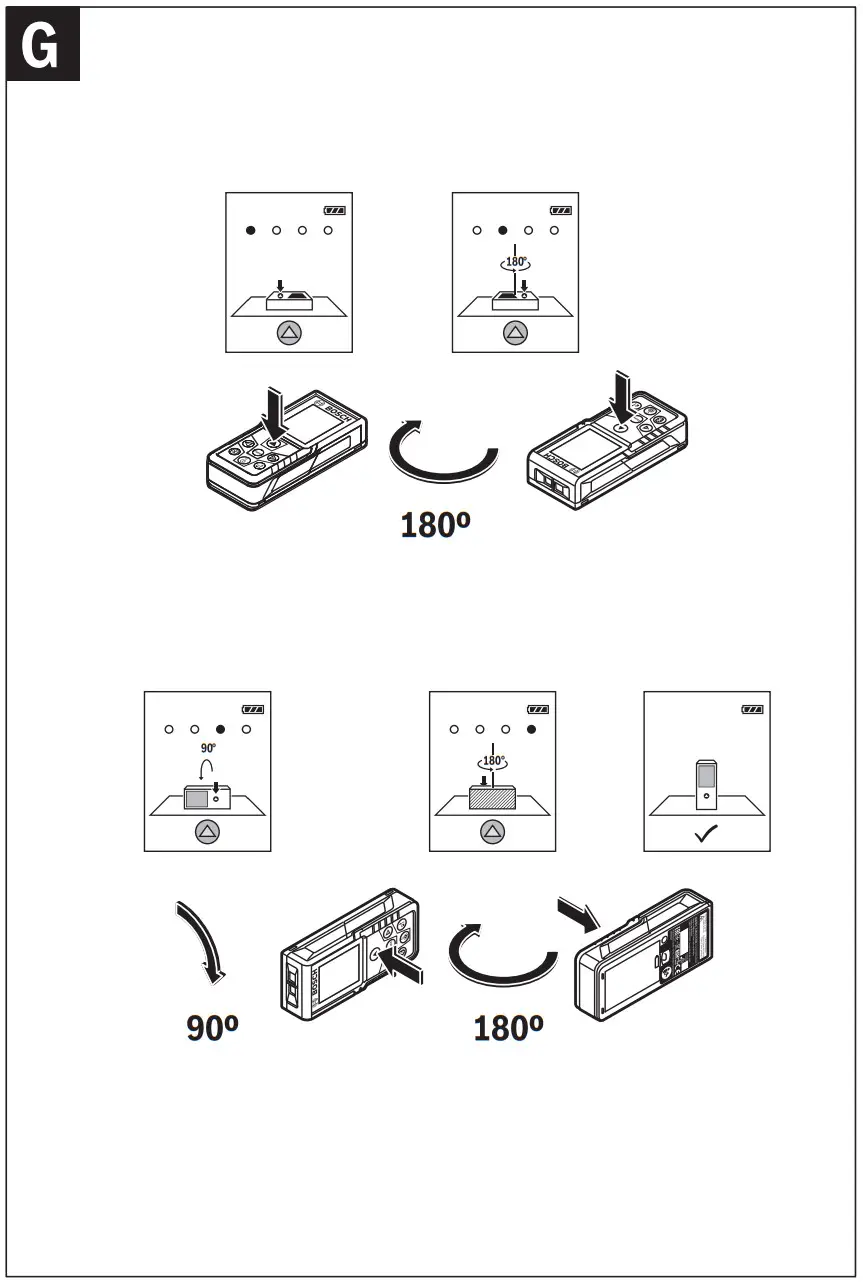
Stake out function (see figure F)
The stake-out function repeatedly measures a defined length (distance). These lengths can be transferred to a surface, for example, to enable the material to be cut into pieces of equal lengths or to install stud walls in drywall construction. The minimum adjustable length is 0.1 m, and the maximum adjustable length is 50 m.
Select the stake-out function ![]() .
.
Set the desired length. Using button 7 [Func] select the corresponding digit/position
and change the value with button 3 [+] or button 8 [–].
Begin the stake-out function by pressing the measuring button 2 [![]() ] and slowly move away from the starting point.
] and slowly move away from the starting point.![]() The measuring tool continuously measures the distance to the starting point. The defined length and the current measured value are thereby displayed. The lower or upper arrow displays the shortest distance to the next or last marking.
The measuring tool continuously measures the distance to the starting point. The defined length and the current measured value are thereby displayed. The lower or upper arrow displays the shortest distance to the next or last marking.
Note: Continuous measuring enables you to set a measured value as a defined length by pressing button 4.![]() The left factor specifies how many times the defined length has already been reached. The green arrows on either side of the display indicate the reaching of a length for marking purposes.
The left factor specifies how many times the defined length has already been reached. The green arrows on either side of the display indicate the reaching of a length for marking purposes.
Inclination Measurement/Digital Spirit Level
Select the inclination measurement/digital spirit level ![]() .
.
The measuring tool automatically switches between two states.![]() The digital spirit level is used to check the horizontal or vertical alignment of an object (e.g. washing machine, refrigerator, etc.). When the inclination of 3° exceeds, the ball in the display lights red.
The digital spirit level is used to check the horizontal or vertical alignment of an object (e.g. washing machine, refrigerator, etc.). When the inclination of 3° exceeds, the ball in the display lights red.![]() Inclination measurement is used to measure a slope or incline (e.g. of stairs, railings, when fitting furniture, laying pipes, etc.). The left-hand side of the measuring tool serves as the reference level for grade measurement. If the display flashes during measurement, the measuring tool has been tipped too heavily to the side.
Inclination measurement is used to measure a slope or incline (e.g. of stairs, railings, when fitting furniture, laying pipes, etc.). The left-hand side of the measuring tool serves as the reference level for grade measurement. If the display flashes during measurement, the measuring tool has been tipped too heavily to the side.
Memory Functions
The value or end result of each completed measurement is automatically saved.
Memory value display
A maximum of 30 values (measured values or end results) can be retrieved.
Select the memory function![]() .
.![]() The number of the memory value is shown at the top of the display, the corresponding memory value is shown at the bottom and the corresponding measuring function is shown on the left.
The number of the memory value is shown at the top of the display, the corresponding memory value is shown at the bottom and the corresponding measuring function is shown on the left.
Press button 3 [+] to browse forwards through the saved values.
Press button 8 [–] to browse backward through the saved values.
If there is no value available in the memory, “0.000” is shown at the bottom of the display and “0” at the top.
The oldest value is located in position 1 in the memory, while the newest value is in position 30 (when 30 memory values are available). When a further value is saved, the oldest value in the memory is always deleted.
Deleting the Memory
To delete the content of the memory, press button 7 [Func] and select the memory function ![]() . Then briefly press the On/Off button 5 [ ] to delete the displayed value.
. Then briefly press the On/Off button 5 [ ] to delete the displayed value.
Simultaneously pressing button 4 and the On/Off button 5 [ ] deletes all values stored in the memory.
Adding/Subtracting Values
Measured values or end results can be added or subtracted.
Adding Values
The following example describes the addition of areas:
Measure an area as described in the section “Area Measurement”, see page 36.![]() Press button 3 [+]. The calculated area and the symbol “+” will be displayed.
Press button 3 [+]. The calculated area and the symbol “+” will be displayed.
Press the measuring button 2 [ ![]() ] to start another area measurement.
] to start another area measurement.
Measure the area as described in the section “Area Measurement”, see page 36. Once the second measurement is completed, the result of the second area measurement is displayed below. To show the end result, press the measurement button 2 [ ![]() ] once more.
] once more.
Note: With a length measurement, the end result is displayed immediately.
To exit the addition, press button 7 [Func].
Subtracting Values
To subtract values, press button 8 [–]. The subsequent steps are the same as for “Adding Values”.
Deleting Measured Values
Briefly pressing the On/Off button 5 [ ![]() ] will delete the last measured value in all measuring functions. Repeated brief pressing of the On/Off button 5 [
] will delete the last measured value in all measuring functions. Repeated brief pressing of the On/Off button 5 [ ![]() ] will delete the measured values in reverse order.
] will delete the measured values in reverse order.
Changing the Unit of Measure
The unit of measure “m” (meters) is set by default.
Switch the measuring tool on.
Press and hold button 7 [Func], to enter the “basic configurations” menu. Select “ft/m”.
Press button 3 [+] or button 8 [–], to change the unit of measure.
Press the On/Off button 5 [ ![]() ] to exit the menu item. The selected setting remains saved after you switch off the measuring tool.
] to exit the menu item. The selected setting remains saved after you switch off the measuring tool.
Bluetooth® Interface
Data Transmission to other Devices
The measuring tool is equipped with a Bluetooth ® module, which enables data transmission via radio technology to certain mobile terminals/devices with a Bluetooth ® interface (e.g., smartphones, tablets).
For information on the necessary system requirements for a Bluetooth ® connection, please refer to the Bosch website at www.bosch-pt.de.![]() For more information, visit the Bosch product page, see the QR code, page 8.
For more information, visit the Bosch product page, see the QR code, page 8.
For data transmission via Bluetooth®, time delays between the mobile terminal/device and measuring tool may occur. This can be possible due to the distance between both devices or the object being measured.
Activating the Bluetooth ® Interface for Data Transmission to a Mobile Terminal/Device
To activate the Bluetooth® interface, press the Bluetooth® button 6 on the measuring tool. To activate the Bluetooth® signal, press the Bluetooth® button 6 or the button 3 [+] once again. Ensure that the Bluetooth® interface is activated on your mobile terminal/device.
To expand the functionality of the mobile terminal/device and to simplify the data processing, special Bosch applications (apps) are available.
These can be downloaded in the respective stores, depending on the terminal/device.
The connection between the mobile terminal/device and the measuring tool is established after the Bosch application has started. If multiple active measuring tools are found, select the appropriate measuring tool using the serial number.
The connection status as well as the active connection (a) are displayed in the status bar (h) of the measuring tool.
Deactivating the Bluetooth® Interface
To deactivate the Bluetooth® connection, press the Bluetooth® button 6. To deactivate the Bluetooth® signal, press the Bluetooth® button 6 once again or the button 8 [–] or switch off the measuring tool.
Working Advice![]() For more information, visit the Bosch product page, see the QR code, page 8.
For more information, visit the Bosch product page, see the QR code, page 8.![]() The measuring tool is equipped with a radio interface. Local operating restrictions, e.g. in airplanes or hospitals, are to be observed.
The measuring tool is equipped with a radio interface. Local operating restrictions, e.g. in airplanes or hospitals, are to be observed.
General Information
The reception lens 14 and the laser beam outlet 15 must not be covered when taking a measurement.
The measuring tool must not be moved while taking measurements. Therefore, place the measuring tool, as far as this is possible, against or on a firm stop or supporting surface.
Influence Effects on the Measuring Range
The measuring range depends on the lighting conditions and the reflective properties of the target surface. For better visibility of the laser beam in extraneous light, use the laser viewing glasses 18 (accessories) and the laser target plate 17 (accessories) or shade the target area.
Influence Effects on the Measuring Result
Due to physical effects, faulty measurements cannot be excluded when measuring on different surfaces. Included here are:
- Transparent surfaces (e.g., glass, water),
- Reflecting surfaces (e.g., polished metal, glass),
- Porous surfaces (e.g. insulation materials),
- Structured surfaces (e.g., roughcast, natural stone).
If required, use the laser target plate 17 (accessory) on these surfaces.
Furthermore, faulty measurements are also possible when sighting inclined target surfaces.
Also, air layers with varying temperatures or indirectly received reflections can affect the measured value.
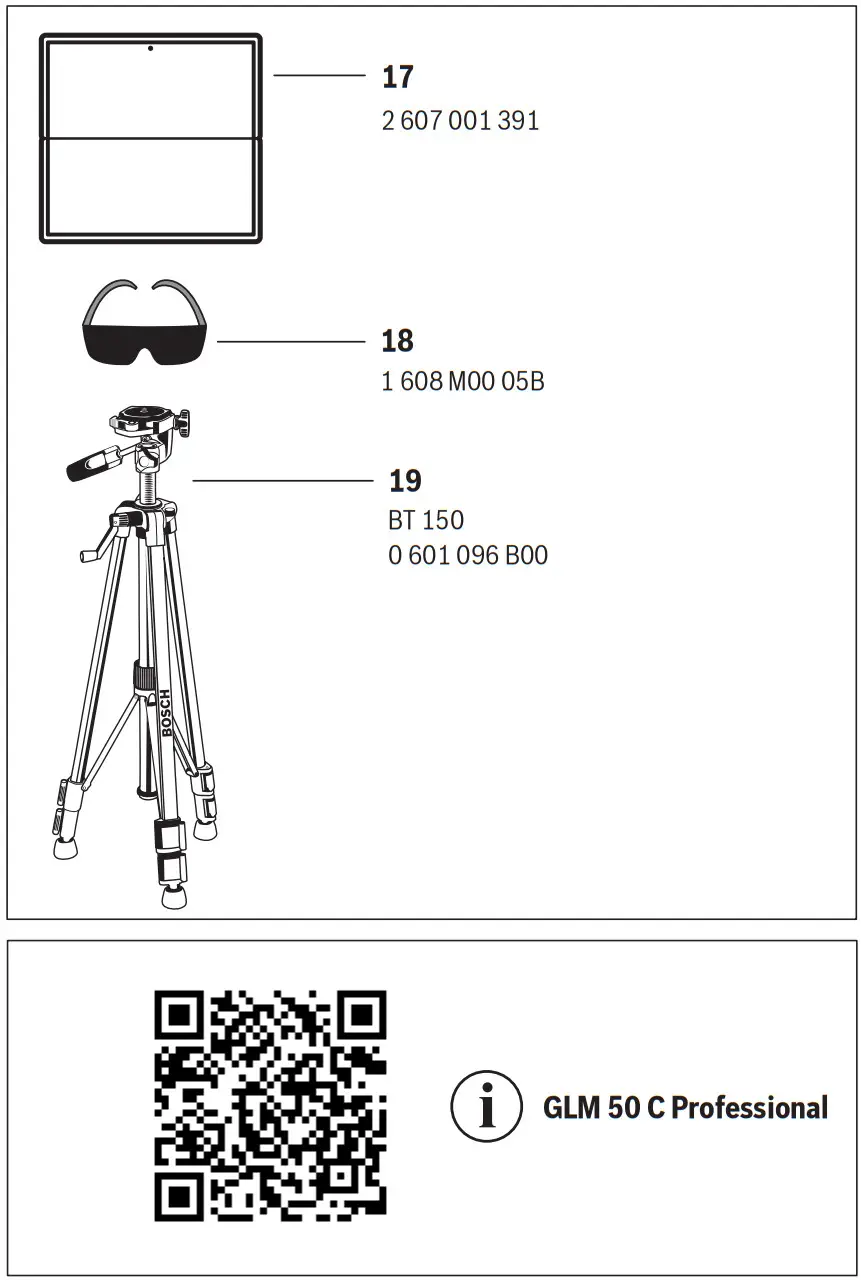
Accuracy Check and Calibration of the Grade Measurement (see figure G)
Regularly check the accuracy of the grade measurement. This is done by carrying out a reversal measurement. For this, place the measuring tool on a table and measure the grade. Turn the measuring tool by 180 ° and measure the grade again. The difference in the indicated reading may not exceed more than 0.3 ° (max.).
In the event of larger deviations, you have to recalibrate the measuring tool. For this, select![]() . Follow the instructions on the display.
. Follow the instructions on the display.
After severe temperature changes and impact, we recommend an accuracy check and, if required, recalibrating the measuring tool. After a temperature change, the measuring tool must acclimate for a while before calibrating.
Accuracy Check of the Distance Measurement
The accuracy of the measuring tool can be checked as follows:
- Select a permanently unchangeable measuring section with a length of approx. 3 to 10 meters; its length must be precisely known (e.g. the width of a room or a door opening). The measurement should be carried out under favorable conditions, meaning, the measuring distance must be indoors and the target surface for the measurement must be smooth and reflect well.
- Measure the distance 10 times after another.
The deviation of the individual measurements from the average value must not exceed ±4 mm over the entire measuring section in favorable conditions. Record the measurements in order to be able to compare the accuracy at a later date.
Working with the Tripod (Accessory)
The use of a tripod is particularly necessary for larger distances. Position the measuring tool with the 1/4″ thread 13 onto the quick-change plate of tripod 19 or a commercially available camera tripod. Tighten the measuring tool with the locking screw of the quick-change plate.
Set the corresponding reference level for measurement with a tripod by pushing button 4 (the reference level is the thread).
Error Message
If a measurement cannot be performed correctly, the error message “Error” appears on the display. Switch the measuring tool off and back on, and start the measurement again.![]() The measuring tool monitors the correct functioning of every measurement. If a defect is detected, the display will indicate only the symbol shown opposite and the measuring tool switches itself off. In this case, have the measuring tool checked by an after-sales service agent for Bosch power tools?
The measuring tool monitors the correct functioning of every measurement. If a defect is detected, the display will indicate only the symbol shown opposite and the measuring tool switches itself off. In this case, have the measuring tool checked by an after-sales service agent for Bosch power tools?
Maintenance and Service
Maintenance and Cleaning
Keep the measuring tool clean at all times.
Do not immerse the measuring tool in water or other fluids.
Wipe off debris using a moist and soft cloth. Do not use any cleaning agents or solvents.
Maintain the reception lens 14 in particular, with the same care as required for eyeglasses or the lens of a camera.
In case of repairs, send in the measuring tool packed in its protective pouch 16.
After-sales Service and Application Service
Our after-sales service responds to your questions concerning the maintenance and repair of your product as well as spare parts. Exploded views and information on spare parts can also be found at: www.bosch-pt.com
Bosch’s application service team will gladly answer questions concerning our products and their accessories.
In all correspondence and spare parts orders, please always include the 10-digit article number given on the nameplate of the product.
| Great Britain Robert Bosch Ltd. (B.S.C.) P.O. Box 98 Broadwater Park North Orbital Road Denham Uxbridge UB 9 5HJ At www.bosch-pt.co.uk you can order spare parts or arrange the collection of a product in need of servicing or repair. Tel. Service: (0344) 7360109 E-Mail: [email protected] | Ireland Origo Ltd. Unit 23 Magna Drive Magna Business Park City West Dublin 24 Tel. Service: (01) 4666700 Fax: (01) 4666888 |
| Australia, New Zealand, and the Pacific Islands Robert Bosch Australia Pty. Ltd. Power Tools Locked Bag 66 Clayton South VIC 3169 Customer Contact Center Inside Australia: Phone: (01300) 307044 Fax: (01300) 307045 Inside New Zealand: Phone: (0800) 543353 Fax: (0800) 428570 Outside AU and NZ: Phone: +61 3 95415555 www.bosch.com.au Supplier code ERAC000385 | Republic of South Africa Customer service Hotline: (011) 6519600 Gauteng – BSC Service Centre 35 Roper Street, New Centre Johannesburg Tel.: (011) 4939375 Fax: (011) 4930126 E-Mail: [email protected] KZN – BSC Service Centre Unit E, Almar Centre 143 Crompton Street Pinetown Tel.: (031) 7012120 Fax: (031) 7012446 E-Mail: [email protected] Western Cape – BSC Service Centre Democracy Way, Prosperity Park Milnerton Tel.: (021) 5512577 Fax: (021) 5513223 E-Mail: [email protected] |
Bosch Headquarters
Midrand, Gauteng
Tel.: (011) 6519600
Fax: (011) 6519880
E-Mail: [email protected]
Disposal
Measuring tools, accessories and packaging should be sorted for environmental-friendly recycling.
Do not dispose of measuring tools and batteries/rechargeable batteries into household waste!
Only for EC countries:![]() According to the European Guideline 2012/19/EU, measuring tools that are no longer usable, and according to the European Guideline 2006/66/EC, defective or used battery packs/batteries must be collected separately and disposed of in an environmentally correct manner.
According to the European Guideline 2012/19/EU, measuring tools that are no longer usable, and according to the European Guideline 2006/66/EC, defective or used battery packs/batteries must be collected separately and disposed of in an environmentally correct manner.
Battery packs/batteries no longer suitable for use can be directly returned at:
Great Britain
Robert Bosch Ltd. (B.S.C.)
P.O. Box 98
Broadwater Park
North Orbital Road
Denham
Uxbridge
UB 9 5HJ
At www.bosch-pt.co.uk
you can order spare parts or arrange the collection of a product in need of servicing or repair.
Tel. Service: (0344) 7360109
E-Mail: [email protected]
Subject to change without notice.
References
 My Blog
-
dz.com
-
Welcome to nis.com
 Bosch Power Tools | Bosch Professional - find your local Website
-
Bosch Power Tools | Bosch Power Tools
-
Select your country | Bosch Power Tools
-
Bosch Elektrowerkzeuge | Bosch Elektrowerkzeuge
-
Outillage électroportatif Bosch | Outillage électroportatif Bosch
-
Elettroutensili Bosch | Elettroutensili Bosch
-
Bosch Elektrowerkzeuge und Zubehör | Bosch Elektrowerkzeuge
-
Bosch-sähkötyökalut | Bosch-sähkötyökalut
-
Outillage électroportatif Bosch | Outillage électroportatif Bosch
-
Bosch elektromos kéziszerszámok | Bosch elektromos kéziszerszámok
-
bosch-pt.kz
-
Elektronarzędzia Bosch | Elektronarzędzia Bosch
-
bosch-pt.ru
-
Elektrické náradie Bosch | Elektrické náradie Bosch
-
Bosch România | Bosch în România
-
Начало | Бош в България
-
Invented for life | Bosch Global
-
Home | Bosch in Australia
-
Domovská stránka | Bosch Česká republika
-
Innostavia tuotteita ja palveluita | Bosch Suomessa
-
Strona główna | Bosch w Polsce
-
Domov | Bosch Slovensko
-
Loading...
 Kärcher Center Keller Niš


