 Hamilton Beach Coffee maker User Manual
WARNING
- Do not immerse this appliance in water or other liquid.
- If the plug on this appliance does not fit in your outlet:
- Do not modify the plug.
- Do not use an adaptor.
- Have an electrician replace the obsolete outlet.
IMPORTANT SAFEGUARDS
When using electrical appliances, basic safety precautions should always be followed to reduce the risk of fire, electric shock, and/or injury to persons, including the following:
- Read all instructions.
- Do not touch hot surfaces. Use handles or knobs. Care must be taken, as burns can occur from touching hot parts or from spilled, hot liquid.
- To protect against electric shock, do not place the cord, plug, or coffeemaker in water or other liquid.
- Close supervision is necessary when any appliance is used by or near children.
- Unplug from the outlet when either the coffeemaker or clock is not in use and before cleaning. Allow cooling before putting on or taking off parts and before cleaning the appliance.
- The coffeemaker must be operated on a flat surface away from the edge of the counter to prevent accidental tipping.
- Do not operate any appliance with a damaged cord or plug, or after the appliance malfunctions or is dropped or damaged in any manner. Call our toll-free customer service number for information on examination, repair, or adjustment.
- The use of accessory attachments not recommended by Hamilton Beach/Proctor-Silex, Inc. may cause injuries.
- Do not use outdoors.
- Do not let the cord hang over the edge of the table or counter or touch hot surfaces, including the stove.
- The carafe is designed for use with this coffeemaker. It must never be used on a range top or in a microwave oven.
- Do not set a hot carafe on a wet or cold surface.
- Do not use a cracked carafe or one with loose or weakened handle.
- Do not clean the carafe with cleansers, steel wool pads, or other abrasive materials.
- Be certain the carafe lid is securely in place during brew cycle and when pouring coffee, do not use force when placing lid on the carafe. Do not place the coffeemaker on or near a hot gas or electric burner or in a heated oven. To disconnect the coffeemaker, turn the controls to OFF, then remove plug from wall outlet.
- Warning: To reduce the risk of fire or electric shock, do not remove the bottom cover. No user-serviceable parts are inside. Repair should be done by authorized service personnel only.
- Do not use appliances for other than intended use.
OTHER SAFETY INFORMATION
This appliance is intended for household use only. The length of the cord used on this appliance was selected to reduce the hazards of becoming tangled in, or tripping over a longer cord. If a longer cord is necessary an approved extension cord may be used. The electrical rating of the extension cord must be equal to or greater than the rating of the coffeemaker. Care must be taken to arrange the extension cord so that it will not drape over the countertop or tabletop where it can be pulled on by children or accidentally tripped over. To avoid an electrical circuit overload, do not use another high-wattage appliance on the same circuit as your coffeemaker.
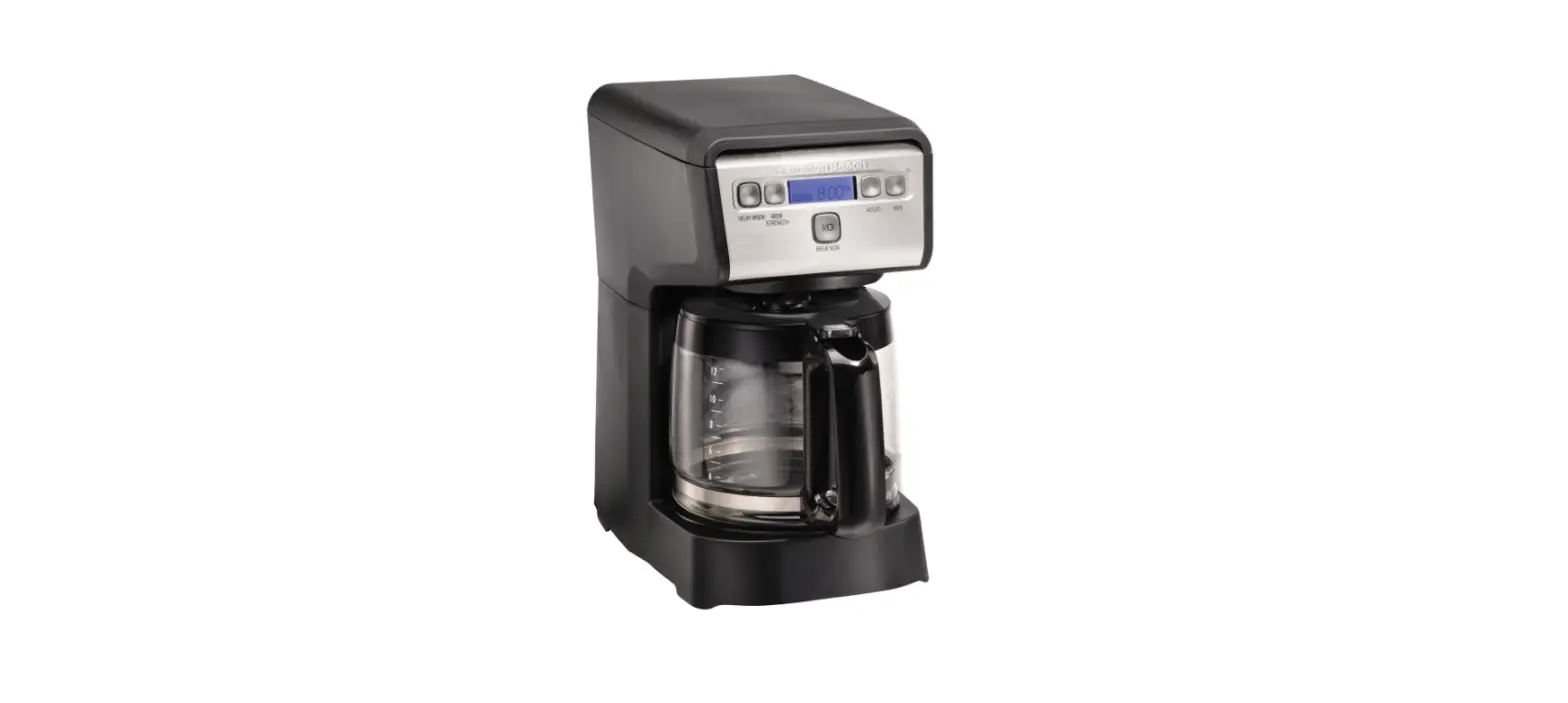
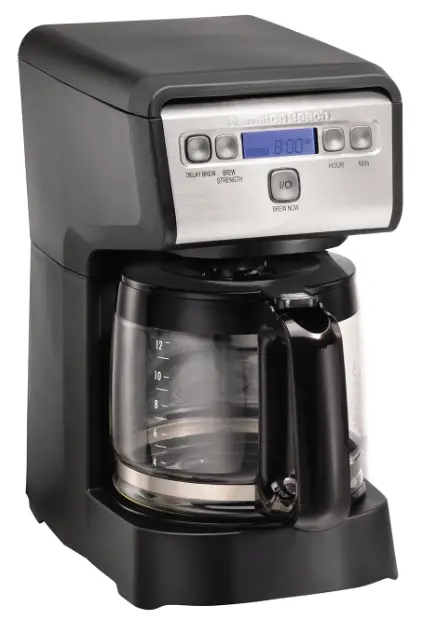
Parts and Features
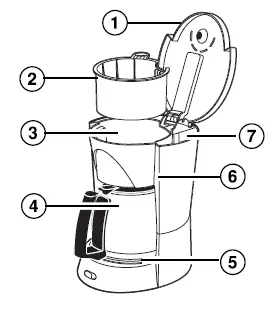
- Lid
- Brew Basket
- Brew Basket Well
- Carafe
- Keep-Hot Plate
- Water Window
- Reservoir
NOTE
The picture references the major components for all coffeemakers covered by these instructions.
Burn Hazard
To avoid hot coffee overflowing from the filter basket:
- When using decaffeinated coffee, do not exceed the coffee manufacturer’s recommended serving amount.
- Press firmly on lid to ensure the lid is completely closed. If a filter basket overflow occurs, unplug the coffeemaker and allow the coffee in the filter basket to cool before removing the filter basket.
To Make Coffee
- Before first use, clean the coffeemaker by following the steps listed in “To Clean the Inside of the Coffeemaker.”Use either clear water or vinegar. If the clock model, read the Digital Clock Timer section.
- Place brew basket in brew basket well. Insert the thumb handle in the left opening. Ensure the brew basket is fully seated.
- Place a cupcake-style paper filter in the brew basket.
- For each cup of coffee being made, place one level scoop (provided with a coffeemaker) or one level tablespoon of coffee into the filter.
- Fill the carafe with the desired amount of cold tap water.
- Lift the lid and pour water from the carafe into the reservoir.
NOTE: Do not fill past the 12-cup mark (54 ounces). - Place the carafe, with the carafe lid attached, on Keep-Hot Plate.
- Close lid. Press firmly on the lid to ensure that it is completely closed.
- For clock models: press ON/OFF button to start.
An illuminated red light on the ON/OFF button indicates the coffeemaker is on. Press ON/OFF again to turn it off and unplug it when finished.
Features
Pause ’N Serve
This feature allows you to pour a cup of coffee before the entire brew cycle has been completed. By removing the carafe, the flow of coffee will temporarily stop. The flow of coffee will resume when the carafe is returned to the Keep-Hot Plate. Do not remove the carafe for more than 20 seconds or the brew basket may overflow.
CAUTION
Return the carafe to Keep-Hot-Plate within 20 seconds. Hot water continues to flow into the filter basket when this feature is used. Overflowing coffee and hot water are burn hazards.
Brew Strength Selector
This feature allows you to control the strength/flavor of the coffee. To select from mild to strong flavors, rotate the Brew Strength Selector Knob, located on top of the coffeemaker, to desired strength.
Automatic Shutoff
The Automatic Shutoff feature shuts off the Keep-Hot Plate two hours after the brew cycle begins. Always turn the coffeemaker off and unplug it when finished.
Digital clock timer
To Set Clock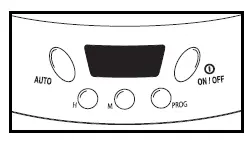
- Plug in the coffeemaker. Numbers on the clock will flash until you set the time of day.
- To set the time of day, press H(hour) button to set the current hour.AM or PMwill be displayed.
- Press the M(minute) button until you reach the current time.
To Set and Use Automatic Brew
- Make sure the clock is set for the correct time of day.
- Fill the coffeemaker with the desired amount of water and coffee. Place carafe with lid on Keep-Hot Plate. Close lid.
- While holding the PROG(program) button, press the Hand M buttons until desired brewing time is reached.
- Once desired brewing time has been reached, release PROGand the current time is displayed.
- Press AUTOto set the coffeemaker to come on automatically at the desired time.
- An illuminated green light on the AUTObutton indicates that the brew cycle will begin at the set time.
- Press AUTOagain to cancel automatic brew.
Cleaning
To maintain the performance of the coffeemaker, clean it once a month. To Clean the Inside of the Coffeemaker:
- Place the empty carafe on Keep-Hot Plate. Close lid.
- Pour one pint of plain white vinegar into the reservoir.
- Plug the unit into an electrical outlet and turn it ON.
- After 30 seconds turn it OFF.
- Wait 30 minutes to allow the vinegar to clean. Then turn it ON again. When the brew cycle is finished, turn it OFF.
- Empty the carafe and rinse. Pour one carafe of cold tap water into the reservoir. Place carafe on Keep-Hot Plate. Close lid.
- Turn it ON. When the brew cycle is finished, empty the carafe. Repeat this process with one more carafe of cold tap water.
- Turn it OFF when complete.
- Wash the carafe and brew basket before making a beverage.
To Clean Carafe and Filter Basket
ash carafe by hand in hot, soapy water or in the top rack of the dishwasher. To remove the carafe lid push the hinge part of lid to one side then gently but firmly twist lid. The pin will release from the hinge. To replace lid, put one side of lid hinge on one of the pins, then snap it onto another pin.To remove the brew basket, open the lid and lift it straight up. Brew basket may be washed by hand or in the top rack.
Usage Tips
- The lid must be firmly closed before brewing.
- When using a paper filter always use a good-quality filter to obtain the best possible results.
- Take care not to spill loose coffee grounds between the filter and filter basket.
- Make sure filter basket is securely in place.
- The carafe lid must be properly attached to the carafe.
- The carafe must be placed properly and leveled on Keep-Hot Plate before starting the brew cycle.
- When using the Pause ’N Serve feature, replace carafe within 20 seconds to prevent overflow of coffee grounds and water from the filter basket.
CAUTION
Return the carafe to Keep-Hot-Plate within 20 seconds. Hot water continues to flow into the filter basket when this feature is used. Overflowing coffee and hot water are burn hazards.
CARAFE SAFETY PRECAUTIONS
This symbol alerts you to the potential danger for personal injury if you fail to read and follow these safety precautions. This symbol reminds you that glass is fragile and can break which could result in personal injury.
- Do not use a cracked carafe or a carafe having a loose or weakened handle.
- This carafe is designed to be used only on the Keep-Hot Plate of your coffeemaker. Do not use on a gas or electric range top, or in a microwave or conventional oven.
- To avoid breakage, handle the carafe with care. Avoid impact. Glass will break as a result of the impact. Use care when filling with water to avoid hitting the faucet.
- Do not place hot carafe on cool or wet surface. Allow to cool before washing or adding liquids.
- Do not set the empty carafe on a hot heating surface.
- Do not clean with steel wool pads, abrasive cleanser, or any other materials that may scratch.
- Do not place hands inside the carafe. When handling, be careful if wearing any hand jewelry, especially diamond rings. Jewelry can scratch the glass, which increases the possibility of breakage.
- Do not bump, scratch, or boil dry.
- Discard the carafe if it is cracked, scratched, or heated while empty for an extended period of time.
- To avoid accidents, do not pour in the direction of people.
- If stirring in the carafe, use only wooden, plastic, or rubber utensils. Do not use metal utensils.
- Follow the above safety precautions carefully to avoid serious burn injuries which may result if breakage occurs while carafe holds heated liquids.
Product Warranty
This Warranty Supersedes All Other Product Warranties
LIMITED WARRANTY
This product is warranted to be free from defects in material and workmanship for a period of one (1) year from the date of original purchase, except as noted below. During this period, we will repair or replace this product, at our option, at no cost to you. THE FOREGOING WARRANTY IS IN LIEU OF ANY OTHER WARRANTY OR CONDITION, WHETHER EXPRESS OR IMPLIED, WRITTEN OR ORAL, INCLUDING WITHOUT LIMITATION, ANY STATUTORY WARRANTY OR CONDITION OF MERCHANTABILITY OR FITNESS FOR A PARTICULAR PURPOSE. ALL CLAIMS FOR SPECIAL, INCIDENTAL, AND CONSEQUENTIAL DAMAGES OR LOSSES ARE HEREBY EXCLUDED. ANY LIABILITY IS EXPRESSLY LIMITED TO AN AMOUNT EQUAL TO THE PURCHASE PRICE PAID.
There is no warranty with respect to motor brushes, containers, cutter assembly, clutches, bristle brushes, funnel, stainless steel cup, agitators, carafes, etc. This warranty extends only to the original purchaser and does not cover any condition resulting from abuse, misuse, neglect, unauthorized repair, or use not in conformity with the printed directions. Always use this product in accordance with the printed directions. This warranty gives you specific legal rights and you may also have other legal rights which vary from state to state or province to province. Some states or provinces do not allow limitations on implied warranties or special, incidental or consequential damages, so the foregoing limitations may not apply to you.
If you have a claim under this warranty in the U.S.A. please contact our TECHNICAL SERVICE DEPARTMENT at 1-866-285-1087 or 910-693-4277; for all other locations, please contact the distributor or dealer from whom you purchased this product. (For faster service please have model, series, and type numbers ready to provide.) Reasonable proof of the date of purchase must be presented; otherwise, the effective date of the warranty will be based upon the date of manufacture plus ninety (90) days. Hamilton Beach Commercial Commercial Technical Service 261 Yadkin Road Southern Pines, NC 28387


