DELL Technologies S4048T-ON Power Switch Instruction Manual
Dell System S4048T–ON 9.14(2.20) Release Notes
This document contains information on open and resolved caveats, and operational information specific to the Dell Networking OS software and the S4048T-ON platform.
Current Release Version: 9.14(2.20)
Release Date: 2023-04-14
Previous Release Version: 9.14(2.18)
Topics:
- Document Revision History
- Supported Hardware
- Supported Software
- New Dell Networking OS Version 9.14(2.20) Features
- Restrictions
- Changes to Default Behavior and CLI Syntax
- Documentation Corrections
- Deferred Issues
- Fixed Issues
- Known Issues
- Upgrading the sub-components
- Upgrading the ONIE Package for the S4048T-ON System
- Upgrading the DIAG Package for the S4048T-ON System
- Installing Dell Networking OS on the S4048T-ON using ONIE
- Support Resources
NOTE: This document may contain language that is not consistent with current guidelines of Dell Technologies. There are plans to update this document over subsequent releases to revise the language accordingly.
Incorrect behavior or unexpected caveats are listed as the Problem Report (PR) numbers within the appropriate sections. For more information on hardware and software features, commands, and capabilities, see the Dell Networking website at:
https://www.dellemc.com/networking.
Document Revision History
Table 1. Revision History
| Date | 2023–04 |
| 2023–04 | Initial release. |
Supported Hardware
The following hardware is supported with this platform:
| Hardware |
| Forty-eight fixed 10GBase-T ports supporting 1G/10G speeds |
| Six fixed QSFP+ ports supporting either one port of 40G or four ports of 10G in breakout mode |
| Two PSUs |
| Four fan modules |
| One MicroUSB serial console port |
| One universal serial bus (USB Type-A) port for additional file storage |
| Management Ethernet interface |
| RS-232 Serial interface |
| Dual core 1.7GHz Rangeley central processing unit (CPU) system |
| Temperature monitoring |
| Software-readable thermal monitor |
| Real time clock (RTC) support |
| Two hot pluggable redundant power supplies |
| Power management monitoring |
| Four removable fans |
| Standard 1U chassis |
The following lists the individual Dell S4048T–ON system hardware components that are available to order:
Table 2. Hardware Components Available to Order
| Fan with airflow from I/O side to PSU side (red — normal air flow direction) |
| Fan with airflow from PSU side to I/O side (blue — reversed air flow direction) |
| AC or DC power supply with airflow from I/O side to PSU side |
| AC or DC power supply with airflow from PSU side to I/O side |
NOTE: Fan modules and power supplies are field replaceable units.
NOTE: All fans and PSUs must have the same airflow direction. If you mix the airflow direction, the switch detects the discrepancy, issues an alarm, and may auto-shutdown to avoid heat damage to components. You must correct the mixed airflow direction.
Supported Software
The following software is supported with this platform:
| Software | Minimum Release Requirement |
| Dell Networking OS | 9.14(2.20) |
| ONIE | 3.27.1.10–0 |
![]() NOTE: For information on non-Dell OS versions, see the Release Notes for the Hardware Platform S4048T–ON.
NOTE: For information on non-Dell OS versions, see the Release Notes for the Hardware Platform S4048T–ON.
New Dell Networking OS Version 9.14(2.20) Features
The following features are integrated into the Dell Networking 9.14.2 branch through this release:
None.
Restrictions
- You can use non-Dell qualified cables, adapters, and optics in a S4048T-ON switch, but Dell Networking does not guarantee their performance as the S4048T-ON does not support non-Dell qualified transceivers of 25G and above. If you insert a non-Dell qualified transceiver of 25G and above into a SFP28, QSFP+, or QSFP28 port, the switch places the interface in an error-disabled (operationally down) state and generates a syslog message, such as:
%S4048TLC0640:8 %IFAGT-2-TRANSCEIVER_UNSUPPORTED_ERROR: Transceiver in slot 1 port 49 unrecognized, putting interface in operational-down state.
To verify the error-disabled status of an interface, enter any of the following show commands.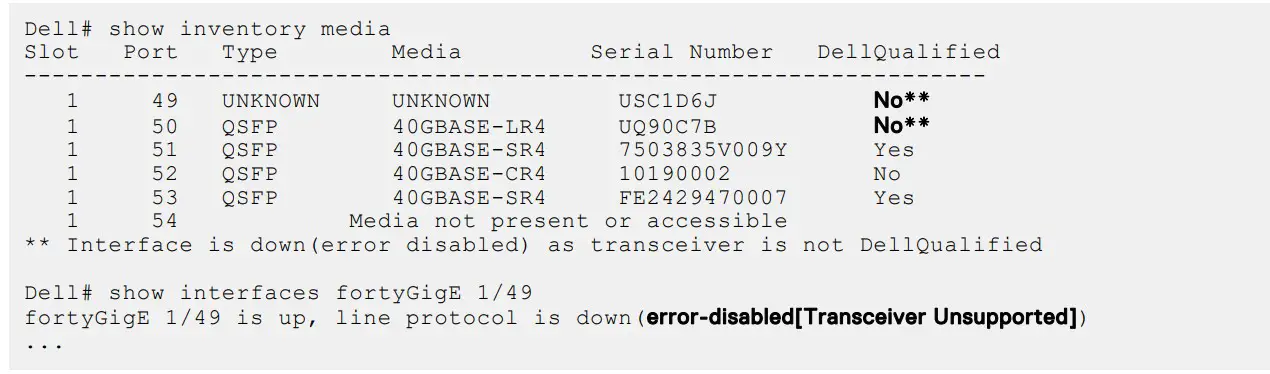
- Prerequisite steps to upgrade the Dell Networking OS from earlier version to 9.14.2.0 or later:
- Uninstall the older version of the Open Automation (OA) package
- Upgrade the Dell Networking OS to 9.14.2.0 or later version
- Install the following OA packages from the respective upgraded version:
a. SmartScripts
b. Puppet
c. Open management infrastructure (OMI)
d. SNMP MIB
Prerequisite steps to downgrade the Dell Networking OS from 9.14.2.0 or later to the earlier version:
- Uninstall the OA package of 9.14.2.0 or later version
- Downgrade the Dell Networking OS to an earlier version
- Install the respective OA package from an earlier version
For more information about installing, uninstalling and upgrading the Dell Networking OS and OA package, refer the respective Dell System Release Notes.
- If you downgrade the Dell Networking OS version from 9.14.2.20 to 9.11.0.0 or any older versions, the system displays the following error message even though there is no functional impact:
 Before downgrading, save the current configuration and then remove the CDB files (confd_cdb.tar.gz.version and confd_cdb.tar.gz). To remove the files, use the following steps:
- In a VXLAN scenario, hybrid port is not supported.
- While deploying the system in the normal-reload mode in BMP configuration, use the ip ssh server enable command at the beginning of the startup configuration if the write memory command is used at the end of the configuration.
- The following features are not available in the Dell Networking OS from version 9.7(0.0):
- PIM ECMP
- Static IGMP join (ip igmp static-group)
- IGMP querier timeout configuration (ip igmp querier-timeout)
- IGMP group join limit (ip igmp group join-limit)
- You can use the negotiation auto command to turn auto-negotiation on or off only on fiber interfaces operating at 1G speed.
- If you use the interface range command to select multiple interfaces that are added to the management VRF, the ipv6 address command does not display the autoconfig option. You can configure the autoconfig command on individual interfaces.
- If you use the interface range command to select multiple interfaces that are added to the management VRF, the ipv6 nd command displays the following options but they do not take effect if you use them:
- dns-server
- hop-limit
- managed-config-flag
- max-ra-interval
- mtu
- other-config-flag
- prefix
- ra-guard
- ra-lifetime
- reachable-time
- retrans-timer
- suppress-ra
- REST API does not support AAA authentication.
- Do not configure the vxlan-instance command on the port, which is configured with the portmode hybrid command. Do not configure the vxlan-instance enabled port as a member of VLAN, which does not have VXLAN-VNI configuration.
- Half-Duplex mode is not supported.
- When FRRP is enabled in a VLT domain, no flavor of Spanning tree should concurrently be enabled on the nodes of that specific VLT domain. In essence FRRP and xSTP should not co-exist in a VLT environment.

Changes to Default Behavior and CLI Syntax
The following behavior and CLI changes are applicable to the S4048T–ON switch with Dell Networking OS version 9.14(2.20): None
Documentation Corrections
This section describes the errors identified in the current release of the Dell Networking OS.
- The router bgp command allows you to configure only one L3 interface with an IPv4 address. The Configuration guide does not mention this limitation and will be corrected in the next release of the guide.
Deferred Issues
Issues that appear in this section were reported in Dell Networking OS version 9.14(2.0) as open, but have since been deferred.
Deferred caveats are those that are found to be invalid, not reproducible, or not scheduled for resolution.
Deferred issues are reported using the following definitions.
Category Description
PR# Problem Report number that identifies the issue.
Severity S1 — Crash: A software crash occurs in the kernel or a running process that requires a restart of AFM, the router, switch, or process.
S2 — Critical: An issue that renders the system or a major feature unusable, which can have a pervasive impact on the system or network, and for which there is no work-around acceptable to the customer.
S3 — Major: An issue that affects the functionality of a major feature or negatively effects the network for which there exists a work-around that is acceptable to the customer.
S4 — Minor: A cosmetic issue or an issue in a minor feature with little or no network impact for which there might be a work-around.
Synopsis: Synopsis is the title or short description of the issue.
Release Notes: Release Notes description contains more detailed information about the issue.
Work around: Work around describes a mechanism for circumventing, avoiding, or recovering from the issue. It might not be a permanent solution.
Issues listed in the “Closed Caveats” section should not be present, and the work-around is unnecessary, as the version of code for which this release note is documented has resolved the caveat.
Deferred S4048T–ON 9.14(2.0) Software Issues
Issues that appear in this section were reported in Dell Networking OS version 9.14(2.0) as open, but have since been deferred.
Deferred caveats are those that are found to be invalid, not reproducible, or not scheduled for resolution.
The following issues have been deferred in the Dell Networking OS version 9.14(2.0): None
Fixed Issues
Fixed issues are reported using the following definitions.
Category Description
PR# Problem Report number that identifies the issue.
Severity S1 — Crash: A software crash occurs in the kernel or a running process that requires a restart of AFM, the router, switch, or process.
S2 — Critical: An issue that renders the system or a major feature unusable, which can have a pervasive impact on the system or network, and for which there is no work-around acceptable to the customer.
S3 — Major: An issue that affects the functionality of a major feature or negatively effects the network for which there exists a work-around that is acceptable to the customer.
S4 — Minor: A cosmetic issue or an issue in a minor feature with little or no network impact for which there might be a work-around.
Synopsis: Synopsis is the title or short description of the issue.
Release Notes Release Notes description contains more detailed information about the issue.
Category Description
Work around Work around describes a mechanism for circumventing, avoiding, or recovering from the issue. It might not be a permanent solution.
Issues listed in the “Closed Caveats” section should not be present, and the work-around is unnecessary, as the version of code for which this release note is documented has resolved the caveat.
Fixed S4048T–ON 9.14(2.20) Software Issues
![]() NOTE: Dell Networking OS 9.14(2.20) includes fixes for caveats addressed in the previous 9.14 releases. Refer to the respective release notes documentation for the list of caveats fixed in the earlier 9.14 releases.
NOTE: Dell Networking OS 9.14(2.20) includes fixes for caveats addressed in the previous 9.14 releases. Refer to the respective release notes documentation for the list of caveats fixed in the earlier 9.14 releases.
The following caveats have been fixed in Dell Networking OS version 9.14(2.20):
PR# 170395
Severity: Sev 2
Synopsis: In certain scenarios, MAC addresses previously learned are re-initialized to zero when some CAM table entries are modified resulting in ping failure.
Release Notes: In certain scenarios, MAC addresses previously learned are re-initialized to zero when some CAM table entries are modified resulting in ping failure.
Workaround: None
Known Issues
Known issues are reported using the following definitions.
Category Description
PR# Problem Report number that identifies the issue.
Severity S1 — Crash: A software crash occurs in the kernel or a running process that requires a restart of AFM, the router, switch, or process.
S2 — Critical: An issue that renders the system or a major feature unusable, which can have a pervasive impact on the system or network, and for which there is no work-around acceptable to the customer.
S3 — Major: An issue that affects the functionality of a major feature or negatively effects the network for which there exists a work-around that is acceptable to the customer.
S4 — Minor: A cosmetic issue or an issue in a minor feature with little or no network impact for which there might be a work-around.
Synopsis:Synopsis is the title or short description of the issue.
Release Notes: Release Notes description contains more detailed information about the issue.
Work around: Work around describes a mechanism for circumventing, avoiding, or recovering from the issue. It might not be a permanent solution.
Issues listed in the “Closed Caveats” section should not be present, and the work-around is unnecessary, as the version of code for which this release note is documented has resolved the caveat.
Known S4048T–ON 9.14(2.20) Software Issues
The following caveats are open in Dell Networking OS version 9.14(2.20): None
Upgrading the sub-components
- It is recommended to upgrade the sub-components in the following order and reload the switch where necessary, before
proceeding with the next sub-component upgrade. - Upgrade the BIOS or Boot-selector – using the upgrade boot bootselector-image stack-unit 1 booted command.
- Upgrade the GRUB or Bootflash – using the upgrade boot bootflash-image stack-unit 1 booted command.
- Upgrade the CPLD – using the upgrade fpga-image system cpld stack-unit 1 booted command.
Upgrade the BIOS or Boot Selector
To upgrade the BIOS or Boot Selector from Dell Networking OS, perform the following steps:
- Upgrade the S4048T-ON Boot Selector image.
EXEC Privilege Mode
- upgrade boot bootselector-image stack-unit [ | all]
Dell Networking OS version 9.14(2.20) requires S4048T-ON Boot Selector image version or higher. The booted option is used to upgrade the Boot Selector image to the image version packed with the loaded Dell Networking OS image. The Boot Selector image version packed with the loaded Dell Networking OS can be found using the show os-version command in EXEC Privilege mode.

- . Reload the unit. EXEC Privilege Mode reload
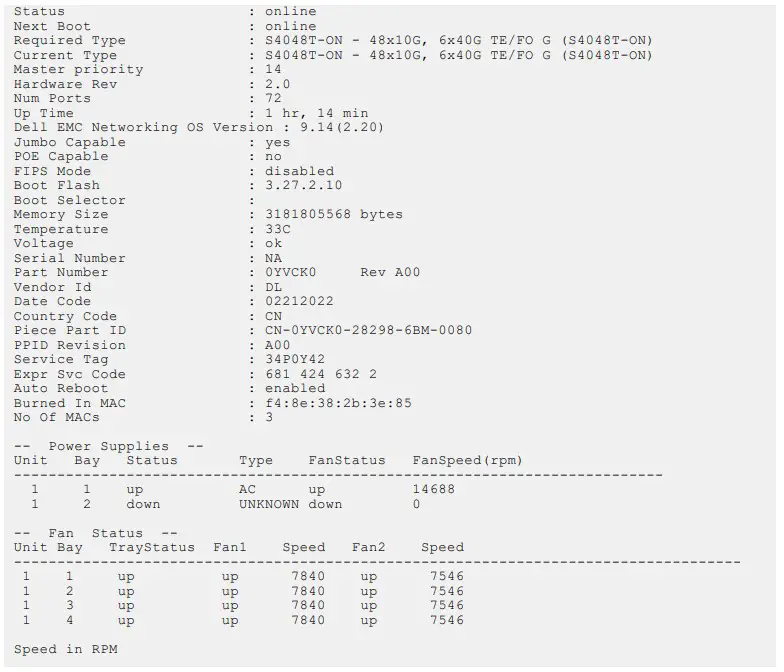
- Verify the Boot Selector image. EXEC Privilege Mode
show system stack-unit


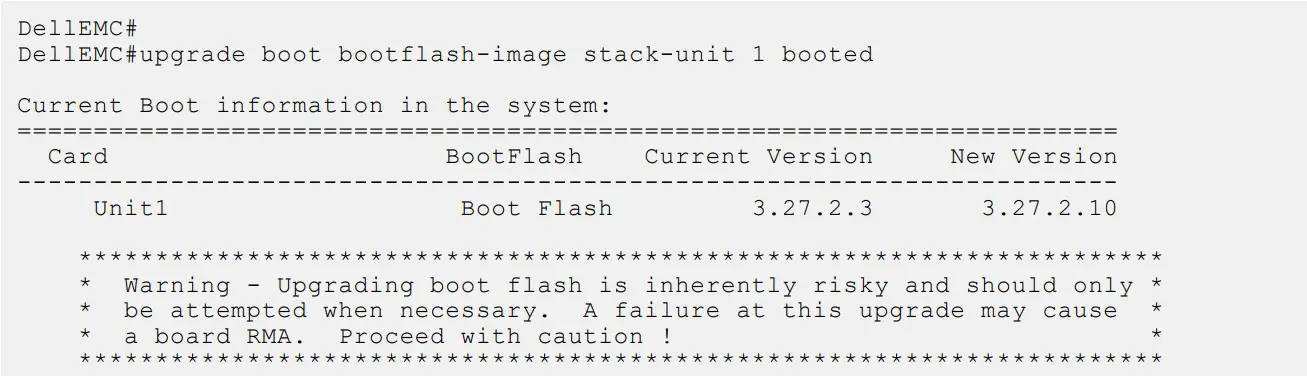
Upgrade the GRUB or Boot Flash
To upgrade the GRUB or Boot Flash from Dell Networking OS, perform the following steps:
- Upgrade the S4048T-ON Boot Flash image.
EXEC Privilege Mode upgrade boot bootflash-image stack-unit [ | all] [booted | flash: | ftp: | scp: | tftp: | usbflash:]

Upgrade the CPLD
The S4048T-ON system with Dell Networking OS Version 9.14(2.20) requires System CPLD revision 12 and Master CPLD
revision 13.![]() NOTE: If your CPLD revisions are higher than the ones shown here, DO NOT make any changes. If you have questions
NOTE: If your CPLD revisions are higher than the ones shown here, DO NOT make any changes. If you have questions
regarding the CPLD revision, contact technical support.
Verify that a CPLD upgrade is required
Use the following command to identify the CPLD version:
Use the following command to view CPLD version that is associated with the Dell Networking OS image: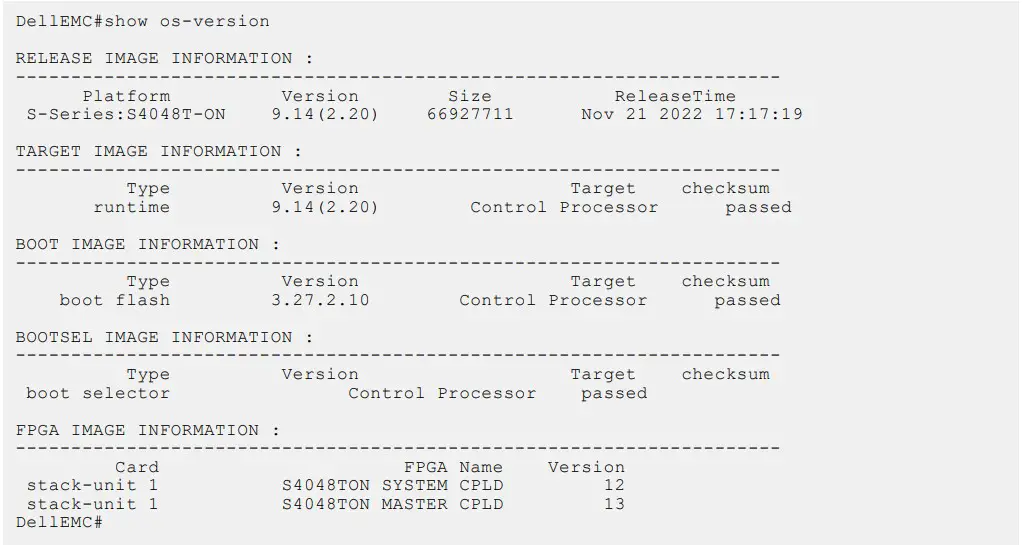
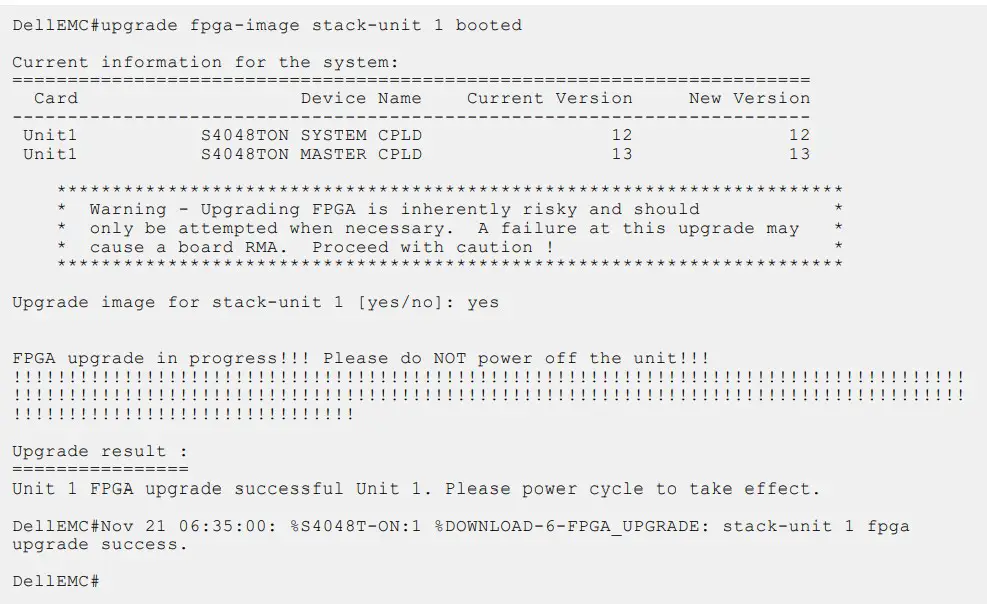
Upgrading the CPLD Image
NOTE: The upgrade fpga-image stack-unit 1 booted command is hidden when using the FPGA Upgrade feature in the CLI. However, it is a supported command and will be accepted when entered as documented.
To upgrade the CPLD image on S4048T-ON, follow these steps:
- Upgrade the CPLD image.
EXEC Privilege Mode
upgrade fpga-image stack-unit booted
- Power cycle the system physically. Switch off the system by unplugging the power chords from the REAR PSUs and wait
until the PSU FAN–REAR STATUS LED is completely OFF.
NOTE: Do not switch on the system with PSU–REAR LED glowing AMBER.
You can alternatively power cycle the switch using the power-cycle stack-unit <1-6> command as follows:
- The CPLD version can be verified using show revision command output:
EXEC Privilege Mode
show revision


![]() NOTE: Do not power off the system while FPGA upgrade is in progress. For any queries, contact technical support.
NOTE: Do not power off the system while FPGA upgrade is in progress. For any queries, contact technical support.
Upgrading the ONIE Package for the S4048T-ON System
To upgrade the ONIE package you have installed, use one of the following two processes: zero touch (dynamic) update or manual update
- Zero touch (dynamic): Copy the update ONIE installer for your system to the TFTP/HTTP server. Configure the DHCP options using the ONIE specifications shown at the following link: https://github.com/opencomputeproject/onie/wiki/Design-SpecS-UpdatingONIE.
- Manual: Copy the image onto the TFTP/HTTP servers and boot ONIE. Update the ONIE using the onie-self-update command, then download and run an ONIE updater image (onie-updater-x86_64 s4048t_c2338-r0). The supported URL types are: HTTP, FTP, TFTP, and FILE
- Manual: Copy the image onto the TFTP/HTTP servers and boot ONIE. Update the ONIE using the onie-self-update command, then download and run an ONIE updater image (onie-updater-x86_64 s4048t_c2338-r0). The supported URL types are: HTTP, FTP, TFTP, and FILE.
To upgrade ONIE, perform the following steps:
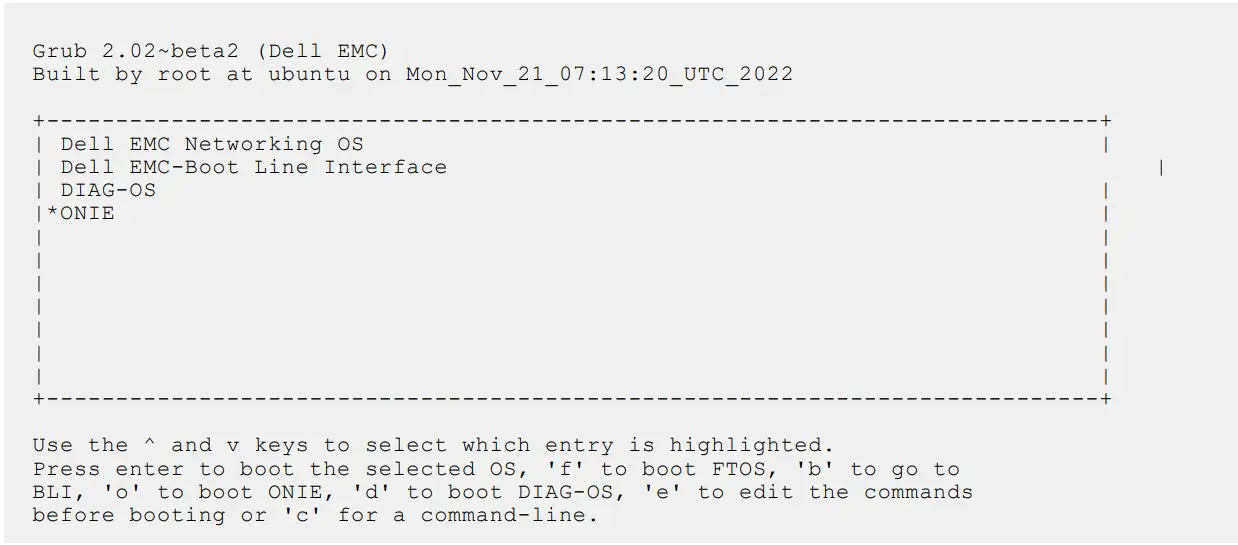
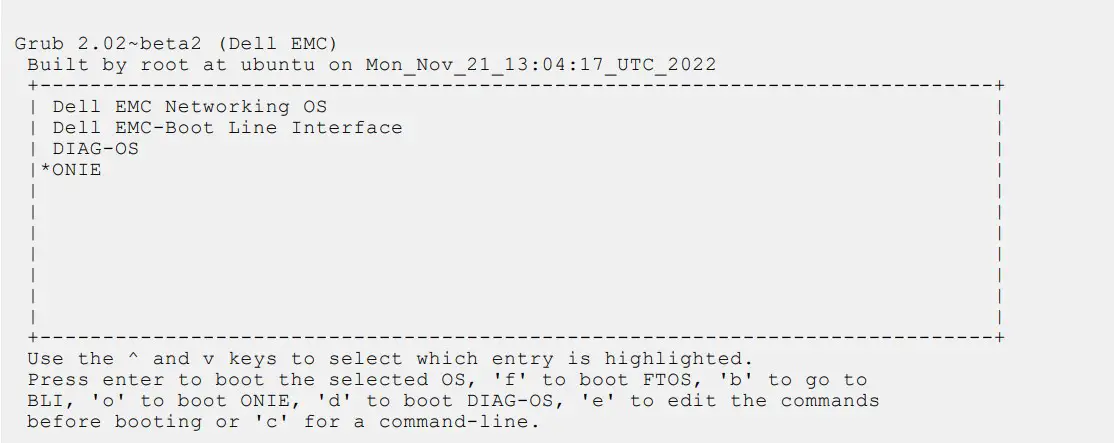
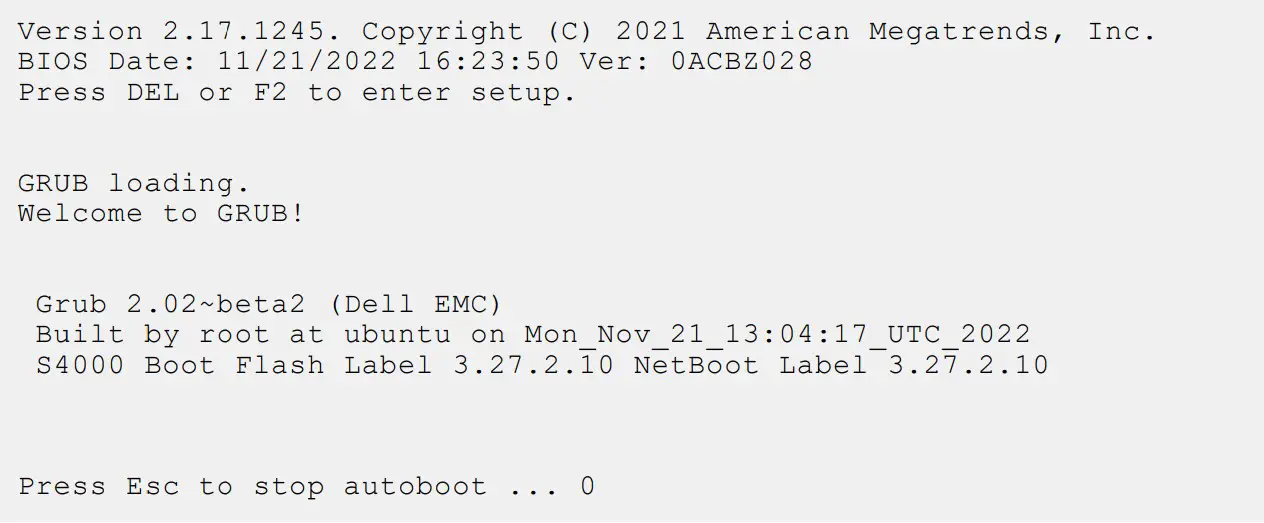
- Reboot the system. During the reboot process, the system displays the following message prompting you to press the Esc key in order to stop the auto-boot process:

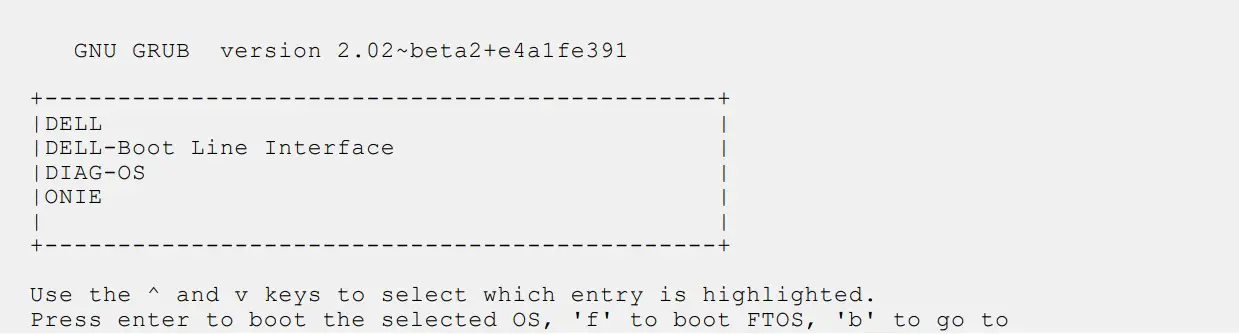
- At this prompt message, press the Esc key. The following menu appears:

- From the menu, choose the ONIE option.
 NOTE: To choose an option from the menu, highlight one of the options using the up or down arrow key and press Enter
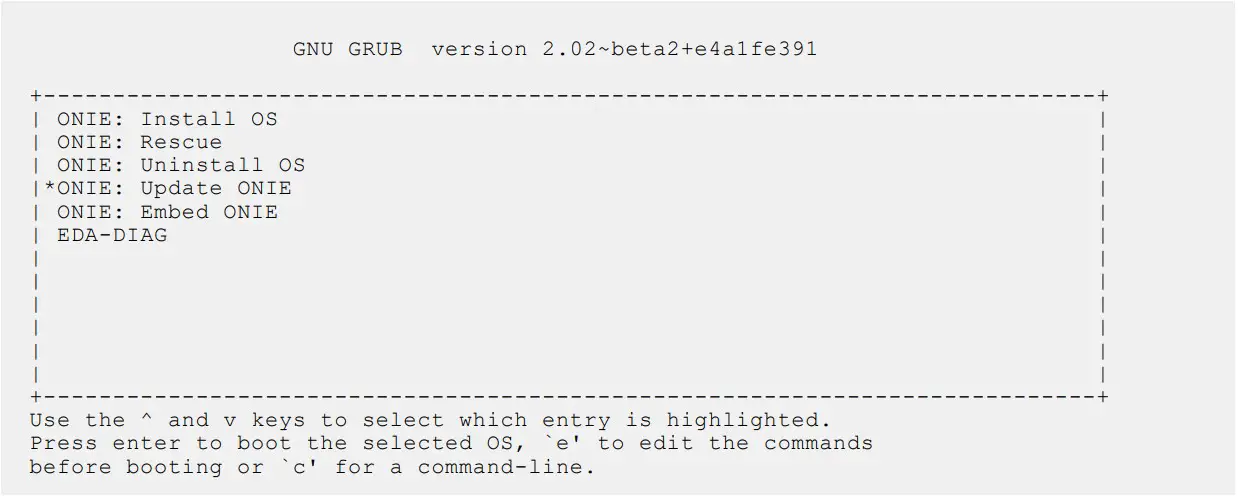
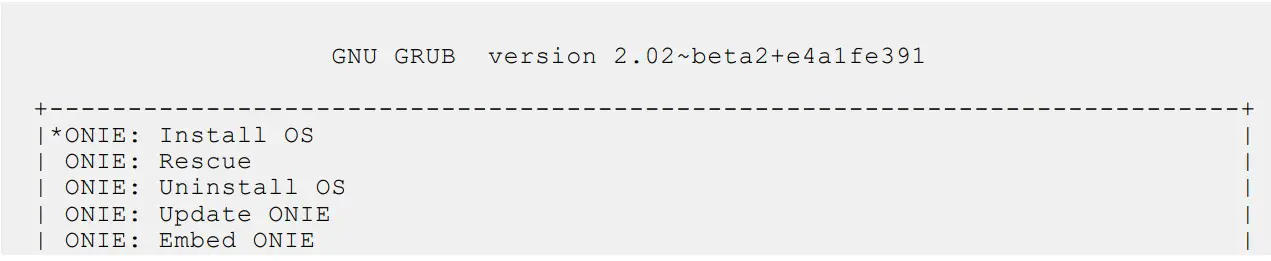
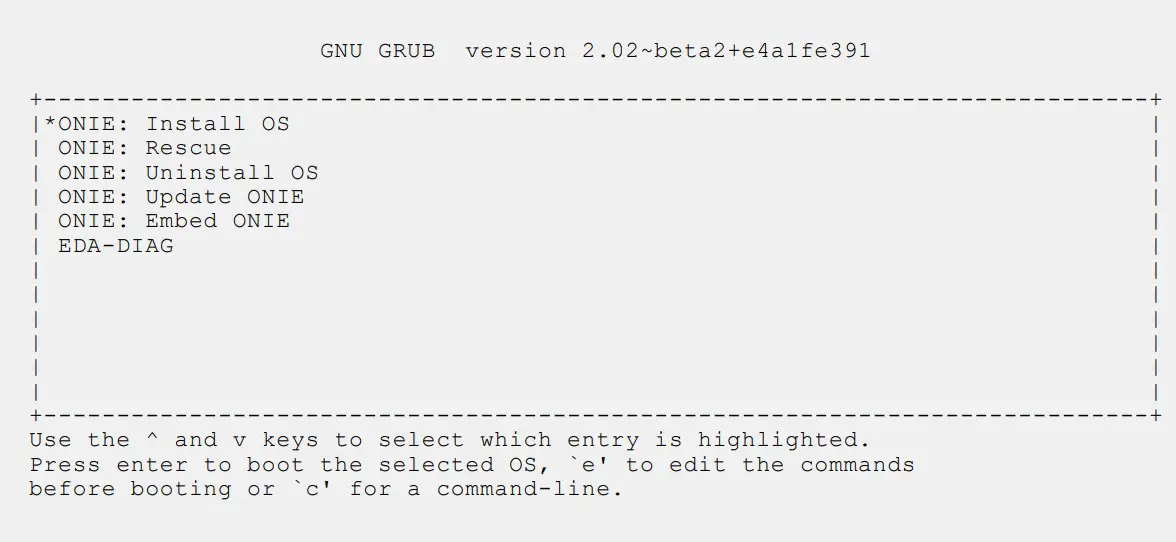
The following menu appears:
- From this menu, choose the ONIE : Update ONIE option.NOTE: To choose an option from the menu, highlight one of the options using the up or down arrow key and press Enter.
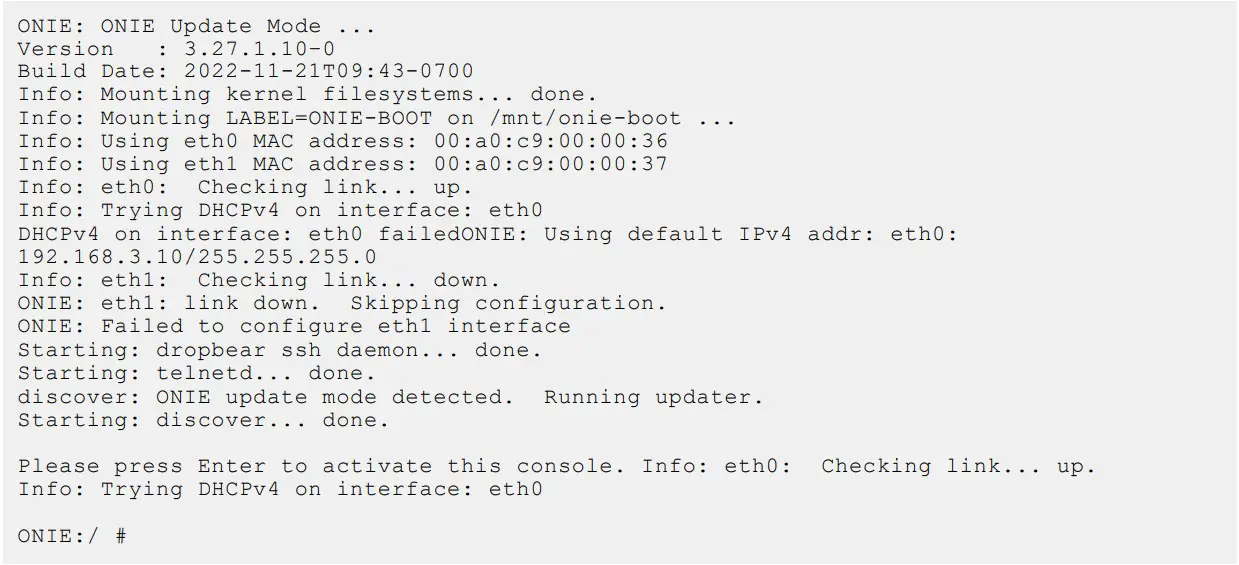
The ONIE update mode is enabled and the ONIE prompt appears, as shown:
- . At the ONIE prompt, to stop the ONIE discovery process, enter the following command:
ONIE:/ # onie-discovery-stop
The ONIE discovery stops, as shown:
- . Configure an interface and assign an IP address to that interface using the following command:
ONIE:/ # ifconfig eth0 10.16.133.213/16
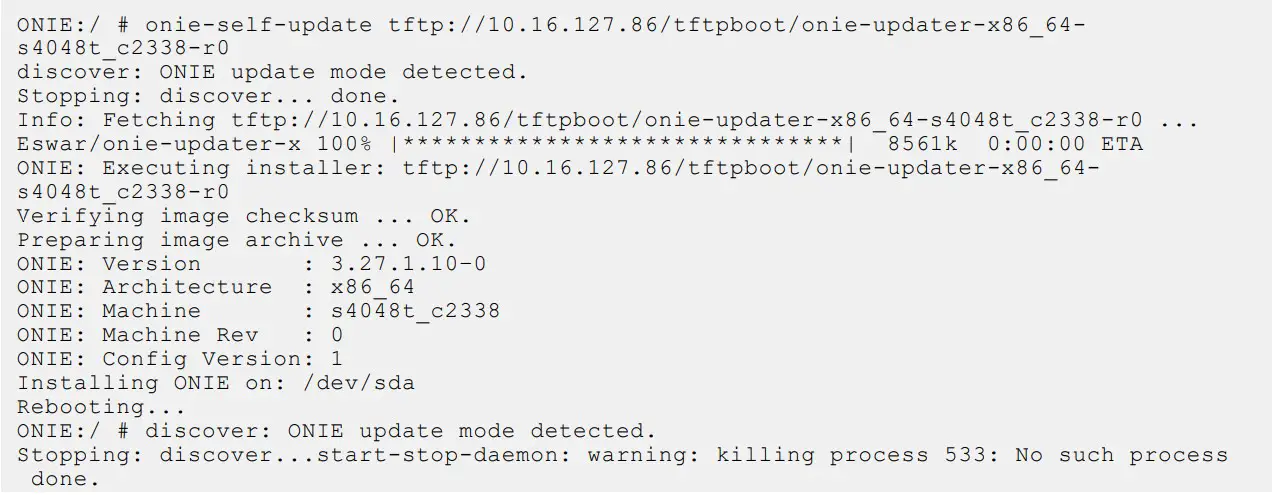
Enter the following command to upgrade ONIE:ONIE:/ # onie-self-update tftp://<tftp-server–address>/ onie-updater-x86_64-s4048t_c2338-r0 NOTE: You must copy the onie-updater-x86_64-s4048t_c2338-r0 file to the /tftpboot folder in the server.
ONIE is updated on the system, as shown:


Upgrading the DIAG Package for the S4048T-ON System
To upgrade the DIAG package, use one of the following two processes:
- Zero touch (dynamic): Copy the update ONIE installer for your system to the TFTP/HTTP server. Configure the DHCP options using the ONIE specifications shown at the following link: https://github.com/opencomputeproject/onie/wiki/ Design-Spec-SW-Updating-ONIE.
- Manual: Copy the image onto the TFTP/HTTP servers and boot ONIE. Update the ONIE using the onie-self-update command, then download and run an ONIE updater image (diag-installer-x86_64-s4048t_c2338-r0.bin). The supported URL types are: HTTP, FTP, TFTP, and FILE.
To upgrade DIAG, perform the following steps:
- Reboot the system. During the reboot process, the system displays the following message prompting you to press the Esc key in order to stop the auto-boot process:

- At this prompt message, press the Esc key. The following menu appears:

- From the menu, choose the ONIE option. NOTE: To choose an option from the menu, highlight one of the options using the up or down arrow key and press Enter.
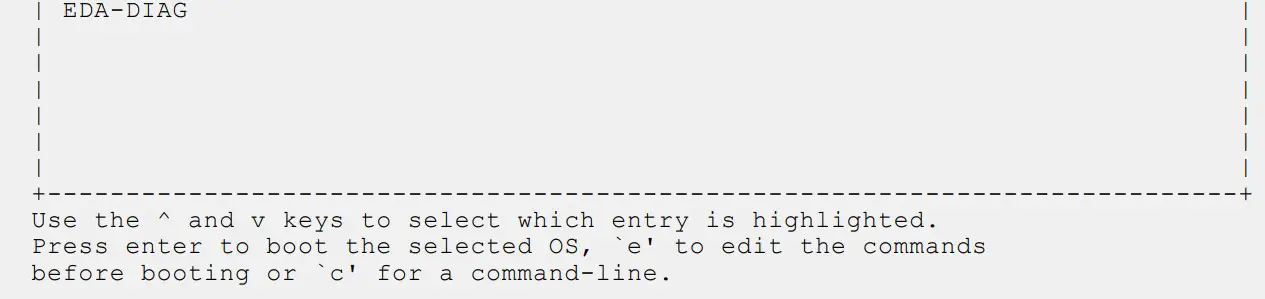
The following menu appears:\

- From this menu, choose the ONIE : Install OS option.
NOTE: To choose an option from the menu, highlight one of the options using the up or down arrow key and press Enter.
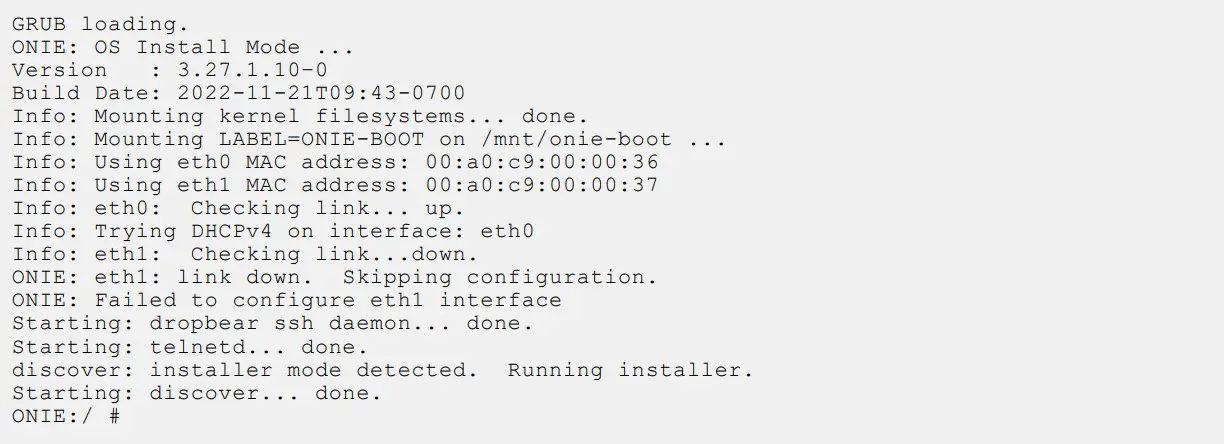
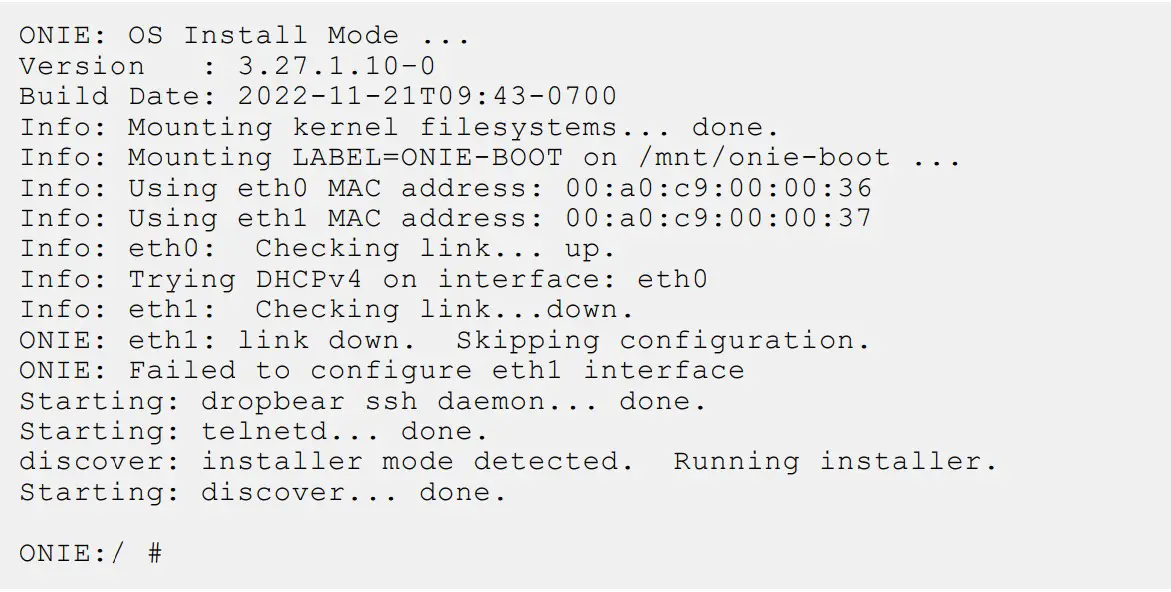
The ONIE Installer mode is enabled and the ONIE prompt appears, as shown:
- At the ONIE prompt, to stop the ONIE discovery process, enter the following command: ONIE:/ # onie-discovery-stop
The ONIE discovery stops, as shown:
- Configure an interface and assign an IP address to that interface using the following command:
ONIE:/ # ifconfig eth0 10.16.133.213/16
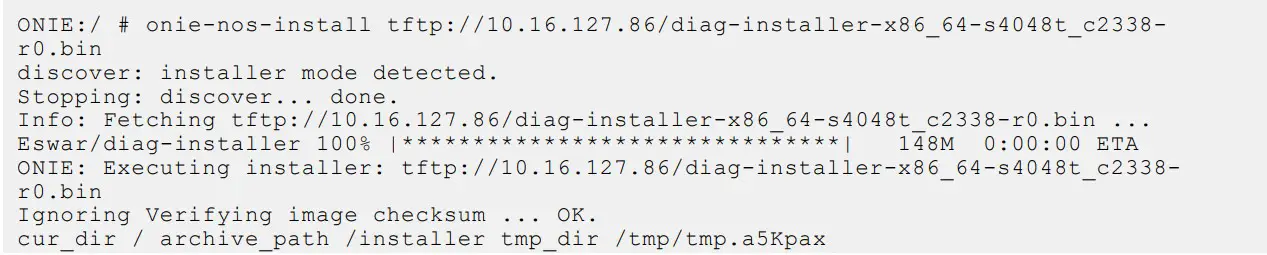
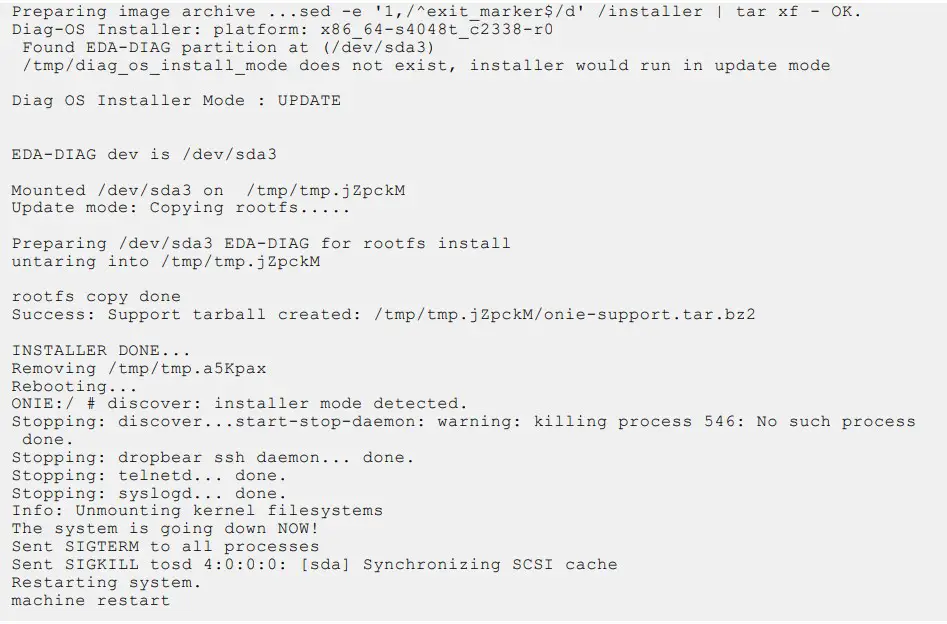
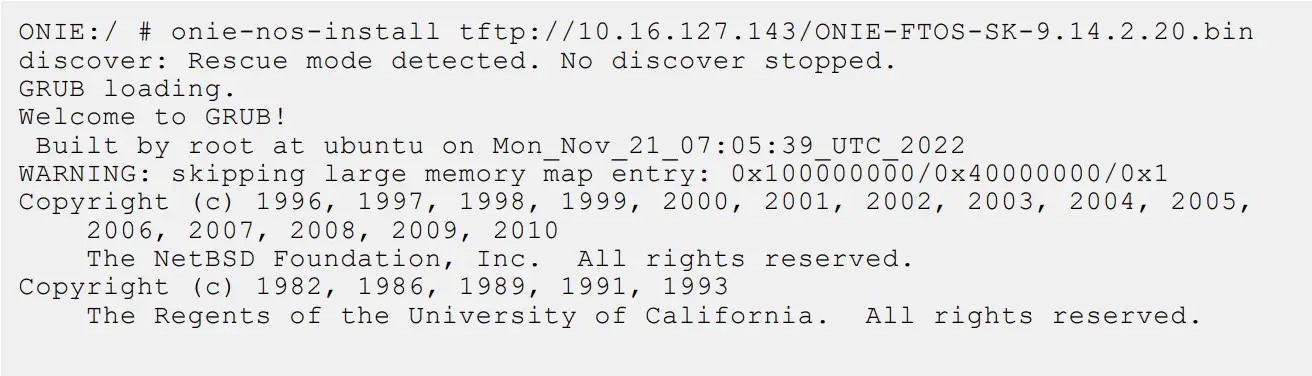
Enter the following command to upgrade DIAG on the S4048T-ON system: onie-nos-install tftp://<tftpserver-adress>/tftpboot/diag-installer-x86_64-s4048t_c2338-r0.bin NOTE: You must copy the diag-installer-x86_64-s4048t_c2338-r0.bin file to the /tftpboot folder in the server.
The DIAG is updated on the system, as shown:


Installing Dell Networking OS on the S4048T-ON using ONIE
NOTE: You will need the Dell Networking OS installer package, ONIE-FTOS-SK-9.14.2.20.bin to install the Dell Networking OS on your S4048T-ON system that has only ONIE.
To install the Dell Networking OS version 9.14(2.20) on a new S4048T-ON device, perform the following steps:
- Reboot the system. During the reboot process, the system displays the following message prompting you to press the Esc key in order to stop the auto-boot process:

- At this prompt message, press the Esc key. The following menu appears:


- From the menu, choose the ONIE option. NOTE: To choose an option from the menu, highlight one of the options using the up or down arrow key and press Enter.
The following menu appears:
- From this menu, choose the ONIE : Install OS option. NOTE: To choose an option from the menu, highlight one of the options using the up or down arrow key and press Enter.
The ONIE Installer mode is enabled and the ONIE prompt appears, as shown:
- At the ONIE prompt, to stop the ONIE discovery process, enter the following command:
ONIE:/ # onie-discovery-stop
The ONIE discovery stops, as shown:
- Configure an interface and assign an IP address to that interface using the following command:
ONIE:/ # ifconfig eth0 ip-address/prefix - Enter the following command to begin the installation process:
 NOTE: You must copy the ONIE-FTOS-SK-9.14.2.20.bin file to the /tftpboot folder in the server. NOTE: After the Dell Networking OS installation completes, the system automatically reboots.
Following is the installation and boot log of Dell Networking OS:
- 8. After the installation completes, the system displays the following DELL prompt:
DellEMC>


Upgrading the S4048T-ON Dell Networking OS Image using the Dell Networking OS CLI
![]() NOTE: If you are upgrading from Dell Networking OS version 9.9(0.0P18) or earlier, you cannot directly upgrade to version 9.14(2.20) or above. Upgrade to version 9.10(0.0) or above first and then upgrade to the required version.
NOTE: If you are upgrading from Dell Networking OS version 9.9(0.0P18) or earlier, you cannot directly upgrade to version 9.14(2.20) or above. Upgrade to version 9.10(0.0) or above first and then upgrade to the required version.
Bare Metal Provisioning![]() NOTE: If you are using Bare Metal Provisioning (BMP), see the Bare Metal Provisioning topic in the Dell Networking OS Configuration Guide or the Open Automation Guide.
NOTE: If you are using Bare Metal Provisioning (BMP), see the Bare Metal Provisioning topic in the Dell Networking OS Configuration Guide or the Open Automation Guide.
Manual Upgrade Procedure
Follow these steps carefully to upgrade your S4048T-ON systems:
- Dell Networking recommends that you back up your startup configuration and any important files and directories to an external media prior to upgrading the system.
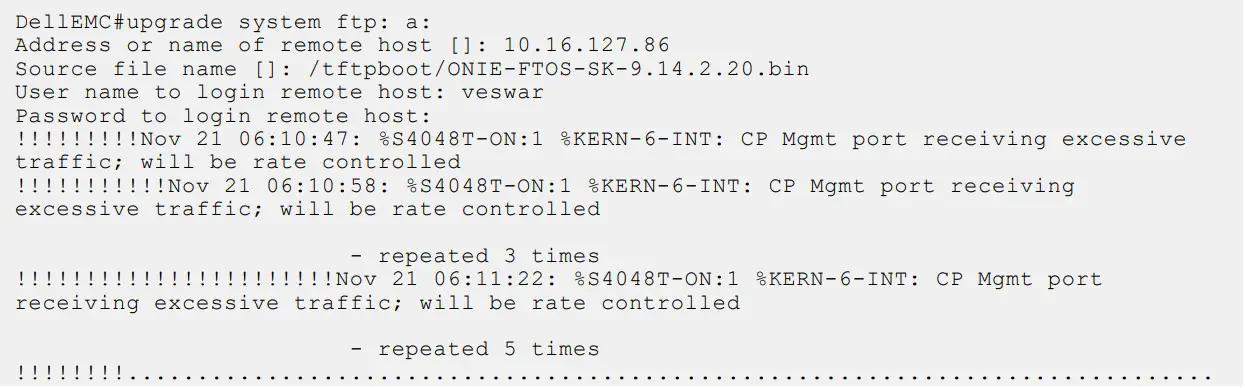
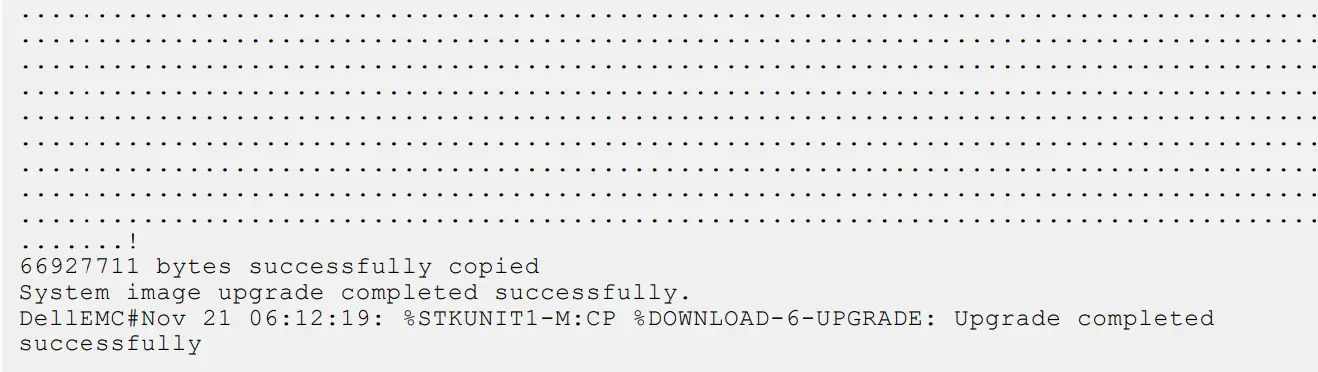
- Upgrade the Dell Networking OS in flash partition A: or B:
EXEC Privilege Mode
upgrade system [flash: | ftp: stack-unit <1-6> | tftp: | scp: | usbflash:] [A: | B:]

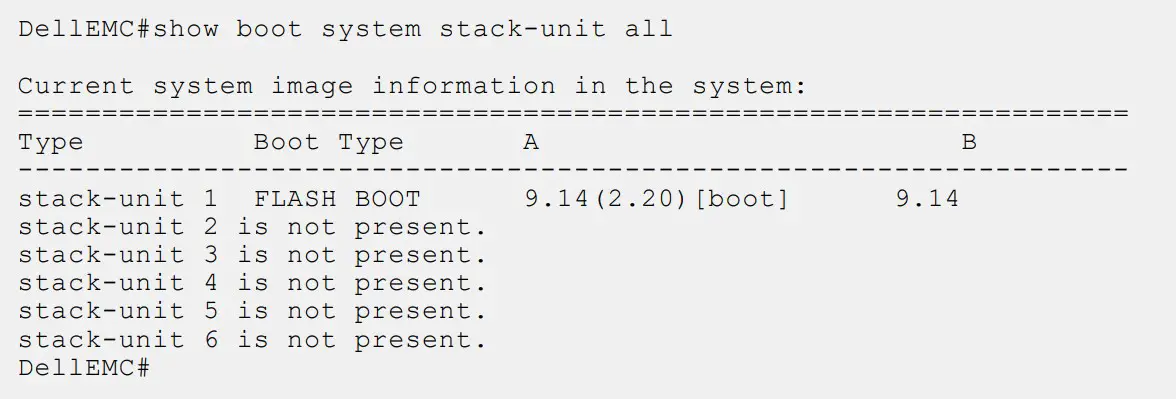
- Verify that the Dell Networking OS has been upgraded correctly in the upgraded flash partition
EXEC Privilege Mode
show boot system stack-unit [1-6] | all]
- Change the Primary Boot Parameter of the S4048T-ON to the upgraded partition A: or B:
CONFIGURATION Mode
boot system stack-unit 1 primary system: [A: | B: | tftp: | ftp:] - Save the configuration so that the configuration will be retained after a reload using write memory command.
EXEC Privilege Mode
write memory
- Reload the unit.
EXEC Privilege Mode
reload
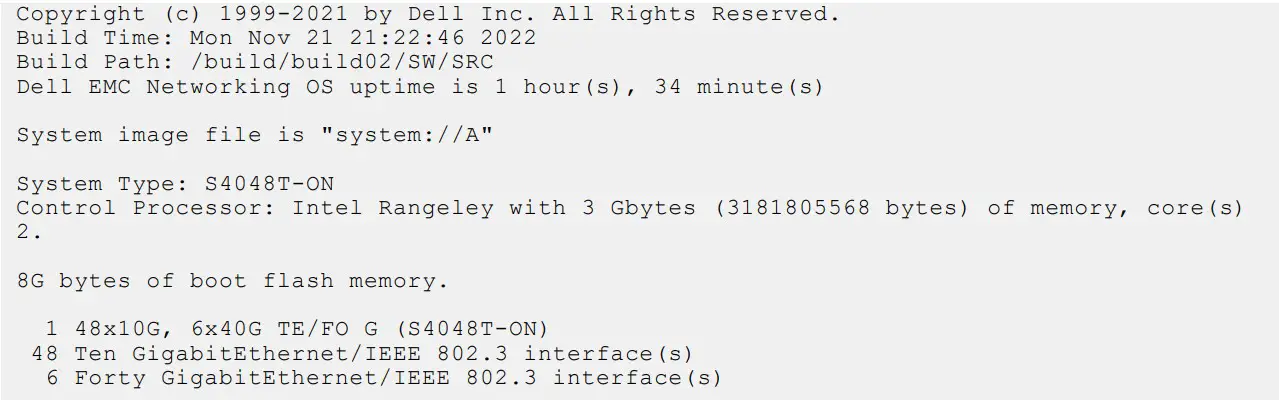
- Verify the S4048T-ON has been upgraded to the Dell Networking OS version 9.14(2.20).
EXEC Privilege Mode
show version


Uninstalling Dell Networking OS from the S4048T-ON
To uninstall Dell Networking OS version 9.14(2.20) from the S4048T-ON device, perform the following steps:
- Reboot the system. During the reboot process, the system displays the following message prompting you to press the Esc key in order to stop the auto-boot process:

- At this prompt message, press the Esc key. The following menu appears:

- From the menu, choose the ONIE option. NOTE: To choose an option from the menu, highlight one of the options using the up or down arrow key and press
Enter.
The following menu appears:
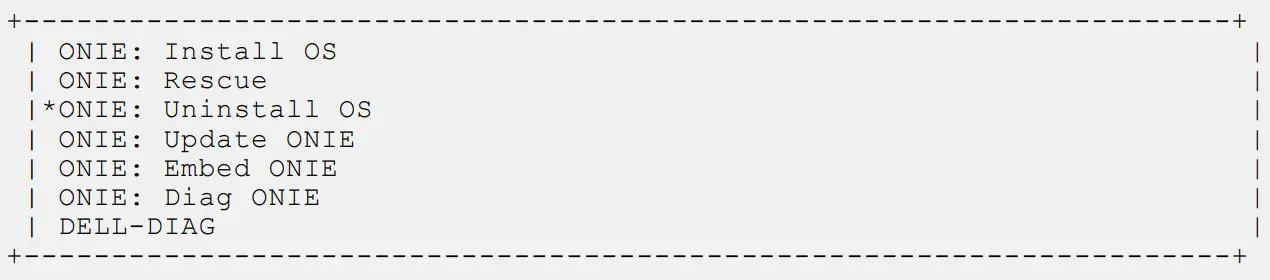
- From this menu, choose the ONIE : Uninstall OS option. NOTE: To choose an option from the menu, highlight one of the options using the up or down arrow key and press
Enter.
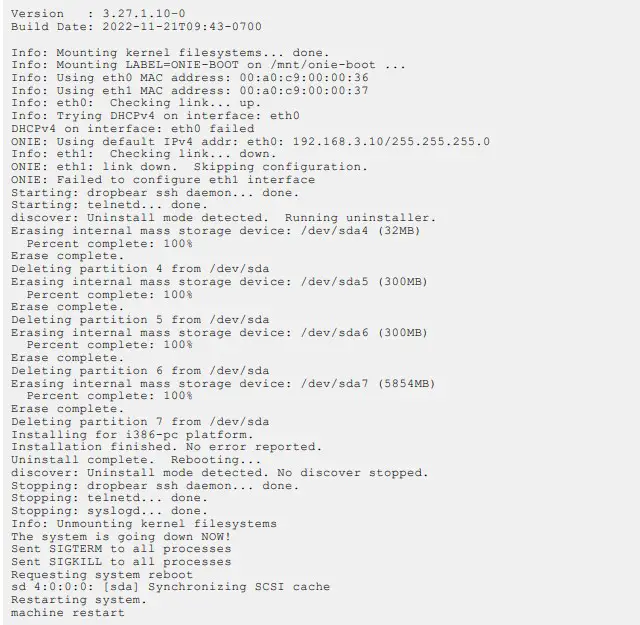
The uninstall process begins. Following is the log generated by the system while Dell Networking OS 9.14(2.20) uninstalls:
- After the installation completes, the system displays the following ONIE prompt:
ONIE:/ #

Installing a Third Party Operating System
Apart from the Dell Networking OS, you can also install a supported third party operating system on the S4048T-ON system. For more information on installing a third party operating system, refer to the third party OS vendor’s website for OS installation instructions
Support Resources
The following support resources are available for the S4048T–ON system.
Documentation Resources
This document contains operational information specific to the S4048T–ON system.
For information about using the S4048T–ON, refer to the following documents at http://www.dell.com/support:
- Installing the S4048T-ON System
- Quick Start Guide
- Dell Networking Command Line Reference Guide for the S4048T-ON System
- Dell Networking Configuration Guide for the S4048T-ON System
For more information about hardware features and capabilities, refer to the Dell Networking website at https://www.dellemc.com/networking.
For more information about the open network installation environment (ONIE)-compatible third-party operating system, refer to
http://onie.org
Issues
Issues are unexpected or incorrect behavior and are listed in order of Problem Report (PR) number within the appropriate sections.
Finding Documentation
This document contains operational information specific to the S4048T–ON system.
- For information about using the S4048T–ON, refer to the documents at http://www.dell.com/support.
- For more information about hardware features and capabilities, refer to the Dell Networking website at https://www.dellemc.com/networking.
- For more information about the open network installation environment (ONIE)-compatible third-party operating system, refer to http://onie.org.
Contacting Dell
![]() NOTE: If you do not have an active Internet connection, you can find contact information on your purchase invoice, packing slip, bill, or Dell product catalog.
NOTE: If you do not have an active Internet connection, you can find contact information on your purchase invoice, packing slip, bill, or Dell product catalog.
Dell provides several online and telephone-based support and service options. Availability varies by country and product, and some services may not be available in your area. To contact Dell for sales, technical support, or customer service issues:
Go to www.dell.com/support.
Notes, cautions, and warnings
![]() NOTE: A NOTE indicates important information that helps you make better use of your product.
NOTE: A NOTE indicates important information that helps you make better use of your product.![]() CAUTION: A CAUTION indicates either potential damage to hardware or loss of data and tells you how to avoid the problem.
CAUTION: A CAUTION indicates either potential damage to hardware or loss of data and tells you how to avoid the problem.![]() WARNING: A WARNING indicates a potential for property damage, personal injury, or death.
WARNING: A WARNING indicates a potential for property damage, personal injury, or death.
© 2023 Dell Inc. or its subsidiaries. All rights reserved. Dell Technologies, Dell, and other trademarks are trademarks of Dell Inc. or its subsidiaries. Other trademarks may be trademarks of their respective owners.
![]()


