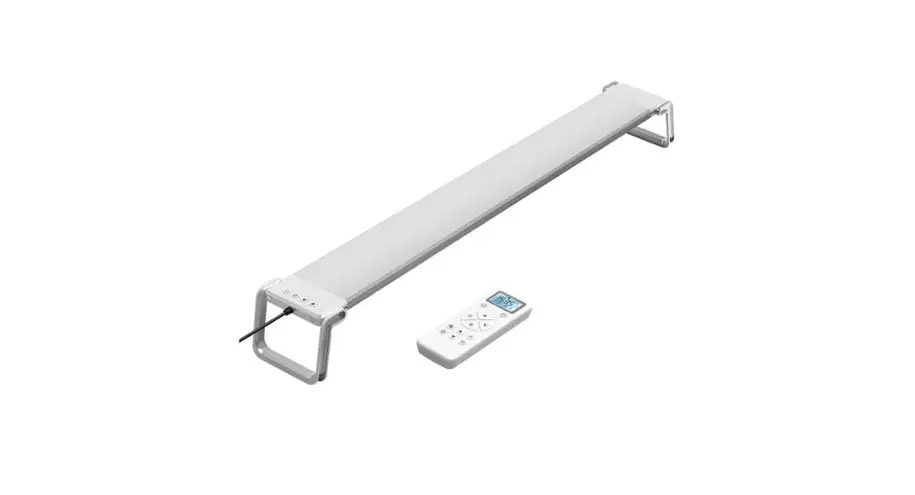
User Manual of Programmable Aquarium Light
High Performance LED light with 2.4G Wireless Solution, Be a Comfortable Lighting for your Aquarium.
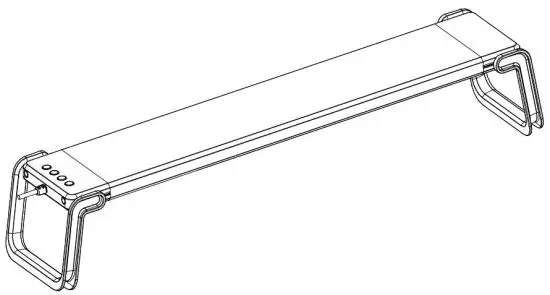
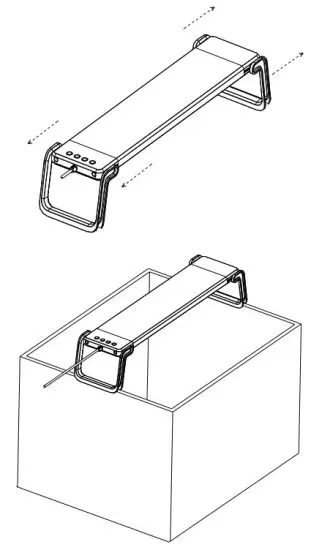
Fixture Installation Instructions
- :This product is recommended for use for freshwater or saltwater aquarium.
- : Fit on the edges of the length of the aquarium to prevent deep in the water.
- : Position the fixture over the aquarium by adjusting the legs to the proper length so that securely hold the fixture in place.
- : Connect the adapter to the connector on the side of the light fixture.
- : Plug the adapter into an acceptable outlet. be sure to incorporate a “drip loop” to prevent water droplets from running down the cord and into the outlet should any water get onto the cord.
- : The light fixture will turn on to a standard-setting and you can program the fixture to your preferred settings using remote or buttons at the end of the lamp.
| ITEM NO. | FITS AQUARIUMS | LED qty’ | POWER | PAR(AVG., | LUMENS |
| HY-18W030-RMT | 12″ (30cm) | 40 pcs | 18 watt | 23 | 1000 |
| HY-26W045-RMT | 18″ (45cm) | 80 pcs | 26 watt | 31 | 1500 |
| HY-35W060-RMT | 24″ (60cm) | 120 pcs | 35 watt | 42 | 2000 |
| HY-40W075-RMT | 30″ (75cm) | 160 pcs | 40 watt | 48 | 2300 |
| HY-50W090-RMT | 36″ (90cm) | 200 pcs | 50 watt | 65 | 2900 |
| HY-60W120-RMT | 48″ (120cm) | 280 pcs | 65 watt | 86 | 3800 |
Remote Layout

Remote instructions
Installing Batteries
- Remove the cover from the back of the remote;
- Install 2(AA) batteries;
- Close the cover in that time remote is ready for use.
Remote Connection
- Turn the power of lamp “ON”;
- Press and hold
 for 3 seconds until you see the lighting blinking. At the same time LCD displays “COd” text.
Setting the Time
- Press and hold for 3 seconds until you see the hour blinking.
- Use
 buttons to set the time on the 12/24 houres option.
 - Press the Hours will be blinking, use the buttons to set the hours.
- Press the minute will be blinking, use the buttons to set the minute.
- Press the time will be set.
Options of Lighting Scene.
- Press
 start the lighting for fish;
 - Press
 start the lighting for coral;
 - Press
 start the daylight;
 - Press
 start the moonlight;
 - Use buttons to adjust the intensity of lighting from 10% ~ 100% of each model.
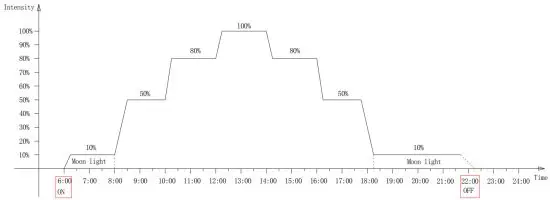
*Icon ![]() of will display in screen when executes a program of Sunrise&Sunset.
of will display in screen when executes a program of Sunrise&Sunset.
Defined the time of Sunrise.
- Press and hold
 3 seconds until the hour of “DAY-L” blinking, use the buttons to set the hours of Sunrise.
 - Pres s move to set minute of “DAY-L”, use the buttons to set the number of minutes..
- Press turn the time of Sunrise set done.
Defined the time of Sunset.
- Press and hold 3 seconds until the hour of “MOON-L” blinking, use the buttons to set the hours of Sunset.
- Press move to set minute of “MOON-L”, use the buttons to set the number of minutes..
- Press turn the time of Sunset done.
Return the default of Sunrise&Sunset.
Press and hold ![]() and
and ![]() buttons at the same time over 3 seconds till LCD displays “E5” text. the system will return the default set of Sunrise&Sunset.
buttons at the same time over 3 seconds till LCD displays “E5” text. the system will return the default set of Sunrise&Sunset.
Setting the RGBW LED color option.
- Press and hold
 adjust colors to your preference.
 - Leave button to keep your preferred color.
- Use buttons to adjust the intensity of lighting from 10% ~ 100%.
Programmable the Timer with 8 channels from L1~L8.
- Press and hold
 for 3 seconds until you see the number of “lighting intensity” in the lower right corner is blinking.
 - Use buttons to adjust the intensity of lighting from 10% ~ 100% for the “L1” timer.
- Press the button and you will see the icon of “lighting scene” is blinking. use and buttons for select lighting scenes from “Fish light/Coral light/Daylight/Moonlight” for the “L1” timer.
- Press the button you will see the hour number is blinking, use and buttons for setting the hours for the “L1” timer.
- Press the button you will see the minute number is blinking, use and buttons for setting the minute for the “L1” timer.
- Repeat the above operation finish timer of L2/L3/L4/L5/L6/L7/L8.
You can set below example of Programmable with 8 channels:
L1: at 00:00 turn on “Moon light” with 100% intensity;
L2: at 03:00 turn on “Moon light” with 50% intensity;
L3: at 06:00 turn on “Moon light” with 10% intensity;
L4: at 09:00 turn on “Fish light” with 60% intensity;
L5: at 12:00 turn on “Coral light” with 100% intensity;
L6: at 18:00 turn on “Day light” with 60% intensity;
L7: at 20:00 turn on “Moon light” with 30% intensity;
L8: at 23:00 turn on “Moon light” with 60% intensity;
*Above information for reference only.
How to be Multi-lights controlled by one remote:
- Turn the “power on” at the same time as all lights,
- Press and hold
 for 3 seconds until you see the all lighting blinking at the same time, also LCD display with “COd” text, the operation is succeeded.
Cancel Multi-lights controlled by one remote:
- Turn the “power on” at the same time as all lights,
- Press and hold for 3 seconds until all lights quickly blinking will cancel.
LIMITED WARRANTY
Warrants that this product shall be free from defective electrical components due to defects in materials or workmanship for a period of 12 months from the date of purchase.
This warranty does not apply to damage resulting from accident, misuse, abuse, lack of reasonable care, failure to follow safety and installation instructions, use of the product with non-standard electrical.
IMPORTANT SAFETY INSTRUCTIONS DO NOT UNDERWATER USE
- To avoid possible electric shock, special care should be taken since water in employed in the use of aquarium.
- If the appliance falls into the water, DO NOT reach for it!
First, unplug it and then retrieve it.
If electrical components of the appliance get wet, unplug the appliance immediately. - Do not operate any appliance if it has a damaged cord or plug.
- Use the certificated power supply only.
- Do not allow children to use.
- Indoor use only.
FCC Warning:
This equipment has been tested and found to comply with the limits for a Class B digital device, pursuant to part 15 of the FCC Rules. These limits are designed to provide reasonable protection against harmful interference in a residential installation. This equipment generates, uses, and can radiate radio frequency energy and, if not installed and used in accordance with the instructions, may cause harmful interference to radio communications. However, there is no guarantee that interference will not occur in a particular installation. If this equipment does cause harmful interference to radio or television reception, which can be determined by turning the equipment off and on, the user is encouraged to try to correct the interference by one or more of the following measures:
- Reorient or relocate the receiving antenna.
- Increase the separation between the equipment and receiver.
- Connect the equipment into an outlet on a circuit different from that to which the receiver is connected.
- Consult the dealer or an experienced radio/TV technician for help.
Caution: Any changes or modifications to this device not explicitly approved by the manufacturer could void your authority to operate this equipment.
This device complies with part 15 of the FCC Rules. Operation is subject to the following two conditions: (1) This device may not cause harmful interference, and (2) this device must accept any interference received, including interference that may cause undesired operation.
The device has been evaluated to meet general RF exposure requirements. The device can be used in portable exposure conditions without restriction.


