HDX 1501HDXA LAWN AND GARDEN SPRAYER
THANK YOU
We appreciate the trust and confidence you have placed in HDX through the purchase of this sprayer. We strive to continually create quality products designed to enhance your home. Visit us online to see our full line of products available for your home improvement needs. Thank you for choosing HDX!
Safety Information
WARNING
- This product is designed to spray chemicals that may be harmful and could cause serious personal injury if inhaled or brought into contact with the user. Failure to read and follow these instructions before use and/or misuse of this product could result in explosive failure with major injuries.
- Always test the sprayer before each use.
- Always wear long sleeve shirts, long pants, goggles, gloves, and durable shoes when using this product.
- Always read and follow the label instructions for the chemicals to be applied.
- After each use, release the pressure and clean the sprayer.
- Always release the pressure in the sprayer before servicing.
- Do not alter the sprayer or any components.
- Do not spray flammable, caustic (i.e. acids, chlorines and bleach), corrosive, heated, or self-heating solutions with this sprayer.
- Do not store liquids in the sprayer.
- Never fill above the maximum fill line on the tank.
Care and Cleaning
- Do not store chemicals in the tank. If the chemical is stored in the tank, it can clog the system as it dries and destroys the seals and other components.
- To prolong the life of the sprayer, clean the sprayer after each use. After using water-based products, rinse thoroughly with soapy water followed by clean water. Always flush out the hose and flow control.
- After spraying solvent or oil-based products, follow the chemical manufacturers’ recommended cleaning procedure. Then rinse and flush the sprayer, hose, and flow control with soapy water followed by clean water.
- To store the sprayer, remove the complete hose assembly (hose with siphon tube, wand, and flow control) from the tank.
- For proper drainage and drying, lock the flow control lever in the on position.
- Loosen the pump assembly, but leave in the tank when storing
- Store all components in a clean, dry area.
Pre-Assembly
PACKAGE CONTENTS
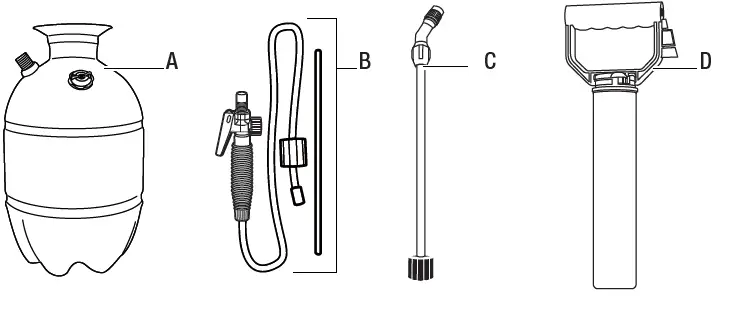
| Part | Description | Quantity |
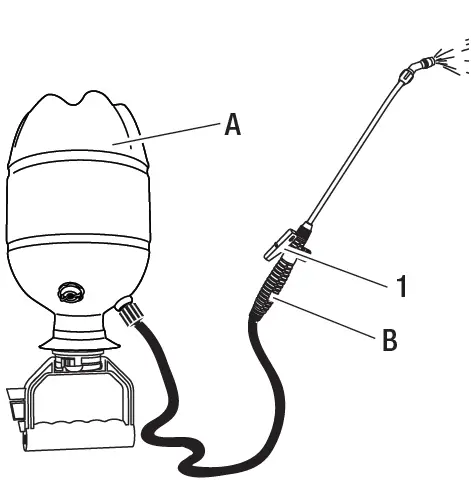
| A | Tank | 1 |
| B | Hose assembly | 1 |
| C | Wand | 1 |
| D | Pump assembly | 1 |
Assembly
Attaching the hose to the tank
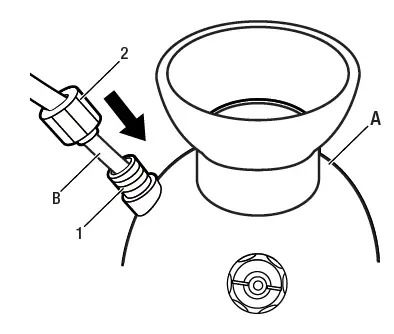
- Lubricate the black o-ring on the black hose insert (B) and then push into the threaded tank nipple (1) on the tank (A) until fully seated.
- Screw the hose nut (2) onto the threaded tank nipple (1). Firmly hand tighten and pull to ensure a tight connection.
Attaching the wand to the flow Control
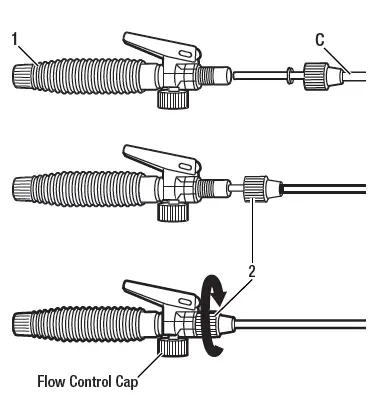
- Push the wand (C) into the flow control (1) all the way into the shoulder.
- Slide the wand nut (2) onto the flow control (1) and firmly hand tighten.
- To ensure the correct assembly, test the sprayer with water before first use.
Operation
Filling the sprayer
WARNING: Do not spray flammable, caustic (.e. acids, chlorines, and bleach), corrosive, heated, or self-heating solutions with this sprayer.
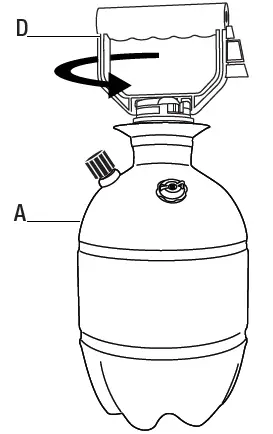
- Remove the pump assembly (D) from tank (A) by locking the pump handle down, then turning counterclockwise.
- Prepare the spray solution following the instructions listed on the chemical manufacturers’ label. Mix only the amount of solution to be sprayed and never fill the tank (A) above the maximum fill line (MAX FILL LINE).
- Screw the pump assembly (D) back into tank (A) by turning clockwise. Firmly hand tightens.
Pressurizing the sprayer
WARNING
- To prevent the ejected pump assembly and/or solution from striking and injuring you, never stand with your face or body directly over the top of the tanks when pumping or loosening the pump.
- Always close the pressure release valve when pressurizing the sprayer.

- To operate the pump (D), unlock the pump handle by turning counterclockwise. Be careful not to loosen the pump (D) from the tank (A).
- To create pressure, move the pump handle up and down until it is hard to pump.
- Lock the pump handle back into the pump assembly (D) by turning clockwise.
Operating the sprayer
- WARNING: Do not loosen or remove the flow control cap (2) while spraying. The flow control cap does not regulate or adjust pressure or liquid flow rate.
- CAUTION: Always wear long sleeve shirts, long pants, goggles, gloves, and durable shoes.

- To start spraying, squeeze the lever (1) on the flow control (B).
- To stop spraying, release the lever (1) on the flow control (B) while pulling back on the lever.
- To spray continuously, squeeze the lever (1) on the flow control (B) and slide forward to lock in place.
- If your sprayer has an adjustable cone nozzle, screw it clockwise for a fine mist and counterclockwise for a coarse stream.
Releasing pressure from the tank
WARNING
- Always release pressure in sprayer before servicing.
- Never leave a pressurized sprayer unattended.
- If your sprayer has a pressure relief valve, turn the yellow knob clockwise until all air pressure is gone.
- To release pressure from tank (A), turn tank (A) upside down, and then squeeze the lever (1) on the flow control (B) until all the air pressure is gone.
- If your sprayer is clogged and the pressure will not release using the flow control, place a rag over the top of the pump handle, covering the top of the sprayer and while firmly pushing down on the pump handle, slowly turn counterclockwise.
Maintenance
To keep the pump working smoothly and efficiently, the plunger gasket needs to be lubricated often by applying a lubricant, such as petroleum jelly, around the outside of the plunger gasket.
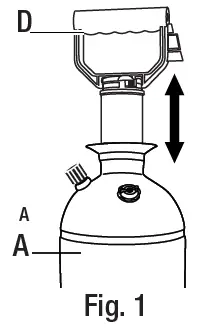
- Remove pump assembly (D) from tank (A). See Fig. 1.
- Unlock the pump handle and pull it out as far as it will go.

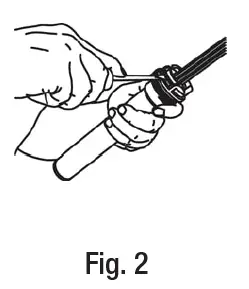
- With a flat blade screwdriver, push down on the tabs on each side of the pump to release the locking cap. See Fig. 2.
- Pull up and the handle and the plunger assembly should come out of the pump cylinder.
- Spread a small amount of lubricant on the outer edge of the plunger gasket.
- To reassemble, insert the plunger assembly into the cylinder and snap the cap back into place.
Troubleshooting
| Problem | Probable Cause | Solution |
| The spray solution or air leaks into the pump cylinder. | The check valve on the bottom of the cylinder is unable to seal properly due to dirt, residue, or damage. | Remove the pump assembly and examine the check valve. Clean if dirty; replace if necessary. For spare parts, call 1-800-253-4642 |
| The hose leaks air at the tank connection. | The tank nut is loose or the hose insert O-ring is damaged. | Unscrew hose nut from tank and ensure that the hose is pushed all the way into the tank up to the ridge in the hose. Make sure the O-ring is properly seated and not damaged. Tighten the hose tank nut or replace the hose O-ring. |
| There is a bad spray pattern or low spray volume. | The nozzle is clogged, the nozzle is tightened too fat, or the pressure is low in the sprayer. | Slowly turn nozzle counterclockwise to ensure it is open. If still low spray volume, remove the nozzle, the diffuser, and clean. Remove the wand and clean. If the wand cannot be unclogged, replace it or repressurize the tank. |
| The nozzle leaks when | The flow control is open because | Make sure level is pulled all the way to |
| the flow control is closed | the lever is locked in the on | the off position. If problem persists and/or |
| and/or the sprayer will not stop spraying. | position. | lever continues to get stuck, completely disassemble the flow control. Inspect all |
| components, clean, and lubricate all | ||
| seals, especially the white plunger inside | ||
| the flow control cap. If needed, replace | ||
| the flow control. Household petroleum | ||
| jelly can be used for lubrication. | ||
| There is a leak at the tank opening. | The pump assembly is not sealed tightly into the tank. The Cylinder O-ring is damaged. | Thoroughly clean the pump cylinder O-ring and surrounding area and apply grease or petroleum jelly to the pump O-ring. Replace the O-ring. For spare parts, call 1-800-253-4642. |
| Fluid leaks from the pressure relief valve. | The tank is over filled. | Release the pressure by following the “Releasing pressure from the Tank” instructions in the Operation section. |
| Air leaks from the pressure relief valve. | The pressure release valve is stuck in the open position. | Turn the pressure release valve counter clockwise until it clicks and reseats itself. |
| The tank is not pressurizing. | The flow control cap is open.
The hose is not fully connected to the tank. | Ensure flow control cap is closed completely.
See Problem #2 above. |
| The lid is not completely closed. | Ensure lid is turned completely clockwise. | |
| The flow control wand is not properly assembled. | Disassemble and reassemble all pieces to flow control wand, ensuring they are properly attached. |
Chemical Recommendations
Do not use
- Flammable Products (gasoline, diesel fuel, hydraulic oil, etc.)
- Hot or Boiling Liquids
- Products containing Acetone/Acetate/Acetic Acid (paint thinner, some concrete sealers)
- Highly Viscous (thick) materials (tar, high-solid paint or stain
- Paint and Stains
- Products containing Chlorine (Bleach, Pool Water, etc.)
- Strong Acids or Bases
- Strong Solvents
- Lacquers or Lacquer Thinners
- Turpentine
- Epsom Salt
- Mineral Spirits
- Vinegar
- Citrus-Based Cleaner
- Products containing Peppermint Oil or Peanut Oil
Recommended for use with
- Most commercial weed killers
- Most commercial insecticides/pesticides
- Mild cleaners
If you have any questions about whether a product fits into one of the above categories, consult the product safety warnings on the label, or contact the manufacturer.
Warranty
WHAT IS COVERED
The supplier warrants to the original purchaser only that the product purchased will continue to function as intended if used in accordance with operating instructions (under NORMAL CONSUMER USE) for the time specified as noted on the product carton. If you no longer have the carton, please contact the Customer Service Team at 1-800-253-4642 or visit www.rlflomaster.com and they will determine the length of the warranty. If the product fails to function as intended-DO NOT RETURN IT TO THE STORE call our Consumer Service Team at 1-800-253-4642 for fast service. We will, at our option, repair or replace any non-functioning parts without charge (shipping and handling charges will apply). This warranty does not apply to damage resulting from accident, misuse, neglect, alterations, operation not in accordance with instructions, commercial use, or normal wear of O-rings, seals, or gaskets. Any implied warranties, including the implied warranty or merchantability and fitness for consumer use, are limited to the duration specified on the product carton. The supplier’s liability is limited solely to the repair or replacement of the non-functioning product or part. The supplier excludes liability under this warranty for any and all incidental and consequential loss or damage. Some states do not allow limitations on how long an implied warranty lasts, or the exclusion or limitation of incidental or consequential damages, so these limitations or exclusions may not apply to you. This warranty gives you specific legal rights and you may have other rights, which vary from state to state.
Contact the Customer Service Team at 1-800-253-4642 or visit www.rlflomaster.com.
Questions, problems, missing parts?
- Before returning to the store, call Customer Service
- Year Round: 8 a.m.-7 p.m., EST, Monday-Friday,
- March 1 – August 30: 8 a.m. – 7 p.m., EST, Monday – Friday, 10 a.m. to 4 p.m., EST, Saturday
- Tel: 1-800-253-4642
- RLFLOMASTER.COM
- HOMEDEPOT.COM


