
Samsung DVD-E350 Region Free DVD Player with USB Input

Precautions

Setting up
- Refer to the identification label located on the rear of your player for its proper operating voltage.
- Install your player in a cabinet with adequate ventilation holes. (7~10cm)
- Do not block ventilation holes on any of the components for air circulation.
- Do not push the disc tray in by hand.
- Do not stack components.
- Be sure to turn all components off before moving the player.
- Before connecting other components to this player, be sure to turn them off.
- Be sure to remove the disc and turn off the player after use, especially if you will not use it for a long time.
- The mains plug is used as a disconnect device and shall stay readily operable at any time
For your safety
- This product utilizes a laser. Use of controls or adjustments or performance of procedures other than those specified herein may result in hazardous radiation exposure.
- Do not open covers and do not repair yourself. Refer servicing to qualified personal
Caution
- Your player is not intended for industrial use but for domestic purposes. Use of this product is for personal use only.
- Apparatus shall not be exposed to dripping or splashing and no objects filled with liquids, such as vases, shall be placed on the apparatus.
- Exterior influences such as lightning and static electricity can affect normal operation of this player. If this occurs, turn the player off and on again with the POWER button, or disconnect and then reconnect the AC power cord to the AC power outlet. The player will operate normally.
- When condensation forms inside the player due to sharp changes in temperature, the player may not operate correctly. If this occurs, leave the player at room temperature until the inside of the player becomes dry and operational.
Disc
- Do not clean disc using record-cleaning sprays, benzene, thinner, or other volatile solvents that may cause damage to the disc surface.
- Do not touch the disc’s bottom.
- Hold by the edges or by one edge and the hole in the center.
- Wipe the dirt away gently; never wipe a cloth back and forth over the disc.
Environmental info
- The battery used in this product contains chemicals that are harmful to the environment.
- So, dispose the batteries in the proper manner, according to federal, state, and local regulations.
The product unit accomparied this user manual is licenced under certain intellectual property rights of certain third parties. This licence is limited to private non-commercial use by end-user consumers for licenced contents. No rights are granted for commercial use. The licence does not cover any product unit other than this product unit and the licence does not extend to any unlicenced product unit or process conforming to ISO/OUR 11172-3 or ISO/ OUR 13818-3 used or sold in combination with this product unit. The licence only covers the use of this product unit to encode and/or decode audio files conforming to the ISO/OUR 11172-3 or ISO/OUR 13818-3. No rights are granted under this licence for product features or functions that do not con form to the ISO/OUR 11172-3 or ISO/OUR 13818-3.
Setup
Excellent Sound
Dolby Digital, a technology developed by Dolby Laboratories, provides crystal clear sound reproduction.
Screen
Both regular and widescreen(16:9) pictures can be viewed.
Slow Motion
An important scene can be viewed in slow motion.
Parental Control (DVD)
The parental control allows users to set the necessary level to prohibit children from viewing harmful movies such as those with violence, adult subject matter, etc.
Various On-Screen Menu Functions
You can select various languages (Audio/Subtitle) and screen angles while enjoying movies.
Description

- DISC TRAY Place the disc here.
- DISPLAY Operation indicators are displayed here.
- OPEN/CLOSE Press to open and close the disc tray.
- PLAY/PAUSE Play or pause the disc.
- POWER ON/OFF Turn on/off and the player is turned on/ off.
- USB HOST (Only DVD-E360K,E360) Connect digital still camera, MP3 player, memory stick, Card reader other removable storage devices.
- MIC (Only DVD-E360K) Connect Microphone for karaoke functions.
Remote Control
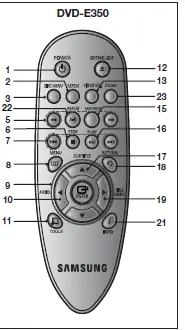
Tour of the Remote Control
- DVD POWER Button Turns the power on or off.
- REPEAT Button Allows you to repeat play a title, chapter, track, or disc.
- DISC MENU Button Brings up the Disc menu.
- RECORD Button (Only DVD-E360K) Use to Karaoke recording.
- SEARCH Buttons ( / )Allows you to search forward/backward through a disc.
- STOP Button ( ) To stop the disc
- SKIP Buttons ( / ) Use to skip the title, chapter or track.
- MENU Button Brings up the DVD player’s menu.
- ENTER/π/†,√/® Buttons This button functions as a toggle switch.
- AUDIO Button (√) Use this button to access various audio functions on a disc.
- TOOLS Button Displays the current disc mode. It also lets you access the Display function.
- OPEN/CLOSE ( ) Button To open and close the disc tray.
- VIDEO SEL. Button Changes video output mode.
- USB Button (Only DVD-E360K,E360) To change device which access to USB device.
- MARKER Button
- PLAY Button ( ) Begins disc play.
- SUBTITLE/(π) Button
- RETURN Button Returns to a previous menu
- TITLE MENU Button (®) Brings up the Title menu.
- KARAOKE (†) Button (Only DVD-E360K) To acces karaoke menu (keycon, mic volume, echo).
- INFO Button Used to displays playback info banner.
- REPEAT A-B Button (Only DVD-E360,E350) Allows you to repeat A-B disc.
- ZOOM Button (Only DVD-E350) Enlarges the DVD Picture.
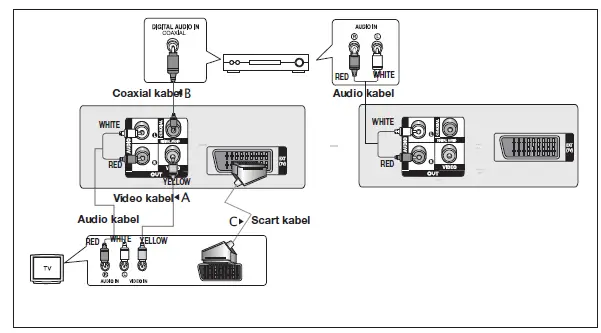
Connections
Choosing a Connection
The following shows examples of connections commonly used to connect the DVD player with a TV and other components.
Before Connecting the DVD Player
- Always turn off the DVD player, TV, and other components before you connect or disconnect any cables.
- Refer to the user’s manual of the additional components you are connecting for more information on those particular components.
Connecting to a TV (For Video)
- Using video/audio cables, connect the VIDEO (yellow)/AUDIO (red and white) OUT terminals on the rear of the DVD player to the VIDEO (yellow)/AUDIO (red and white) IN terminals of TV.
- Turn on the DVD player and TV.
- Press the input selector on your TV remote control until the Video signal from the DVD player appears on the TV screen.
Connection to an Audio System (2 Channel Amplifier, Dolby Digital, MPEG2)
- Using the audio cables, connect the AUDIO (red and white) OUT terminals on the rear of the DVD player to the AUDIO (red and white) IN terminals of the Amplifier. If using a coaxial cable, connect the DIGITAL AUDIO OUT (COAXIAL) terminal on the rear of the DVD player to the DIGITAL AUDIO IN (COAXIAL) terminal of the Amplifier.
- Using the video signal cable(s), connect the VIDEO terminals on the rear of the DVD player to the VIDEO terminals of your TV
- Turn on the DVD player, TV, and Amplifier.
- Press the input select button of the Amplifier to select external input in order to hear sound from the
- DVD player. Refer to your Amplifier’s user manual to set the Amplifier’s audio input.
Connecting to a TV (SCART)
- Using Scart cable, connect to SCART terminal on the rear of the DVD player to the SCART IN terminals of TV.
- Turn on the DVD player and TV.
- Press the input selector on your TV remote control until the Video signal from the DVD player appears on the TV screen.

Basic functions
Playing a Disc
Turn on your TV and set it to the correct Video Input by pressing TV/VIDEO button on the TV remote control. – If you connected an external Audio System, turn on your Audio System and set it to the correct Audio Input. After plugging in the player, the first time you press the DVD POWER button, this screen comes up: If you want to select a language, press the π/† button, and then press the ENTER button. (This screen will only appear when you plug in the player for the first time.)If the language for the startup screen is not set, the set-tings may change whenever you turn the power on or off. Therefore, make sure that you select the language you want to use.Once you select a menu language, you can change it by pressing the ®|| button on the front panel of the unit for more than 5 seconds with no disc in the unit. Then the SELECT MENU LANGUAGE window appears again where you can reset your preferred language.
Advanced functions
To play back using aspect ratio (DVD)
- During play, press the TOOLS button on the remote control.
- Press the π/† buttons to select EZ icon. Each time you press the √/® buttons, the screen size changes. For graphics of the screen sizes and lists of the sequences in which
- the sizes change, see the next column.
- Press the RETURN button to exit EZ View.
CD Ripping (Only DVD-E360K, E360)
- Open the dics tray. Place the Audio CD (CD DA) disc on the tray, and close the tray. Connect the
- USB device to the USB port on the front of the unit. Press the USB button.
- Press the TOOLS button to display the Ripping screen.
- Press the π/† buttons, then press the ENTER button to select files for ripping.
- To deselect files, press ENTER button again.
- Press the √ and † button to select START, then press the ENTER button begin ripping.
- The Ripping menu contain the following buttons :
- Mode (Fast/Normal)
- Bitrate, press ENTER to change : 128kbps ➞ 192kbps ➞ 128kbps.
- Standard : 128kbps
- Better Quality : 192kbps
- Device selection, press ENTER to change between partitions on the USB device (max 4).
- Select – Unselect, press ENTER to change from Select all (files) or Select none
Picture CD Playback
- Select the desired folder.
- Press the π/† buttons to select a Picture file in the clips menu and then press the ENTER button.
Rotation
- Press the TOOLS button to select Rotate, and then press ENTER.
- Each time the √/® buttons are pressed, the picture rotates 90 degrees clockwise.
- Each time the π button is pressed, the picture will reverse to the upside down to show a mirror image.
- Each time the † button is pressed, the picture will reverse to the right side to show a mirror image.
Zoom
- Press the TOOLS button to select Zoom, and then press ENTER.
- Each time ENTER button is pressed, the picture is enlarged. Zoom mode : X1-X2-X3-X4-X1.
- Press the √/®/π/† buttons to move the enlarged picture so you can view different portions.
Slide Show
- When you press the PLAY at JPEG file, it will go to full screen mode and automatically slide show.
CD-R JPEG Disc
- Only files with the “.jpg” and “.JPG” extensions can be played.
- If the disc has not been closed during the recording phase,(ie has not been finalised) it will take longer to start playing and not all of the recorded files may be played.
- Only CD-R discs with JPEG files in ISO 9660 or Joliet format can be played.
- The name of the JPEG file may not be longer than 8 characters and should contain no blank spaces or special characters (. / = +).
- Only a consecutively written multi-se ssion disc can be played.If there is a blank segment in the multi-session disc, the disc can be played only up to the blank segment.
- A maximum of 500 images can be stored on a single CD.
- Kodak Picture CDs are recommended.
- When playing a Kodak Picture CD, only the JPEG files in the pictures folder can be played.
- Kodak Picture CD: The JPEG files in the pictures folder can be played automatically.
- Konica Picture CD: If you want to see the Picture, select the JPEG files in the clips menu.
- Fuji Picture CD: If you want to see the Picture, select the JPEG files in the clips menu.
- QSS Picture CD: The unit may not play QSS Picture CD.
- If the number of files in 1 Disc is over 500, only 500 JPEG files can be played.
- If the number of folders in 1 Disc is over 500, only JPEG files in 500 folders can be played
Karaoke functions
Operation Sequence
- Connect the terminals Mixed Audio Out to TV or Amplifier.
- Connect the microphone plug to Mic (microphone) and set Karaoke score to On. When MIC is connected and Karaoke score is On, the karaoke functions can be used.
Karaoke Scoring (Score)
The scoring will appear as :
- The microphone is connected and Karaoke score is On.
- At the end of each chapter/title of karaoke disc.
- If the DVD karaoke have any information on the scoring drive.
- Karaoke score will appear at the end of time for each chapter/title for about 6s.
Karaoke Sound Recording
- Insert USB storage media into USB jack and then connected the microphone plug to Mic.
- To star karaoke recording, choose one of DVD file, then press RECORD button.
- When recording, user can only press STOP button and PAUSE button to cancel the recording.
- If user do cancelation, then file result will be saved.
Reference
Firmware upgrade
Introduction
Upgrading the Firmware will keep your DVD player up-to-date. The latest firmware version for this unit is provided on the Samsung Website (www.samsung.com).
| Function | Description |
| Skip (|k or K|) | During play, press the |k or K| button, it moves to next or previous track. |
| Search (k or K) | During play, press the SEARCH (k or K) button and press again to search at a faster speed. Allows you to search at a faster speed in an AVI file. (2X, 4X, 8X, 16X, 32X) |
| Slow Motion Play | During play, press the PLAY ( ( ) button, and then press the SEARCH (K) button to view video at a slower speed. (1/2, 1/4, 1/8, 1/16) |
| ZOOM | 1X/2X/3X/4X/Normal in order. |
How to make an upgrade disc
- You must burn the latest firmware version onto a blank CD-R or CD-RW disc:
- Download a new file from Samsung’s website (www.samsung.com) Download Center.
- Write the file to disc using the data disc setting of your disc burning software or copy the file into USB
Upgrade procedure
- Open the disc tray of your DVD Player. Place the burned disc on the tray. then close the tray. If you use USB device, connect it to the USB port on the front of the unit.
- The Firmware upgrade screen will appear.
- Press the ENTER or PLAY button to start the upgrade.
- Press any other buttons on the remote control or eject the disc to cancel the upgrade.
- During the firmware upgrade process, the tray will open.
- Please remove the disc and wait for about 2 minutes.
- If the DVD player was successfully updated, the unit will turn off, then turn on manually by pressing power button.
- When the unit turns on, the Select Menu Language screen will appear.
- Press the π/† buttons to select the desired language, and then press the ENTER button..
Troubleshooting
| Problem | Action |
| The screen is blocked. | • Press the ®|| button (in front panel) for more than 5 seconds under no disc inside. All setting will revert to factory settings. |
| Forgot password. | • Press the ®|| button (in front panel) for more than 5 seconds under no disc inside. All setings including the password will revert to the factory settings. Don’t use this unless absolutely necessary. |
Specifications
|
General | Power Requirements | AC110~240V, 50/60Hz |
| Power Comsumption | For the power supply and power consumption, refer to the label attached to the product | |
| Weight | 1.10 Kg | |
| Dimensions | 300mm(W) X 208mm(D) X 42mm(H) | |
| Operating Temperature Range | +5ºC to +35ºC | |
| Operating Humidity Range | 10 % to 75 % | |
|
Video Output | Composite Video | 1 channel : 1.0 Vp-p (75 W load) |
|
Scart Jack | R(Red) : 0.7 Vp-p (75 W load) G(Green) : 0.7 Vp-p (75 W load) B(Blue) : 0.7 Vp-p (75 W load) Composite Video : 1.0 Vp-p (75 W load) Luminance Signal : 1.0 Vp-p (75 W load) Color Signal : 0.3 Vp-p (75 W load) | |
|
Audio Output | Output terminal | 2 CH |
| Maximum Output Level | 2Vrms | |
| Frequency Response | 20 Hz to 20 kHz | |
| Digital Audio Out | Coaxial terminal (S/PDIF) |
Contact SAMSUNG WORLD WIDE
| Area | Contact Centre ( | Web Site |
| ALBANIA | 42 27 5755 | www.samsung.com |
| AUSTRIA | 0810 – SAMSUNG (7267864, € 0.07/min) | www.samsung.com |
| BELGIUM | 02-201-24-18 | www.samsung.com/be (Dutch) www.samsung.com/be_fr (French) |
| BOSNIA | 05 133 1999 | www.samsung.com |
| BULGARIA | 07001 33 11 | www.samsung.com |
| CROATIA | 062 SAMSUNG (062 726 7864) | www.samsung.com |
| CZECH | 800 – SAMSUNG (800-726786) | www.samsung.com |
| DENMARK | 70 70 19 70 | www.samsung.com |
| FINLAND | 030 – 6227 515 | www.samsung.com |
| FRANCE | 01 48 63 00 00 | www.samsung.com |
| GERMANY | 01805 – SAMSUNG(726-7864 € 0,14/Min) | www.samsung.com |
| CYPRUS | 8009 4000 only from landline | www.samsung.com |
| GREECE | 80111-SAMSUNG (80111 726 7864) only from land line (+30) 210 6897691 from mobile and land line | www.samsung.com |
| HUNGARY | 06-80-SAMSUNG(726-7864) | www.samsung.com |
| ITALIA | 800-SAMSUNG(726-7864) | www.samsung.com |
| KOSOVO | +381 0113216899 | www.samsung.com |
| LUXEMBURG | 261 03 710 | www.samsung.com |
| MACEDONIA | 023 207 777 | www.samsung.com |
| MONTENEGRO | 020 405 888 | www.samsung.com |
| NETHERLANDS | 0900-SAMSUNG (0900-7267864) (€ 0,10/Min) | www.samsung.com |
| NORWAY | 815-56 480 | www.samsung.com |
| POLAND | 0 801-1SAMSUNG(172-678) +48 22 607-93-33 | www.samsung.com |
| PORTUGAL | 808 20-SAMSUNG (808 20 7267) | www.samsung.com |
| ROMANIA | 08010 SAMSUNG (08010 726 7864) only from landline (+40) 21 206 01 10 from mobile and land line | www.samsung.com |
| SERBIA | 0700 Samsung (0700 726 7864) | www.samsung.com |
| SLOVAKIA | 0800 – SAMSUNG(0800-726 786) | www.samsung.com |
| SPAIN | 902 – 1 – SAMSUNG (902 172 678) | www.samsung.com |
| SWEDEN | 0771 726 7864 (SAMSUNG) | www.samsung.com |
| Switzerland | 0848 – SAMSUNG(7267864, CHF 0.08/min) | www.samsung.com/ch www.samsung.com/ch_fr (French) |
| U.K | 0330 SAMSUNG (7267864) | www.samsung.com |
| EIRE | 0818 717100 | www.samsung.com |
| LITHUANIA | 8-800-77777 | www.samsung.com |
| LATVIA | 8000-7267 | www.samsung.com |
| ESTONIA | 800-7267 | www.samsung.com |
Correct disposal of batteries in this product
(Applicable in the European Union and other European countries with separate battery return systems.) This marking on the battery, manual or packaging indicates that the batteries in this product should not be disposed of with other household waste at the end of their working life. Where marked, the chemical symbols Hg, Cd or Pb indicate that the battery contains mercury, cadmium or lead above the reference levels in EC Directive 2006/66. If batteries are not properly disposed of, these substances can cause harm to human health or the environment. To protect natural resources and to promote material reuse, please separate batteries from other types of waste and recycle them through your local, free battery return system.
Correct Disposal of This Product
(Waste Electrical & Electronic Equipment) (Applicable in the European Union and other European countries with separate collection systems) This marking on the product, accessories or literature indicates that the product and its electronic accessories (e.g. charger, headset, USB cable) should not be disposed of with other household waste at the end of their working life. To prevent possible harm to the environment or human health from uncontrolled waste disposal, please separate these items from other types of waste and recycle them responsibly to promote the sustainable reuse of material resources. Household users should contact either the retailer where they purchased this product, or their local government office, for details of where and how they can take these items for environmentally safe recycling. Business users should contact their supplier and check the terms and conditions of the purchase contract. This product and its electronic accessories should not be mixed with other commercial wastes for disposal.
FAQS
voltage 110 – 240? or just 110?
Yes it is world wide compatible so it works with 110, 220 and 240
Does it play Palsecam
Sorry, never heard of Palsecam. This model plays DVDs from any Region, do not know if Palsecam is an indicator of any particular Region.
have a Curtis mathis tv that is about 20 years old. it has the three input cord. would this work on this tv.?
If your “3 input cord” means that you have three separate inputs, 1 for LEFT audio(White), 1 for RIGHT audio(Red) and 1 for VIDEO
I just bought this. Played 2 dvds that were not region 1. Both were in black and white only, and both had spotty image. What’s wrong?
When I bought this I had to buy different connection wires from walmart. I think I got the wires that have the white red and yellow cords.
I want to purchase to use in the Netherlands, will it be able to be plugged in?
Yes, this unit comes with the global plug kit! It will work in the Netherlands
is this karaoke machine come with remote control?
Yes. There is remote control.
Does this unit support normal karaoke functions with Chinese karaoke DVDs?
yes, DVD-Player support karaoke functions but don’t know if it support chinese. Y don’t use chinese karaoke DVDs.
Is Samsung DVD player multi region?
Product detailsProduct details. It is guaranteed to play both PAL/NTSC DVDs from any Country or any Region 0-6, DVD, DVD±R,DVD±RW, CD, CD-R/RW, MP3, WMA, JPEG, MPEG-4.
Are there any DVD players that play all regions?
The Panasonic DVD-S700 plays discs from all over the world. Support for Dolby Digital audio as well as a USB port for video, music, and image file playback are all included features.
Are USB DVD drives region-free?
The simple answer is no, as each DVD drive must include only one region indicator. Europe has a different region code than North America
Can I change my DVD player to multi region?
Turn your DVD or Blu-ray Player on and make sure there’s no disc inside. The region can’t be changed if there’s a disc in there.
How do you break a region lock on a DVD?
Insert the DVD into the disc drive of your computer and launch the DVD ripper. Click the “DVD Disc” button and the DVD ripper will automatically detect the region-locked DVD
Can you change a DVD region code?
The region code can be changed up to four times. If a new region code is needed the DVD/CDROM drive will need to be replaced. Replacement of the drive is not covered under the warranty.
How many times can you change DVD region?
You can set the region code for your DVD drive only five times (including the original setting)
Why did Samsung stop making DVD players?
One of the reasons for pulling out could be that the existing 4K players’ format support has lagged behind the rest of the industry


