![]() INSTALLATION AND OPERATION INSTRUCTIONS
INSTALLATION AND OPERATION INSTRUCTIONS
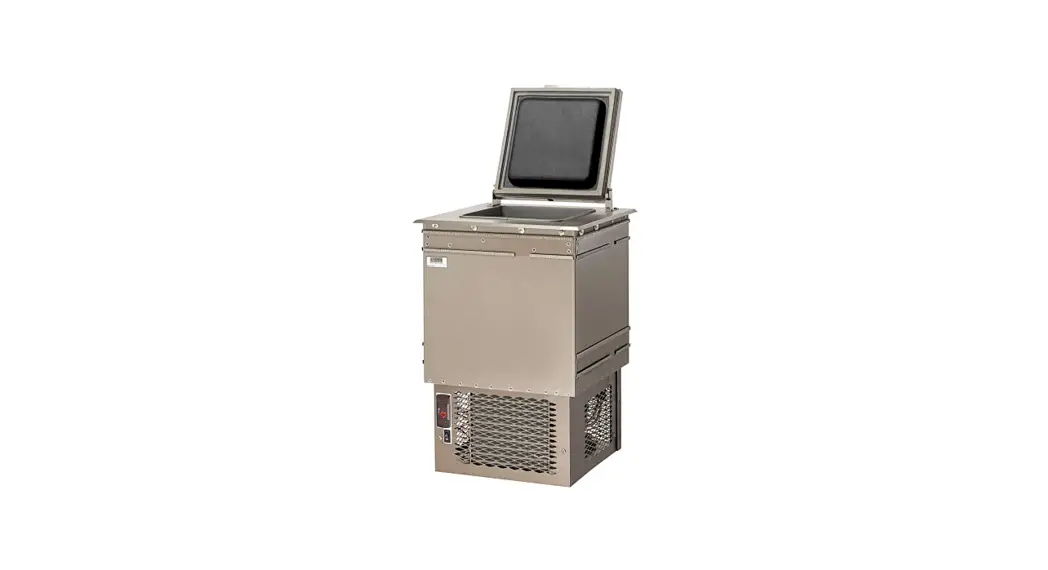
PERLICK ICE CREAM CABINET
MODEL
8000B![]() R290 Hydrocarbon Refrigerant
R290 Hydrocarbon Refrigerant
Instruction Manual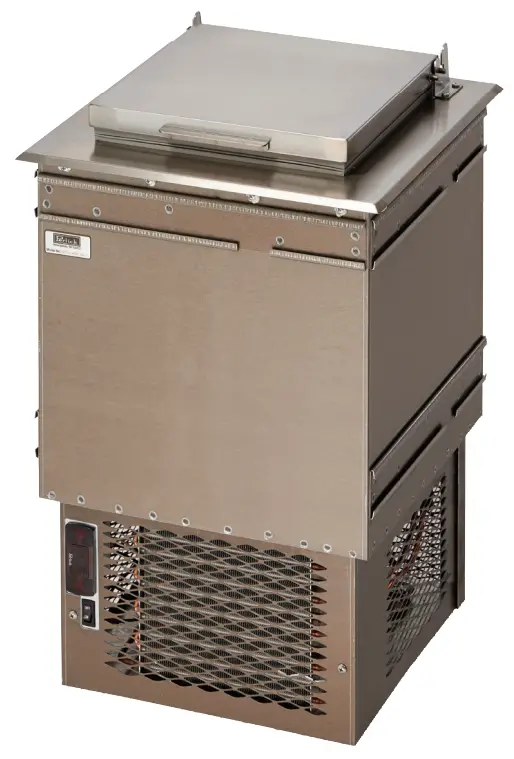
GENERAL INFORMATION
Introduction
Congratulations on your purchase of a Perlick commercial underbar product. This manual has been prepared to assist you in the installation of your cabinet and to acquaint you with its operation and maintenance.
This manual has been prepared to assist you in the installation of your Ice Vault and to acquaint you with its operation and maintenance.
We dedicate considerable time to ensure that our products provide the highest level of customer satisfaction. If service is required, your dealer can provide you with a list of qualified service agents. For your own protection, never return merchandise for credit without our approval.
We thank you for selecting a Perlick product and assure you of our continuing interest in your satisfaction.
Warranty
To register your product, visit our web site at www.perlick.com. Click on “Commercial”, then “Service”.
Click on the link “Warranty Registration Form”. You must complete and submit this form or the installationdate will revert back to the ship date.
Please record the purchase date and the dealer’s name, address and telephone number below.
Model Number: ___________________________
Serial Number: ____________________________
Purchase Date: ____________________________
Dealer Name & Address_____________________
Phone Number____________________________
SAFETY
PLEASE READ all instructions completely before attempting to install or operate the unit. Take particular note of the DANGER, WARNING and CAUTION information in the manual. The information is important for the safe and efficient installation, operation and care of your Perlick unit.![]() DANGER Indicates a hazard that WILL result in serious injury or death if precautions are not followed.
DANGER Indicates a hazard that WILL result in serious injury or death if precautions are not followed.![]() WARNING Indicates a hazard MAY cause serious injury or death if precautions are not followed.
WARNING Indicates a hazard MAY cause serious injury or death if precautions are not followed.![]() CAUTION Indicates a hazard where minor or moderate injury may occur if precautions are not followed.
CAUTION Indicates a hazard where minor or moderate injury may occur if precautions are not followed.
NOTICE Indicates that property damage may occur if warnings or instructions are not followed.
IMPORTANT!
Read and understand all information in this manual before attempting the installation.
All plumbing and electrical work must be performed by a qualified technician and conform to all applicable state and local codes.
SPECIFICATIONS
| JOB | |
| AREA | |
| ITEM NO. | |
| MODEL NO. |
8000B
| MODEL NUMBERS | 8000B | |
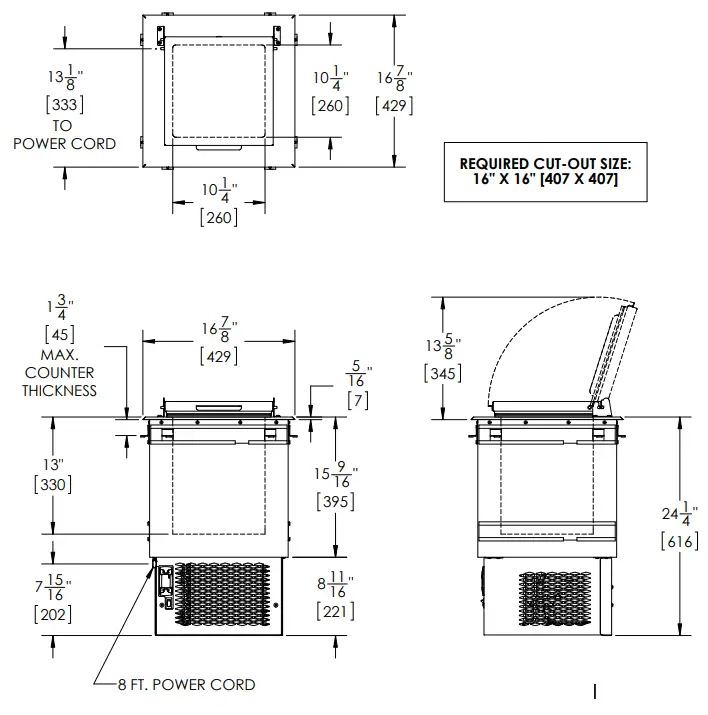
| EXTERIOR CABINET DIMENSIONS | Height – in. (mm) | 26-3/8 (670) |
| Width – in. (mm) | 16-7/8 (429) | |
| Depth – in. (mm) | 16-7/8 (429) | |
| INERNAL NET VOLUME – cubic ft. (liters) | Well Dimensions: 13″ [330] H x 10-1/4″ [260] W x 10-1/4″ [260] D | |
| SHIPPING WEIGHT LBS. (KG.) | 90 (41) | |
| CABINET CONSTRUCTION (INTERIOR) | All models have stainless steel walls and base. | |
| CABINET CONSTRUCTION (EXTERIOR) | 20 gauge stainless steel top and removable hinged door lid | |
| DOORS LID AND HARDWARE | Removable hinged door lid | |
| PLUMBING | No drain required. | |
| INSULATION | 2 inch foamed-in-place, environmentally friendly Ecomate® polyurethane insulation. Methyl Formate C2H402 Blowing Agent | |
| VENTILATION | For proper air flow allow a minimum of at least 2.5″ on the left side, 2.5″ on the right side, 4.5″ on the rear side, and 6″ between bottom of freezer and the the floor. In addition to those clearances above, a minimum 15” X 15” opening to fresh air source is require to allow for proper air circulation around the unit. | |
| TEMPERATURE SPECIFICATIONS | Factory Setpoint – °F [°C] | 0 [-17.7] |
| Adjustable Setpoint Range – °F [°C] | -15 to 10 [-26.1 to -12.2] | |
| ELECTRICAL SPECIFICATIONS | Supply | 115 VAC/60 Hz/1 Ph |
| Running Load Amps | 1.0 Amps | |
| Power Cord | 8-foot length with NEMA 5-15 plug. | |
| Thermostat | NSF Listed electronic control. | |
| REFRIGERATION SPECIFICATIONS | Expansion Device | Capillary Tube |
| Refrigerant | R290 | |
| Refrigerant Charge (g) | 55g | |
| Compressor H.P. | 1/6 H.P. | |
| Total Heat of Rejection At 75°F ambient (BTU/h) | 205 BTU/hr | |
Preparing the Cabinet for Use
UNCRATING AND INSPECTION
Remove all crating material before operating this cabinet. Carefully inspect cabinet for potential hidden damage. If damage is discovered, file your claim immediately with the transportation company. Perlick is not responsible for damage in transit. Do not discard cabinet legs.
![]() DANGER
DANGER
Do not use or store flammable liquids (ie; gasoline) or vapors near the appliance to avoid fire.
CAUTION – RISK OF FIRE OR EXPLOSION. DISPOSE OF PROPERLY IN ACCORDANCE WITH FEDERAL OR LOCAL REGULATIONS. FLAMMABLE REFRIGERANT USED.
P/N:1019364
DANGER – RISK OF FIRE OR EXPLOSION. FLAMMABLE REFRIGERANT USED. DO NOT USE MECHANICAL DEVICES TO DEFROST REFRIGERATOR. DO NOT PUNCTURE REFRIGERANT TUBING
P/II:1019365
REFRIGERANT
All models covered in this user manual are manufactured using refrigerant R290 (Propane).
R290 is a hydrocarbon. This refrigerant is flammable and is only allowed for use in appliances which fulfill the requirements of UL 471 (To cover potential risk originated from the use of flammable refrigerants). Consequently, R290 is only allowed to be used in refrigerating appliances which are designed for this refrigerant and fulfill the above-mentioned standard.
- R290 is heavier than air. The concentration will always be highest at floor level.
- The explosion limits are as follows:
– Lower Limit: 1.7% by vol. (37 g/m3)
– Upper Limit: 9.5% by vol. (177 g/m3)
– Ignition Temperature: 470 °C
![]() DANGER
DANGER
Take caution when handling, moving and using the product to avoid damaging the refrigerant tubing or increasing the risk of a leak.![]() WARNING
WARNING
All service work shall be performed by factory authorized service personnel and all component parts shall be replaced with like components to minimize the risk of possible
ignition due to incorrect parts or improper service.
![]() CAUTION If service is necessary, repair work must be performed by a Perlick authorized servicer. Work done by unqualified individuals could potentially be dangerous and will void the warranty.
CAUTION If service is necessary, repair work must be performed by a Perlick authorized servicer. Work done by unqualified individuals could potentially be dangerous and will void the warranty.
Uncrating and Inspection
Remove all crating material before operating this cabinet. Carefully inspect cabinet for hidden damage.
If damage is discovered, file your claim immediately with the transportation company. Perlick is not responsible for damage in transit.
ELECTRICAL
The cabinet must be connected to a separately fused power source (see Electrical Specification Plate affixed to unit) in accordance with National and Local electrical codes.
![]() CAUTION Do not attempt to operate the equipment on any other power source than that listed on the Electrical Specification Plate.
CAUTION Do not attempt to operate the equipment on any other power source than that listed on the Electrical Specification Plate.
NOTICE This product contains blown foam insulation using blowing agent R-611 (Methyl Formate). The foam in this product does not contain HFC’s, CFC’s, or HCFC’s.
PLACING THE CABINET
IMPORTANT: The unit must NOT be totally enclosed. In addition to the clearances required around the condensing unit below, there must be at least one opening (minimum size 15”X15”) to allow for air circulation . This is important to ensure that the hot air that is being exhausted from the unit has a place to escape and allow fresh air in.
The condenser and cabinet front must be provided with a minimum of two inches air space. Be sure to provide access so front cover of drop-in ice cream cabinet can be removed to clean the condenser. Other required minimum installation clearances are: 2.5” on left side, 2.5” on right side, 4.5” on rear side, and 6” between bottom of freezer and floor.
After placing the cabinet into its initial operation, allow about 24 hours for the cabinet to reach and maintain proper temperature.
How To Operate
COOLING SYSTEM
This cabinet maintains temperatures from the cold walls of the storage compartment. If excessive frost accumulates on the walls, remove the plug from the electrical outlet. Never use a sharp instrument to break ice from the cabinet walls.
Digital Temperature Control
To display the Set point values press the ![]() key when the ‘SET’ label is displayed. The Set point value appears on the display. To change the Set point value, press the
key when the ‘SET’ label is displayed. The Set point value appears on the display. To change the Set point value, press the ![]() and
and ![]() keys within 15 seconds. Press
keys within 15 seconds. Press ![]() to confirm the modification.
to confirm the modification.
The condenser fan motor turns off and on with compressor. The evaporator fan motor runs continuously.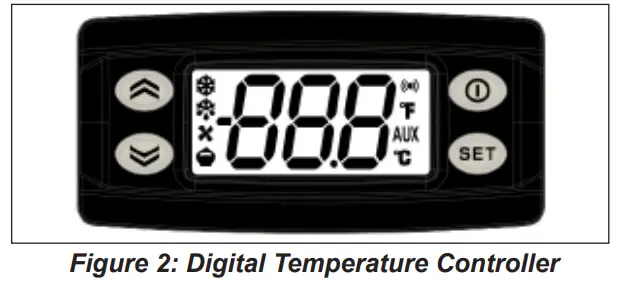
OILING
The system is sealed and the compressor requires no oiling.
Cleaning
Condenser![]() DANGER
DANGER
Flammable Refrigerant.
Risk of fire or explosion.
Do not damage refrigeration tubes.
- The condenser (located behind the front grille) should be inspected every 30 days, and cleaned, if necessary. Condenser should be cleaned using a soft bristled brush and vacuum. Failure to keep the condenser clean will cause a loss in condensing unit efficiency, or compressor failure.
Cabinet
Use a damp cloth with mild detergent and water to clean the inside and outside of the cabinet. Dry thoroughly.
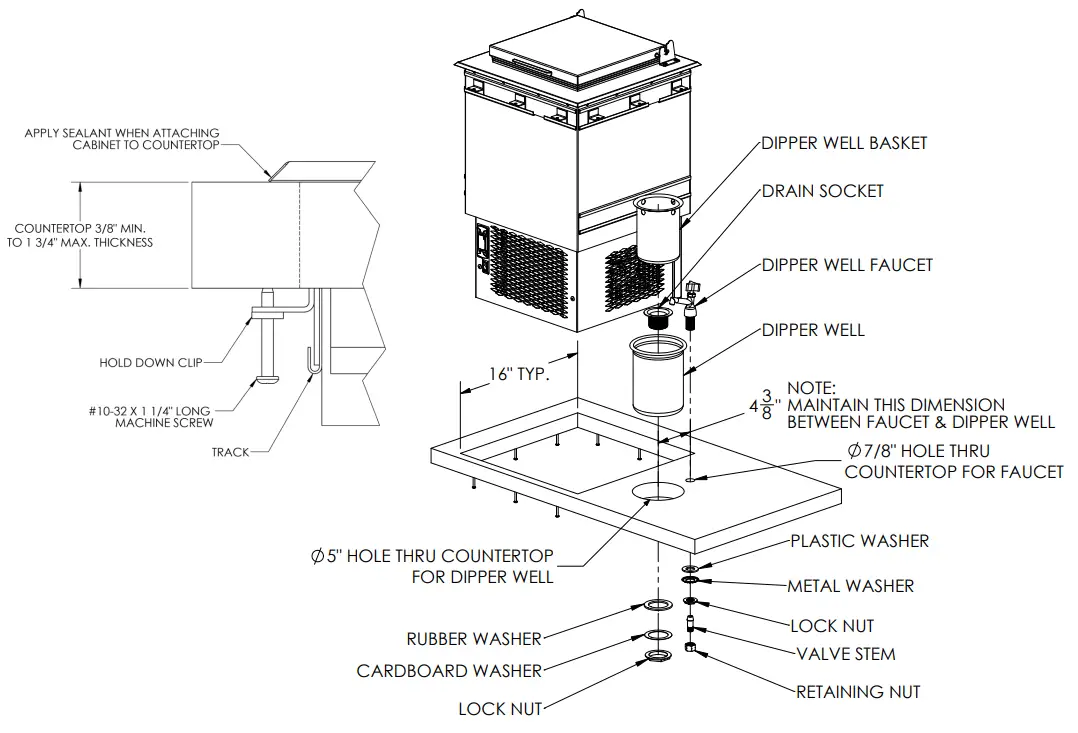
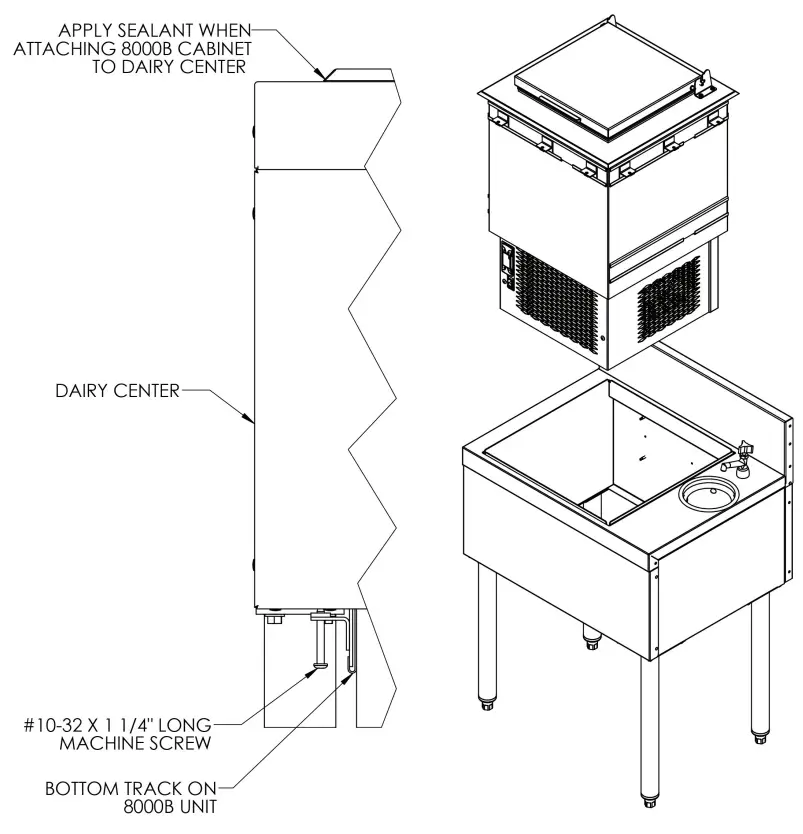
Installation of 8000B
Installing Into A Countertop
- Cut a 16” (407mm) x 16 (407mm) square hole in the countertop for the drop-in ice cream cabinet.
NOTE: If 8000B Dipper Well and Faucet Kit are also being installed, cut the two (2) round holes required. (Access from bottom and sides is needed to secure unit to countertop). - Apply 1/4” (6mm) diameter bead of sealant (supplied) to bottom outer edge of top flange as shown in cross sections.
- Insert ice cream cabinet into opening as shown, making sure there are no voids in sealant where top flange meets the countertop.
- After ice cream cabinet is in position, from underneath, install the (3) hold down clips in each upper track through slots as shown in cross sections in approximate positions shown below.
- With uniform pressure, tighten screws in hold down clips evenly to ensure a positive seal to the countertop.
- Remove exposed excess sealant from top flange and countertop.
- The faucet and drain area are to be connected to comply with local codes.
8000BB DROP-IN ICE CREAM FREEZER COUNTERTOP INSTALLATION
NOTE: AFTER LOWERING ICE CREAM UNIT INTO POSITION, POSITION 3 HOLD DOWN CLIPS INTO EACH TRACK.
Installing Into A Topshelf Underbar Stainless Steel Module
- A 16” (407mm) x 16 (407mm) square hole has been provided in the top of the TS24DC-A cabinet for the drop-in ice cream cabinet.
- Apply 1/4” (6mm) diameter bead of sealant (supplied) to bottom outer edge of top flange as shown in cross secitons.
- Insert ice cream cabinet into opening as shown, making sure there are no voids in sealant where top flange meets the countertop.
- After ice cream cabinet is in position, from underneath, install (3) hold down clips in tracks in approximate positions shown below.
- With uniform pressure, tighten screws in hold down clips evenly to ensure a positive seal.
- Remove exposed excess sealant from top flange and workboard.
- The faucet and drain area are to be connected to comply with local codes.
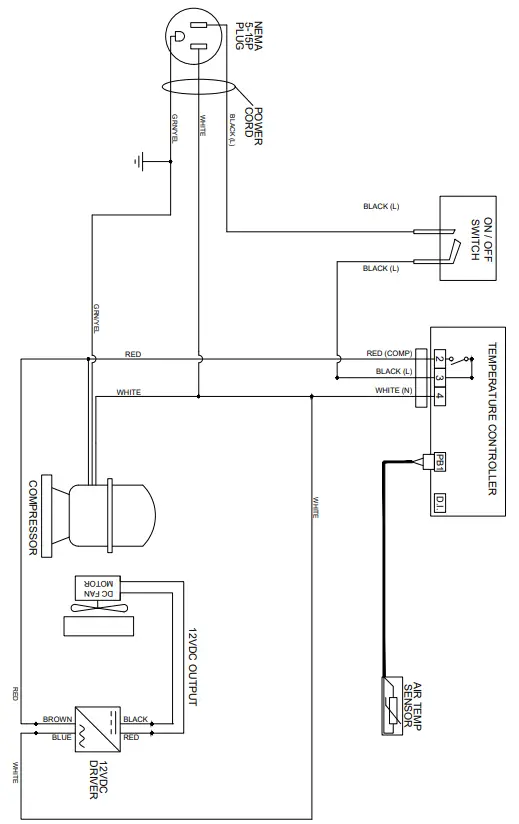
Wiring Diagram
Replacement Parts
MODEL NOS. 8000B
| Description | Part # |
| Replacement compressor, R290 | 1019724 |
| DC Fan, Condenser | 68872 |
| Power supply DC | 68758 |
| Condenser coil | 68927 |
| Cover assembly | 68881 |
| Left hinge bracket | 70060-1 |
| Right hinge bracket | 70059-1 |
| Mounting stud | C27073-1 |
| Digital temperature controller | 1028315 |
| Breaker strip | C25181-1 |
| Back unit cover | 68933-1 |
| Front & side unit cover | 68934-1 |
| Hold-down clip | C27476 |
| On/Off switch | 1018086 |
| Temperature Probe | 1023903 |
| Drier | 63718 |
Items Not Shown
| Power cord & Wiring harness | 1028207 |
| Suction line and capillary tube assembly | 1027764 |
| Refrigerant charge (grams R290) | 55g |
Spec Drawings
Notes______________________
Perlick is committed to continuous improvement. Therefore, we reserve the right to change specifications without prior notice
![]()
8300 West Good Hope Road
Miwaukee, WI 53223
Toll Free 800.558.5592
Fax 414.353.7069
www.perlick.com
Form No. Z2643
Rev. 11.02.21


