![]()
User Manual
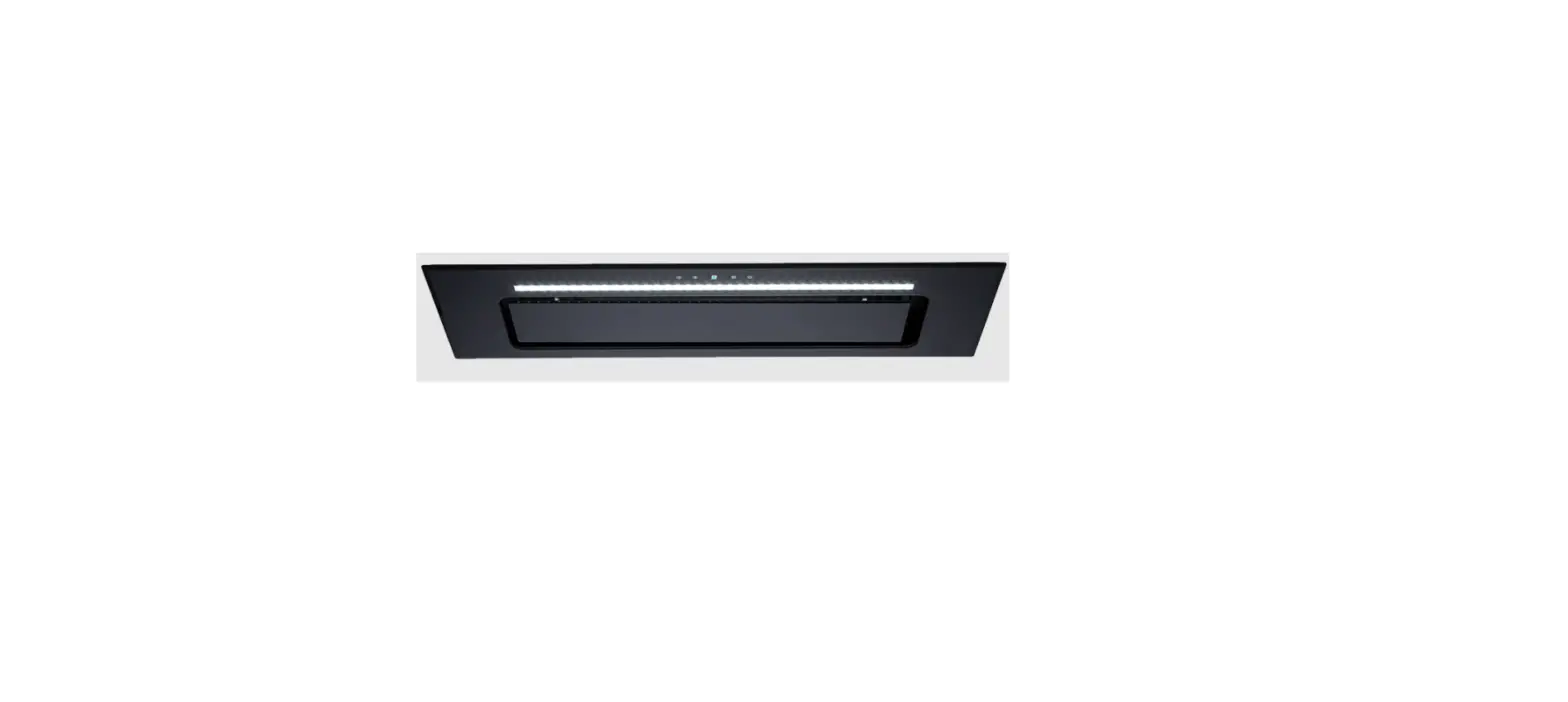
90cm Glass Under Cupboard Rangehood
UCG90B & UCG90W
Dear Customer,
We thank you for choosing this quality appliance and hope you enjoy many years of reliable service.
Please ensure this manual is read carefully before installation and use.
Keep this manual in a safe and accessible location should future reference be required.
Regards
Home Appliances
NOTICE
- Thank you for choosing our canopy rangehood.
Please read the instruction manual carefully before use. - The installation work must be undertaken by a qualified and competent installer.
- The manufacturer disclaims all liability for any damage or injury caused as a result of not following instructions for installation contained in the following text.
The power rating used for this Rangehood is 220/240v, 50Hz.
1
SAFETY WARNINGS
- Installation of this Integrated Canopy Rangehood must be carried by a Qualified and competent installer electrician. Before you use the Rangehood, make sure that the voltage (V) and the frequency (Hz) indicated on the Rangehood are exactly the same as the voltage (V) and the frequency (Hz) in your home.
- HAPL will not bear any responsibility for the damage or injury caused as a result of not following this instruction manual or by inappropriate installation and usage.
- This Integrated Rangehood is not intended for use by young children or infirm persons without supervision. Young children should not play with this Integrated Rangehood. Please ensure children supervised when near the Rangehood.
- To avoid possible electric shock this Integrated Rangehood should be unplugged before any maintenance or cleaning is carried out.
- This Integrated Rangehood cannot be installed in an external environment, and it is not recommended for use over Barbeques.
- The Grease Filters should be cleaned at least once a month to avoid the risk of fire.
- Flambé cooking cannot be carried out under the Integrated Rangehood.
- Ducting must be independent from any other form of ducting of other Household heating sources. Ducting into wall cavities is prohibited unless the cavity has been designed for this purpose.
- A gas burner that has been ignited should never remain uncovered or on when there is no pan present due to the risk of fire.
- Adequate ventilation of the room is required when the cooker hood is used at the same time as appliances that use gas or other fuels.
– CAUTION: Accessible parts may become hot when used with cooking appliances.
2
FUNCTION AND FEATURE
- The cooker hood is made of high quality materials with streamlined design accordingly to technical and physical engineering theory, high end and luxury with age aesthetic feeling, also there are kinds of styles for your option to perfect your kitchen.
- The Rangehood quipped with a large power low noise electric motor and centrifugal fan, it produces strong extraction, low noise, non-stick grease filter and is easy to clean.
- The grease filter is easy to remove and clean in warm soapy water. The motor and other internal parts should only be wiped lightly with a paper towel or damp cloth. Please ensure the power is turned off when cleaning to avoid any injury.
3
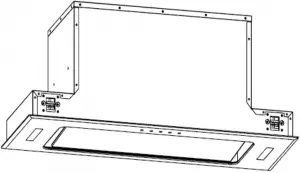
1. INSTALLATION
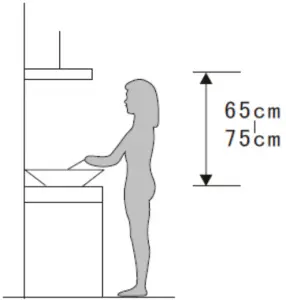
1) The rangehood should be installed at the recommended distance of 650-750mm from the cooking surface for the best effect.
The recommended minimum distance between the lowest point of the rangehood and the cooking surface of the hob is - 65cm minimum, when located above a gas appliance hob and 60cm minimum, when located above an electric hob.
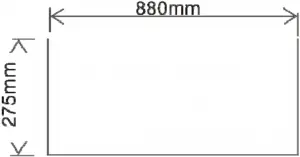
2) Measure and cut a hole in the cabinet, with a width of 500x275mm (UCG52) and 880x275mm (UCG90), and then centre above the cooktop. Ensure the distance between the edges of the cut-out to the edge of the cupboard is at least 35mm.
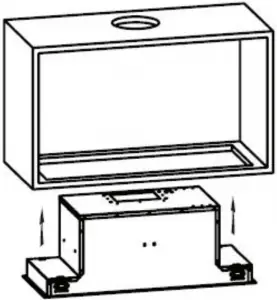
3) Place the hood into the cabinet, and tighten up the screws with a screwdriver, and make sure the hood is fixed securely.
4) Once the rangehood is installed, we recommend that the appropriate Ducting Kit for the installation should be used for the best results. Please
| 90CM
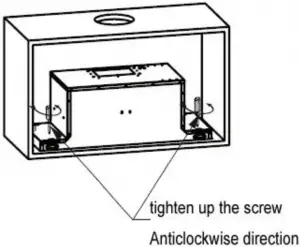
Warning: Failure to install the screws or fixing the rangehood in accordance with these instructions may result in electrical hazards
4
2. OPERATION


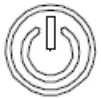
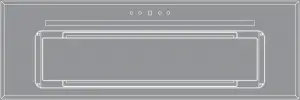
Timer Lamp Speed Power
LED Touch control has four buttons: ![]() (Timer),
(Timer), ![]() (Lamp),
(Lamp), ![]() (Speed),
(Speed), ![]() (Power). See Pic
(Power). See Pic
- Power on: After you have connected the rangehood to the mains supply, the backlight of button will turn on. The backlight will turn off after 30 seconds if no operation has been detected, and the rangehood will enter into stand-by mode.
- Press
 button once, lights will be on. Press button again; lights will be off.
 - Turn on hood and select the speed, use button “
 ”, the motor works at 3 speeds, low, mid and high, and the LED display will display “1”,”2″,”3″.
Press once, the motor starts to work at low speed and the LED display will display “1”,
Press again base on the low speed, the motor works at mid speed and the LED display will display “2”,
Press again base on the mid speed, the motor works at high speed and the LED display will display “3”.
Go on pressing button, the hood works at low speed again and it repeats: “ low -> mid -> high – > low -> mid…” - Press
 button once, the hood will work at the speed which it was on last use.
Press button again, the hood will stop working. - The time button
 will work only when the motor is working.
Press , the rangehood enters into timer setting mode. The max delay time is 9 minutes, and the LED display will display “9”.
When the timer is set, the LED display will display “9”,“8”,“7”…… decreasing by every minute, when it displays “1”, the motor will continue working for 60s and then stop.
Press once, the rangehood will enter into the timer setting mode, press
5
![]() once again, the rangehood will exit the timer setting mode. Press
once again, the rangehood will exit the timer setting mode. Press ![]() once when the cooker hood is working at timer setting, the cooker hood will exit the timer setting mode automatically.
once when the cooker hood is working at timer setting, the cooker hood will exit the timer setting mode automatically.
3. MAINTENANCE
1) The rangehood and its filters should be cleaned regularly in order to keep them in
good working order. Because the grease filters are made of metal, do not clean the filters with corrosive detergents that damage metal products.
Clean the filters as below:
a) Method one:
Put the filter in the water (40 – 50°C), pour in some grease-loosening detergent, soak it for about 2-3 minutes and then clean it with a soft brush. Do not brush too hard so as not to damage the filter.
2) To protect the main body from corrosion over a long period of time, the rangehood should be cleaned with warm soapy water or non-corrosive detergent once a week. Do not use grinding detergent, or it will damage the body.
3) Keep the motor and other spare parts free from water, as this will cause damage to the appliance.
4) The replacement of the LED light should only be carried out by a qualified technician.
5) Disassembly and assembly the filter:

6
4. ABNORMITY AND SOLUTION
| Fault | Cause | Solution |
| Light does not work, but motor work | The bulb damaged | Change bulb |
| Bulb contact lamp cap bad | Fix or change | |
| Light panel switch damage | Fix or change | |
| Light work, but motor does not work | Bulb contact lamp cap | Restart later |
| Motor bearings damage | contact a service agent | |
| Motor burn out | contact a service agent | |
| Motor control switch damage | contact a service agent | |
| Light does not work, motor does not work | Plug contact outlet bad | plug in correctly |
| Power wire cut | contact a service agent | |
| Switch damage | contact a service agent | |
| Shake of the body | Fan motor damaged | service call |
| Motor screw loosen | service call | |
| Combination screw loosen | service call | |
| Hood body not secure | Secure the hood body | |
| Insufficient suction | The distance between the body and the gas top too long | Re-adjust the distance |
| Cross-ventilation too strong or too closed in the kitchen | Reduce cross-ventilation or open the window | |
| Exhaust pipe too long | Adjust the length of pipe | |
| Air outlet valve not open | Check the valve if operating correctly | |
| The outside breeze is too strong | No the technical problem |
7
5. DUCTING KIT SOLUTIONS
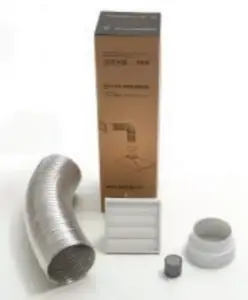
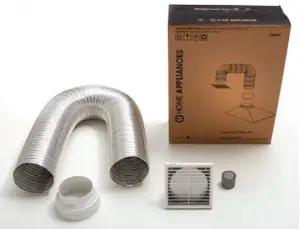
Wall Ducting Kit Eave Ducting Kit
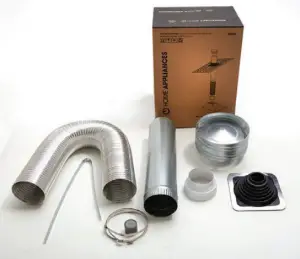
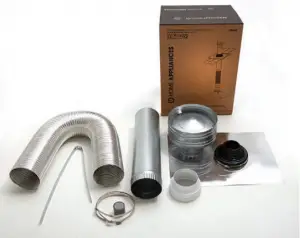
Tile Roof Ducting Kit Metal Roof Ducting Kit
*For customer service please contact us on: 1800 805 300 or [email protected]
8
For after sales support please contact us on:
1800 805 300
or
[email protected]


