![]()
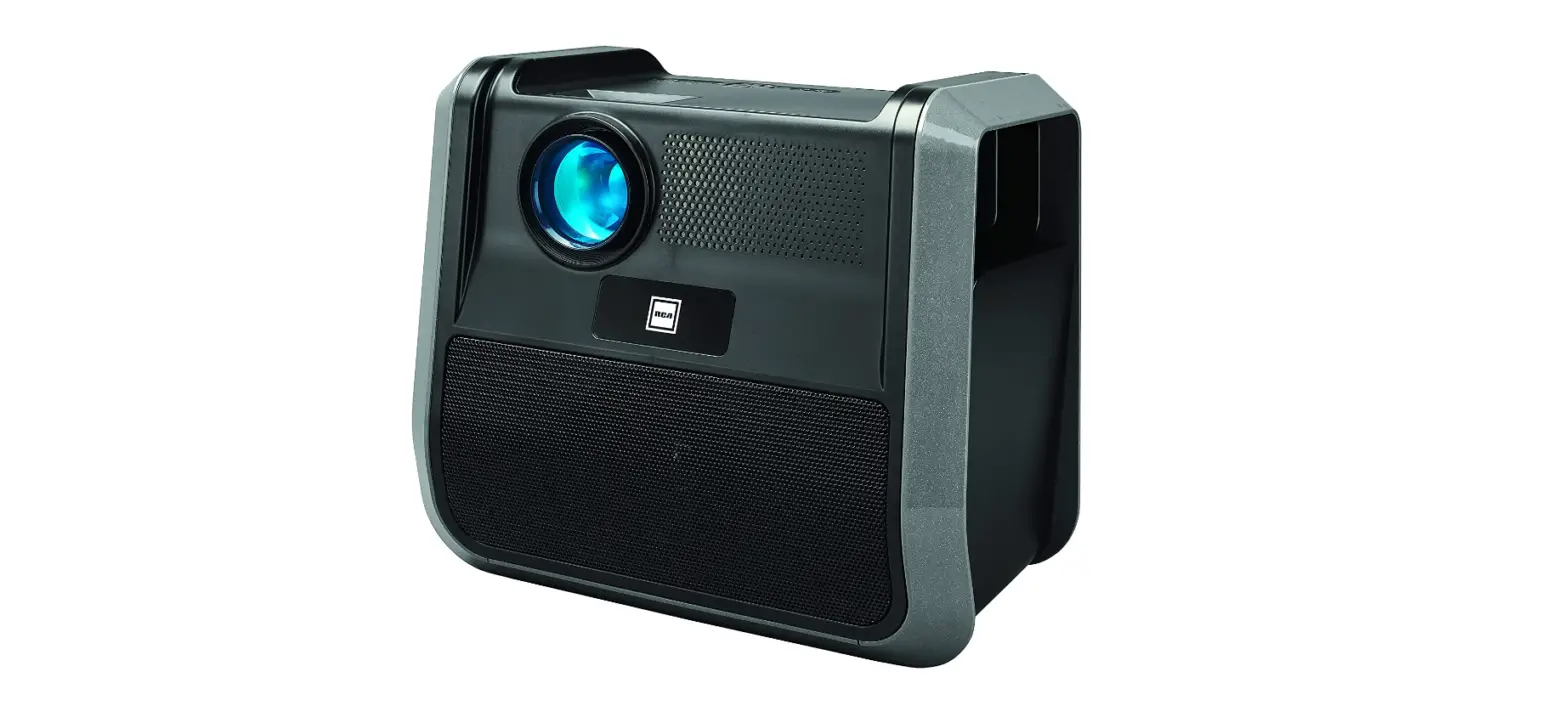
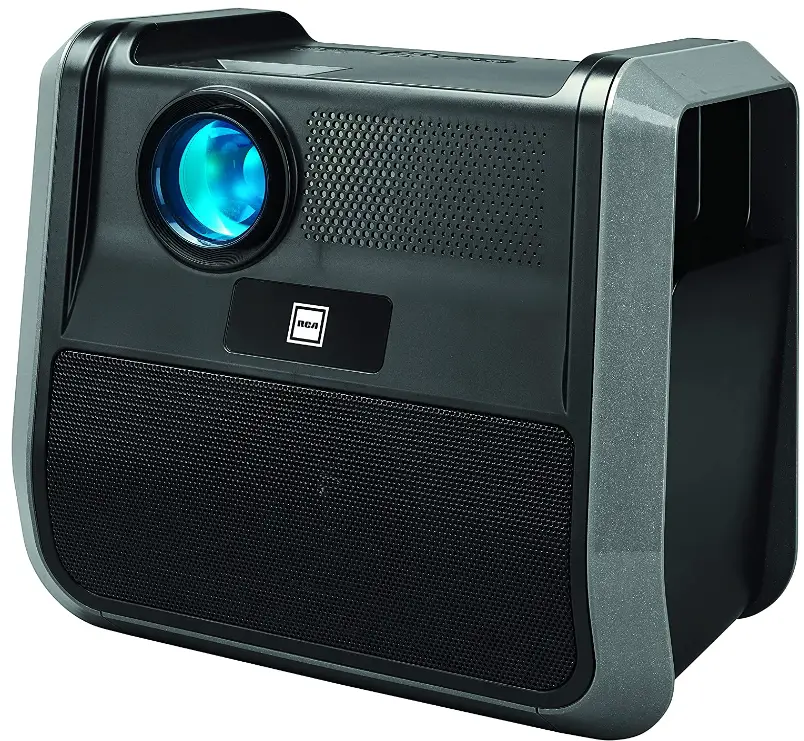
RPJ060 Portable Projector Home Theater Entertainment System
PLEASE READ BEFORE OPERATING THIS EQUIPMENT
This product is manufactured and sold by Curtis International Ltd.RCA, the RCA logo, the two dogs (Nipper and Chipper) logo, are registered trademarks or trademarks of RCA Trademark Management and are used under license by Curtis International Ltd. Any other product, service, company, trade or product name and logo referenced herein are neither endorsed nor sponsored by RCA Trademark Management or its affiliates. Ideal for dark viewing environments for optimal performance.
Please note: Projector brightness is measured in ANSI lumens. Your viewing environment is the deciding factor on how many lumens your projector needs.
Important Safety Instructions
- Read these Instructions.
- Keep these Instructions.
- Heed all Warnings.
- Follow all instructions.
- Do not use this apparatus near water.
- Clean only with a dry cloth.
- Do not block any ventilation openings. Install in accordance with the manufacturer’s instructions.
- Do not install near any heat sources such as radiators, heat registers, stoves, or other apparatus (including amplifier) that product heat.
- Protect the power cord from being walked on or pinched particularly at plugs, convenience receptacles, and the point where they exit from the apparatus.
- Only use attachments/accessories specified by the manufacturer.
- Unplug this apparatus during lightning storms or when unused for long periods of time.
- Refer all servicing to qualified service personnel. Servicing is required when the apparatus has been damaged in any way, such as power-supply cord or plug is damaged, liquid has been spilled or objects have fallen into the apparatus, the apparatus has been exposed to rain or moisture, does not operate normally, or has been dropped.
- Use only with a cart, stand, tripod, bracket, or table specified by the manufacturer or sold with the apparatus. When a cart is used, use caution when moving the cart/ apparatus combination to avoid injury from tip-over.
Additional Warnings and Precautions
- Do not look directly into the projector light.
- Don’t touch the project lens
- Mains adapter is used as disconnect device and it should remain readily operable during intended use. In order to disconnect the apparatus from the mains completely, the mains plug should be disconnected from the mains socket outlet completely.
- CAUTION: Use of controls or adjustments or performance of procedures other than those specified may result in hazardous radiation exposure.
- WARNING: Changes or modified to this unit not expressly approved by the party responsible for compliance could void the user’s authority to operate the equipment.
- WARNING: Use of this unit near fluorescent lighting may cause interference regarding use of the remote. If the unit is displaying erratic behavior move away from any fluorescent lighting, as it may be the cause.
- WARNING: Shock hazard – Do Not Open.
- Caution and marking information is located at the rear or bottom of the apparatus.
- WARNING: To reduce the risk of fire or electric shock, do not expose this apparatus to rain, moisture, dripping, or splashing.
- Objects filled with liquids, such as vases, shall not be placed on the apparatus.
In The Box Remove & Close The Lens Cover
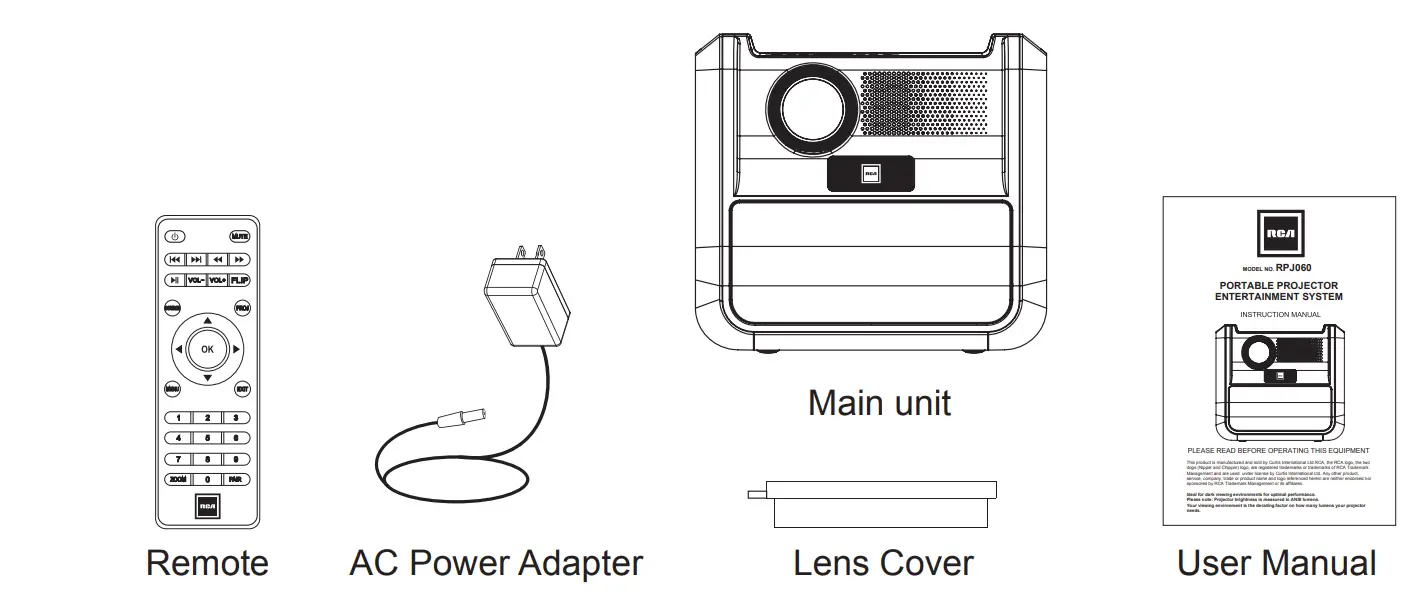 Remove & Close The Lens Cover
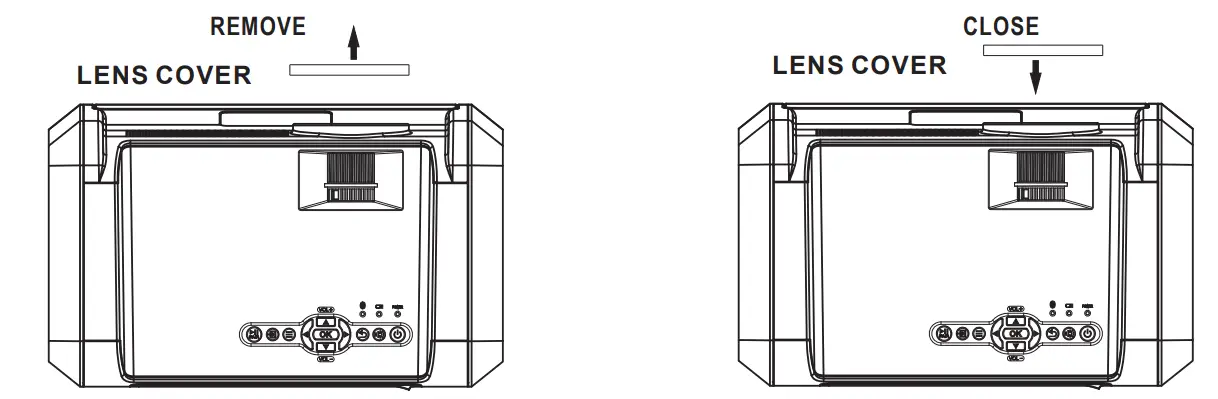
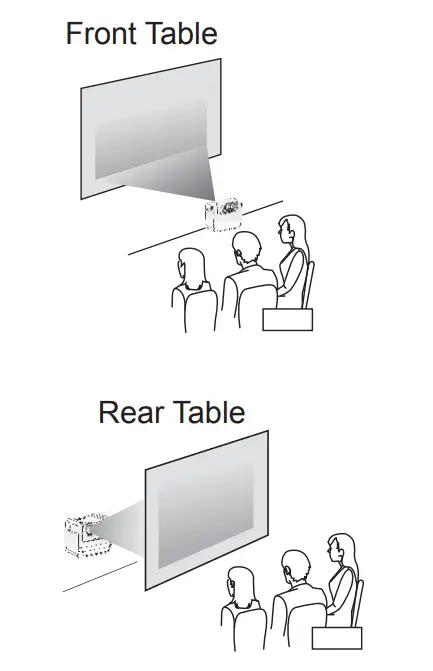
Placing of Your Projector
Your projector can be installed in four different configurations (see picture below):
- Front Table:
Select this location with the projector placed near the floor in front of the screen. This is the most common way to position the projector for quick setup and portability.
- Rear Table:
Select this location with the projector placed near the floor behind the screen.
NOTE: That a special rear projection screen is required.
To Reduce Image Distortion
- Move the projector as close to the center of the screen as possible.
- The light beam from the projector should be perpendicular to the screen for a rectangular or square image.

Distance Between the Projector and Screen
Measure the distance between the projector and where you want to position the screen. This is the projection distance for reference.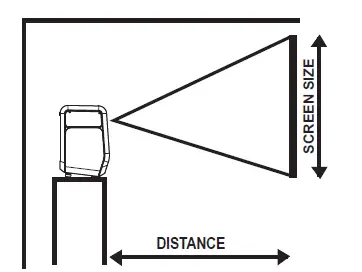
| Distance | Screen Size |
| 1.16m | 37inch |
| 1.35m | 45 inch |
| 1.51m | 50 inch |
| 1.79m | 60 inch |
| 2.15m | 72 inch |
| 2.81m | 100 inch |
| 3.43m | 120 inch |
| 4.44m | 150 inch |
Adjust The Focus And Keystone
Follow below picture to adjust the focus and trapezoidal screen.
Adjust the focus by turning the knob while observing the image pixels near the center of the screen. Optimal focus is obtained when the pixels are clearly visible. Depending on the projected screen size, the focus near the screen edges may be less sharp than the screen center.
Keystone image is created when the projector lens is projected from above or below the center of the screen. Keystone correction restores the distorted image to a rectangular or square shape.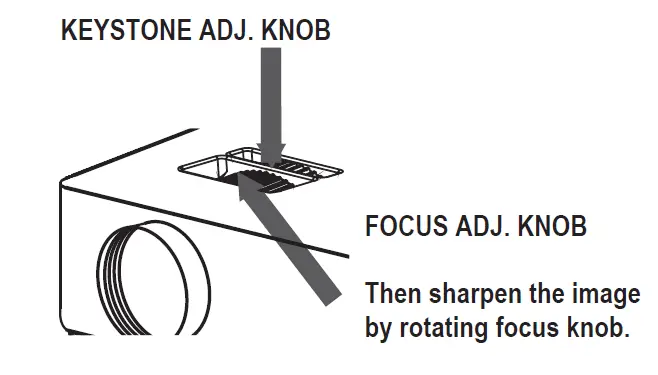
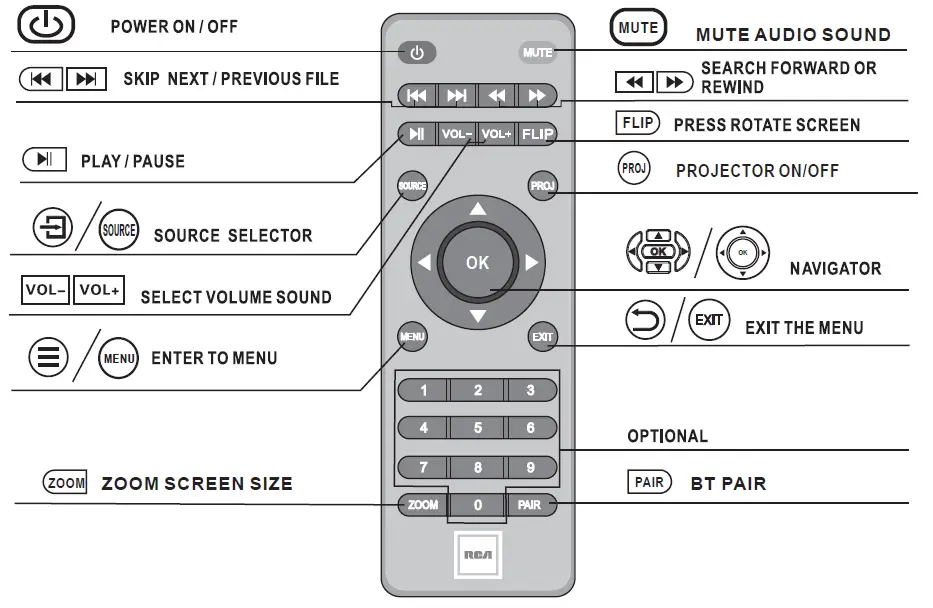
Controls of Remote
Install / Remove the Batteries of the Remote
BATTERY DOOR
Remove the battery compartment cover on the back of your remote by carefully sliding to open. The battery cover can then be lifted away. Fit the correct batteries (not included), referring to the polarity markings. Finally, replace the cover.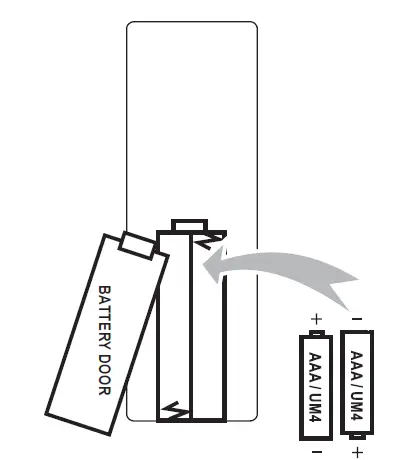
NOTES:
- Batteries shall not be exposed to excessive heat such as placing under the sunlight or near a fire.
- Please make sure the batteries are installed with their correct polarities.
- Do not mix old and new batteries.
- Use only the same type of batteries.
- Do not dispose of the batteries in fire, battery may explode or leak.
- Do not recharge a non-rechargeable battery.
Controls of Projector
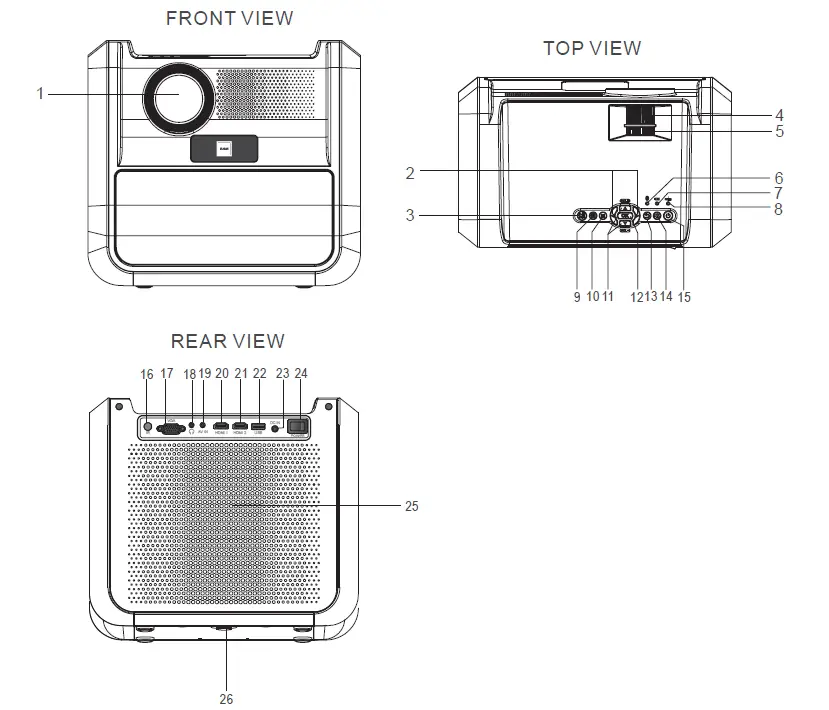
- LENS
- Buttons
- PAIR Button
- FOCUS ADJ. Knob
- TRAPEZOIDAL ADJ. Knob
- BT indicator
- BATTERY Indicator
- POWER Indicator
- SOURCE Button
- MENU Button
- VOL+ / VOL- Buttons
- Button
- RETURN Button
- PROJECTOR Button
- POWER Button
- IR Sensor
- VGA Port
- Headphone Jack
- AV IN Jack
- HDMI 1 Port
- HDMI 2 Port
- USB Port
- DC IN Jack
- POWER Switch
- SPEAKER
- ANGEL ADJ. Knob
Install Power Adapter
Follow below picture to connect power adapter Plug the included AC adapter body into the standard AC power outlet to power the unit. Connect small end to the DC IN jack of main unit. After that, press the POWER switch to on position to turn the unit in standby model, the indicator is lighted red. To turn on the unit, press button once on unit panel or by the remote. The indicator is lighted green.
WARNING:
Before connecting to the power supply, ensure that the supply corresponds to the information on the rating label at the back of the apparatus.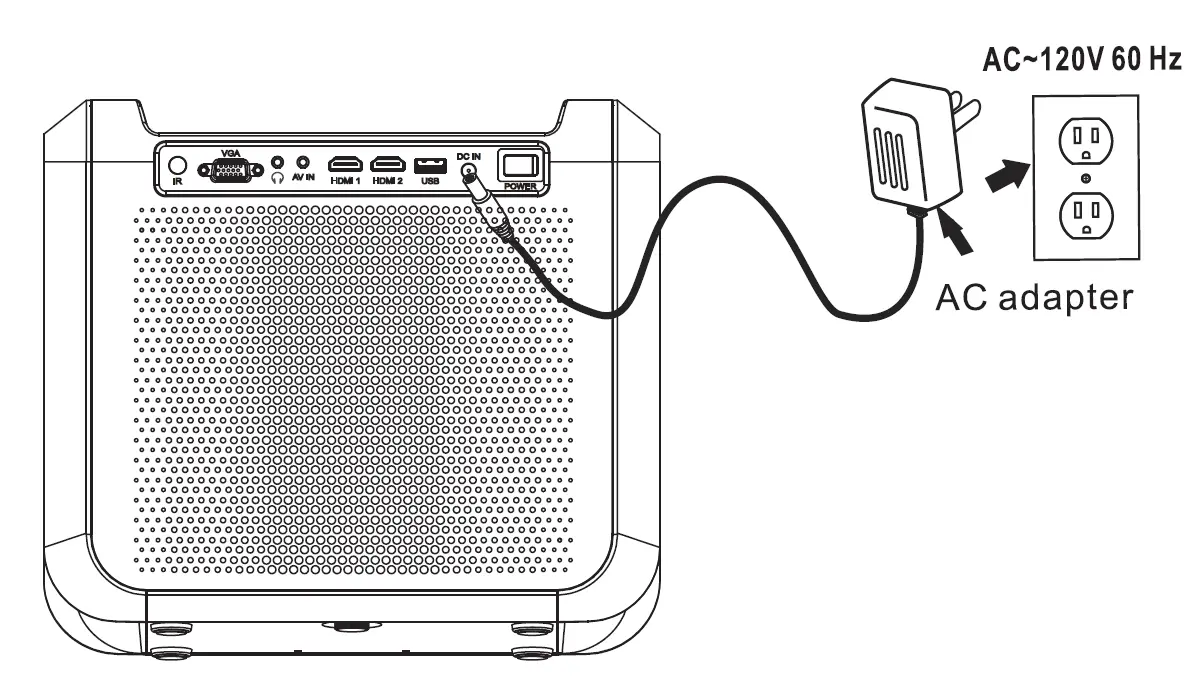
Charging Battery
- Charging the built-in battery by connect small end of adapter into DC IN jack at the rear of the unit and plug adapter body to AC wall outlet.
- When the built-in battery charging now, the charging indicator light RED.
- If the charging indicator is light GREEN that the built-in battery fully charging.
Unplug the output of adapter from the DC IN jack once the battery is fully charged.
Battery Safety Notes:
- To prolong the life of a rechargeable battery, it is recommended to completely discharge it before fully charging it again.
- Do not dispose of the built-in battery in fire, the battery may be explode or leak.
- Do not open the built-in battery may explode.
Battery Operation (Build-in battery)
For battery operation, unplug the adapter from the AC wall outlet first and then remove the DC plug from the DC IN jack at the rear of the unit.
Caution:
When the unit is intended to be unused for a long period of the time, please press POWER SWITCH to OFF position to turn off the unit and unplug the power adapter from the AC wall outlet.
 Press the button to turn on unit, press again to standby mode.
 Press the button to select input source.
 Press the button to enter projector menu.
 – Press the buttons to navigate and select screen item of menu.
 Press the button to return to previous status or exit the menu.
 – Press the buttons to fast search forward and rewind on USB.
 – Press the buttons to search next or previous file on USB.
- VOL+ / VOL– Press the buttons to select the sound level.
 – Press the button to play/pause the playback of file on USB.
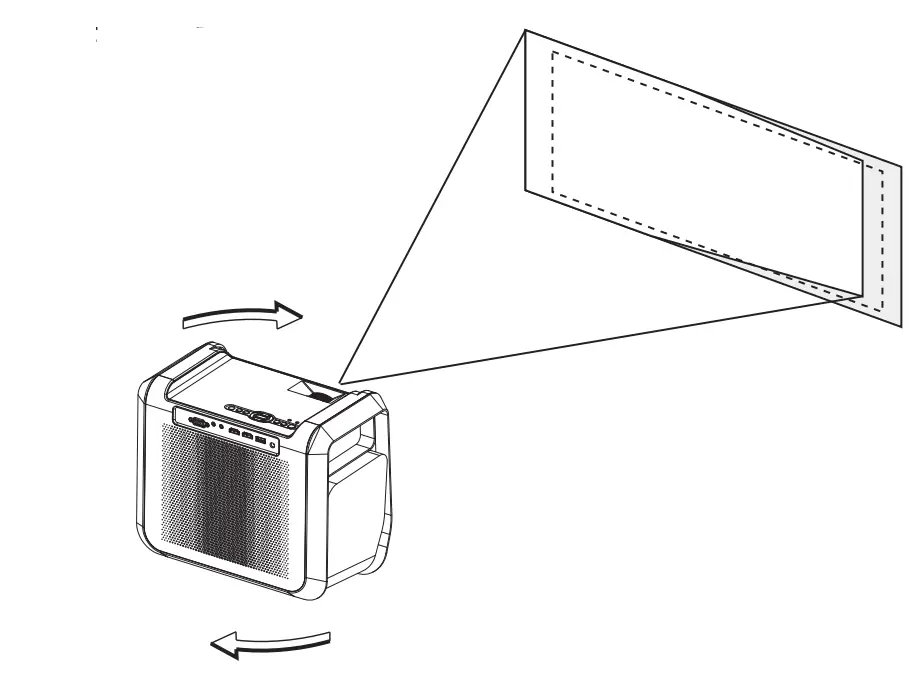
- FLIP– Press the button to rotate / mirror projector screen
- ZOOM– Press the button to select image scale.
- PROJ– Press the button to On / Off the projector function.
- PAIR– Press the button to Pair or disconnect the bluetooth connection
- MUTE– Press to mute the audio. Press again to resume.
 Press the button to turn on unit, press again to standby mode.
 Press the button to select input source.
 Press the button to enter projector menu.
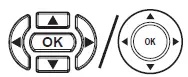 – Press the buttons to navigate and select screen item of menu.
 Press the button to return to previous status or exit the menu.
 – Press the buttons to fast search forward and rewind on USB.
 – Press the buttons to search next or previous file on USB.
 – Press the button to play/pause the playback of file on USB.
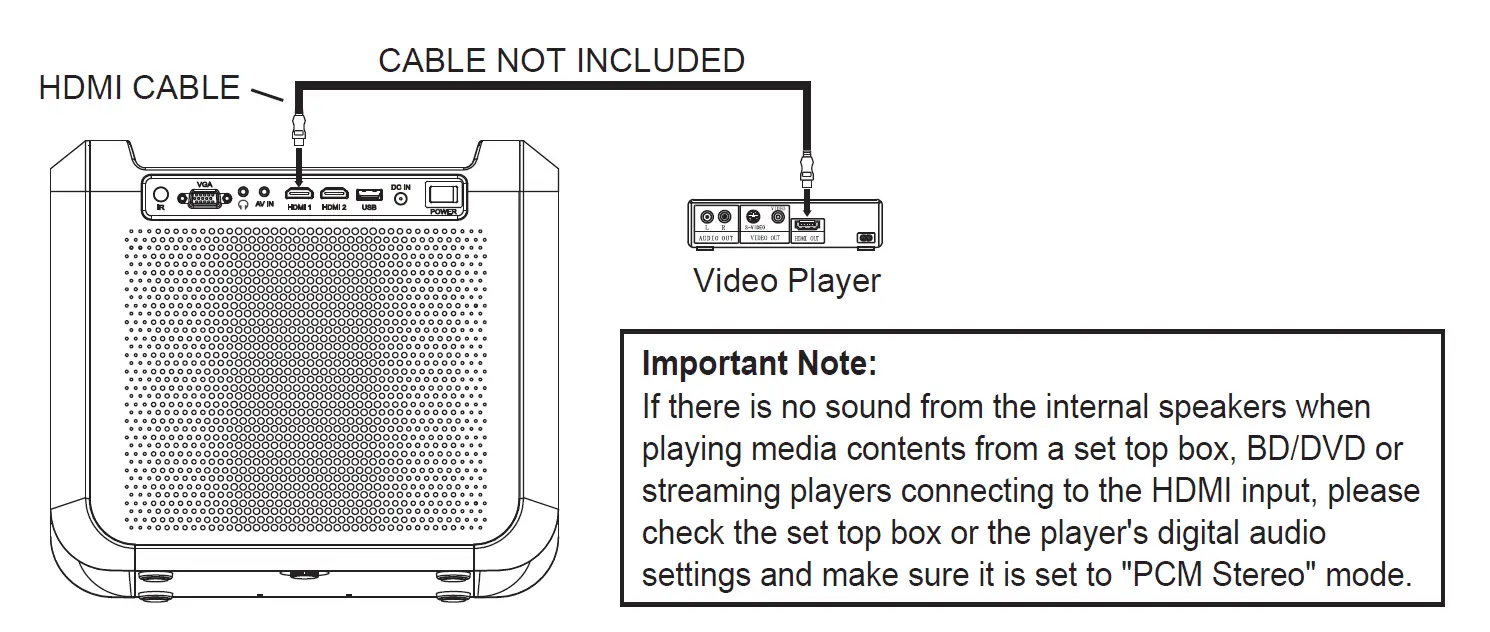
Connect HDMI Show The Image On Projector Screen
Refer to the following picture to connect a set top box, a BD/DVD player or a streaming
player to the HDMI input.
- Turn the unit to standby mode before connect HDMI cable.
- After connection, press the button to turn on unit and indicator will light GREEN.
- Press the / SOURCE button, use the button to select HDMI, and press button to enter. The video from the connected device will be shown on projector screen.
- Press the button to turn the unit to standby mode.

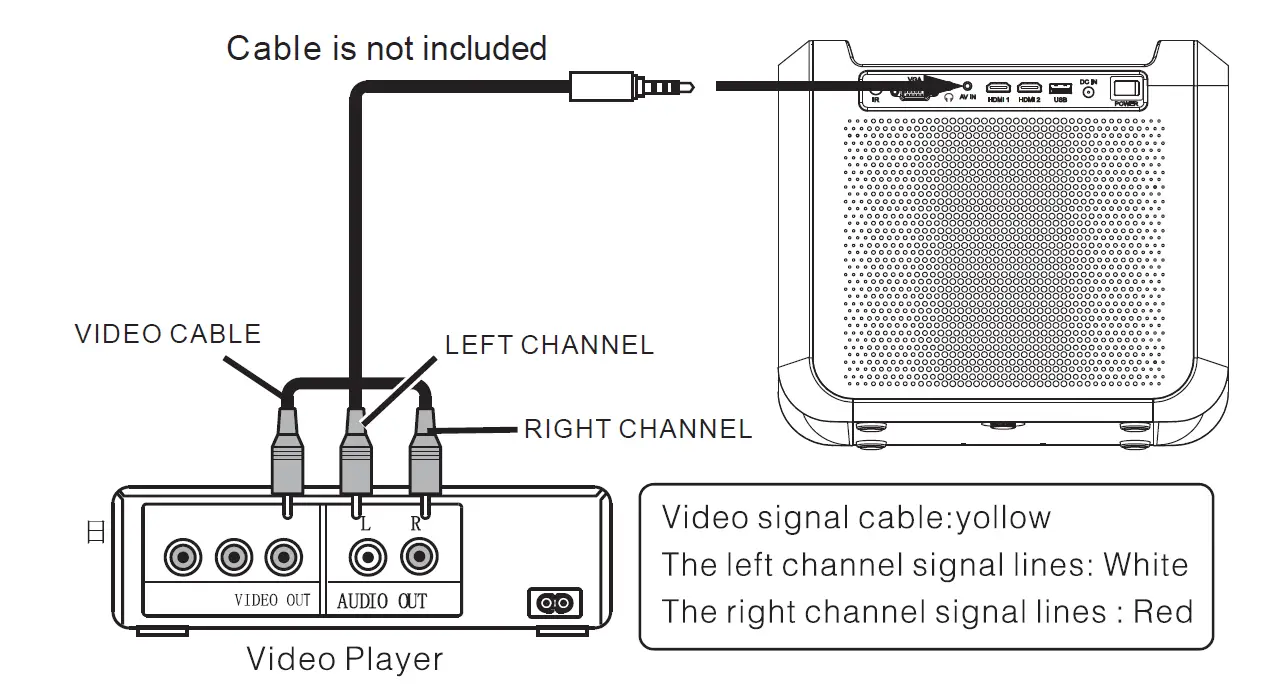
Connect AV Show The Image On Projector Screen
Follow below picture to connect AV cable and device.
- Turn the unit to standby mode before connect AV cable.
- After connect, press the button to turn on unit and power indicator will light GREEN
- Press the / SOURCE button, use the button
 to select AV and press button to enter. The video of AV device will show on projector screen
 - Press the button to turn the unit to standby mode.

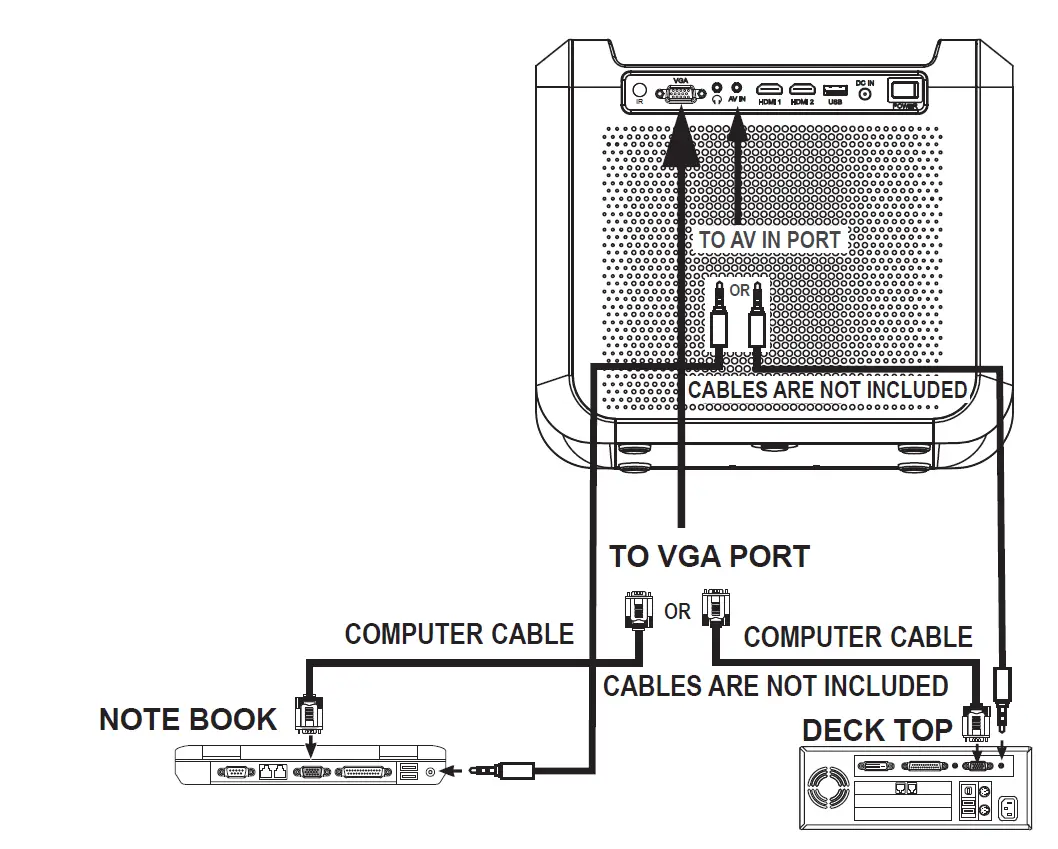
Connect VGA Show The Image On Projector Screen
Follow below picture to connect VGA cable AUDIO cable and device.
- Turn the unit to standby mode before connect VGA cable.
- Use audio cable to connect follow below figure.
- After connect, press the button to turn on unit and power indicator will light GREEN
- Press the / SOURCE button, use the button to select VGA and press button to enter. The video of VGA device will show on projector screen and sound will come out from the projector speaker.
- Press the button to turn the unit to standby mode.

Please refer to the following table to adjust the output signal from the computer
| Type | R | Frequency | Field Frequency | |
|
PC | VGA | 640×480 | 31.5 | 60 |
| 34.7 | 70 | |||
| 37.9 | 72 | |||
| 37.5 | 75 | |||
|
SVGA |
800×600 | 31.4 | 50 | |
| 35.1 | 56 | |||
| 37.9 | 60 | |||
| 46.6 | 70 | |||
| 48.1 | 72 | |||
| 46.9 | 75 | |||
| XGA | 1024×768 | 40.3 | 50 | |
| 48.4 | 60 | |||
| 56.5 | 70 | |||
NOTE: In order to get the sound from the unit, please connect AV IN cable when you connect VGA input.
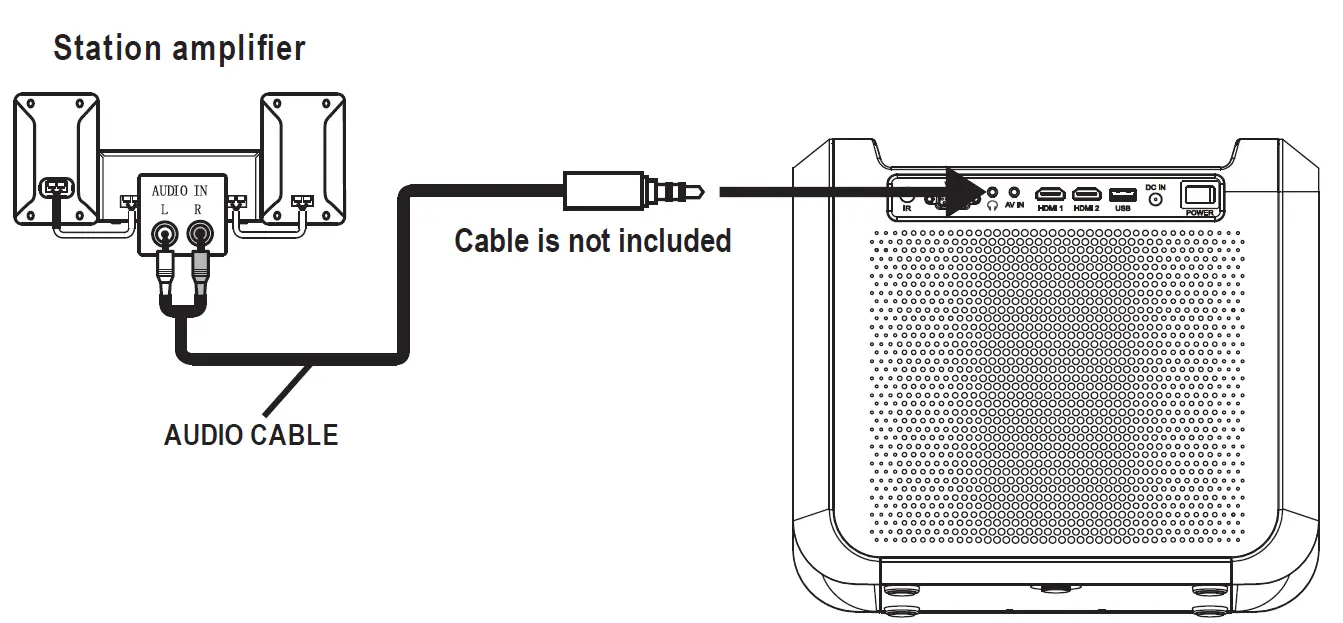
Connect Audio Output ( Aux Out / Line Out / Earphone)
Follow below picture to connect audio cable and device.
- Press the button to turn the unit in standby mode before connection.
- Use audio cable to connect follow below figure.
- After connect and turn on both units. Your projector sound from external device now.
- After using , turn off both unit

Important Note:
If there is no sound from the stereo audio output when playing media contents from a set top box, BD/DVD or streaming players connecting to the HDMI input, please check the set top box or the player’s digital audio settings and make sure it is set to “PCM Stereo” mode.
Install USB Device
Follow below picture to install USB
Press the button to turn unit to standby mode before install USB.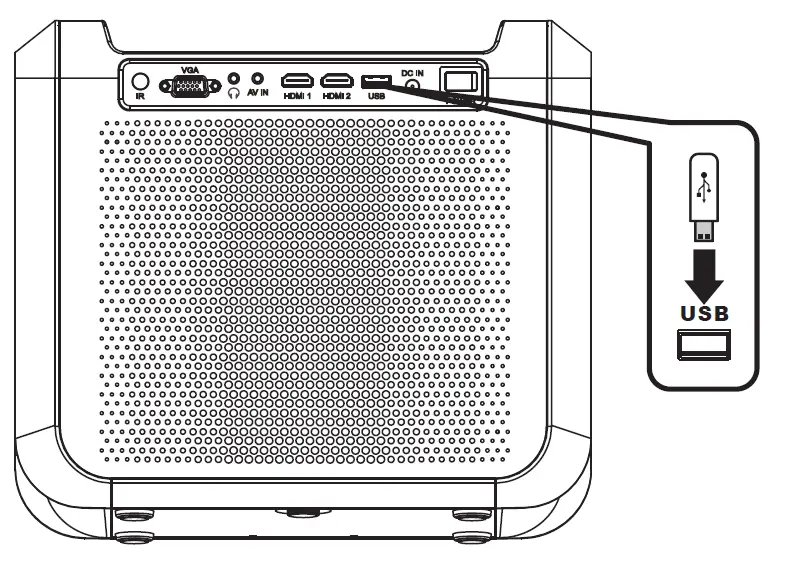
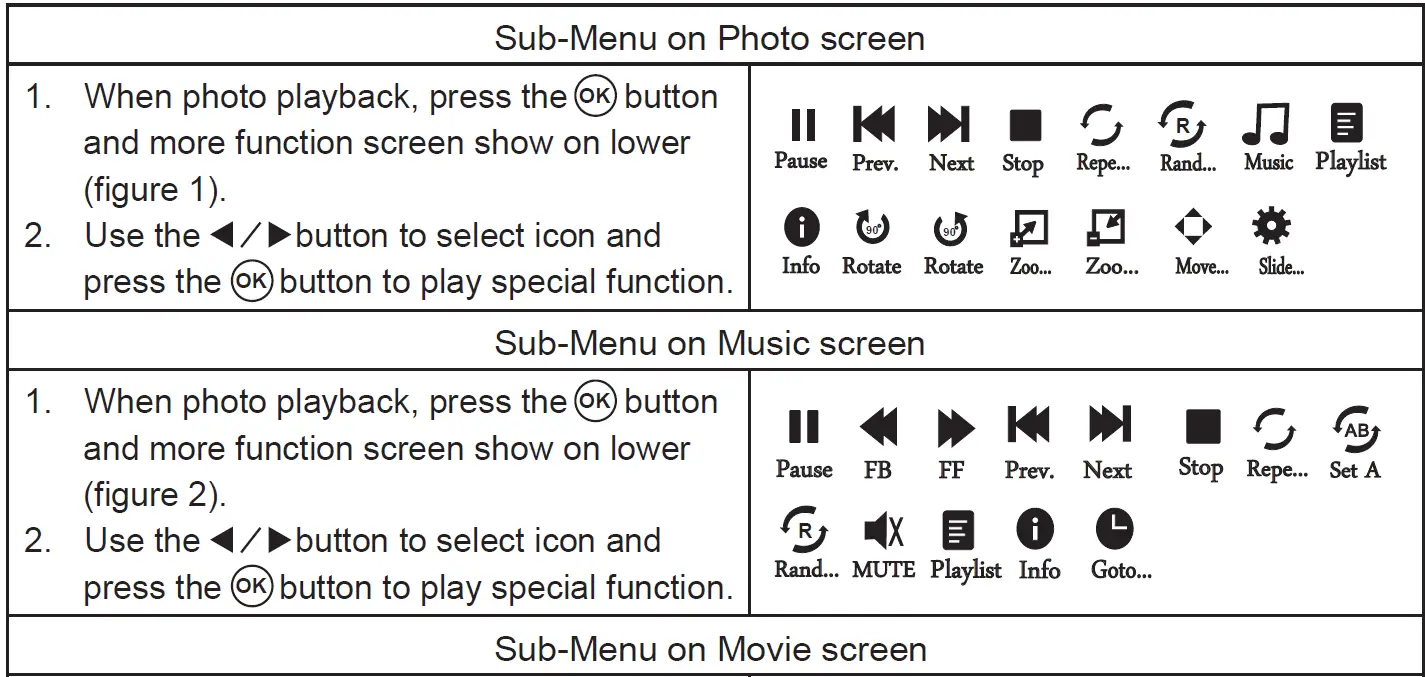
Using USB Playback (Media Player)
Install USB device:
- Press the PROJECTOR Button to turn off the projector function before installing the USB.
- Install the USB device into the USB port.
- After connecting, press the PROJECTOR button to turn on unit
- Press the / SOURCE button to enter, use the buttons to select Media Player and press the button to enter.
- After that, the Media Player menu will display, use buttons to select one of the icons of PHOTO / MUSIC / MOVIE / TEXT and press the button to enter.
- Use the button to select USB and press the button to enter.
- Use buttons to search the correct file and press the button to preview the playback file and press the button of remote to start playback.
- Press the button to fast search forward and rewind.
- Press button to search next or previous file.
- During playback, press the button to pause and press again to resume.
NOTE:
If the USB no name, the unit default it as C
To remove the USB, press the button to turn the unit in standby mode FIRST.


Using Bluetooth Playback
External devices that have a built-in Bluetooth feature can connect wirelessly to the Unit.410
Getting Connected
Pairing a Bluetooth device
- Press the button to turn on unit, the power indicator light GREEN
- Press the / SOURCE button, use the button to select Bluetooth and press button to enter Bluetooth mode and Bluetooth indicator will flash Blue.
- The Bluetooth function of your external device to ON and begin searching for devices.
NOTE: The effective distance between your external device and this apparatus is 10 meters (30 feet) - Select “RCA RPJ060” from the device list when it appears on your device screen.
- If you are asked for a password, enter “0000”
- An audible chime will sound and Bluetooth indicator is lighted blue steadily that indicates a connection has been established. The screen will show “Connected”
- A few seconds later your Bluetooth connection should be ready to use.
- If you want change to pair with another Bluetooth Enable Device. Press and hold the PAIR button. The Bluetooth indicator will flash blue, the screen will show “No Connect” and the unit will go into Pairing / Discoverable mode again.
Note: After initial pairing, the unit will stay paired unless unpaired manually by the user or erased due to a reset of the device. If your device should become unpaired or your find it is unable to connect, repeat the above steps or press and hold the Bluetooth PAIR button again
Playing Music from an External Bluetooth Device
- After pair your external device and set it to play.
- Turn on the music player program on your external device and set it to play.
- Audio played through the connected Bluetooth Device will now be heard through the speakers.
- Press the PLAY/PAUSE button on the remote or short press the PLAY/PAUSE button on unit to pause or resume play.
- Also can use button to select previous or next file on external device.
- If you select ECO mode, the unit will turn off the project function. To resume, press PROJECTOR button once.
- Press VOL+ or VOL- button to obtain the desired volume level.
Press /MENU button to enter projector menu Picture menu.
This Picture menu showed on right upper of view screen.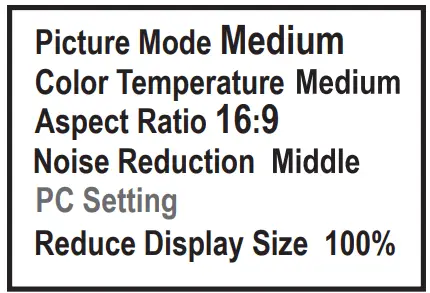
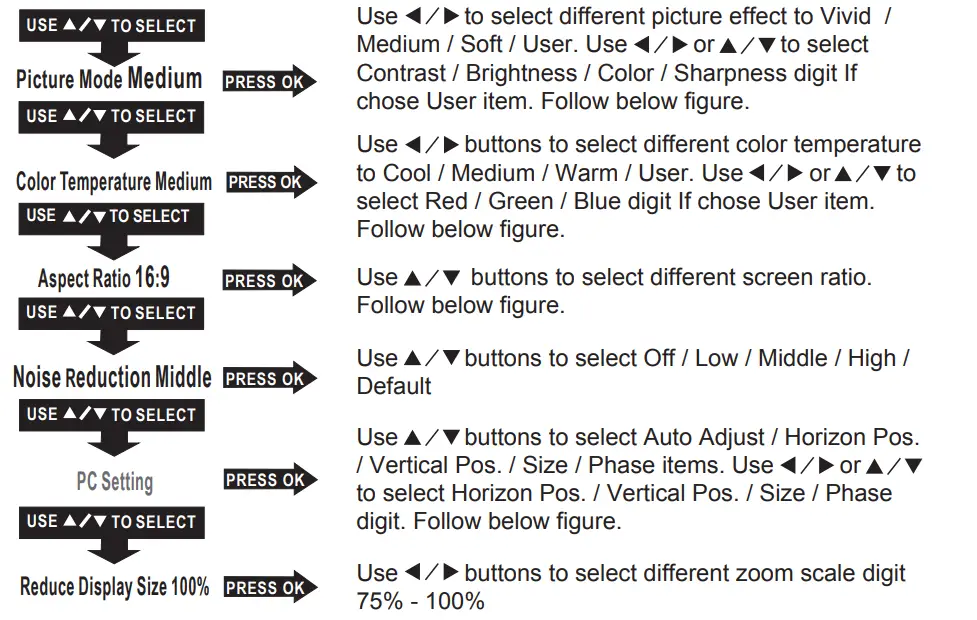
| Picture Mode | |
| Customer define | Parameter |
| Contrast | 0-100 |
| Brightness | 0-100 |
| Color | 0-100 |
| Sharpness | 0-100 |
| Color Temperature | |
| Customer define | Parameter |
| RED | 0-100 |
| GREEN | 0-100 |
| BLUE | 0-100 |
| Aspect Ratio | |
| AV mode | Auto, Panorama, Zoom2, Zoom1, 16:9, 4:3 |
| HDMI mode | Auto, 4:3, 16:9, Zoom1, Zoom2, Just Scan |
| VGA mode | Auto, 4:3, 16:9, Point to Point |
| USB mode | Auto, 4:3, 16:9 |
| PC Setting (Active in VGA mode) | |
| Customer define | Parameter |
| Horizon Pos. | 0-100 |
| Vertical Pos. | 0-100 |
| Size | 0-100 |
| Phase | 0-100 |
Note: PC setting menu is activated in VGA mode only.
Press MENU button to enter projector menu, press buttons to select Sound menu.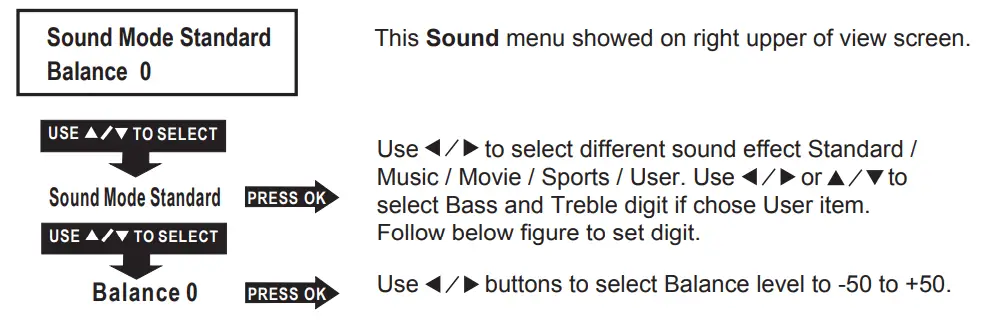
| Sound Mode – User | Parameter |
| Treble | 0-100 |
| Bass | 0-100 |
Press the MENU button to enter the projector menu, press buttons to select Option menu.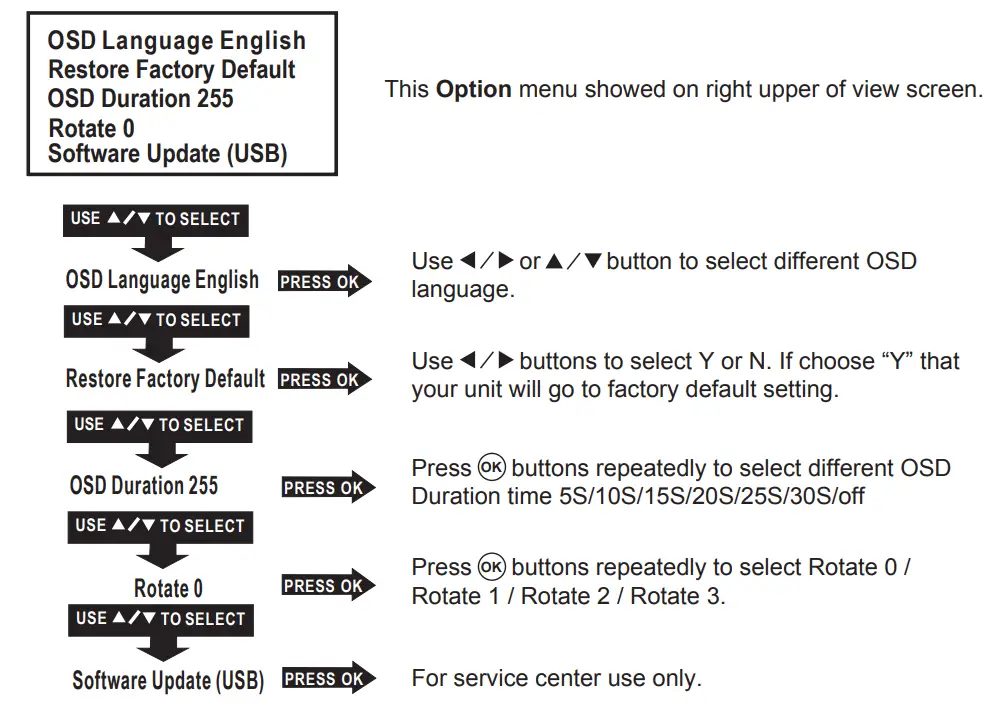
Specifications
| Bluetooth Version | 5.0 |
| Light Source Type | LED |
| Unit ANSI Lumens | 45 |
| Display Native Resolution | 800 x 480 RGB |
| HDMI Input Supported
Video Resolution. | 1080p , 1080i , 720p, 576i , 480p, and 480i |
| Projection Size | 37-150 inch |
| Input Port | HDMI / USB / AV IN / VGA IN |
| USB Port Supported Format | Support USB device up to 32GB
Support Picture format: JPG, GIF, BMP, PNG Support Audio format: MP3 Support Video format: Mpeg1, Mpeg2, Mpeg4,
RM, AVI, RMVB, MOV, MJPEG |
| DC IN Power | DC 13V , 4A |
| Battery | Built-in Lithium Battery (The battery playing time is around 2 hours for the movie. It depends on the sounds output and brightness when playing the movies.) |
Specifications are typical, individual units might vary. They are subject to continuous improvement without notice and without incurring any obligation.
For service assistance and product information, please call: 1-800-968-9853.
Pour obtenir assistance et information appelez: 1-800-968-9853.
Curtis International Ltd.
7045 BECKETT DRIVE, UNIT 15, MISSISSAUGA, ON, L5S 2A3
www.curtisint.com
To make a warranty claim, do not return this product to the store. Please email [email protected] or call 1-800-968-9853.
90-day Warranty
This product is warranted to be free from defects in material and workmanship for a period of ninety (90) days from the date of original purchase. During this period, your exclusive remedy is repair or replacement of this product or component found to be defective, at our option; however, you are responsible for all costs associated with returning the product to us. If the product or component is no longer available, we will replace with a similar one of equal or greater value. Prior to a replacement being sent, the product must be rendered inoperable or returned to us. This warranty does not cover glass, filters, wear from normal use, use not in conformity with the printed directions., or damage to the product resulting from accident, alteration, abuse, or misuse. This warranty extends only to the original consumer purchaser or gift recipient. Keep the original sales receipt, as proof of purchase is required to make a warranty claim. This warranty is void if the product is used for other than single-family household use or subjected to any voltage and waveform other than as on the specified rating on the label (e.g., 120V~60Hz).
We exclude all claims for special, incidental, and consequential damages caused by breach of express or implied warranty. All liability is limited to the amount of the purchase price. Every implied warranty, including any statutory warranty or condition of merchantability or fitness for a particular purpose, is disclaimed except to the extent prohibited by law, in which case such warranty or condition is limited to the duration of this written warranty. This warranty gives you specific legal rights. You may have other legal rights that vary depending on where you live. Some states or provinces do not allow limitations on implied warranties or special, incidental, or consequential damages, so the foregoing limitations may not apply to you. For faster service, locate the model, type, and serial numbers on your appliance.
FAQS
What speakers can you hook to the projector for sound ?
The unit has an analogue 3.5mm audio output jack. You can use a 3.5 mm plug to dual RCA male cable to hook the audio of the projector to a stereo/home theatre amplifier, a set of amplified computer speakers or a sound bar.
Can this be used with cable (spectrum)
The projector has 2 HDMI ports that you can use to connect your Spectrum Cable Set Top Box (if it has HDMI output
The projector also has an analogue AV input jack if you have a Set Top Box that only has analogue AV output.
Where can i find the ac dc adapter power cord for this model to buy?
you can’t you have to buy a new unit that’s what I did and kept the old one for parts I looked every where
Can this mounted to the ceiling
Yes
Does this have the option to flip the screen when hanging from the ceiling
Yes
Can u use with a blUetooh speaker
The unit has an analogue audio output via a headphone jack. This can be connected to an external amplifier or speaker. The unit has no Bluetooth output.
Does this come with a manual in English because the one that I received is only in Spanish .
Mine did. It is also on the website
Is this projector 3d capable?
No.


