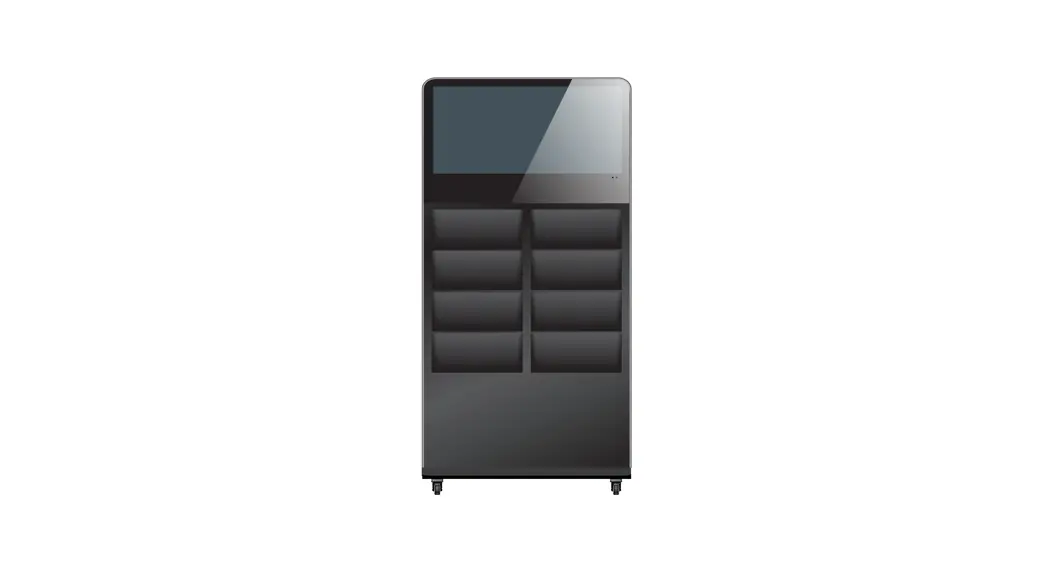

![]() 32-Inch Digital Literature Holder
32-Inch Digital Literature Holder
User Manual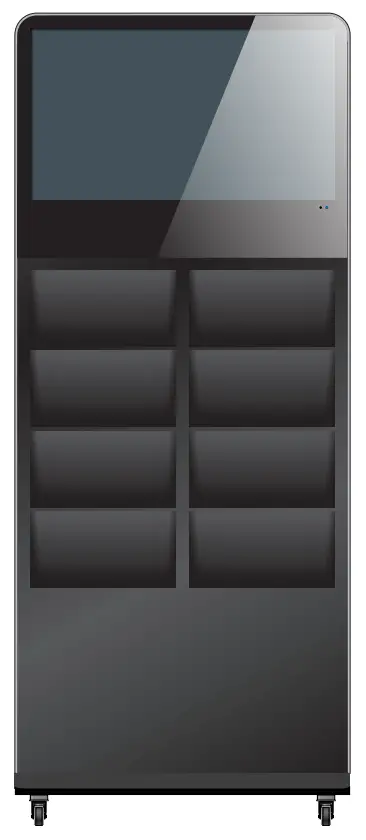
Assembly and Connection
Parts List
| Accessory | Picture | Qty |
| Remote control | 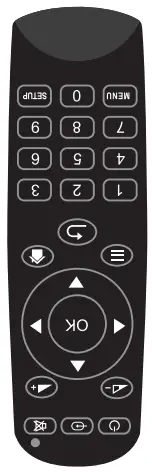 | 1 |
| Caster |  | 4 |
| M8 x 20 screws |  | 12 |
| M8 x 16 screws |  | 16 |
| Washer |  | 12 |
| Wrench |  | 3 |
| User manual |  | 1 |
Description of Parts
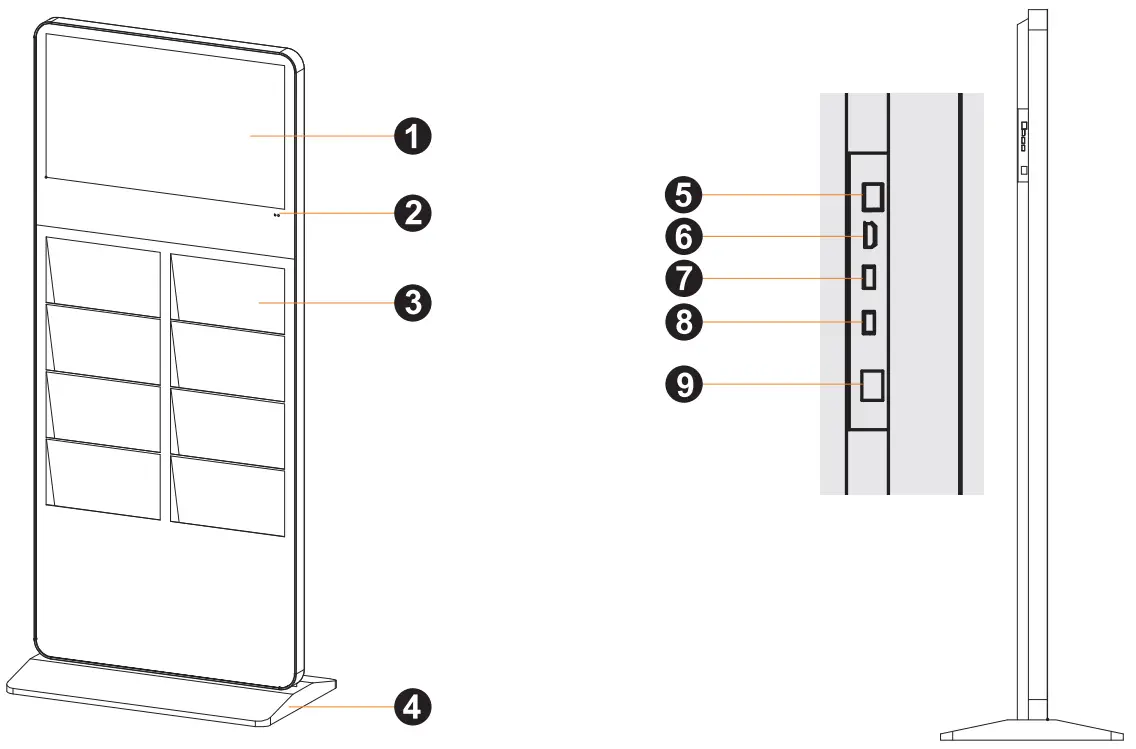
- LCD Screen
- IR indicator
- Literature holder
- Base
- Ethernet port (RJ45 socket)
- HDMI input port
- USB port
- USB port
- On/off switch
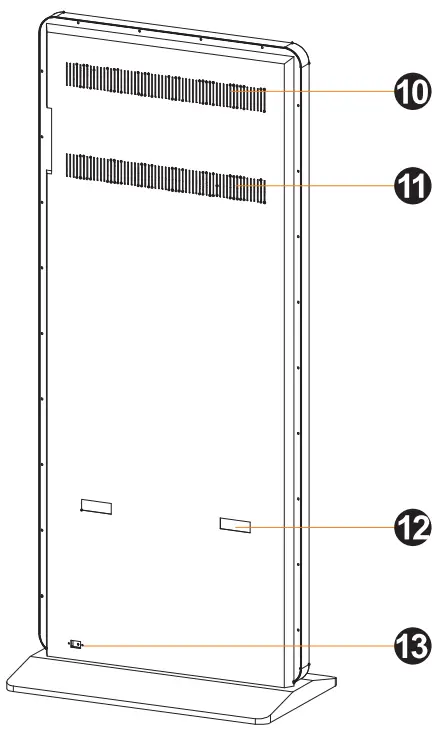
- Speaker
- Heat sink
- Handle
- AC power cord socket
CAUTION: Disconnect the power plug before assembling or disassembling the unit!
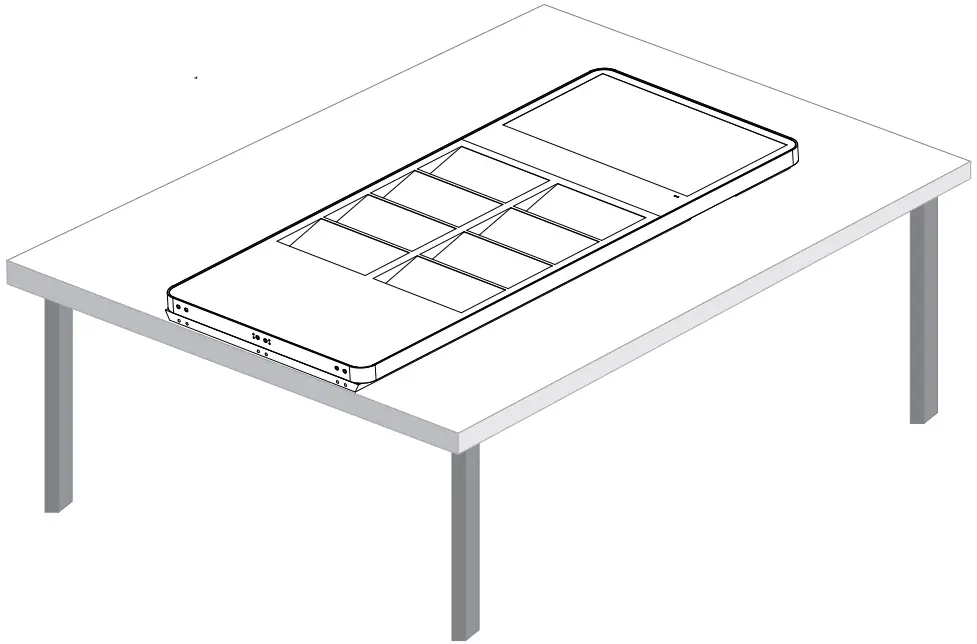
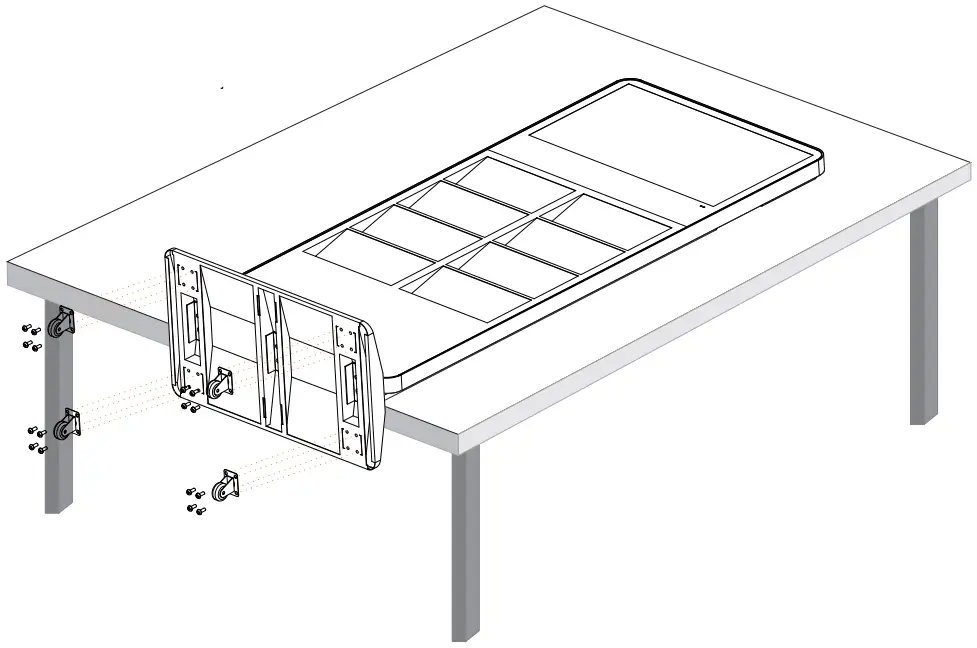
Assembly Instruction
- Lay the LCD screen on a non-abrasive table (Note: When taking out the device, please hold the bottom with your hands to avoid slipping and breaking)

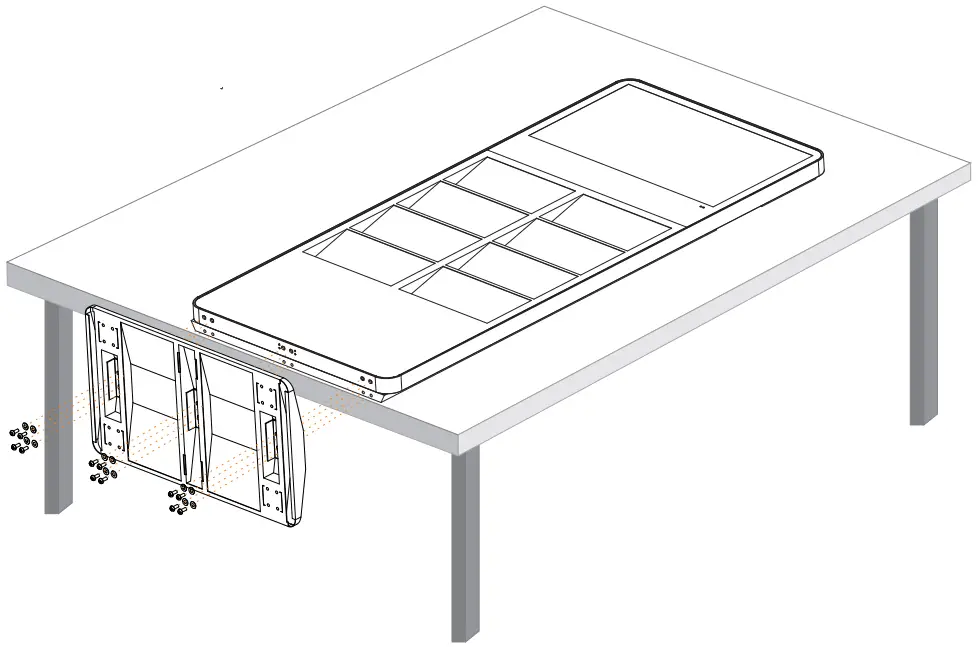
- Attach the base to the LCD screen using the attached M8*20 round head hexagon screws & washers and tighten them properly.

- Attach the 4 casters to the base using M8*16 round head hexagonal screws provided and tighten them properly.

Technical Specification
| ITEM | SPECIFICATION | |
| LCD Screen | Material | Alu.+Steel |
| Panel Type | 32″ BOE LCD | |
| Display Area | 698.4*392.85mm | |
| Optimum Resolution | 1920* 1080 | |
| Contrast Ratio | 1200:1 | |
| Viewing Angles | 89/89 | |
| Response Time | 8ms | |
| Light Source | LED | |
| Brightness | 400nits | |
| Pixel Pitch | 363.75(V)X121.25(H) | |
| Display Colors | 16.7M(8bits-true) | |
| Color Temp | Cold white | |
| Aspect Ratio | 16:09 | |
| Refresh Rate | 50/60HZ | |
| Panel Surface Material | TFT | |
| Touch | NO | |
| Operating Time | 7x18hrs | |
| Panel Life (hours) | 30000hrs | |
| Software | Operating System | Android 7.1 |
| Software | Sign way | |
| Player | Integrated into software | |
| Drive Type | Integrated into software | |
| External or Integrated | Integrated | |
| Templates | yes | |
| Maximum video decoding | 1080P | |
| HTML | No |
| Software | IP Streaming IP | yes, but subject to bandwidth |
| Live Text & Media Feeds | USB; WIFI; Wire Network | |
| Multi-Zone | YES | |
| Transitions | YES | |
| Day Parting | YES | |
| Scheduling | YES | |
| Drag & Drop Functionality | YES | |
| Loops | YES | |
| Campaigns | YES | |
| Remote Content Update | YES | |
| Video | Video playback | YES |
| Audio | Audio format | MP3 |
| Image | Picture format | JPG, JPEG, BMP, PNG, GIF |
| Input | Video Input | NO |
| Storage | Internal Storage Capacity | 16GB |
| Speaker | Amplifier | YES |
| Connector | Control | Rockchip RK3288W, Quad-core |
| SD Slot | NO | |
| Ethernet LAN | YES | |
| Audio IN | NO | |
| USB | YES | |
| HDMI Output | YES | |
| VGA | NO | |
| Digital | NO | |
| USB/SD/Micro SC/HDMI: list all | USB/HDMI/R145 | |
| Power | YES |
| Brochure Holder | Holders included | 8pcs |
| Applicable magazine size | A4 | |
| Holder inner size | 335*44*175mm | |
| Power | Voltage (in/out) | AC100-240V |
| Consumption (Watts) | About 48W | |
| Cord Length | 1.8m | |
| Compliance Listed (on power source) | Power supply with UL listed | |
| Operating Conditions | Temperature | Operating temperature:0-40°C |
| Humidity | 10-80% | |
| Product Dimensions | Screen | 32″ |
| Overall Unit | 770*450*1800mm | |
| Weight | Net | 49.8kgs |
| Gross | 62kgs | |
| Packing Information of LCD | Net Weight. (Kgs) | 40kgs |
| Gross Weight. (Kgs) | 50kgs | |
| Packing Dimension | 1915*220*930mm | |
| Packing Information of Base | Net Weight. (Kgs) | 9.8kgs |
| Gross Weight. (Kgs) | 12kgs | |
| Packing Dimension | 860*510*110mm |
Safety Warnings and Precautions
Based on the product design and LCD property, the following security works must be complied with in the device handling and use.
- Avoid high temperature and high moisture circumstance use: operating temperature 0~40°C; operating humidity 10%~80%
- Suitable operating time: 20 hours a day or less
- Suitable voltage input: 100~240v, excess voltage will cause damage to the device
- Keep away from strong electromagnetic circumstances: strong electromagnetic waves will cause damage to the device
- Be used in ventilated circumstances: well- ventilated environment would be better for the device used
- Avoid excessive vibration, heavy drop, and severe impact: any heavy vibration, drop, and impact will cause damage to the device
- Do not replace or modify product parts by yourself: we will not be responsible for any product problems of the device caused by self-adjustment.
- This is a non-water-proof product, so please be sure to avoid water leaking into the product.
- To have regular cleaning work: regular cleaning work is good for the device’s operation
Product Installation
1. Terminology of the product :
- The product: The whole product, including hardware and software of front-end display device and back-end content software platform.
- The device: front-end display device which drawing showed on the cover page of this manual.
- GTV: the display software applied on the front-end device management. Please refer to the “Sign way DS Player Software_Android_Manual_V1.0_ 140609” PDF for the detail.
- CDMS: the content management software applied on the back-end content edit, program produce, program publish… etc. management. Please refer to the “Digital Signage CDMS_Manual_V4.6.20” PDF for detail.
- Android: Android is an operating system based on a modified version of the Linux kernel and other open source software, designed primarily for digital devices. The product was developed based on the Android system.
2. Set up the product and the way to access
- Open the device back bracket, place it on a flat floor, and connect the AC power
- Turn on the power switch, make sure the LCD is on and the IR indicator, blue light on the surface, is on as well.
- Make sure the mouse or the remote control works well ( we recommend using the mouse which is a more efficient tool )
- mouse: connect a wire or wireless mouse by using the USB port on the back of the device
- remote control
| Illustration | Button | Function |
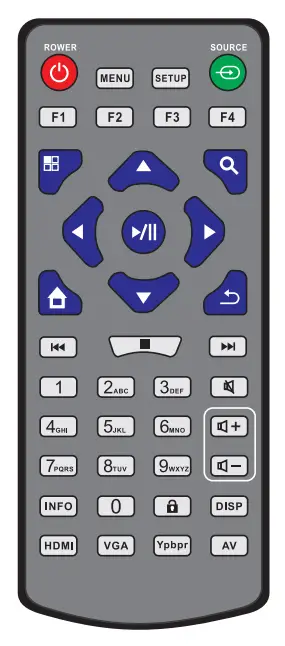 |  | power switch |
 | Call out OSD setup function ( active at GTV home page only) | |
 | Function Key, active on the GTV home page and Android home page only, acts as a moving key | |
| sequentially press Fl -F2-F3-F4 to exit GTV and enter the Android home page | ||
 | return | |
| play and pause | |
| stop playback. Press this button, the GTV home page will be presented right after | ||
 | up/down/left/right | |
| mute/volume up/volume down | ||
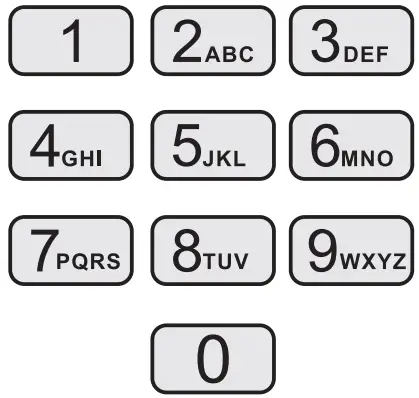 | Number input keys | |
 | For extension out only, not available for content upload | |
 | No function |
1. Two ways to configure the device
– Through the GTV Home page ( also called the OSD menu)
When the device is turned on, the system will enter into the GTV home page at once and playback mode being active automatically, then if there is a program ready for playback, either source from ROM or USB storage, the program will playback immediately. But there is no program ready, GTV home page shown below will stand still for further action.
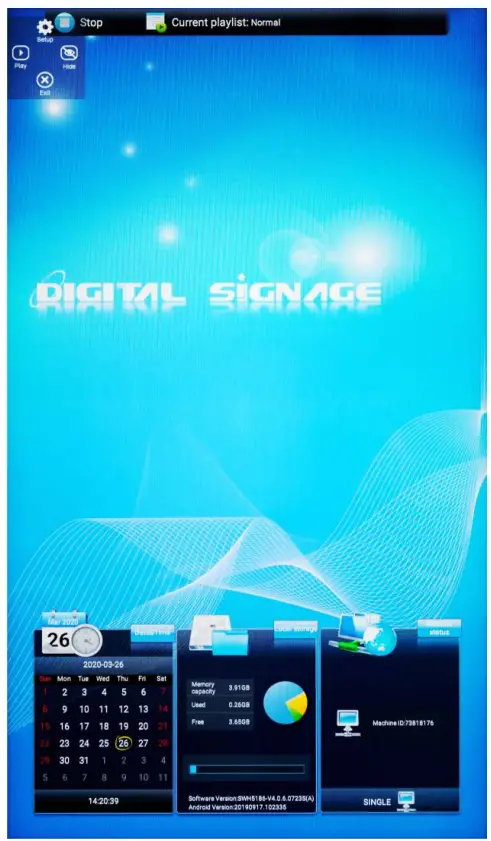 GTV home page
At this moment, you can press the![]() button on the remote control or click
button on the remote control or click![]() Fey on the upper left corner of the GTV home page and enter into the system setting page as below, then you can go on for language, work mode, network, time…configuration.
Fey on the upper left corner of the GTV home page and enter into the system setting page as below, then you can go on for language, work mode, network, time…configuration.
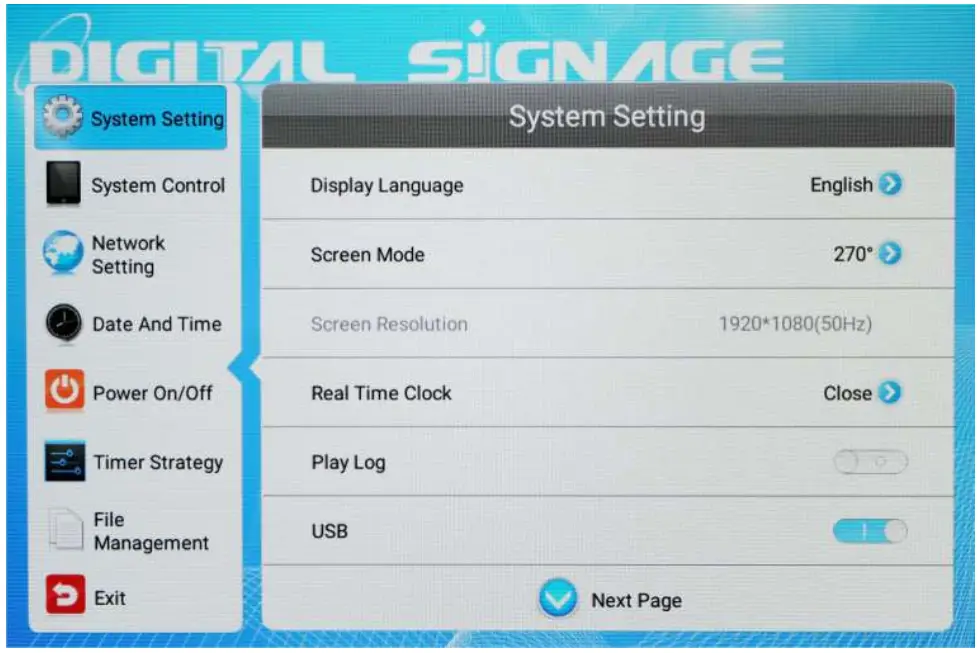 System setting page on GTV
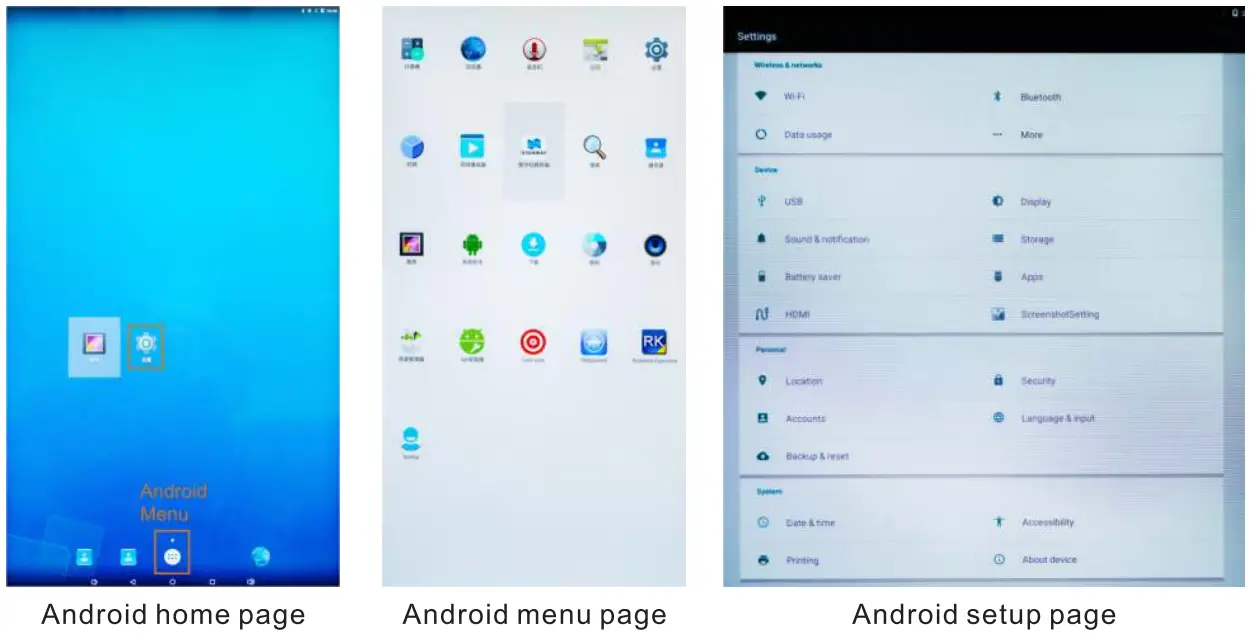
– Through the Android home page :
When the device is playing, press![]() to return to the GTV home page. At that moment, press
to return to the GTV home page. At that moment, press![]() sequentially to perform the action of exiting GTV and entering the Android home page. Afterward, you can click
sequentially to perform the action of exiting GTV and entering the Android home page. Afterward, you can click![]() on the page or click the
on the page or click the![]() Android menu first and then click
Android menu first and then click![]() on the Android menu page to enter into the Android setup page for device configuration. After configuration, click
on the Android menu page to enter into the Android setup page for device configuration. After configuration, click![]() to come back to GTV and have playback again.
to come back to GTV and have playback again.
2. Certain settings are required before playback
– Language:
English is the default language set in the factory, you can choose to select Simple Chinese or Japanese as you want by pressing![]() .
.
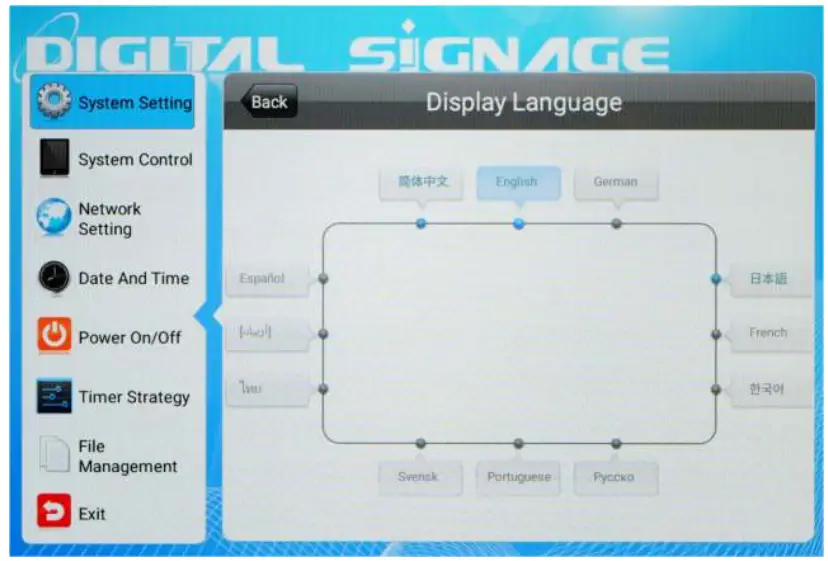 Language page
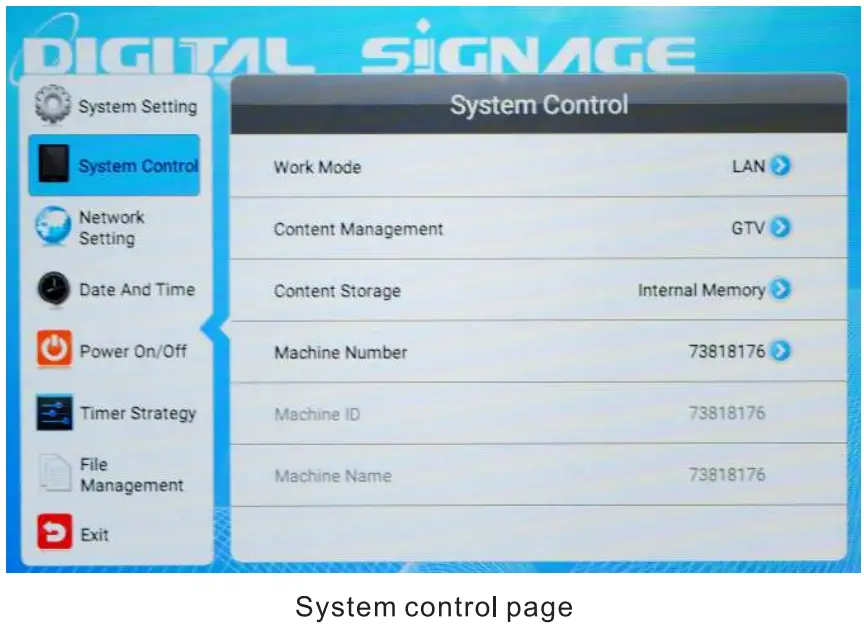
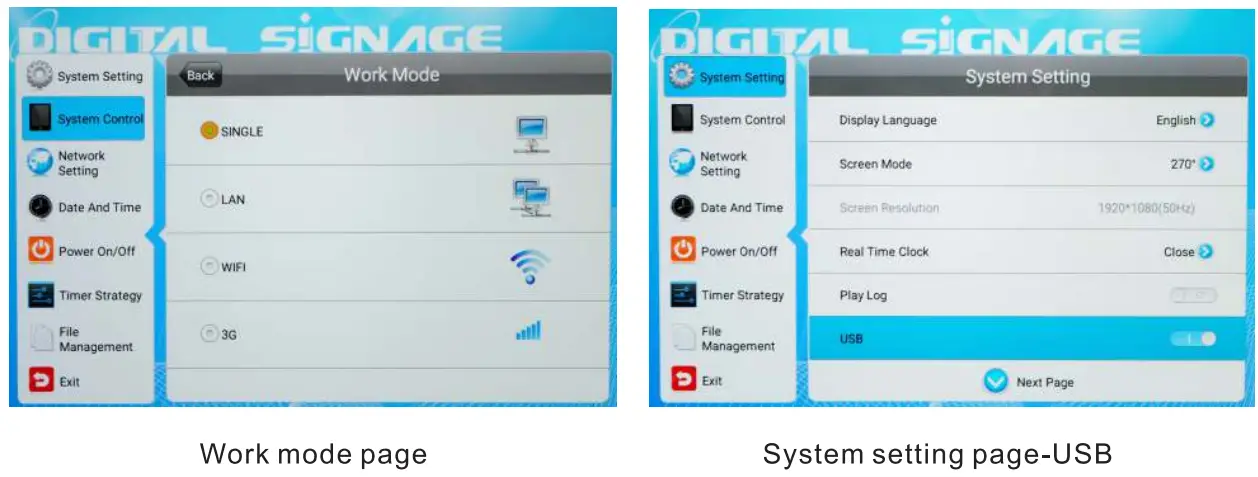
– Work mode:
there are two major categories of work mode: network and stand-alone
– Network: It means to upload programs to the device by the network, which is divided into wired(LAN), wireless(wifi), and 3G according to the upload path used.
– Stand alone: It means to upload programs to the device by USB manually. You should click Work Mode and select “Single” and you have to activate the USB on the System Setting page at the same time, then the device will recognize USB storage and upload the program inside when the USB is inserted into the USB port.
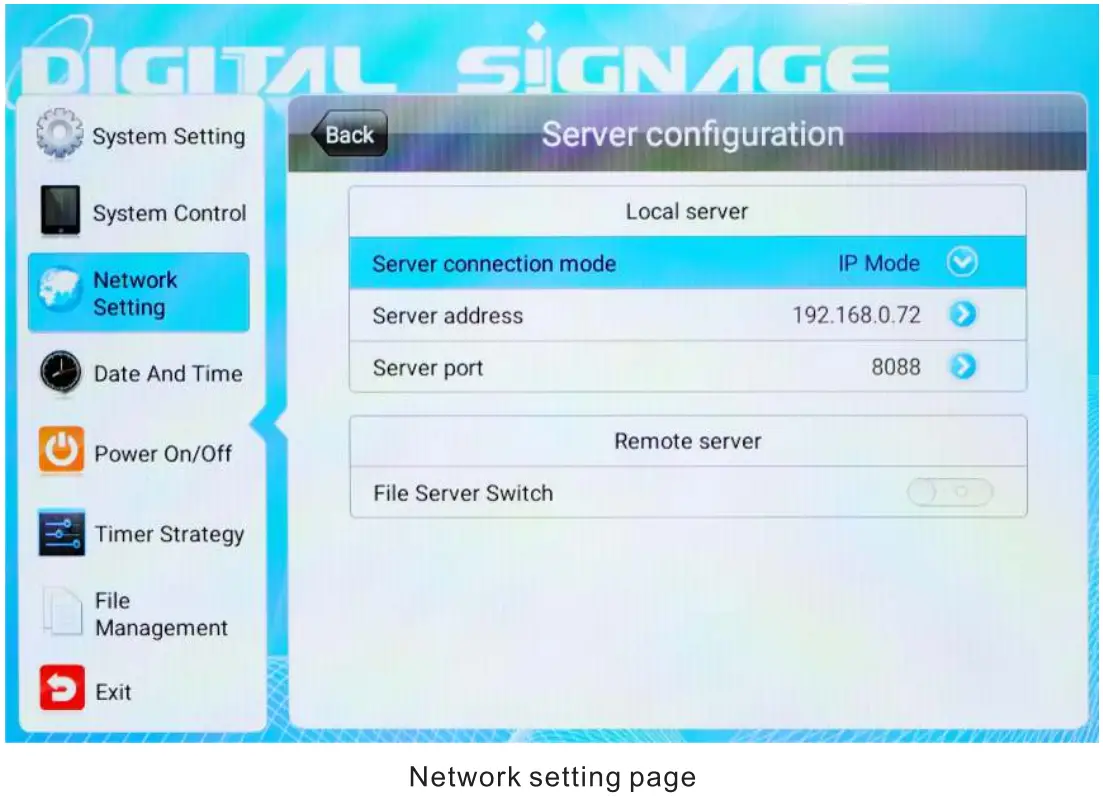
– Network setting:
When you select one of the network paths as your Work Mode, you must ensure that the network environment is properly set and available. If you have the correct setting, you will see the server address (web IP) shown on the page below.
Content Edit and Playback
1. Cloud CDMS server platform
We have set up a cloud CDMS server platform on the web to serve our customers. Please have your account and password and enter the website by using the computer.
http://47.52.207.18:8088/cdmsA/index.jsp
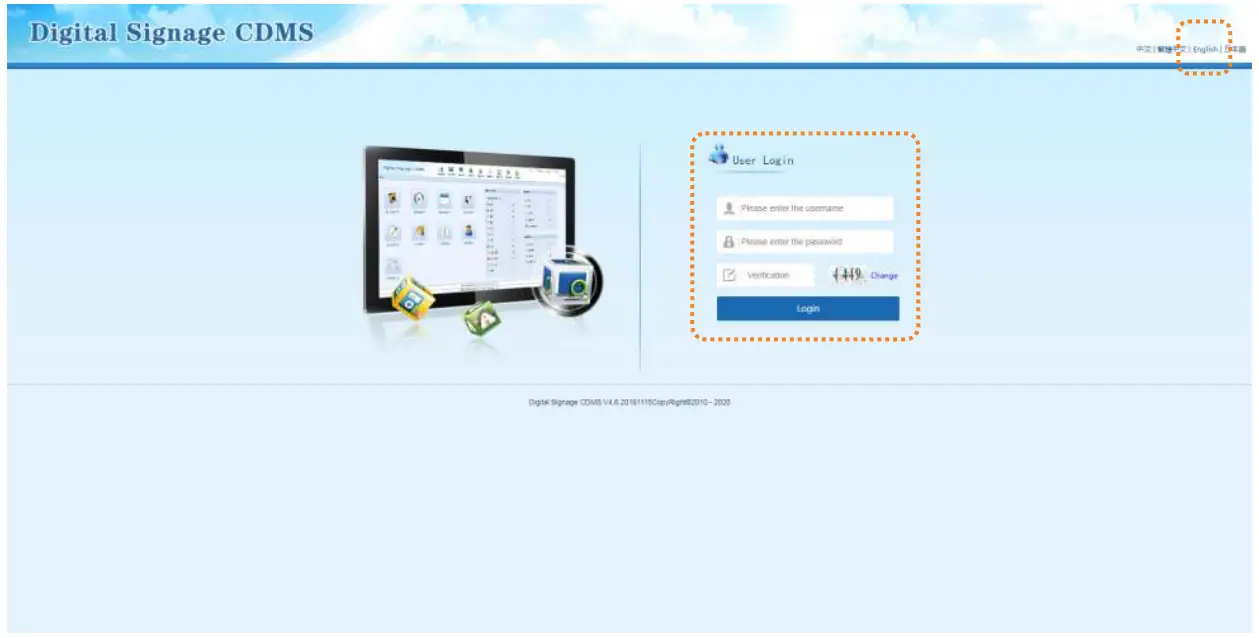
2. Content edit and produce program
After log-in the cloud CDMS platform, you can edit content, produce programs, create a display plan, and publish programs to the devices on the platform. CDMS is a powerful platform for your displays, including images, text, video, audio, or a complex, please refer to the “Digital Signage CDMS_Manual_V4.6.20” PDF for the detail of the operation.
3. Content upload and playback
As mentioned in 2.4.2 Work mode, there are two ways of uploading programs to the devices,
- Network: Be sure your device network is fully configured and functioning well, then you can publish programs to the devices easily.
- USB: In the stand-alone (single) scenario, you need to configure to activate the USB first. as shown in >>”System Setting page-USB” on 2.4.2, download programs from the CDMS platform to your USB storage and insert the USB into the USB port of the device, then the device will recongize the USB, upload program and playback automatically.
Product Warranty and Maintenance
1. Warranty Policy
- The product provides a one-year warranty starting from the ex-work delivery date under the premise of the normal and reasonable use of the product.
- Any unauthorized replacement of parts and components and wiring changes are deemed to be a violation of normal and reasonable use, and we will not perform the warranty responsibility
2. Product Maintenance
- Regular cleaning on the product including dedusting of the surface and frame is required
- Following through with the use precautions mentioned in “1.4 Safety Warnings and Precautions” above is the most basic maintenance work.
- In case of a failure, please Inform the manufacturer and have maintenance operations by a qualified person under the manufacturer’s guidance.
FCC Warning
This device complies with part 15 of the FCC Rules. Operation is subject to the following two conditions:
- This device may not cause harmful interference, and
- this device must accept any interference received, including interference that may cause undesired operation Any Changes or modifications not expressly approved by the party responsible for compliance could void the user’s authority to operate the equipment.
This equipment has been tested and found to comply with the limits for a Class B digital device, pursuant to part 15 of the FCC Rules. These limits are designed to provide reasonable protection against harmful interference in a residential installation. This equipment generates uses and can radiate radio frequency energy and, if not installed and used in accordance with the instructions, may cause harmful interference to radio communications. However, there is no guarantee that interference will not occur in a particular installation. If this equipment does cause harmful interference to radio or television reception, which can be determined by turning the equipment off and on, the user is encouraged to try to correct the interference by one or more of the following measures:
- Reorient or relocate the receiving antenna.
- Increase the separation between the equipment and receiver.
- Connect the equipment into an outlet on a circuit different from that to which the receiver is connected.
- Consult the dealer or an experienced radio/TV technician for help
FCC RF exposure statement:
The equipment complies with FCC radiation exposure limits set forth for an uncontrolled environment.
This equipment should be installed and operated with a minimum distance between 20cm from the radiator and your body.
V1.0 @ 2022.09


