YAMAHA PSS-A50 Piano Keyboard
PRECAUTIONS
PLEASE READ CAREFULLY BEFORE PROCEEDING
Please keep this manual in a safe and handy place for future reference.
WARNING
Always follow the basic precautions listed below to avoid the possibility of serious injury or even death from electrical shock, short-circuiting, damages, fire or other hazards. These precautions include, but are not limited to, the following:
Power Supply
- Do not place the USB cable near heat sources such as heaters or radiators. Also, do not excessively bend or otherwise damage the cable, or place heavy objects on it.
- Only use the voltage specified as correct for the instrument. The required voltage is printed on the name plate of the instrument.
- Included USB cable is designed for use with only this instrument. Do not use for any other instrument.
- Check the plug periodically and remove any dirt or dust which may have accumulated on it.
Do not Open
- This instrument contains no user-serviceable parts. Do not open the instrument or attempt to disassemble or modify the internal components in any way. If it should appear to be malfunctioning, discontinue use immediately and have it inspected by qualified Yamaha service personnel.
Water Warning
- Do not expose the instrument to rain, use it near water or in damp or wet conditions, or place on it any containers (such as vases, bottles or glasses) containing liquids which might spill into any openings. If any liquid such as water seeps into the instrument, turn off the power immediately and disconnect the plug from the AC outlet. Then have the instrument inspected by qualified Yamaha service personnel.
- Never insert or remove a plug with wet hands.
Fire Warning
- Do not put burning items, such as candles, on the unit. A burning item may fall over and cause a fire.
Influences on Electro-Medical Devices
- Magnetism may affect electro-medical devices.
- Do not use this product near medical devices or inside areas in which the use of radio waves is restricted.
- Do not use this product within 15cm (6 in.) of persons with a heart pacemaker or defibrillator implant.
Battery
- Follow the precautions below. Failure to do so might result in explosion, fire, overheating or battery fluid leakage.
- Do not tamper with or disassemble batteries.
- Do not dispose of batteries in fire.
- Do not attempt to recharge batteries that are not designed to be charged.
- Keep the batteries separate from metallic objects such as necklaces, hairpins, coins, and keys.
- Use the specified battery type only.
- Use new batteries, all of which are the same type, same model, and made by the same manufacturer.
- Always make sure all batteries are inserted in conformity with the +/- polarity markings.
- When the batteries run out, or if the instrument is not to be used for a long time, remove the batteries from the instrument.
- When using Ni-MH batteries, follow the instructions that came with the batteries. Use only the specified charger device when charging.
- Keep batteries away from small children who might accidentally swallow them.
- If the batteries do leak, avoid contact with the leaked fluid. If the battery fluid should come in contact with your eyes, mouth, or skin, wash immediately with water and consult a doctor. Battery fluid is corrosive and may possibly cause loss of sight or chemical burns.
If You Notice any Abnormality
- When one of the following problems occur, immediately turn off the power switch and disconnect the plug from the outlet. (If you are using batteries, remove all batteries from the instrument.) Then have the device inspected by Yamaha service personnel.
- The USB cable or plug becomes frayed or damaged.
- It emits unusual smells or smoke.
- Some object has been dropped into the instrument.
- There is a sudden loss of sound during use of the instrument.
- If any cracks or breakages exist on the instrument.
CAUTION
Always follow the basic precautions listed below to avoid the possibility of physical injury to you or others, or damage to the instrument or other property. These precautions include, but are not limited to, the following:
Power Supply
- Use the specified USB power adaptor (page 7) only. Using the wrong adaptor can result in damage to the instrument or overheating.
- Do not connect the instrument to an electrical outlet using a multiple-connector. Doing so can result in lower sound quality, or possibly cause overheating in the outlet.
- When removing the plug from the instrument or an outlet, always hold the plug itself and not the USB cable. Pulling by the cable can damage it.
- Remove the plug from the outlet when the instrument is not to be used for extended periods of time, or during electrical storms.
Location
- Do not place the instrument in an unstable position where it might accidentally fall over.
- Before moving the instrument, remove all connected cables, to prevent damage to the cables or injury to anyone who might trip over them.
- When setting up the product, make sure that the AC outlet you are using is easily accessible. If some trouble or malfunction occurs, immediately turn off the power switch and disconnect the plug from the outlet. Even when the power switch is turned off, electricity is still flowing to the product at the minimum level. When you are not using the product for a long time, make sure to disconnect the plug from the wall AC outlet.
Connections
- Before connecting the instrument to other electronic components, turn off the power for all components. Before turning the power on or off for all components, set all volume levels to minimum.
- Be sure to set the volumes of all components at their minimum levels and gradually raise the volume controls while playing the instrument to set the desired listening level.
Handling Caution
- Do not insert a finger or hand in any gaps on the instrument.
- Never insert or drop paper, metallic, or other objects into the gaps on the panel or keyboard. This could cause physical injury to you or others, damage to the instrument or other property, or operational failure.
- Do not rest your weight on, or place heavy objects on the instrument, and do not use excessive force on the buttons, switches or connectors.
- Do not use the instrument/device or headphones for a long period of time at a high or uncomfortable volume level, since this can cause permanent hearing loss. If you experience any hearing loss or ringing in the ears, consult a physician.
Yamaha cannot be held responsible for damage caused by improper use or modifications to the instrument, or data that is lost or destroyed.
Always turn the power off when the instrument is not in use.
Even when the Standby/On switch is in standby status (display is off), electricity is still flowing to the instrument at the minimum level.
When you are not using the instrument for a long time, make sure you disconnect the plug from the wall AC outlet.
Make sure to discard used batteries according to local regulations.
NOTICE
To avoid the possibility of malfunction/ damage to the product, damage to data, or damage to other property, follow the notices below.
- Handling
- Do not use the instrument in the vicinity of a TV, radio, stereo equipment, mobile phone, or other electric devices. Otherwise, the instrument, TV, or radio may generate noise.
- Do not expose the instrument to excessive dust or vibrations, or extreme cold or heat (such as in direct sunlight, near a heater, or in a car during the day) to prevent the possibility of panel disfiguration, damage to the internal components or unstable operation. (Verified operating temperature range: 5° – 40°C, or 41° – 104°F.)
- Do not place vinyl, plastic or rubber objects on the instrument, since this might discolor the panel or keyboard.
- Maintenance
- When cleaning the instrument, use a soft and dry cloth. Do not use paint thinners, solvents, alcohol, cleaning fluids, or chemical-impregnated wiping cloths.
- Saving Data
- Some of the data of this instrument are retained when the power is turned off. However, the saved data may be lost due to some failure, an operation mistake, etc.
- About Copyrights
- Copying of the commercially available musical data including but not limited to MIDI data and/or audio data is strictly prohibited except for your personal use.
- This product incorporates and bundles contents in which Yamaha owns copyrights or with respect to which Yamaha has license to use others’ copyrights. Due to copyright laws and other relevant laws, you are NOT allowed to distribute media in which these contents are saved or recorded and remain virtually the same or very similar to those in the product.
* The contents described above include a computer program, Accompaniment Style data, MIDI data, WAVE data, voice recording data, a score, score data, etc.
* You are allowed to distribute medium in which your performance or music production using these contents is recorded, and the permission of Yamaha Corporation is not required in such cases.
- About This Manual
- The illustrations and displays as shown in this manual are for instructional purposes only, and may appear somewhat different from those on your instrument.
- The company names and product names in this manual are the trademarks or registered trademarks of their respective companies.
This instrument provides powerful performance features including versatile effects and sounds enjoyable even for beginners. We recommend that you read this manual carefully so that you can fully take advantage of the advanced and convenient functions of the instrument.
We also recommend that you keep this manual in a safe and handy place for future reference.
Included Accessories
- Owner’s Manual (this book)
- USB cable
- Online Member Product Registration
Setting Up
Depending on how you are powering your instrument, follow one of the three power supply instructions below. The PSS-A50 does not include power supply accessories (with the exception of the USB cable), so make sure to purchase them separately as required.
Using USB Bus Power
USB Bus Power
This instrument is a bus-powered type device which can be powered by a computer connected via the USB cable.
Connect the included USB cable in the order shown in the illustration.
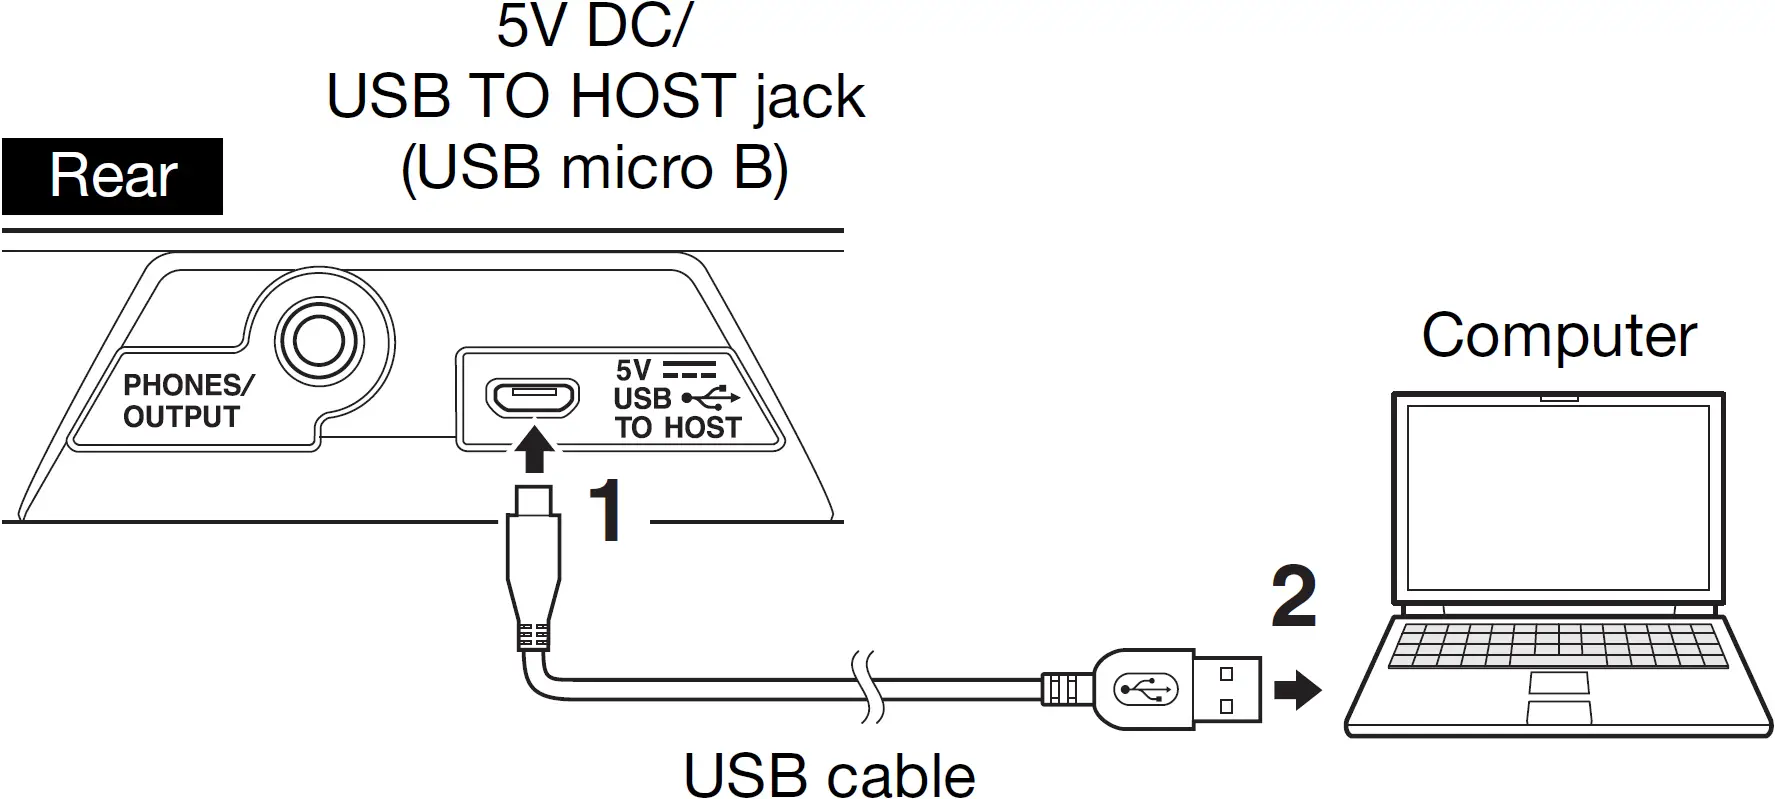
When disconnecting the USB cable, first turn off the power, then follow the order shown above in reverse.
PHONES/OUTPUT Jack
- Before using the headphones, be sure to set the volume of the instrument at the minimum level. Then gradually raise the volume while playing the instrument, for your ear comfort and safety.
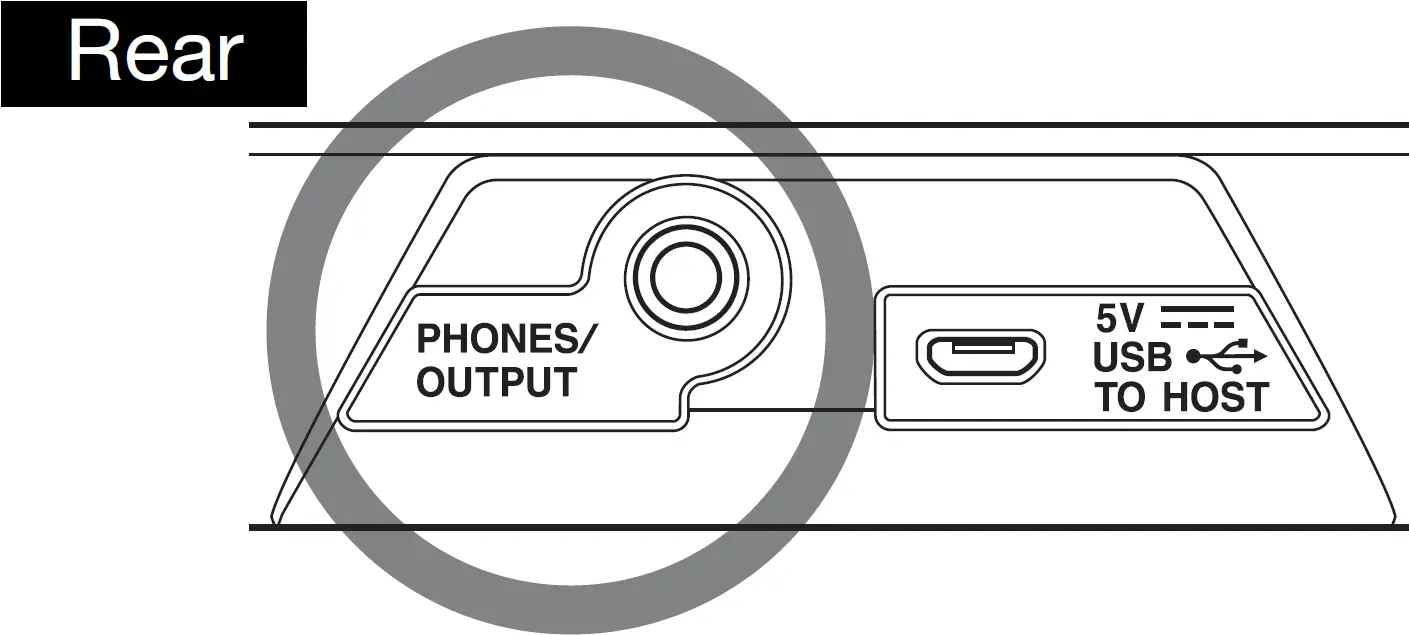
For connecting a set of stereo headphones with a stereo mini plug. This jack also functions as an external output for sending the audio signal of this instrument to external audio equipment.
The speakers of the instrument are automatically shut off when a headphones plug, etc. is inserted into this jack.
CAUTION
- Do not use the instrument or headphones for a long period of time at a high or uncomfortable volume level, since this can cause permanent hearing loss.
- Before connecting the instrument to other electronic com-ponents, make sure to set all volume levels to minimum, then turn off the power of all the components. Otherwise, damage to the components or electrical shock may occur.
NOTICE
- To avoid possible damage to the external device, first turn on the power to the instrument, then to the external device. When turning off the power, do so in reverse order: first turn off the power to the external device, then to the instrument.
Using a USB Power Adaptor or USB Mobile Battery
Connect the included USB cable and the USB power adaptor (or USB mobile battery) sold separately in the order shown in the illustration.
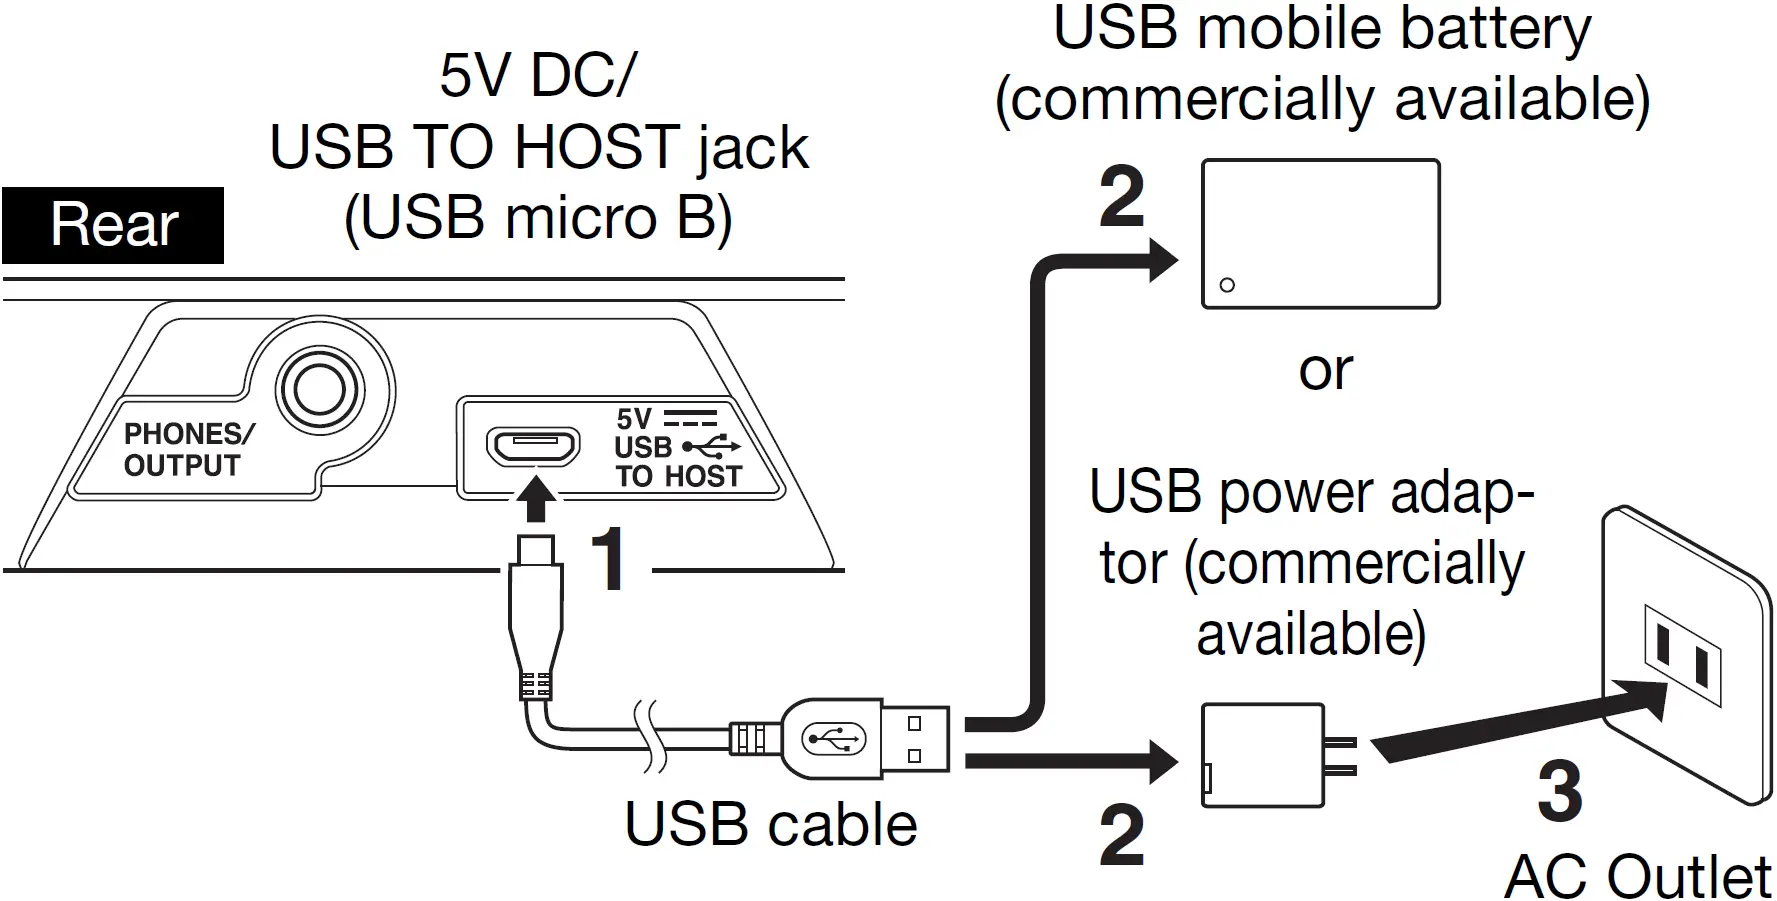
The shape of the plug and outlet differs depending on your locale.
When disconnecting the USB cable or so, first turn off the power, then follow the order shown above in reverse.
USB Power adaptor / USB mobile battery requirements
- Output voltage: 4.8 V to 5.2 V
- Output current: 0.5 A or greater
CAUTION
- Make sure to use a USB power adaptor or USB mobile battery with the specifications above. Using the wrong USB power adaptor can result in damage to the instru-ment or overheating.
Read the safety precautions for your particular USB power adaptor or USB mobile battery.
NOTICE
- Some USB mobile batteries automatically stop supplying power when connected to a device with low cur-rent consumption, such as this instrument.
Use a USB mobile battery that has a low-current mode function, etc., and can supply power to devices with current consumption of 40 mA or less. - When the instrument is turned on and power turns off suddenly and unexpectedly, your USB power adaptor may not meet the requirements or may be damaged. Try using another USB power adaptor that meets the requirements, etc. If it should appear to be malfunctioning, please consult Yamaha service personnel.
Using Batteries
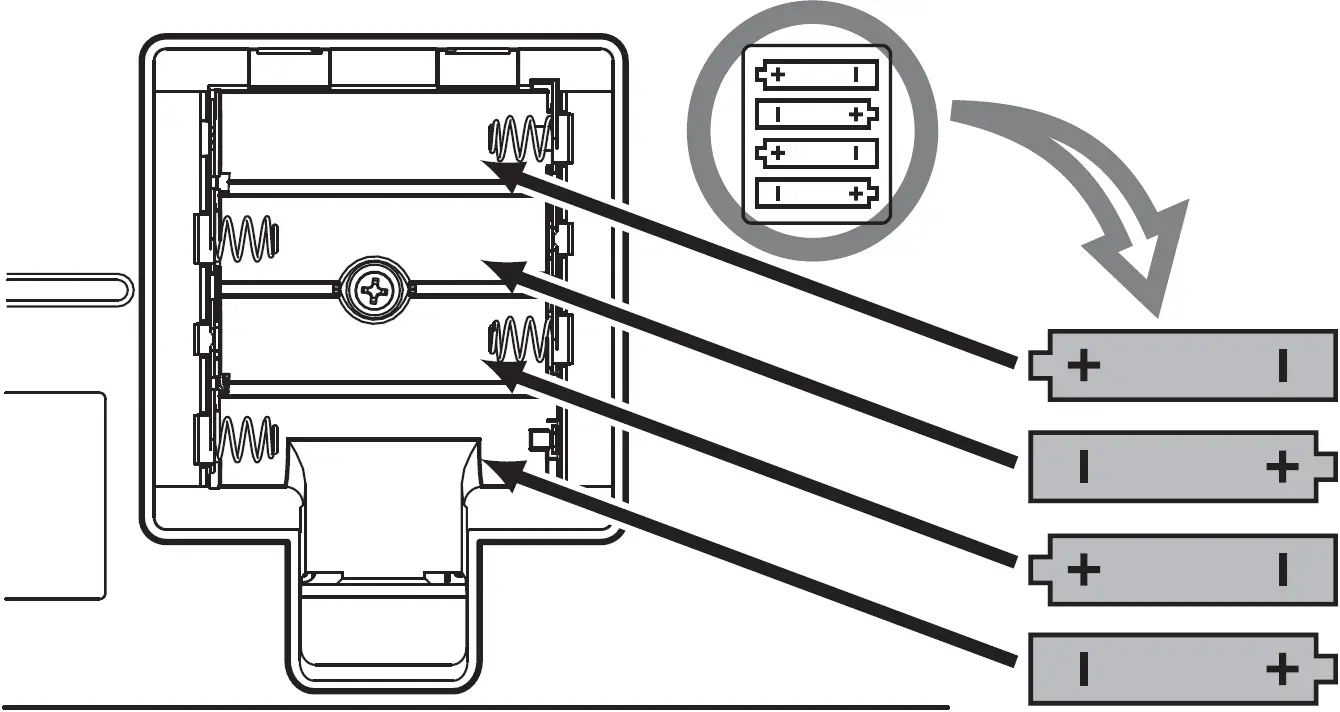
This instrument requires four “AA” size, Alkaline (LR6)/Manganese (R6) batteries, or rechargeable nickel-metal hydride batteries (rechargeable Ni-MH batteries). The Alkaline batteries or rechargeable Ni-MH batteries are recommended for this instrument, since other types may result in poorer battery performance.
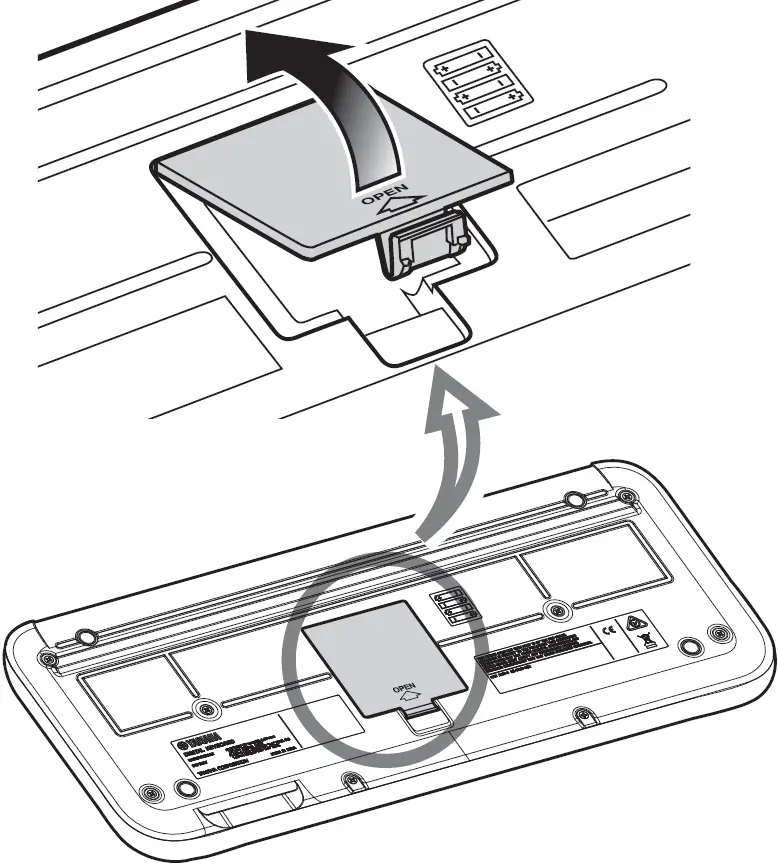
- Make sure that the power of the instrument is off.
- Open the battery compartment cover located on the instrument’s bottom panel.

- Insert the four new batteries, being careful to follow the polarity markings on the inside of the compartment.

- Replace the compartment cover, making sure that it locks firmly in place.
NOTICE
- Make sure to set the Battery Type correctly. Failure to set the battery type may shorten the amount of the battery life.
- Connecting or disconnecting the USB cable with batteries installed may turn the power off, resulting in loss of data being recorded at the time.
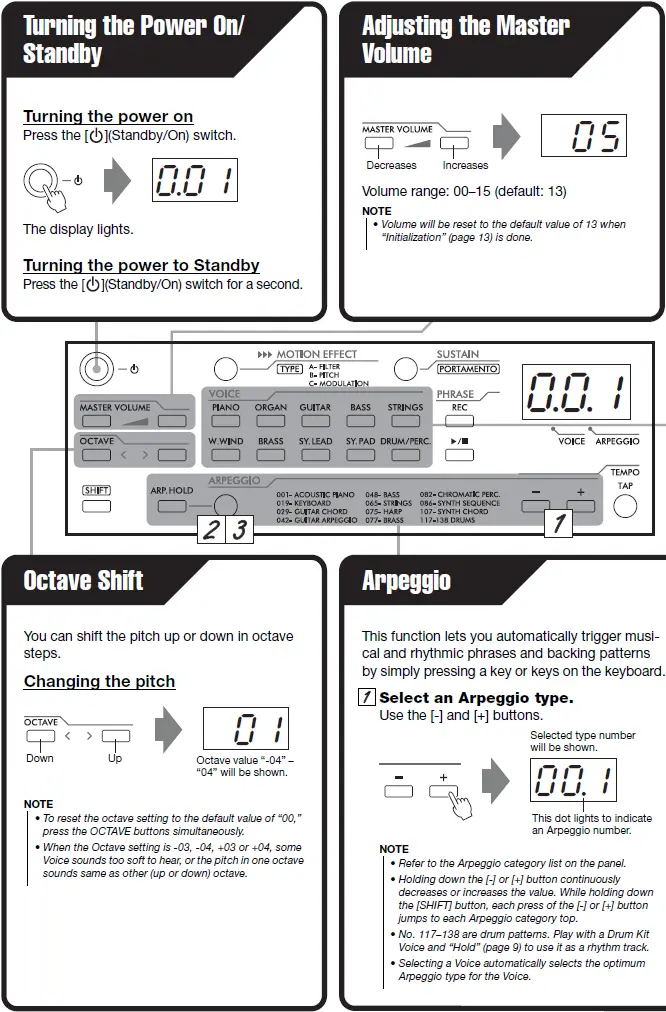
Selecting the Keyboard Sound (Voice)
Various instrumental Voices are categorized and assigned to the Voice buttons. Pressing the same Voice button repeatedly selects the assigned Voices in order.
NOTE
- For specific Voice names.
- Voice numbers 039 and 040 in the [DRUM/PERC.] button are Drum Kit Voice. Various drum and percussion sounds are assigned to individual keys, from which they can be played. For details on the instruments and key assignments of each Drum Kit.
If you can’t hear any sound or the sound is too soft, try the following.
- Increase the volume.
- Disconnect the headphones from the PHONES/OUTPUT terminal.
- Set Local Control to On
- Replace all the batteries with new ones or recharged ones
- Reset the Octave setting to the default value of 00.
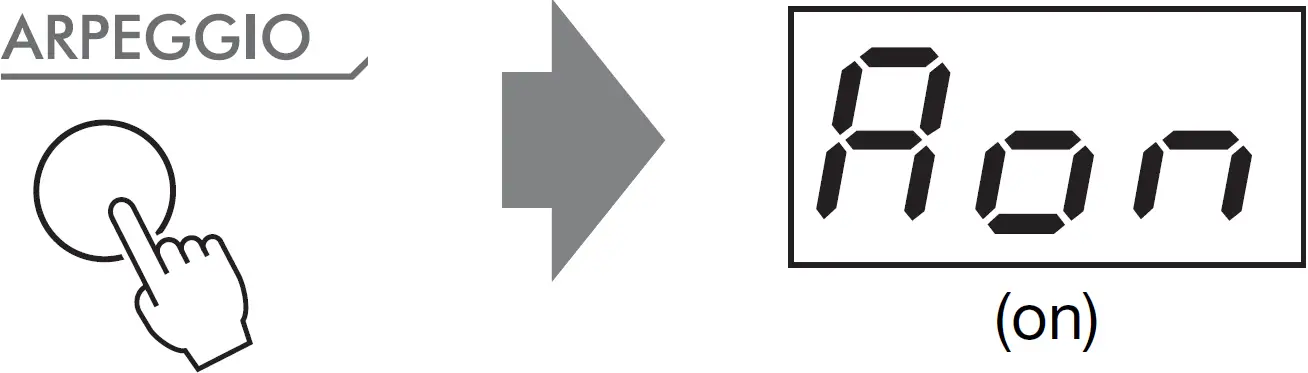
- Start the Arpeggio sequence.
Press the [ARPEGGIO] button. Hold keys to start Arpeggio sequence.
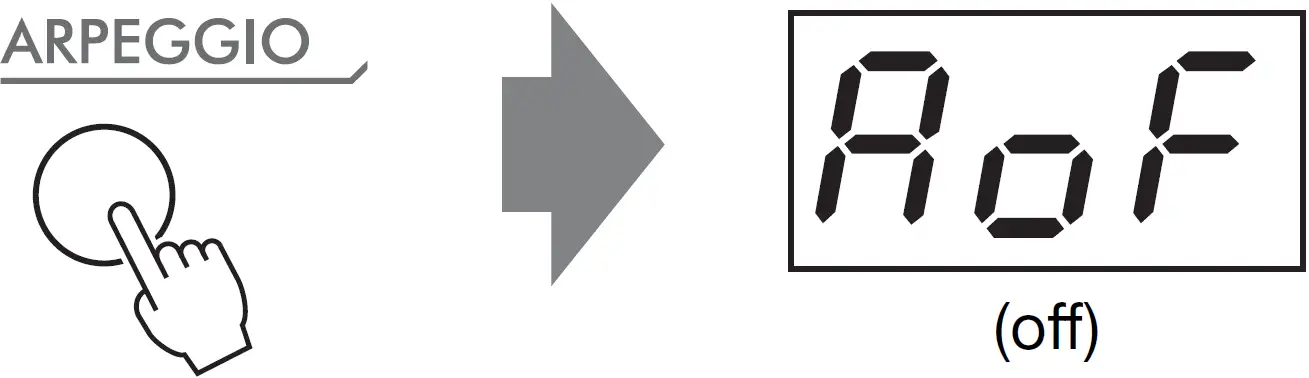
- Turn off Arpeggio
Press the [ARPEGGIO] button.
 Hold keys to start Arpeggio sequence.
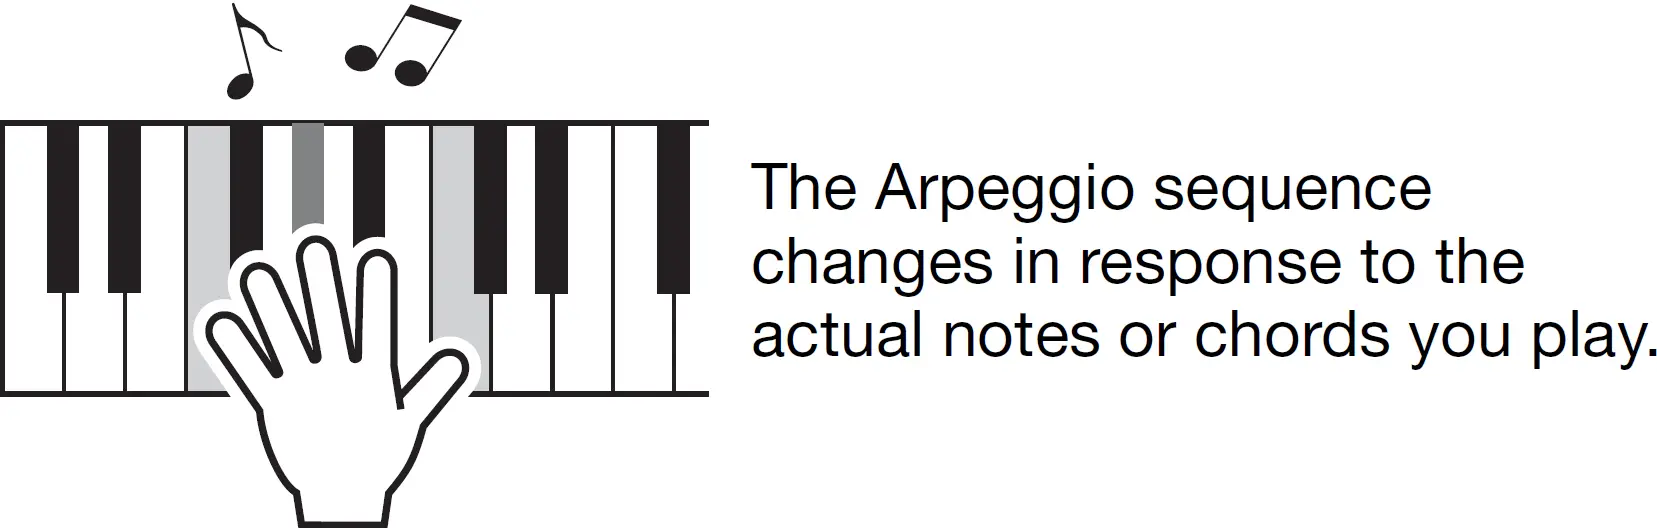
Arpeggio Hold
The Arpeggio cycles automatically, even if you release your fingers from the keys. You can play the keys over the Arpeggio sound.
Press [ARP. HOLD] button while the Arpeggio is playing.
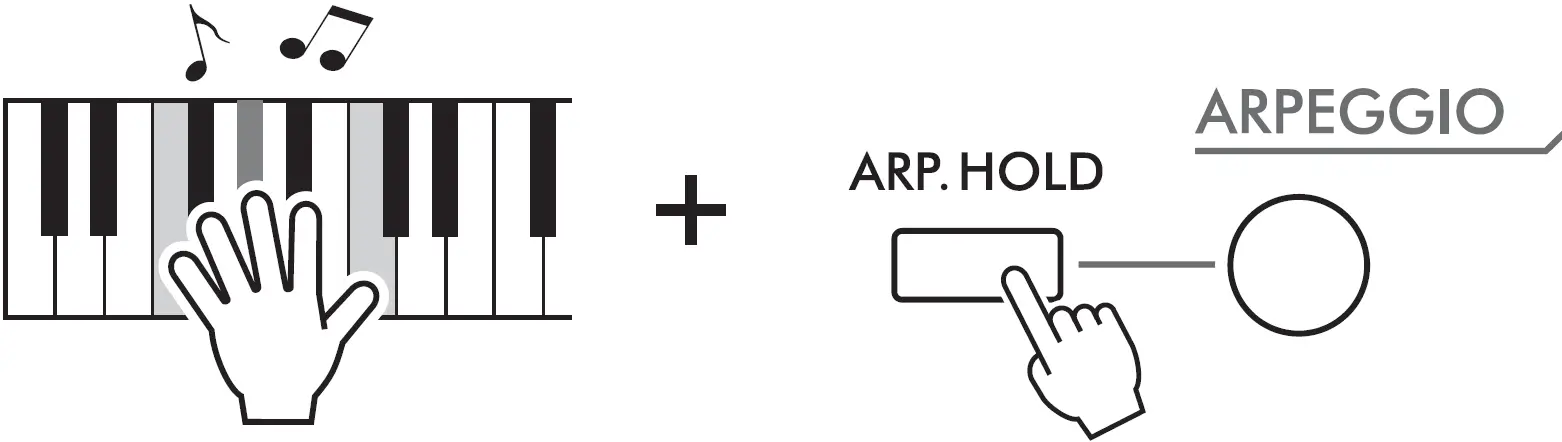
To disable Arpeggio Hold, press the [ARP. HOLD] button again.
NOTE
- During Arpeggio Hold, you can change Arpeggio phrases by pressing desired keys while holding down the [ARP. HOLD] button.
- When Arpeggio Hold is disabled, the last Voice selected before entering Arpeggio Hold will be called up.
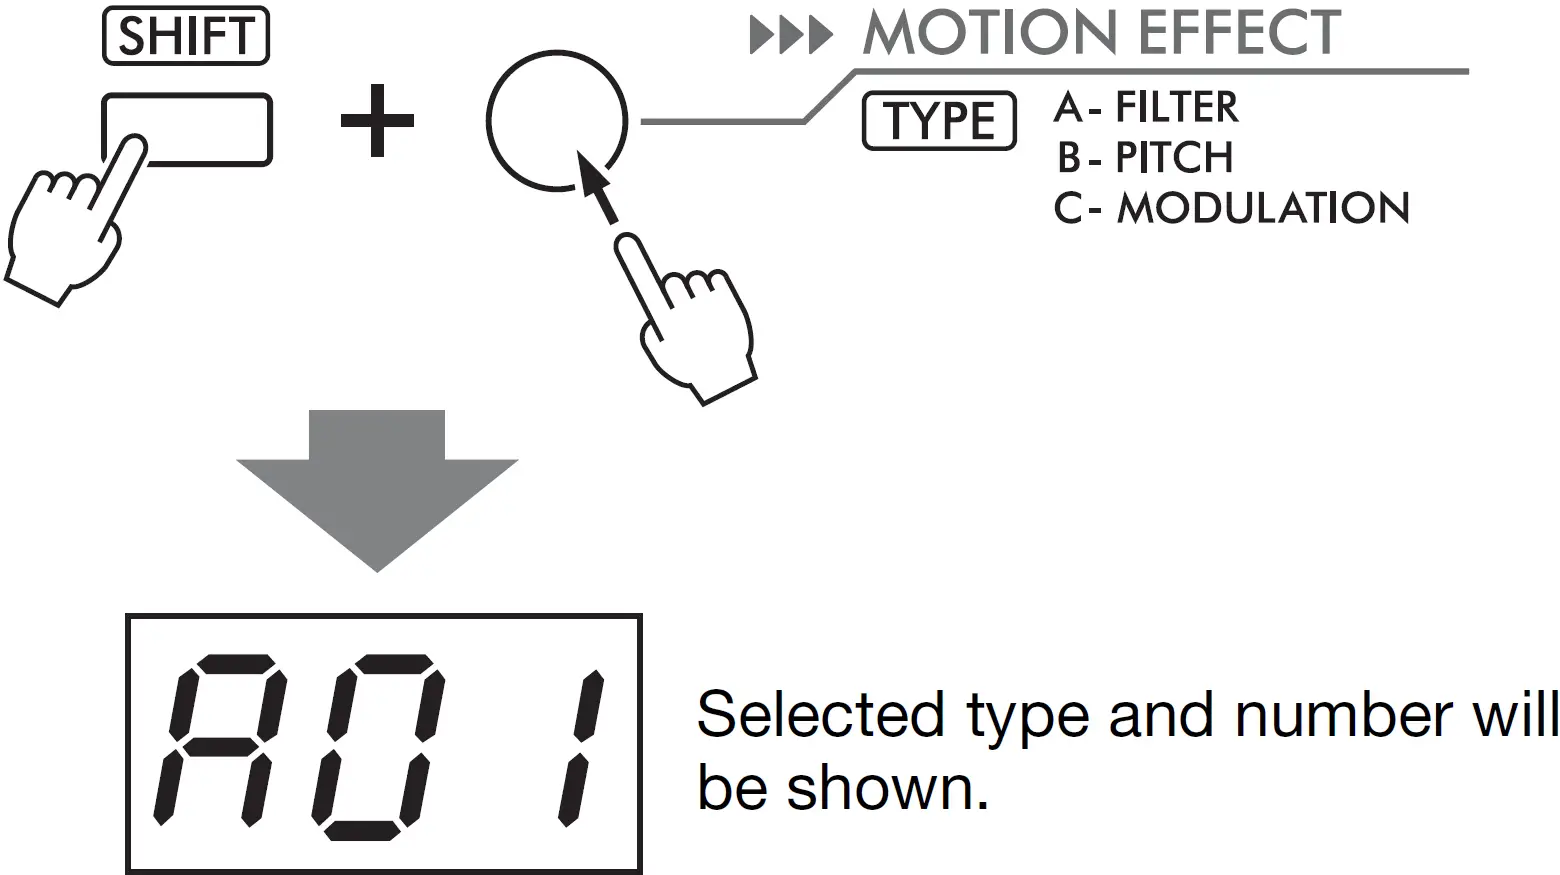
Motion Effect
While holding down the [MOTION EFFECT] button, Motion Effect applies to the notes you play. Motion Effect has three types A, B and C, and correspondingly changes the Filter, Pitch, and/or Modulation of the sound over time. Each type has around 10 variations.
Selecting a Desired Type
While holding down the [SHIFT] button, each press of the [MOTION EFFECT] button selects the type in order (A01, A02, etc.).
NOTE
- To jump to the top of the A, B or C type in order, hold down the [MOTION EFFECT] button while holding down the [SHIFT] button.
- Certain combinations of a specific Voice, octave and type may generate noise.
[SHIFT] button
- Sets the various setting of the instrument
- Selects the function boxed. (TYPE of Motion Effect; Type, PORTAMENTO;)
Recording/Playing
You can record your performance (Phrase Recording). Note that the previously recorded data will be erased since only one recording is available.
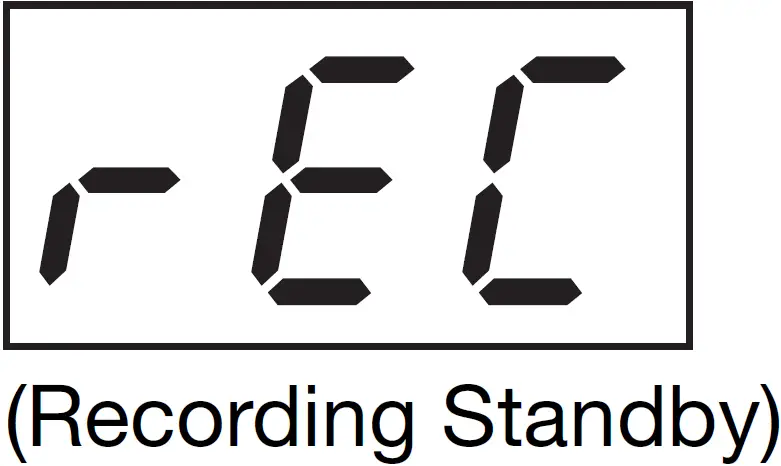
- Recording Standby
Press [REC]. To exit from Recording Standby mode, press [REC] again.
 - Start Recording
Play the keyboard to start recording. (Dot flashes with beat)
You can also start recording by pressing Play/Stop button. - Stop Recording
Press [REC]. - Playback
Press Play/Stop button.
 To exit from Recording Standby mode, press [REC] again.
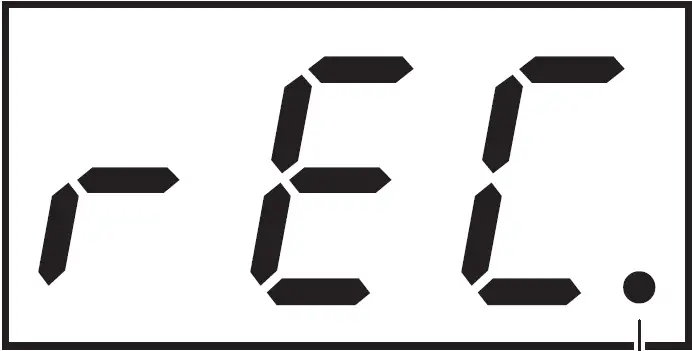 (Dot flashes with beat)
Time Signature
When recording the Phrase used for Repeat Playback, set the Time Signature during the Recording Standby mode (“rEC” indication.) If you recorded with a wrong Time Signature, unwanted silence may be inserted during the repeats since the Phrase is repeated in measures. The Time Signature can be set from “Metronome”. (The default setting is 4/4.) You can use the metronome while recording, but the metronome will not be recorded.
NOTE
- When recording capacity becomes full during recording, a “FUL” message appears on the display and recording is stopped.
- You can start a Phrase at a desired speed by simply tapping the [TEMPO/TAP] button four times for time signatures in 4 (such as 4/4) or three times for time signatures in 3 (such as 3/4).
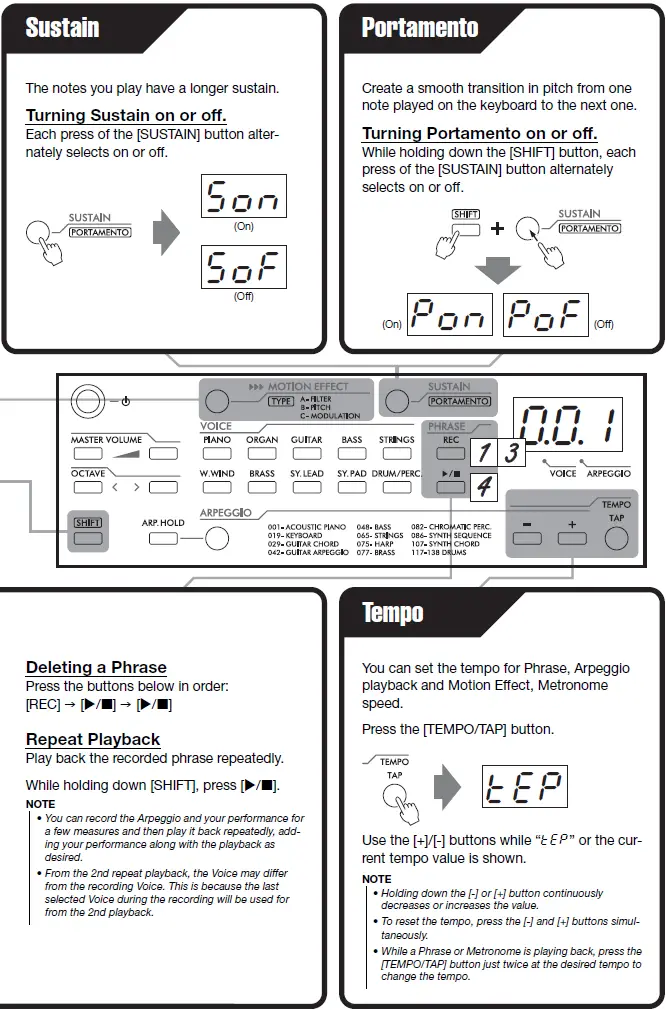
Keyboard Settings
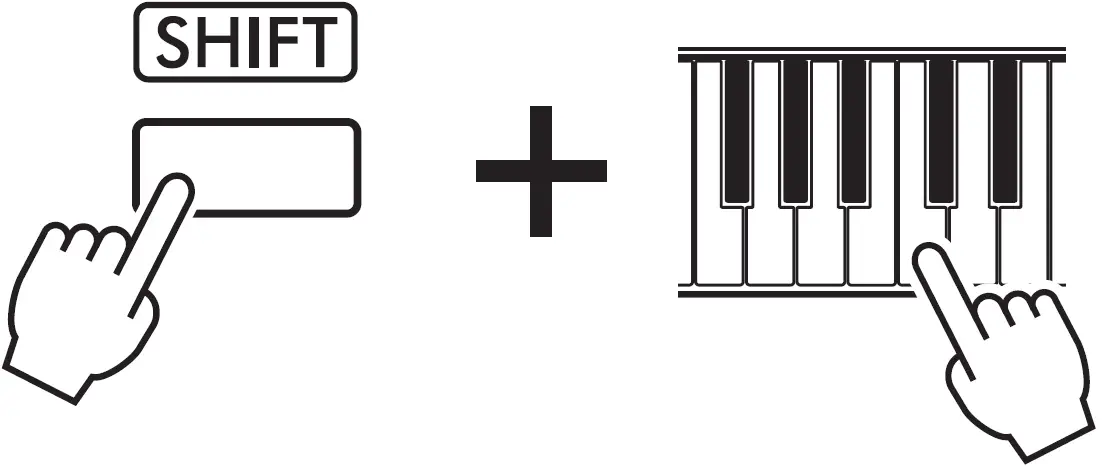
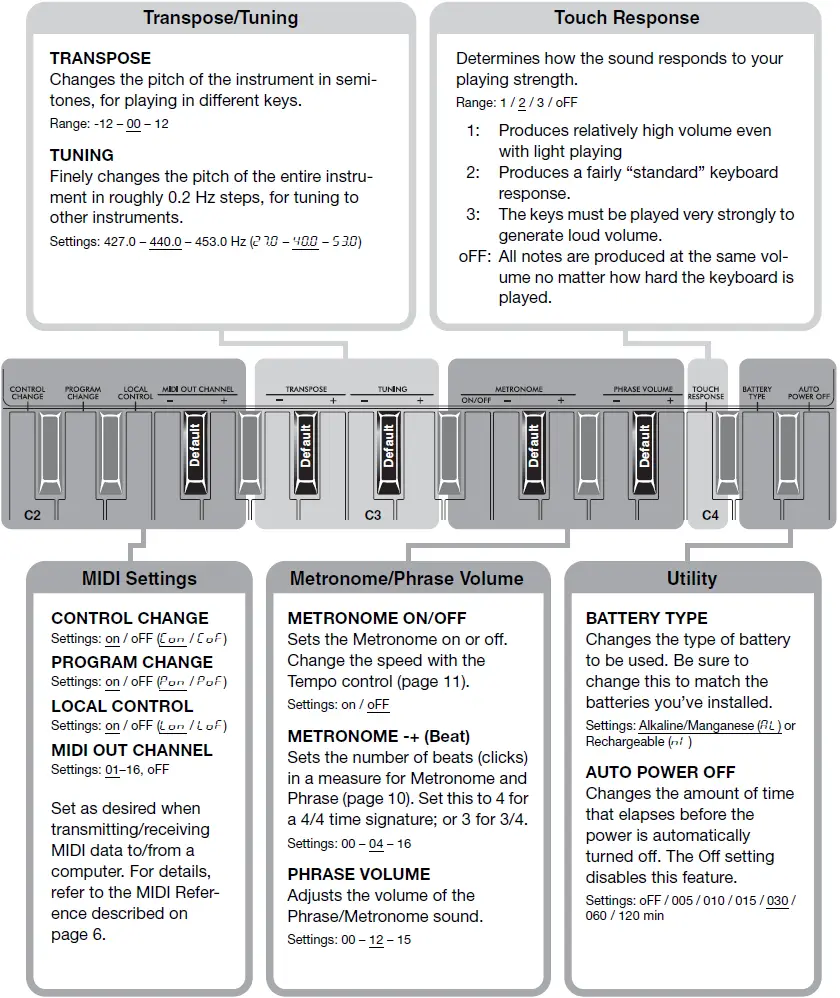
These detailed settings provide extra convenience and enhanced operation. To change them, hold down the [SHIFT] button, and then simultaneously press the appropriate key on the keyboard (repeatedly if necessary) as indicated. Use the [+] and [-] keys to change the value, or the Default key to call up the default value (indicated with underline).
Creating Music with MIDI
By connecting this instrument to a computer via USB cable, you can record performances on this instrument as a MIDI Song to music production software on computer, or use this instrument as a master keyboard to enter data on music production software. These features greatly expand your music creation and performance possibilities. For details on MIDI, refer to the online PDF manual “MIDI basics” on the Yamaha website.
Supported OS
- Windows 7, 8.1, 10
- Mac OSX 10.12, 10.13, 10.14
NOTICE
- Be sure to read “Precautions when Using the [5V DC/USB TO HOST] Terminal” in the MIDI Reference before using the [5V DC/USB TO HOST] terminal.
- Turn off Local Control (MIDI settings) as needed.
- Connect this instrument and the computer with the USB cable.
- Start recording to the music production software and play this instrument.
- Windows is a registered trademark of Microsoft® Corporation in the United States and other countries.
- Mac is trademark of Apple Inc., registered in the U.S. and other countries.
Troubleshooting
| Problem | Solution |
| No sound, too soft sound or choppy sound | See the text in the shaded box. |
Specifications
Product Name | Digital Keyboard |
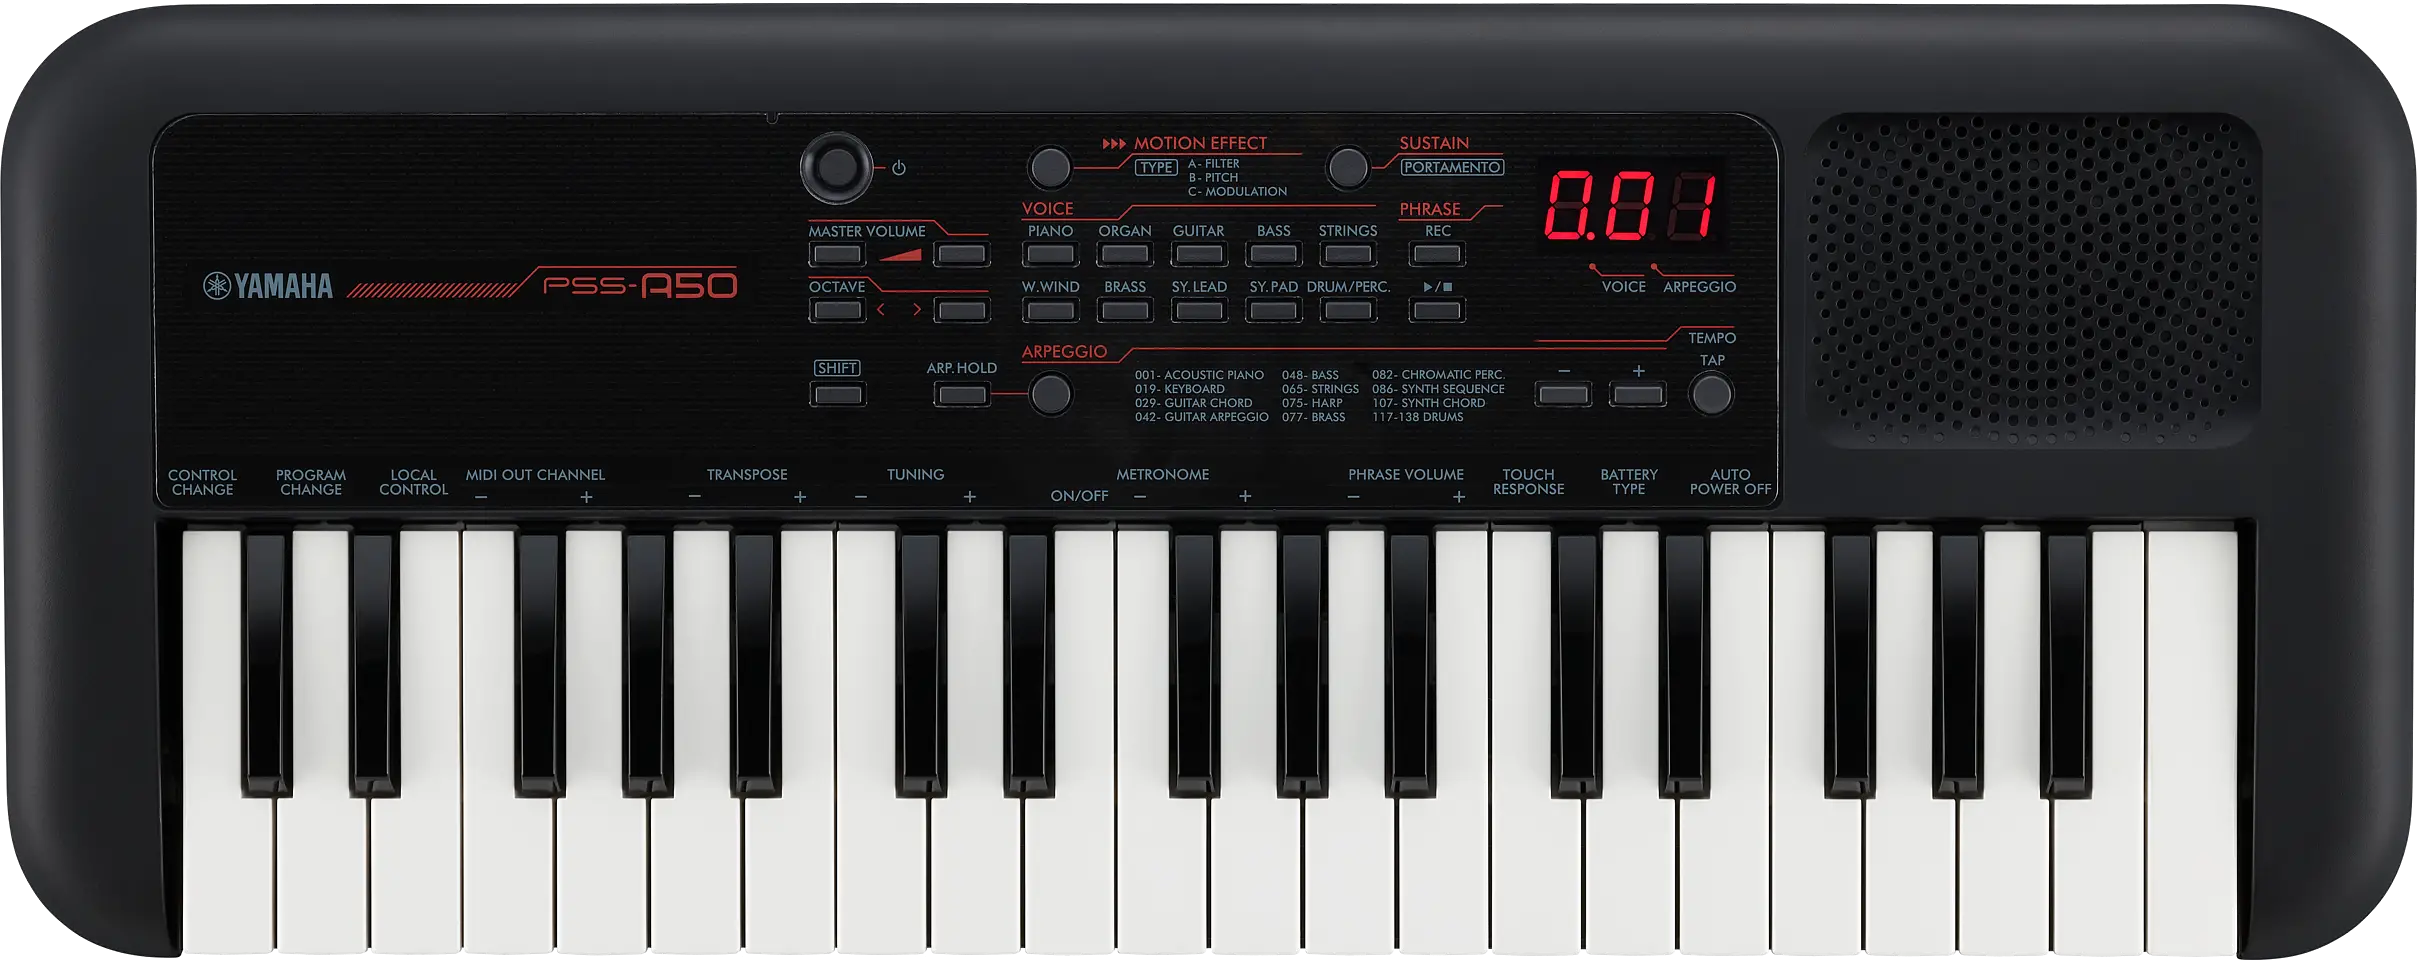
| Keyboard | 37 HQ (High Quality) Mini Keys |
| Touch Response | Soft, Medium, Hard, Fixed |
| Voices | Preset: 40 Voices + 2 Drum Kits Polyphony (Max.): 32 notes |
| Octave Button | Yes (-04 – +04) |
| Arpeggio | 138 types |
| Effects | Motion Effect, Portamento, Sustain |
| Function | Metronome: Yes, Tempo: 11 – 280, Transpose: -12 – +12, Tuning: 427.0 – 440.0 – 453.0 Hz (approx. 0.2 Hz increments) |
| Recording (MIDI data only; audio not supported.) |
|
| Display | LED display |
| Connectivity | Headphones/Output (stereo mini), 5V DC/USB TO HOST (USB micro B) |
| Amplifiers | 1.4 W |
| Speakers | 8 cm x 1 |
| Power Supply |
|
| Power Consumption | 1.5 W |
| Auto Power Off | Yes |
| Dimensions (W x D x H) | 506 mm x 201 mm x 54 mm |
| Weight | 1.2 kg (2 lb, 10 oz) |
| Included Accessories | Owner’s Manual, USB cable, Online Member Product Registration |
| Separately Sold Accessories (May not be available depending on your area.) | Headphones |
* The contents of this manual apply to the latest specifications as of the publishing date. To obtain the latest manual, access the Yamaha website then download the manual file. Since specifications, equipment or separately sold accessories may not be the same in every locale, please check with your Yamaha dealer.
Backup Parameters
The following settings are maintained even when the power is turned off.
Phrase, Master Volume Level, Tuning, Touch Response, Battery Type, Auto Power Off setting, MIDI Settings (other than Local Control)
When disconnecting the USB power adaptor, or low (or no) battery power, backup is not executed.
Initialization
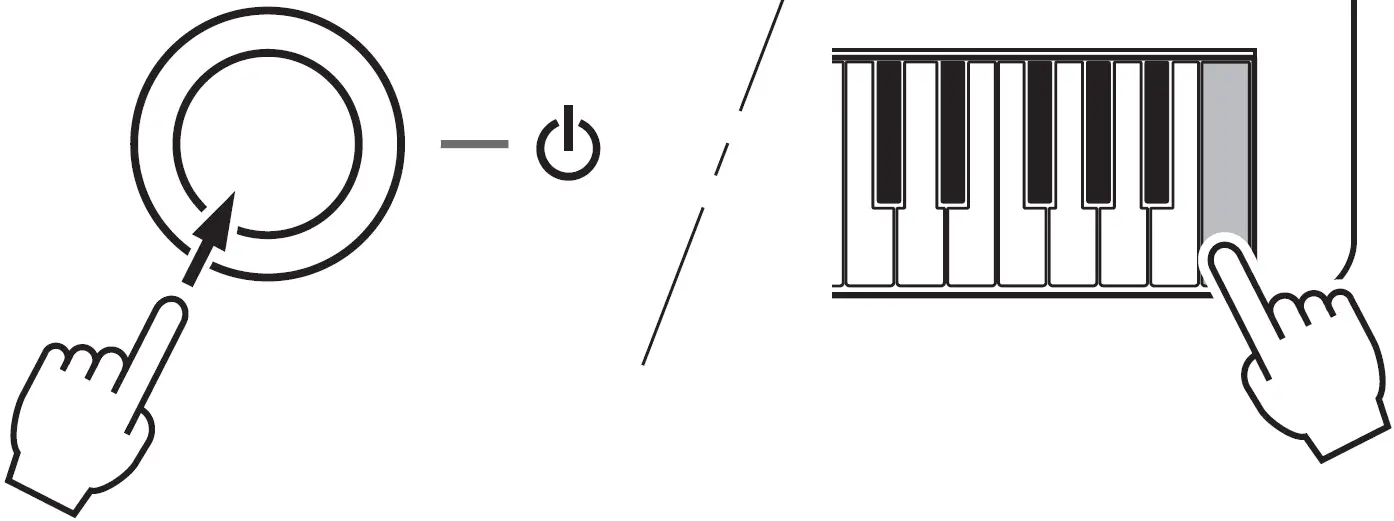
This operation initializes the backup data. While holding down the highest white key on the keyboard, simultaneously press the Standby/On switch to turn the power on so that “CLr” will be displayed.
Voice List
| Voice No. | MSB (0-127) | LSB (0-127) | MIDI Program Change No. (1-128) | Voice Name |
| PIANO | ||||
| 1 | 0 | 0 | 1 | Grand Piano |
| 2 | 0 | 0 | 5 | Electric Piano 1 |
| 3 | 0 | 0 | 6 | Electric Piano 2 |
| 4 | 0 | 0 | 3 | Electric Grand Piano |
| ORGAN | ||||
| 5 | 0 | 0 | 17 | Drawbar Organ |
| 6 | 0 | 0 | 19 | Rock Organ |
| 7 | 0 | 0 | 22 | Accordion |
| 8 | 0 | 0 | 23 | Harmonica |
| GUITAR | ||||
| 9 | 0 | 0 | 25 | Nylon Guitar |
| 10 | 0 | 0 | 26 | Steel Guitar |
| 11 | 0 | 0 | 27 | Jazz Guitar |
| 12 | 0 | 0 | 28 | Clean Guitar |
| 13 | 0 | 0 | 30 | Overdriven Guitar |
| BASS | ||||
| 14 | 0 | 0 | 33 | Acoustic Bass |
| Voice No. | MSB (0-127) | LSB (0-127) | MIDI Program Change No. (1-128) | Voice Name |
| 15 | 0 | 0 | 34 | Finger Bass |
| 16 | 0 | 0 | 37 | Slap Bass |
| 17 | 0 | 0 | 39 | Synth Bass |
| STRINGS | ||||
| 18 | 0 | 0 | 49 | Strings |
| 19 | 0 | 0 | 46 | Pizzicato Strings |
| 20 | 0 | 0 | 41 | Violin |
| 21 | 0 | 0 | 43 | Cello |
| 22 | 0 | 0 | 47 | Orchestral Harp |
| WOODWIND | ||||
| 23 | 0 | 0 | 69 | Oboe |
| 24 | 0 | 0 | 72 | Clarinet |
| 25 | 0 | 0 | 74 | Flute |
| 26 | 0 | 0 | 67 | Tenor Sax |
| BRASS | ||||
| 27 | 0 | 0 | 62 | Brass Section |
| 28 | 0 | 0 | 57 | Trumpet |
| 29 | 0 | 0 | 58 | Trombone |
| Voice No. | MSB (0-127) | LSB (0-127) | MIDI Program Change No. (1-128) | Voice Name |
| 30 | 0 | 0 | 61 | French Horn |
| 31 | 0 | 0 | 63 | Synth Brass |
| SYNTH LEAD | ||||
| 32 | 0 | 0 | 83 | Gemini |
| 33 | 0 | 0 | 85 | Punchy Chordz |
| 34 | 0 | 0 | 81 | Square Lead |
| 35 | 0 | 0 | 82 | Sawtooth Lead |
| SYNTH PAD | ||||
| 36 | 0 | 0 | 89 | New Age Pad |
| 37 | 0 | 0 | 90 | Warm Pad |
| 38 | 0 | 0 | 101 | Brightness |
| DRUM KIT/PERCUSSION | ||||
| 39 | 127 | 0 | 1 | Standard Kit |
| 40 | 127 | 0 | 28 | Dance Kit |
| 41 | 0 | 0 | 12 | Vibraphone |
| 42 | 0 | 0 | 13 | Marimba |
Maximum Polyphony
The instrument has 32-note maximum polyphony. This means that it can play a maximum of up to 32 notes at once, regardless of what functions are used. Arpeggio and Phrase playback use a number of the available notes, so when Arpeggio and Phrase playback are used the total number of available notes for playing on the keyboard is correspondingly reduced. If the maximum polyphony is exceeded, earlier played notes will be cut off and the most recent notes have priority (last note priority).
NOTE
- The Voice List includes MIDI program change numbers for each voice. Use these program change numbers when playing the instrument via MIDI from an external device.
- Program change numbers are often specified as numbers “0–127. ” For these cases, it is necessary to subtract 1 from the intended program change number to select the appropriate sound, because this list uses a “1–128” numbering system. For example, to select program change number 39 in the list, transmit program change number 38.
Drum Kit List
| Voice No. | 39 | 40 | |||||
| MSB (0–127) / LSB (0–127) / PC (1–128) | 127/000/001 | 127/000/28 | |||||
| Keyboard | MIDI | Standard Kit | Dance Kit | ||||
| Note# | Note | Note# | Note | ||||
| 25 | C# | 0 | 13 | C# | -1 | Surdo Mute | Surdo Mute |
| 26 | D | 0 | 14 | D | -1 | Surdo Open | Surdo Open |
| 27 | D# | 0 | 15 | D# | -1 | Hi Q | Hi Q |
| 28 | E | 0 | 16 | E | -1 | Whip Slap | Whip Slap |
| 29 | F | 0 | 17 | F | -1 | Scratch H | Scratch H |
| 30 | F# | 0 | 18 | F# | -1 | Scratch L | Scratch L |
| 31 | G | 0 | 19 | G | -1 | Finger Snap | Finger Snap |
| 32 | G# | 0 | 20 | G# | -1 | Click Noise | Click Noise |
| 33 | A | 0 | 21 | A | -1 | Metronome Click | Metronome Click |
| 34 | A# | 0 | 22 | A# | -1 | Metronome Bell | Metronome Bell |
| 35 | B | 0 | 23 | B | -1 | Seq Click L | Seq Click L |
| 36 | C | 1 | 24 | C | 0 | Seq Click H | Seq Click H |
| 37 | C# | 1 | 25 | C# | 0 | Brush Tap | Brush Tap |
| 38 | D | 1 | 26 | D | 0 | Brush Swirl | Brush Swirl |
| 39 | D# | 1 | 27 | D# | 0 | Brush Slap | Brush Slap |
| 40 | E | 1 | 28 | E | 0 | Brush Tap Swirl | Reverse Cymbal |
| 41 | F | 1 | 29 | F | 0 | Snare Roll | Snare Roll |
| 42 | F# | 1 | 30 | F# | 0 | Castanet | Hi Q 2 |
| 43 | G | 1 | 31 | G | 0 | Snare Soft | Snare Techno |
| 44 | G# | 1 | 32 | G# | 0 | Sticks | Sticks |
| 45 | A | 1 | 33 | A | 0 | Bass Drum Soft | Kick Techno Q |
| 46 | A# | 1 | 34 | A# | 0 | Open Rim Shot | Rim Gate |
| 47 | B | 1 | 35 | B | 0 | Bass Drum Hard | Kick Techno L |
| 48 | C | 2 | 36 | C | 1 | Bass Drum | Kick Techno |
| 49 | C# | 2 | 37 | C# | 1 | Side Stick | Side Stick Analog |
| 50 | D | 2 | 38 | D | 1 | Snare | Snare Clap |
| 51 | D# | 2 | 39 | D# | 1 | Hand Clap | Hand Clap |
| 52 | E | 2 | 40 | E | 1 | Snare Tight | Snare Dry |
| 53 | F | 2 | 41 | F | 1 | Floor Tom L | Tom Analog 1 |
| 54 | F# | 2 | 42 | F# | 1 | Hi-Hat Closed | Hi-Hat Close Analog 1 |
| 55 | G | 2 | 43 | G | 1 | Floor Tom H | Tom Analog 2 |
| 56 | G# | 2 | 44 | G# | 1 | Hi-Hat Pedal | Hi-Hat Close Analog 2 |
| 57 | A | 2 | 45 | A | 1 | Low Tom | Tom Analog 3 |
| 58 | A# | 2 | 46 | A# | 1 | Hi-Hat Open | Hi-Hat Open Analog |
| 59 | B | 2 | 47 | B | 1 | Mid Tom L | Tom Analog 4 |
| 60 | C | 3 | 48 | C | 2 | Mid Tom H | Tom Analog 5 |
| 61 | C# | 3 | 49 | C# | 2 | Crash Cymbal 1 | Cymbal Analog |
| 62 | D | 3 | 50 | D | 2 | High Tom | Tom Analog 6 |
| 63 | D# | 3 | 51 | D# | 2 | Ride Cymbal 1 | Ride Cymbal 1 |
| 64 | E | 3 | 52 | E | 2 | Chinese Cymbal | Chinese Cymbal |
| 65 | F | 3 | 53 | F | 2 | Ride Cymbal Cup | Ride Cymbal Cup |
| 66 | F# | 3 | 54 | F# | 2 | Tambourine | Tambourine |
| 67 | G | 3 | 55 | G | 2 | Splash Cymbal | Splash Cymbal |
| 68 | G# | 3 | 56 | G# | 2 | Cowbell | Cowbell Analog |
| 69 | A | 3 | 57 | A | 2 | Crash Cymbal 2 | Crash Cymbal 2 |
| 70 | A# | 3 | 58 | A# | 2 | Vibraslap | Vibraslap |
| 71 | B | 3 | 59 | B | 2 | Ride Cymbal 2 | Ride Cymbal 2 |
| 72 | C | 4 | 60 | C | 3 | Bongo H | Bongo H |
| 73 | C# | 4 | 61 | C# | 3 | Bongo L | Bongo L |
| 74 | D | 4 | 62 | D | 3 | Conga H Mute | Conga Analog H |
| 75 | D# | 4 | 63 | D# | 3 | Conga H Open | Conga Analog M |
| 76 | E | 4 | 64 | E | 3 | Conga L | Conga Analog L |
| 77 | F | 4 | 65 | F | 3 | Timbale H | Timbale H |
| 78 | F# | 4 | 66 | F# | 3 | Timbale L | Timbale L |
| 79 | G | 4 | 67 | G | 3 | Agogo H | Agogo H |
| 80 | G# | 4 | 68 | G# | 3 | Agogo L | Agogo L |
| 81 | A | 4 | 69 | A | 3 | Cabasa | Cabasa |
| 82 | A# | 4 | 70 | A# | 3 | Maracas | Maracas 2 |
| 83 | B | 4 | 71 | B | 3 | Samba Whistle H | Samba Whistle H |
| 84 | C | 5 | 72 | C | 4 | Samba Whistle L | Samba Whistle L |
| 85 | C# | 5 | 73 | C# | 4 | Guiro Short | Guiro Short |
| 86 | D | 5 | 74 | D | 4 | Guiro Long | Guiro Long |
| 87 | D# | 5 | 75 | D# | 4 | Claves | Claves 2 |
| 88 | E | 5 | 76 | E | 4 | Wood Block H | Wood Block H |
| 89 | F | 5 | 77 | F | 4 | Wood Block L | Wood Block L |
| 90 | F# | 5 | 78 | F# | 4 | Cuica Mute | Scratch H |
| 91 | G | 5 | 79 | G | 4 | Cuica Open | Scratch L |
| 92 | G# | 5 | 80 | G# | 4 | Triangle Mute | Triangle Mute |
| 93 | A | 5 | 81 | A | 4 | Triangle Open | Triangle Open |
| 94 | A# | 5 | 82 | A# | 4 | Shaker | Shaker |
| 95 | B | 5 | 83 | B | 4 | Jingle Bells | Jingle Bells |
| 96 | C | 6 | 84 | C | 5 | Bell Tree | Bell Tree |
- Each percussion Voice uses one note.
- The MIDI Note No. and Note are actually one octave lower than keyboard Note No. and Note.
For example, in “Standard Kit,” the “Snare Tight” (Note No.52/Note E2) corresponds to MIDI (Note No.40/Note E1).
Arpeggio List
| No. | Type Name |
| ACOUSTIC PIANO | |
| 1 | PfArp1 |
| 2 | PfArp2 |
| 3 | PfArp3 |
| 4 | PfArp4 |
| 5 | PfClub1 |
| 6 | PfClub2 |
| 7 | PfBallad |
| 8 | PfChd8th |
| 9 | PfShufle |
| 10 | PfRock |
| 11 | RocknPf |
| 12 | 70RockPf |
| 13 | SlowflPf |
| 14 | SoulPf |
| 15 | LatinRck |
| 16 | Salsa1 |
| 17 | Salsa2 |
| 18 | 6/8R&B |
| KEYBOARD | |
| 19 | EPArp |
| 20 | BalladEP |
| 21 | ChordUp |
| 22 | ChdDance |
| 23 | Clavi1 |
| 24 | Clavi2 |
| 25 | Gospel |
| 26 | Reggae1 |
| 27 | Reggae2 |
| 28 | Reggae3 |
| GUITAR CHORD | |
| 29 | Strum1 |
| 30 | Strum2 |
| 31 | Strum3 |
| 32 | Strum4 |
| 33 | Funky |
| 34 | GtrChrd1 |
| 35 | GtrChrd2 |
| 36 | GtrChrd3 |
| 37 | CleanGtr |
| 38 | Samba1 |
| 39 | Samba2 |
| 40 | Spanish1 |
| 41 | Spanish2 |
| GUITAR ARPEGGIO | |
| 42 | Pickin1 |
| 43 | Pickin2 |
| 44 | GtrArp |
| 45 | FngrPck1 |
| 46 | FngrPck2 |
| 47 | Slowfl |
| BASS | |
| 48 | FngrBas1 |
| 49 | FngrBas2 |
| 50 | FngrBas3 |
| 51 | CoolFunk |
| 52 | SlapBass |
| 53 | AcidBas1 |
| 54 | AcidBas2 |
| 55 | FunkyBas |
| 56 | CmbJazB1 |
| 57 | CmbJazB2 |
| 58 | CmbJazB3 |
| 59 | NewR&BBs |
| 60 | HipHopBs |
| 61 | SmoothBs |
| 62 | DreamBas |
| 63 | TranceBs |
| 64 | LatinBas |
| STRINGS | |
| 65 | Strings1 |
| 66 | Strings2 |
| 67 | Strings3 |
| 68 | Strings4 |
| 69 | StrngDwn |
| 70 | StrngUp |
| 71 | OrcheStr |
| 72 | Jupiter |
| 73 | Pizz1 |
| 74 | Pizz2 |
| HARP | |
| 75 | Harp1 |
| 76 | Harp2 |
| BRASS | |
| 77 | BrasSec1 |
| 78 | BrasSec2 |
| 79 | BrasSec3 |
| 80 | FunkBras |
| 81 | SoulReed |
| CHROMATIC PERC. | |
| 82 | PercArp |
| 83 | Trill |
| 84 | Cresendo |
| 85 | DiscoCP |
| SYNTH SEQUENCE | |
| 86 | UpOct |
| 87 | DownOct |
| 88 | UpDwnOct |
| 89 | SynArp1 |
| 90 | SynArp2 |
| 91 | SynArp3 |
| 92 | SynArp4 |
| 93 | SyncEcho |
| 94 | PulsLine |
| 95 | StepLine |
| 96 | Random |
| 97 | Down&Up |
| 98 | SuperArp |
| 99 | AcidLine |
| 100 | TekEcho |
| 101 | VelGruv |
| 102 | Planet |
| 103 | Trance1 |
| 104 | Trance2 |
| 105 | Trance3 |
| 106 | DiscoLd |
| SYNTH CHORD | |
| 107 | ChordAlt |
| 108 | SynChrd1 |
| 109 | SynChrd2 |
| 110 | Syncopa |
| 111 | Hybrid1 |
| 112 | Hybrid2 |
| 113 | Hybrid3 |
| 114 | Hybrid4 |
| 115 | Hybrid5 |
| 116 | SmoothPd |
| DRUMS | |
| 117 | Funk1 |
| 118 | Funk2 |
| 119 | Funk3 |
| 120 | Soul |
| 121 | ClscHip |
| 122 | Smooth |
| 123 | NewGospl |
| 124 | CmbJazz1 |
| 125 | Bebop |
| 126 | JazzHop |
| 127 | FolkRock |
| 128 | Unpluggd |
| 129 | Dream |
| 130 | 2 Step |
| 131 | ClubHs1 |
| 132 | ClubHs2 |
| 133 | House |
| 134 | Ibiza2 |
| 135 | Ibiza3 |
| 136 | Garage |
| 137 | Samba |
| 138 | African |
NOTE
- For Nos. 117 – 138, play with a Drum Kit Voice (No. 39 Standard Kit or No. 40 Dance Kit).
Motion Effect List
| No. | Type Name |
| A FILTER | |
| A01 | Filter 1 |
| A02 | Filter 2 |
| A03 | Filter Wah |
| A04 | Filter 3 |
| A05 | Filter 4 |
| A06 | Filter 5 |
| A07 | Filter 6 |
| A08 | Filter 7 |
| A09 | Filter + Modulation 1 |
| A10 | Filter + Modulation 2 |
| B PITCH | |
| B01 | Pitch Whole-Note Up |
| B02 | Pitch Half-Note Up |
| B03 | Pitch Whole-Note Down |
| B04 | Pitch Half-Note Down |
| B05 | Choking Up |
| B06 | Choking Down |
| B07 | Pitch Down 1 |
| B08 | Pitch Down 2 |
| B09 | Pitch Up 1 |
| B10 | Pitch Up 2 |
| B11 | Pitch Up + Modulation |
| B12 | Pitch Up 3 |
| C MODULATION | |
| C01 | Modulation On 1 |
| C02 | Modulation On 2 |
| C03 | Pitch Up + Modulation On 1 |
| C04 | Pitch Up + Modulation On 2 |
| C05 | Expression Slice 1 |
| C06 | Expression Slice 2 |
| C07 | Expression Slice + Filter 1 |
| C08 | Expression Slice + Filter 2 |
| C09 | Pitch Up + Expression Slice 1 |
| C10 | Pitch Up + Expression Slice 2 |
| C11 | Pitch Up + Expression Slice 3 |
| C12 | Pitch Up + Expression Slice 4 |
CUSTOMER SERVICE
Yamaha Corporation of America
6600 Orangethorpe Avenue, Buena Park, California 90620-1373
Telephone: 800-854-1569
www.yamaha.com
Do not return any product to the above address without a written Return Authorization issued by YAMAHA.
Yamaha Global Site
https://www.yamaha.com/
Yamaha Downloads
https://download.yamaha.com/


