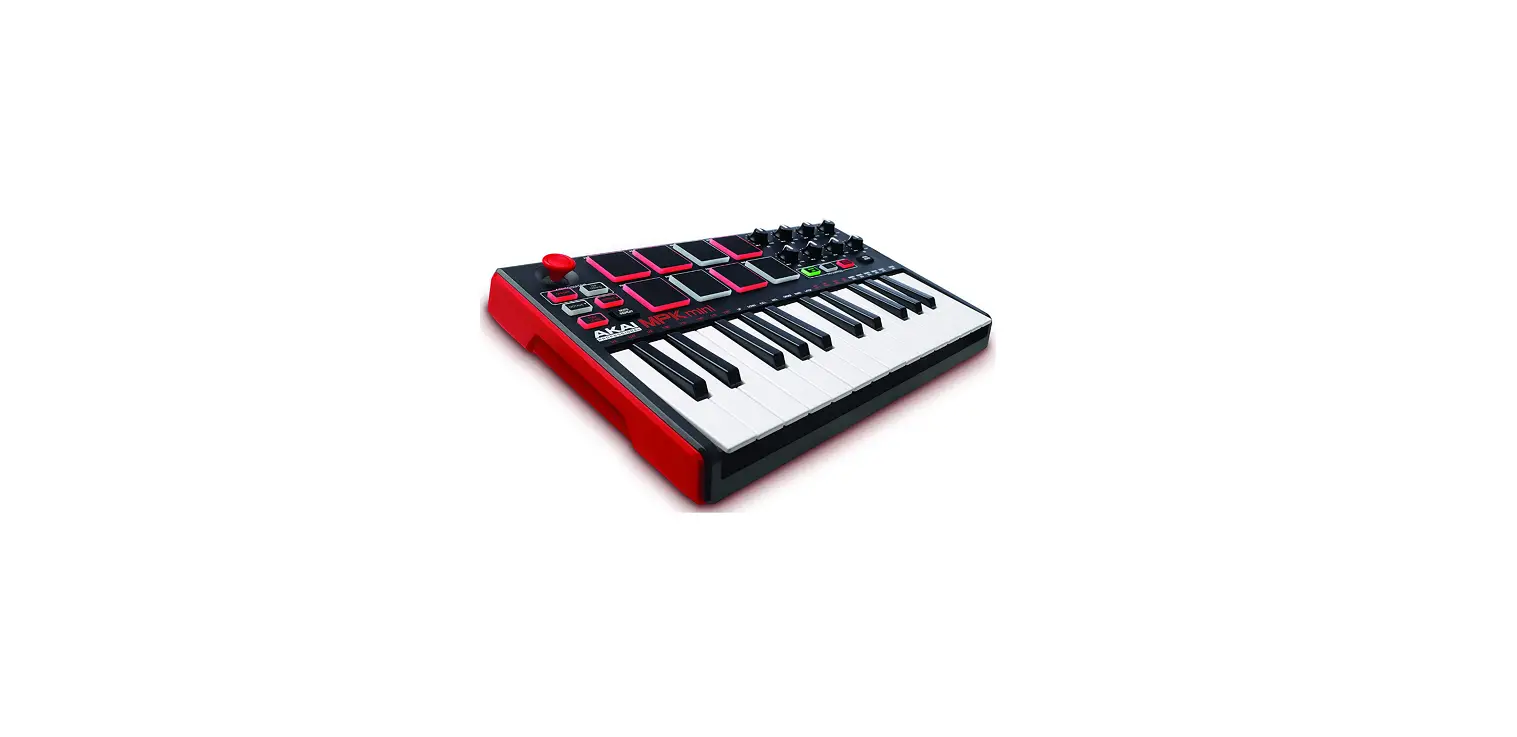
Akai Professional MPKMINI2 MPK Mini MKII

Box Contents
- MPK mini
- USB Cable
- MPK mini Editor (download)
- Software Download Card
- User Guide
- Safety & Warranty Manual
Support
For the latest information about this product (system requirements, compatibility information, etc.) and product registration, visit akaipro.com/mpkmini.
For additional product support, visit akaipro.com/support.
Quick Start
Device Setup in Software
To select MPK mini as a controller for your digital audio workstation (DAW):
- Connect MPK mini to your computer using a standard USB cable. (If you are connecting MPK mini to a USB hub, make sure it is a powered hub.)
- Open your DAW.
- Open your DAW’s Preferences, Options, or Device Setup, select MPK mini as your hardware controller, and then close that window. Your MPK mini is now able to communicate with your software.
MPK mini Editor Installation
We recommend visiting akaipro.com/mpkmini and downloading the MPK mini Editor, which gives you a visual and intuitive way to edit the various MIDI messages that MPK mini’s controls (pads, knobs, and X-Y controller) send to your computer. Learn more about the MPK mini Editor in the User Guide included with the download package.
Features
Top Panel
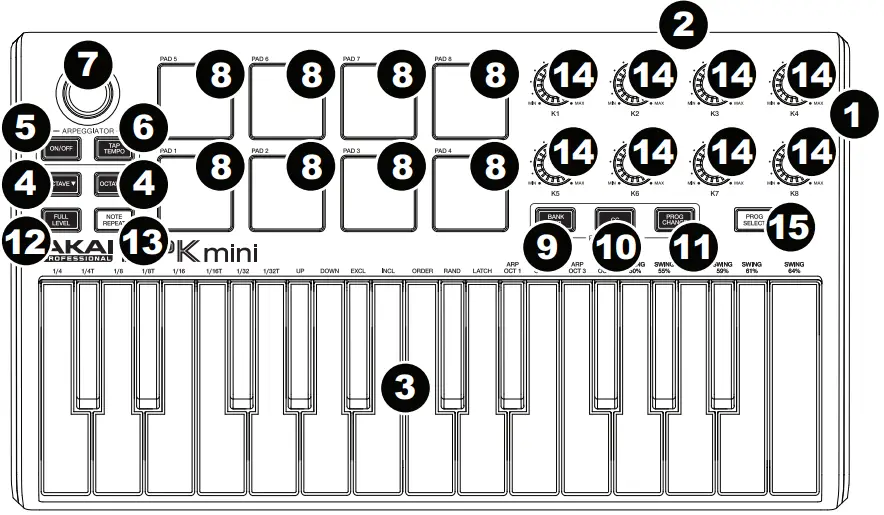
- USB Port: Use a standard USB cable to connect this USB port to a USB port on your computer. The computer’s USB port will provide power to MPK mini. This connection is also used to send and receive MIDI data to and from your computer.
- Sustain Pedal Input: Connect an optional 1/4″ TS sustain pedal to this input.
- Keyboard: This 25-note keyboard is velocity-sensitive and, in conjunction with the Octave Down / Up buttons, can control a ten-octave range. You can use the keys to access certain additional commands, as well.
- Octave Down / Up: Use these buttons to shift the keyboard’s range up or down (up to four octaves in either direction). When you are higher or lower than the center octave, the corresponding Octave button will light. Press both Octave buttons simultaneously to reset the keyboard to the default center octave.
- Arpeggiator On/Off: Press this button to turn the Arpeggiator on or off. Pressing it during a latched arpeggio will stop the arpeggio. Hold down Arpeggiator On/Off and press a key on MPK mini’s keyboard to enter new settings for the Arpeggiator:
- Time Division: 1/4 note, 1/4 note triplet (1/4T), 1/8 note, 1/8 note triplet (1/8T), 1/16 note, 1/16 note triplet (1/16T), 1/32 note, or 1/32 note triplet (1/32T).
- Mode: The mode determines how the arpeggiated notes are played back.
- Up: Notes will sound from the lowest to the highest.
- Down: Notes will sound from the highest to lowest.
- Incl (Inclusive): Notes will sound from the lowest to the highest, and then back down. The lowest and highest notes will sound twice at the directional change.
- Excl (Exclusive): Notes will sound from the lowest to the highest, and then back down. The lowest and highest notes will sound only once at the directional change.
- Order: Notes will sound in the order they were pressed.
- Rand (Random): Notes will sound in random order.
- Latch: The Arpeggiator will continue to arpeggiate the notes even after you lift your fingers. While holding down the keys, you can add more notes to the arpeggiated chord by pressing down additional keys. If you press the keys, release them, and then press down a new combination of notes, the Arpeggiator will memorize and arpeggiate the new notes.
- Octave: Arpeggio octave range (Arp Oct) of 0, 1, 2, or 3 octaves.
- Swing: 50% (no swing), 55%, 57%, 59%, 61%, or 64%.
- Tap Tempo: Tap this button at the desired rate to determine the tempo of the Arpeggiator. The minimum number of taps required is programmable in the MPK mini Editor.
Note: This button is disabled if the Arpeggiator is synced to an external clock. - X-Y Controller: Use this 4-axis thumbstick to send MIDI pitch bend messages or send MIDI CC messages. You can use the free, downloadable MPK mini Editor to assign how this X-Y Controller functions.
- Pads: The pads can be used to trigger drum hits or other samples in your software. The pads are velocity-sensitive, which makes them very responsive and intuitive to play. You can use the free, downloadable MPK mini Editor to assign what MIDI message each pad (in each pad bank) sends.
- Bank A/B: Press this button to switch MPK mini’s pads between Pad Bank A or Pad Bank B. You can use the free, downloadable MPK mini Editor to assign what MIDI message each pad (in each pad bank) sends.
- CC: When this button is active, MPK mini’s pads will send MIDI CC messages instead of MIDI Note On messages. You can use the free, downloadable MPK mini Editor to assign what CC message each pad sends.
- Prog Change: When this button is active, MPK mini’s pads will send MIDI Program Change messages instead of MIDI Note On messages. You can use the free, downloadable MPK mini Editor to assign what Program Change message each pad sends.
- Full Level: Press this button to activate or deactivate Full Level Mode in which the pads always play at a maximum velocity (127), no matter how hard or soft you hit them.
- Note Repeat: Press and hold this button while striking a pad to cause the pad to retrigger at a rate based on the current Tempo and Time Division settings.
- Assignable Knobs: Each 270º knob sends a MIDI CC message. You can use the free, downloadable MPK mini Editor to assign what CC message each knob sends.
- Prog Select: Hold down this button and press Pad 5, Pad 6, Pad 7, or Pad 8 to select the Program whose number is printed above that pad.
FAQs
The MPK249 is a full-size keyboard, while the MPK mini is a compact, 25-key controller.
The X-Y pad is a compact controller that offers an XY touchpad and eight assignable buttons. The MPK mini has 25 keys, an X-Y touchpad, eight assignable buttons, and an assignable knob. Akai Professional MPKMINI2 MPK Mini MKII User Guide
No! You can start playing right away with the MPK mini Play because it comes with built-in instruments, sound effects, and drum sounds!
The brand-new MPK small is a super-compact keyboard controller created for desktop producers and touring musicians. With a variety of hardware controls, MPK mini enables you to record, compose, and play at any time using virtual instruments, effect plugins, and DAWs.
The upgraded key-bed, the additional LED screen, the infinite encoder knobs, the USB port being moved to the rear rather than the side, and the heavier, more robust keys are what distinguish the AKAI Mini MKIII from the MKII.
The MPK Mini was quite popular among artists, and now that Play has all those sounds and a built-in speaker in addition to its portability to go anywhere, it opens up new creative possibilities that people will adore.
The incredibly portable MPK Mini Play is based on the MPK Mini from Akai Professional, the most widely used midi controller in the world, but it now has 128 sounds and a built-in speaker. Players have everything they need to play their music anytime, anywhere with 8 LED MPC drum pads and a 4-way joystick for easy operation.
The Hybrid, Velvet, or Mini Grand standalone programmes are located in the Application or Program folder on your computer. Simply run the application after connecting the MPK to your computer. The player will instantly establish a connection with the MPK so you can start listening to music right away!
Users of the MPK mini Play don’t need to bother about power adapters, charges, or cords because the MPK mini Play has a battery-operated performance of 14+ hours. Playing and jamming are more enjoyable thanks to the enhanced built-in speaker’s higher output and added low-end responsiveness.
The MPK Mini Play enables you to record those fleeting moments of invention whether you are lounging on the couch, strolling through the park, or heading to your next show! The MPK Mini Play enables you to record, write, and perform with virtual instruments, effect plugins, and DAWs anytime inspiration strikes thanks to a variety of hardware controls.
Hold down the PROG SELECT button while pressing Pad 5 (Prog 1) on your MPK Mini MKII to choose preset 1. To indicate that the preset choice has been made, the pad should flash. 6. Your MPK mini mkII pads should now be ready to play samples!
Conclusion. Having saying that, many users find the Akai MPK Mini MK3 to be a great MIDI keyboard. It is perfect for people who require a compact, portable rig for live performances because it has everything a complete beginner to beatmaking might ever need.


