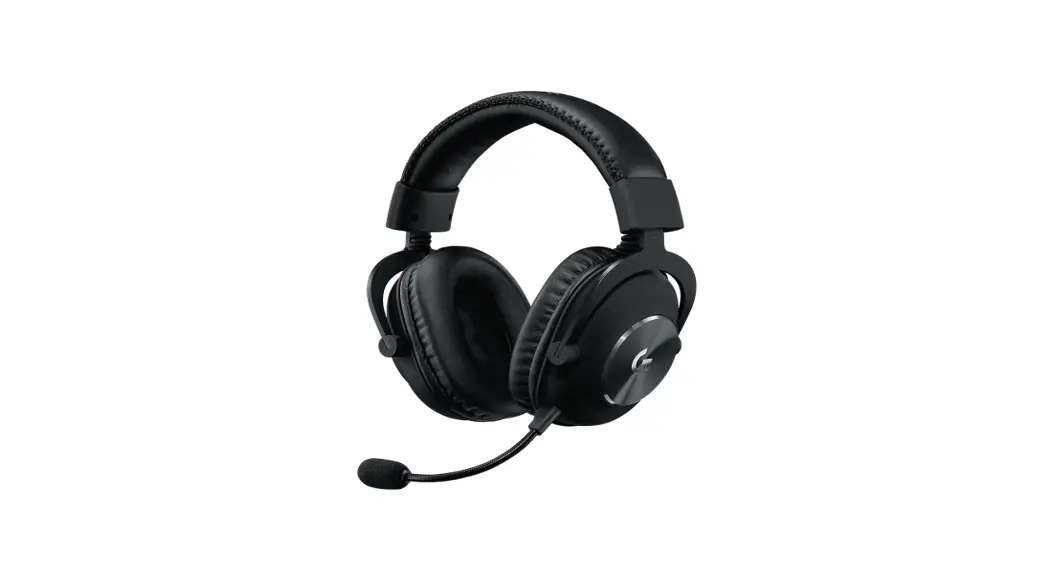
![]() G926 PRO WIRELESS
G926 PRO WIRELESS
GAMING HEADSET
USER MANUAL
G926 Pro Wireless Gaming Headset
Read the user manual first, and if you still need help, please contact us.
US/CAN: [email protected]
EU/UK: [email protected]![]() WARNING
WARNING
To prevent possible hearing damage, do not listen at high volume levels for long periods.
Headphone Parameters Information
Read the user manual first, and if you still need help, please contact us.
| Bluetooth scheme description | |
| Pairing Name: | G926 |
| Frequency range: | 2.40-2.480ghz |
| Receiving sensitivity: | -85db |
| Straight line distance: | k10m (indoor turning) |
| Battery capacity: | 500mA / h (603030) |
| Play / talk time: | 12-15 hours |
| Standby time: | shutdown state > 3 months |
| Charging time: | 2 hours |
| Sound generating unit: | cp 50mm |
| Sensitivity: | 97dB + / -3dB, at 1kHz, 1MW |
| Performance of headphone | |
| Frequency response: | 20Hz-20KHz |
| Output sound pressure (SPL): | 100dB + / -3dB, at 1 kHz, 1MW |
| Rated power: | 20MW, maximum power: 30MW |
| Total harmonic distortion: | <3% (1 kHz, 1 MW) |
| Microphone index requirements: | |
| Frequency range: | 100hz-8khz |
| Sensitivity: | -42db ± 4dB |
| Directivity: | omnidirectional |
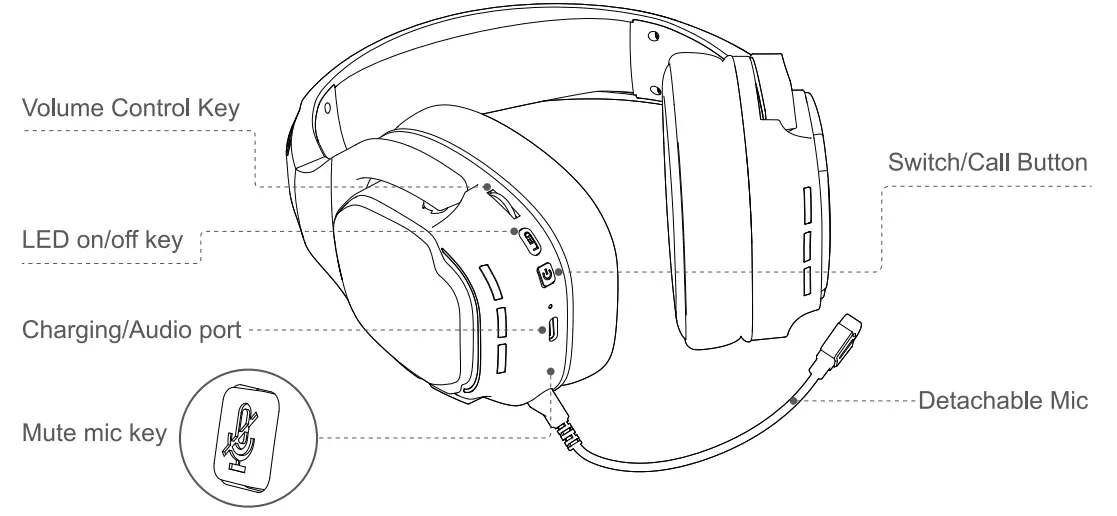
| Switch! Call Button | Power on | Power off | Long press the ‘Power On’ button for 3 seconds |
| Power off | Power on | Long press the “Power On’ button for 3 seconds | |
| Pause | Play | Shod press the “Power On” button once | |
| Answer | Call | Shod press the “on / off key once | |
| Callback | Last call | Short Press the button twice | |
| Hang up | on the phone | Short press the button once | |
| LED on/off key | Turn off | Backlight off | Long press the LED key |
| EQ switch | EC/ sound mode | Shod press the LED button once | |
| Mute mic key | Mute | No call from the microphone | Short press the Mute mic key once |
| Mode switching | 2.4G and Bluetooth switching | Short press the static microphone button twice in a row | |
| Potentiometer | High volume | Volume up | Turn the knob upward |
| Low volume | Volume down | Turn the knob down | |
| When there Is no connection/disconnection, It will shut down automatically after 10 minutes. | |||
| LED indicator description | |
| Power on | Blue light flash |
| Shut down | LED off |
| Pairing status | Blue light flash |
| Connected | The blue light flashes slowly |
| Not connected | Blue light flash |
| Charging | The red light is always on |
| Fully charged | The blue light is always off |
| Play music | The blue light flashes once every 4 seconds |
| Low power state | Turn to red light flashing (10% power starts to remind) |
Instructions for use:
- After the headset is turned on, it will automatically search and connect automatically
- If the transmitter is not plugged in, open the mobile phone to search for the corresponding pairing name, and then pair it.
- If the transmitter is plugged in, the headset will automatically connect and pair after it is turned on.
- Connect to any device, if you want to switch the mode, press the mute button twice in a row, 2.4G and Bluetooth are seamlessly switched, and short press the microphone to mute.
- Long press the LED key to turn off the backlight, which can save battery power and prolong the use time.
- Short press the LED button to switch the EQ sound mode.
- The headset will automatically shut down when charging, and it can be reset if it crashes or has abnormal charging.
HEADSET CONNECTION
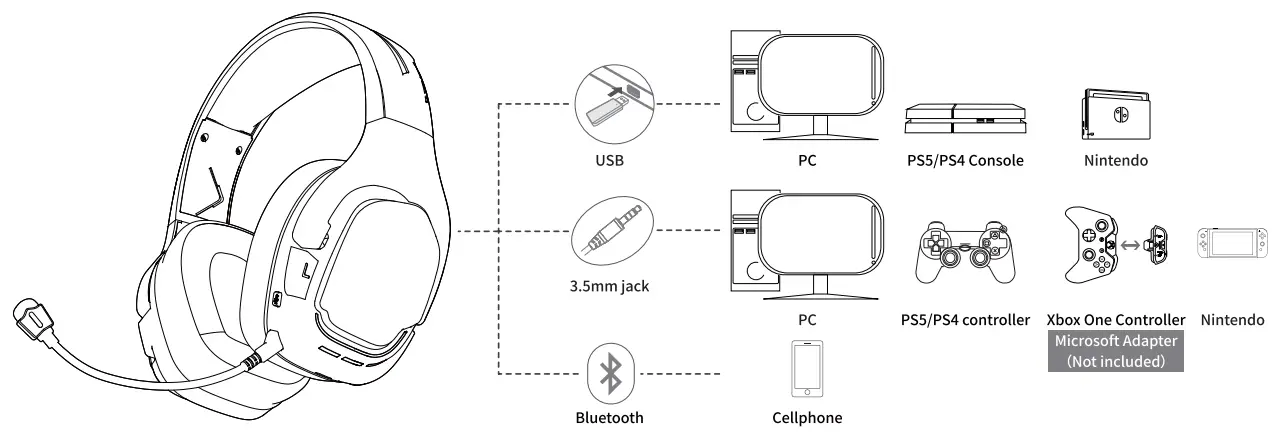
To use the wireless headset on your device (PC, PS4, Nintendo, Mac):
- Connect the wireless adapter to a USB port on your device (PC, PS4, Nintendo, Mac).
- Press the power button on the headset for 3 seconds to power on.
- When the headset ear cup LED is solid, the headset is connected.
* Note: If it is your first time using the headset, you may need to set the headset as the default input and output device.
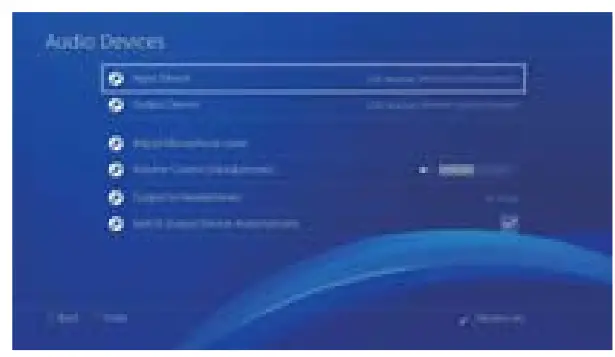
Headset PlayStation 4 Configuration
- Click the ‘settings’ in the screen.

- Click on the ‘Devices’ tab, then go to the next step.

- Click on the ‘Audio Devices’ tab, then go to the next step.

- Click on ‘Input Device’ and ‘Output Device’, right-click on ‘this wireless gaming headset’ and select ‘Set as Default Device, and adjust the ‘volume control (headphones)’.


TROUBLESHOOTING TIPS
| No sound/low sound | |
| Possible Cause | Solution |
| Volume Control | Press the Volume Up button on the Ear Force Headset Audio Controller If necessary. Press the Game button of the Chat/Game Mix.Chat/Game Mix. |
| App Problem | Close the active App and re-open it alternatively poweron/off your devices. At times the Audio Output in a particular Application may need to be reset. |
| Loose Connector | Confirm that each plug is inserted firmly and fully. |
| Microphone not working | |
| Possible Cause | Solution |
| Mic Button | Check the mic one-key mute button on the headset is off. |
| Chat Volume | Press the Chat Button on the Chat/Came Mix of the Ear Force Headset Audio Controller. |
| Loose Connector | Confirm that each plug is inserted firmly and fully. |
| Voice interrupted | |
| Possible cause | Solution |
| Setting | Check the default (input and output) sound device is selected for this headset. |
| Weak Signal | Check the network. |
This device complies with part 15 of the FCC Rules. Operation is subject to the following two conditions: (1) this device may not cause harmful interference, and (2) this device must accept any interference received, including interference that may cause undesired operation.
Any changes or modifications not expressly approved by the party responsible for compliance could void the user’s authority to operate the equipment.
NOTE: This equipment has been tested and found to comply with the limits for a Class B digital device, pursuant to Part 15 of the FCC Rules. These limits are designed to provide reasonable protection against harmful interference in a residential installation. This equipment generates, uses, and can radiate radio frequency energy and, if not installed and used in accordance with the instructions, may cause harmful interference to radio communications.
However, there is no guarantee that interference will not occur in a particular installation.
If this equipment does cause harmful interference to radio or television reception,
which can be determined by turning the equipment off and on, the user is encouraged to try to correct the interference by one or more of the following measures:
- Reorient or relocate the receiving antenna.
- Increase the separation between the equipment and receiver.
- Connect the equipment to an outlet on a circuit different from that to which the receiver is connected.
- Consult the dealer or an experienced radio/TV technician for help.
The device has been evaluated to meet the general RF exposure requirements. The device can be used in portable exposure conditions without restriction
![]()


