
GOODBABY SM35PTZ Digital Wireless Video Baby Monitor With 3.5 inches Color Screen
| ⚠WARNING: STRANGULATION HAZARD – Children have STRANGLED in cords. Keep this cord out of the reach of children (more than 3 feet (0.9 m) away). Do not remove this tag that affixed to the cord of the unit.Never use extension cords with AC Adapters. Only use the AC Adapters provided. |
Thank you for purchasing this baby monitor. We will try to offer you the best products and service.
Congratulations
- Now you can take care of your babies anywhere and anytime!
- Please read the user manual before use!
- Please retain your original dated sales receipt for your records.
- For warranty service of your baby monitor, you will need to provide a copy of your dated sales receipt to confirm warranty status.
- Registration is not required for warranty coverage.
- Before you use the product, we recommend you to fully charge the battery in the parent unit, so that it will continue to work if you disconnect it from the power supply to carry it to other location.
- Please read the Safety Instructions carefully.
All rights reserved
The features described in user’s manual are subject to modifications without prior notice.
Safety Instructions
Warning-Strangulation Hazard-Children have STRANGLED in cords.
Keep this cord out of the reach of children {more than 3 ft (0.9 m) V:t!!£J away). Do not remove this tag that affixed to the cord of the unit.
Read and Keep Instructions:
All the safety and operating instructions should be read before the video baby monitor is operated.
This product cannot replace responsible adult supervision.
Water and Moisture:
This product is designed for indoor use only. The unit should not be exposed to rain, moisture, dripping or splashing.
No object filled with liquid, such as a glass or a vase, should be placed on top of, or beside the product. This item should not be used near water.
DO NOT:
Use the appliance if the cord or plug is damaged . If your baby monitor is not operating properly or has suffered any damage, contact service center to request inspection and repair it in order to avoid any possible risk.
DO NOT:
Attempt to repair or adjust any of the electrical or mechanical functions of the unit since, if you do, the guarantee will be made void.
Ventilation:
This baby monitor should not be used on a bed, sofa, rug or similar surface that may block the ventilation openings, or be placed in an enclosed area, such as a bookcase or drawer that may impede airflow.
Keep Away from Sources of Heat:
This unit should not be exposed to direct heat sources such as a candle, radiator, heat register, stove or other appliance that emits heat. The unit should not be placed under direct sunlight.
Power Source:
This unit should only be used with the AC power adapters included in this package {rated SV 700mA).
Damage Requiring Service: This unit should be serviced by qualified personnel.
FCC STATEMENTS
This device complies with part 15 of the FCC Rules. Operation is subject to the following two conditions:
(1)This device may not cause harmful interference.
(2)This device must accept any interference received, including interference that may cause undesired operation.
NOTE 1:
This equipment complies with FCC RF radiation exposure compliance requirements. The antenna{s) used for this equipment must be installed and operated with a minimum distance of least 20 cm between the radiator and your body. This transmitter must not be co-located or operating in conjunction with any other antenna or transmitter. Use of other accessories may not ensure compliance with FCC RF.
NOTE2:
Any changes or modifications to this unit not expressly approved by the party responsible for compliance could void the user’s authority to operate the equipment.
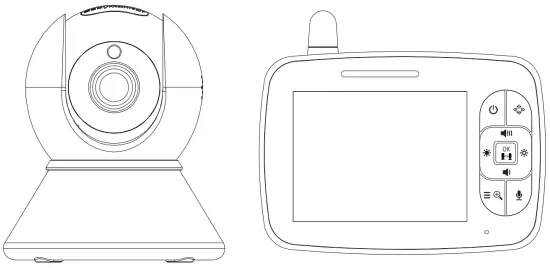
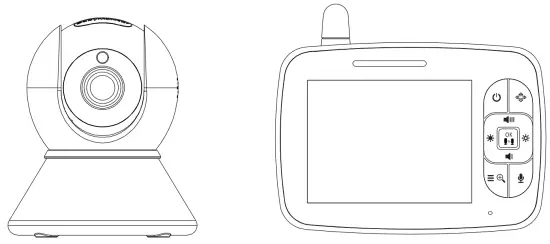
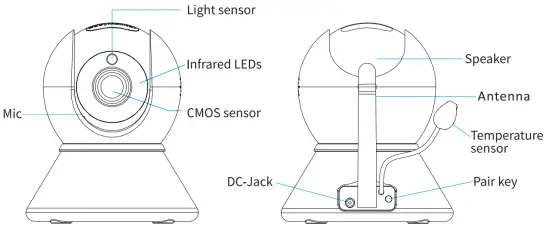
Product Overview
What’ s included
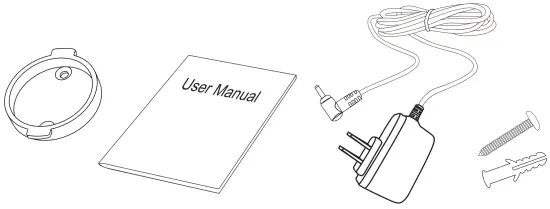
|
Parent Unit
Baby Unit
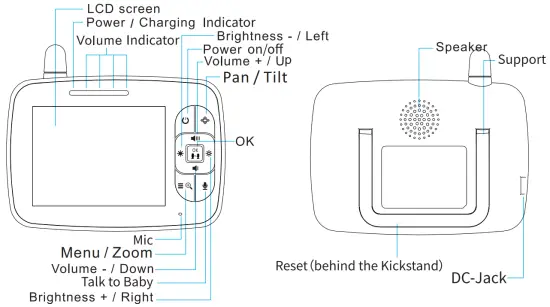
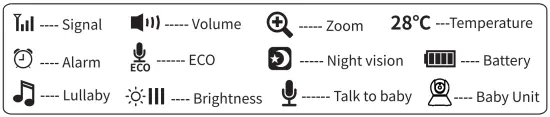
Icons Overview
Getting Started
Charge the Parent Unit
Step 1: Fully charge the Parent Unit before using it.
- When Charging, the charging indicator will turn red.
- When the unit is turned on, the charging indicator will turn green


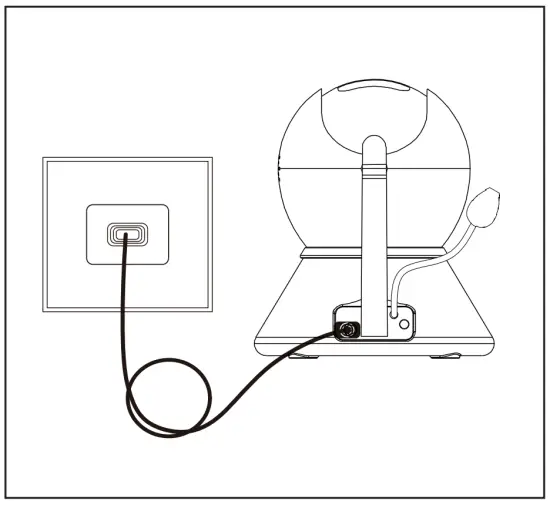
Turn On the Baby Unit
Step 2:
Use the provided AC adapter to connect the Baby Unit to an AC outlet.
- Note: the Baby Unit needs to be connected to the AC adapter when using.
Turn On the Parent Unit
Step 3:
Press and hold the power button. The animation “waiting for connection” will be displayed on the screen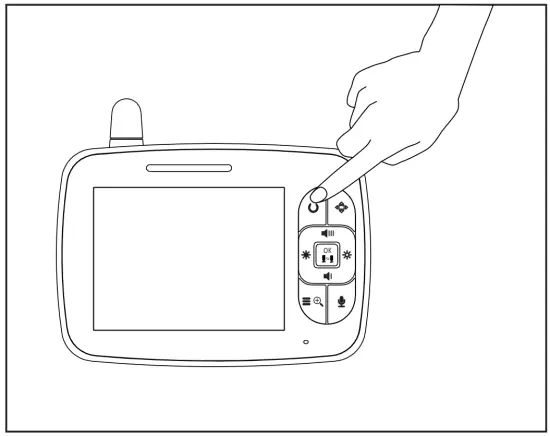
Prepare for Connecting the Baby Unit
Step 4:
Press = and choose ![]() to select
to select ![]() ; the icon will flash; then wait for connection.
; the icon will flash; then wait for connection.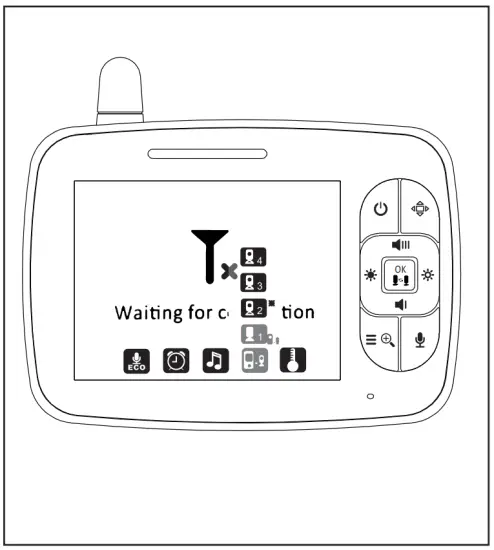
Pair the Parent Unit with the Baby Unit
Steps:
Long press the “Pair” button at the back of the Baby Unit until the Parent Unit shows images. If failed, choose another Baby Unit channel ![]() and try to pair again.
and try to pair again.
Notes:
Important Guidelines for Installing Your Baby Monitor.
* Any large metal object, like a refrigerator, a mirror, a filing cabinet, a metallic door or reinforced concrete between the Baby Unit and the Parent
Unit may block the radio signal.
*The signal strength may also be reduced by other solid structures, like walls, or by radio or electrical equipment, such as TVs, computers, cordless or mobile phones, fluorescent lights or dimmer switches.
*Use of other 2.4GHz product, such as wireless networks (Wi-Fi routers),
Bluetooth systems, or microwave ovens, may cause interference to this product, so keep the baby monitor at least Sft(l.Sm) away from these types of products, or turn them off if they appear to cause interference.
* Note: If you place the Parent Unit and the Baby Unit too close together, it will be normal for you to hear a high-pitched noise called “feedback”. The units are designed to be placed in separate rooms.
Function Operation
Pairing More Than One Baby Unit with Parent Unit
- Press the Menu/Exit key

 , then the menu will display;
 - Press the LEFT button
 or RIGHT button until the Baby Unit icon is highlighted, then press UP button
  or DOWN button
  to select the Baby Unit to pair;
 - Press OK button to Start pairing;
- While the LED is flashing, press the PAIR button on the back of the Baby Unit;
- Once paired, the screen will display the image from the Baby Unit;
- If failed, please repeat the steps above.
- After connecting with all the Baby Unit, press OK key to view/scan the Baby Unit;
- In Scan Mode, the scan icon
 will be displayed on the top of screen.
Digital Zoom & Pan/Tilt
- Press and hold for around 2 seconds to operate Zoom in/out;
- In the Zoom Mode, press and hold the Up/Down/Left/Right button to pan/tilt the image; In Digital Zoom Mode, the zoom icon will be displayed on the top of screen.
* Note: If you want to adjust the volume/brightness, you have to exit the Zoom Mode before operation.
Talk to Baby
To talk to your baby, press and hold ![]() on the Parent Unit. Release the button
on the Parent Unit. Release the button
when you have finished talking, and listen to the sound from the baby’s room
again. Bear in mind that you can’t listen to your baby whilst you’re talking to him/her; to listen to him/her, you have to stop pressing this button.
Infrared Night Vision{Automatic)
The infrared night vision function allows the Baby Unit to pick up images of your baby or the monitored area in dark or low light conditions. In this mode, only black and white images will be displayed on the Parent Unit. The optimum distance is 6 feet between the Baby Unit and the object.
ECO Setting
This mode allows you to control the sound activation of your baby monitor. When the ECO default setting is ON, if there is no sound comes to the Baby Unit within 30 seconds, the Baby Unit will stops transmitting signal. The Parent Unit screen will turn off when the Baby Unit is not transmitting. When the Baby Unit detects sound that is louder than the preset sensitivity level, it will start transmitting the signal to the Parent Unit again. To change the ECO level, please follow the next instructions:
- Press the Menu/Exit key ,.and the menu will display;
- Press the LEFT button or RIGHT button- until the the ECO icon
 is highlighted, then press UP button or DOWN button to select desired level;
 - Press OK button to confirm.
Note:
LOW- high volume of sound is required to reactivate the transmission
MID – medium volume of sound is required to reactivate the transmission
HIGH – low volume of sound is required to reactivate the transmission
OFF – no standby mode.
When ECO function is on, a ECO indicator will be displayed on top of the LCD screen. To view a video signal on your Parent Unit when ECO function is on, please simply press the power button.
Alarm Setting
You can use the alarm to remind yourself to feed baby/change diapers/sleep, etc.
- Press the Menu/Exit button ,.and the menu will display;
- Press the LEFT button or RIGHT button until the alarm icon
 is highlighted;
 - Press UP button or DOWN button to select the desired time;
- Press OK button to confirm.
Note:
If the alarm is ringing and no one answers, then the ringing will last for 1 minute; after 3 minutes the ringing will start again.
The alarm will ring for three times total if no one answers
Lullaby Setting
You can soothe the baby to sleep by playing a gentle lullaby from the Baby Unit.
- Press the Menu/Exit button . and the menu will display;
- Press the LEFT button , or RIGHT button until the lullaby icon
 is highlighted;
 - Press UP button or DOWN button to select;
- Press OK button to confirm.
Video Pan / Tilt
- Press the shot-cut key
 enter into the Pan/Tilt mode;
 - Press or key to Pan the Video;
- Press or key to Tilt the video;
- Press the shot-cut key to exit the Pan/Tilt mode;
Note: During the Pan/Tilt mode can not use the navigatoin key to adjust the Volume and the Brightness;
Specifications
| Frequency | 2.4GHz FHSS |
| Type of Modulation | GFSK |
| Transmitting Power | 18dBm Max |
| Operation Environment | Indoor use only; Temperature: 0-40 °C; Humidity: 5% to 90% rh |
| Operating Range | Up to 900 feet (straight line and open space) |
| Power Adapter | Input: 100-240VAC 50/60Hz, 300mA Max; Output: SVDC, 700mA |
| LCD | 3.5″ TFT LCD |
| Rechargeable Battery for Parent Unit | Model:503450; 3.7V, 1200 mAh |
| Operating Time with Fully-charged Battery (Parent Unit) | Up to 12 hours (ECO on) |
| Image Sensor Type | 1/6.5″ Color CMOS image sensor |
| IR LED Type | 940nm |
Trouble Shooting
| No Reception On the Parent Unit |
|
| Interference or Poor Reception |
|
| A high-pitched Noise is Heard |
|
| No Sound on the Parent Unit |
|
| Image Freezes
Temperature is Inaccurate | -Restart the Baby Unit (plug out the adapter then plug it into the socket again); -Press the reset key at the back of Parent Unit (hid behind the stand)
|
| Cannot Connect with Multiple Baby Unit |
|
Maintenance and Warranty Terms
Maintenance
- Clean the surfaces of the Baby Unit and Parent Unit with a soft, fluff-free cloth;
- Never use cleaning agents or solvents;
- If the units become dirty, use a lightly dampened cloth to wipe surfaces, taking care not to allow water into any openings
Warranty Terms
We take quality very seriously. This is why all of our products come with three months warranty (replace or refund) and lifetime technical support from the original purchase date against defects in workmanship and materials. The warranty terms do not apply to any product that has been subject to abuse, misuse, negligenceor accident. Defects caused by tampering, unauthorized alterations or repairs are not covered by this warranty.
FCC Statement
This equipment has been tested and found to comply with the limits for a
Class B digital device, pursuant to Part 15 of the FCC Rules. These limits are designed to provide reasonable protection against harmful interference in a residential installation. This equipment generates uses and can radiate radio frequency energy and, if not installed and used in accordance with the instructions, may cause harmful interference to radio communications.
However, there is no guarantee that interference will not occur in a particular installation. If this equipment does cause harmful interference to radio or television reception, which can be determined by turning the equipment off and on, the user is encouraged to try to correct the interference by one or more of the following measures:
- Reorient or relocate the receiving antenna.
- Increase the separation between the equipment and receiver.
- Connect the equipment into an outlet on a circuit different from that to which the receiver is connected.
- Consult the dealer or an experienced radio/TV technician for help.
This product complies with RF specifications when it’s used at 20cm form
your body.
This device complies with part 15 of the FCC Rules. Operation is subject to the following two conditions: (1) This device may not cause harmful interference, and (2) this device must accept any interference received, including interference that may cause undesired operation.


