![]()
Smart PTZ Dome Camera
Command Codes 
![]() Warning To prevent fire or electronic shock, please install Warning and use the camera according to local standards aa•
Warning To prevent fire or electronic shock, please install Warning and use the camera according to local standards aa•![]() Note Do not turn the PTZ camera with your hands.
Note Do not turn the PTZ camera with your hands.
Notes
- Please installed and placed the camera firmly to avoid falling and body injury.
- Please keep the camera lens & cover clean to ensure the best video quality.
- To avoid damaging the product, do not use any corrosive liquid while cleaning.
- Please do not disassemble the camera without a professional guide. It may cause the camera to lose weather resistance.
- In the lightning environment, please install lightning protection equipment or unplug all connection cables to prevent lightning damage.
- Please keep this product away from Highfield devices such as microwave ovens.
- Do not use this product out of its working humidity and temperature.
- Avoid heavy pressure, falling, severe vibration, and immersion during transportation and storage.
Product Specifications
- Power supply: 100-240V AC to DC 12-14V/ 1000-2000MA.
- To ensure a stable power supply, use a power cable within 10ft (3m). In an environment -4°F (-20°C) or below, use a power cable within 5ft (1.5m).
- PTZ control protocol : Pelco-D / Pelco-P.
- Baud rate: 2400, 4800, 9600 (Selectable).
- Working temperature: -13-140°F / -25-60°C.
- Working humidity :590%RH.
- PTZ camera key features Presets, smart cruise, point to point scan, adjustable scanning speed, home point, Light control.
Steps to run a command code
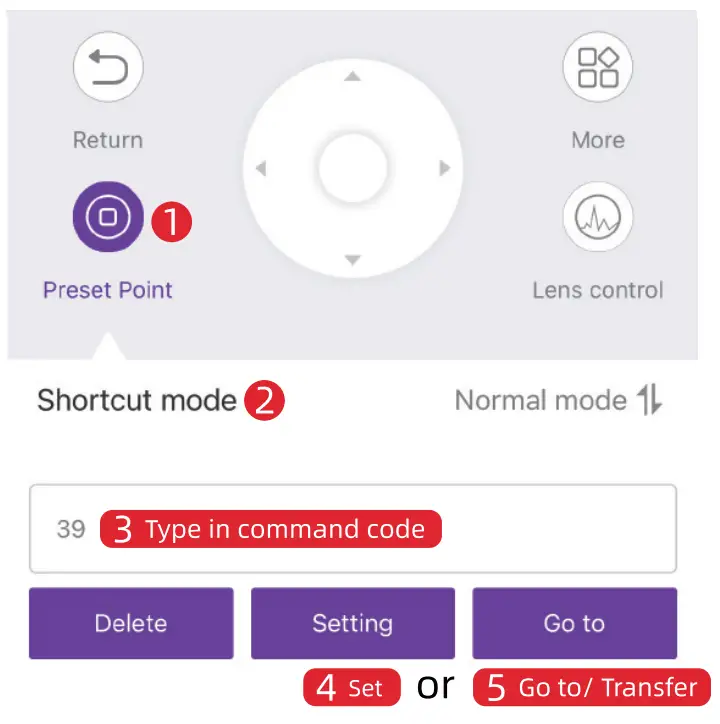
Tips: am 0. x tray. w MW operating from NY*.
PTZ Command Codes
| 1 | Auto-scan | Description | The continuous horizontal scan lasts 48 hours | |||
| Turn on auto scan | In preset point, type in 39, and Go to/ Transfer | |||||
| 2 | Limits scan | Description | Continuous horizontal scan from left limit to right limit lasts 48 hours | |||
| Set limit | Rotate to wanted left point, type in 9, and Set | |||||
| Set right limit point | Rotate to the wanted right point, type in 10, and Set | |||||
| Turn on limits scan | In preset point, type in 38, and Go to/ Transfer | |||||
| 3 | Speed of Scan | Low speed | Type in 61 and set | |||
| Medium speed | Type in 62 and set | |||||
| High speed | Type in 63 and | |||||
| Higher speed | Type in 64 and set | |||||
| 4 | Home point | Description | After auto-tracking, or no control within 3 minutes, the camera automatically returns to the home point | |||
| Set home point | Rotate to wanted home point, type in 58, and tap Set | |||||
| Turn on home point return | Type in 56, and Go to/ Transfer | |||||
| Turn off home point return | Type in 56, and Set | |||||
| 5 | Preset | Set preset points | Rotate to the wanted point, enter point number (1-8), tap Set |
| Go to a preset point | Enter a preset number (1-8), tap Go to/ Transfer | ||
| 6 | Preset Cruise | Description | Automatically rotate to each preset point in sequence and stay, and stops after cruising 3000 cycles |
| Cruise 1-8 preset points | Type in 41, and Go to/ Transfer | ||
| Delete 1-8 preset points | Type in 41, and Set | ||
| 7 | Cruise scan per point stay time | Stay for 2-3 seconds | Type in 51, and Set |
| Stay for 4-5 seconds | Type in 52, and Set | ||
| Stay for 6-7 seconds | Type in 53, and Set | ||
| Stay for 8-9 seconds | Type in 54, and Set | ||
| Stay for 10-12 seconds | Type in 55, and Set | ||
| 8 | Auto tracking (works only for some models) | Set home point | Type in 58, and Set |
| Turn on auto-tracking | Type in 96, and Go to/ Transfer (default off) | ||
| Turn off auto-tracking | Type in 96, and Set | ||
| Turn off auto zoom | Type in 97, and Set | ||
| Turn on auto-zoom | Type in 97, and Go to/ Transfer | ||
| 9 | Light control (works only for some models) | Turn on the lights | Type in 93, and Go to/ Transfer |
| Turn off the lights | Type in 94, and Go to/ Transfer | ||
| Turn on Red/blue alarm lights during the day | type in 26, and Go to/ Transfer | ||
| Turn off Red/blue alarm lights during the day | Type in 27, and Go to/ Transfer | ||
| 10 | PTZ calibration/ Factory reset | Calibrate the PTZ | Type in 34, and Go to/ Transfer |
| Restore factory settings of PTZ | Type in 40, and Set |
Statement
The content in this manual is only to provide guidance for users. It does not guarantee the products you purchased have all the features. Please refer to the actual product description.
Important: sometimes you may not see the image moving while navigating your camera, or it reaches the end when you finally see the movie. This is typically caused by the insufficient WiFi signal strength of the camera. Please mount the camera within better WiFi reception, or hardwire the camera to router/ NVR.


