MAT-1920RC Glass Panel Heater with Remote
MateStar®
GLASS PANEL HEATER WITH REMOTE
INSTRUCTION MANUAL
MAT-1920RC
This product is only suitable for well insulated spaces or occasional use.
Made in PRC
Imported by
ROMICO J.T. TRADERS LTD
11 DIOS STR., 1056 NICOSIA- CYPRUS
Tel. 22430310
WWW.MateStar.EU
GENERAL SAFETY INFORMATION
- Read all instructions carefully before using.
- Make sure the voltage is the same as that indicated on the rating plate of the appliance.
- Do not operate this appliance if the cable or plug becomes damaged.
- Keep the appliance and cable away from sources of heat, sharp objects or anything that may cause damage.
- If the cord is damaged, it must be replaced by the manufacturer, its service agent or similarly qualified persons in order to avoid a hazard.
- Ensure the appliance is switched off before connecting to the mains power supply.
- Switch off the power supply and disconnect from mains supply when not in use, before cleaning or other maintenance.
- To disconnect the appliance, switch it “0”, and then remove the plug from outlet. Do not pull the cord to disconnect the plug.
- The heater must not be located immediately below a socket-outlet.
- Do not operate in areas where gasoline, paint or other flammable liquids are used or stored.
- Indoor use only.
- In order to avoid overheating, do not cover the heater.
- To prevent a possible fire, do not block air intakes or exhaust in any manner.
- Don’t touch the hot surfaces.
- Do not insert or allow foreign objects to enter any ventilation or exhaust opening, as this may cause an electric shock, fire or damage to the appliance.
- Always ensure that hands are dry before operating or adjusting any switch on the product or touching the plug and socket-outlet.
- This appliance can be used by children aged from 8 years and above and persons with reduced physical, sensory or mental capabilities or lack of experience and knowledge if they have been given supervision or instruction concerning use of the appliance in a safe way and understand the hazards involved. Children shall not play with the appliance. Cleaning and user maintenance shall not be made by children without supervision.
- Children of less than 3 years should be kept away unless continuously supervised.
- Children aged from 3 years and less than 8 years shall only switch on/off the appliance provided that it has been placed or installed in its intended normal operating position and they have been given supervision or instruction concerning use of the appliance in a safe way and understand the hazards involved. Children aged from 3 years and less than 8 years shall not plug in, regulate and clean the appliance or perform user maintenance. CAUTION Some parts of this product can become very hot and cause burns. Particular attention has to be given where children and vulnerable people are present
- Do not leave this appliance unattended when it’s in use.
- The most common cause of overheating is deposits of dust or fluff in the appliance. Ensure these deposits are removed regularly by disconnect the appliance and vacuum cleaning air vents and grilles.
- Do not place the heater on carpet; don’t place the cable under carpets. Arrange cord away from traffic areas so that it will not be tripped over.
- Do not use this heater in the immediate surroundings of a bath, a shower or a swimming pool.
- Do not store away until the heater cools down, store the heater in cool dry location when not in use.
Before any use, refer to the corresponding section in this user manual.
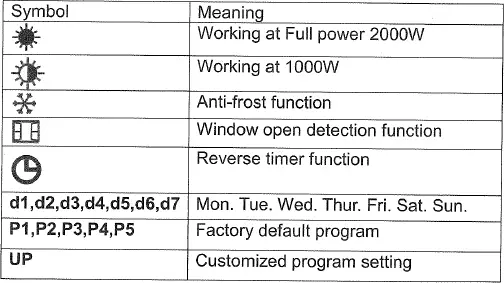
DESCRIPTION OF THE SYMBOLS
CE In accordance with European directives applicable to this product
![]() WARNING: To avoid overheating, do not cover
WARNING: To avoid overheating, do not cover
![]() CAUTION: Parts of this unit may become hot and cause burns. Be very vigilant and avoid touching the hot parts.
CAUTION: Parts of this unit may become hot and cause burns. Be very vigilant and avoid touching the hot parts.
![]() The crossed-out wheeled bin symbol indicates that the item should be disposed of separately from household waste. The item should be handed in for recycling in accordance with local environmental regulations for waste disposal. By separating a marked item from household waste, you will help reduce the volume of waste sent to incinerators or land-fill and minimize any potential negative impact on human health and the environment.
The crossed-out wheeled bin symbol indicates that the item should be disposed of separately from household waste. The item should be handed in for recycling in accordance with local environmental regulations for waste disposal. By separating a marked item from household waste, you will help reduce the volume of waste sent to incinerators or land-fill and minimize any potential negative impact on human health and the environment.
ASSEMBLY
Unpack the heater and the accessories.
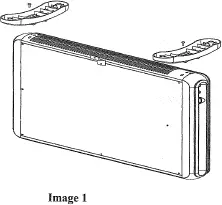
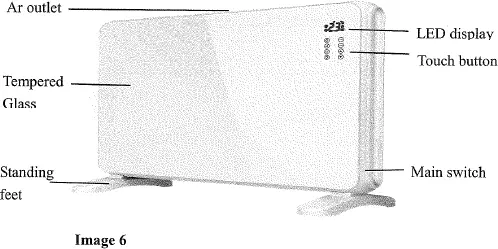
FREE STANDING USE
1. Place the unit upside down and fix the right and left feet with screw (Image 1).
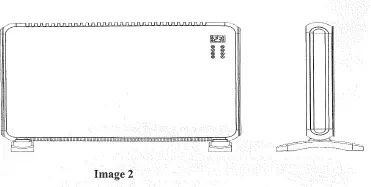
2. Place the unit upright and check if the feet is fixed properly before use (Image 2)
WALL MOUNTED USE
Instruction for fixing the heater on wall:
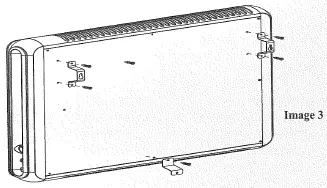
– Take out 1# bracket (2pcs)/2# bracket(1pc)/ST4*14(4pcs)
screws of the accessories bag.
– Install 1# bracket at the back of the appliance by fixing the 4
screws (see picture).
– Remove the middle one screw at the bottom of appliance,
and install 2# bracket here by fixing this one screw.

– Installing range for 1# bracket:630mm
– Use 6# pressing drill to drill out 1# bracket mounting holes on the wall, fit the holes with colloidal particles within the accessories bag, then fixing screws ST4*36 on the wall.
(Note: Screw should appear 3-5mm)

– Hang the appliance on the wall, mark the 2# bracket installation hole with pencil.
– Remove the appliance, use 6# pressing drill to drill out mounting holes on the wall, fit the holes with colloidal particles.
– Hang the appliance on the wall, fixing 2# bracket with screws ST4*36.
-Wall-mounted installation finished.
TECHNICAL SPECIFICATIONS
| Model | MAT-1920RC |
| Rated Voltage | 220-240 V~ |
| Rated Frequency | 50-60 Hz |
| Rated Power | 2000W |
| Protective Class | I |
| Remote control | Yes |
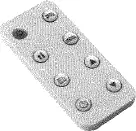
Remote Control
OPERATION
Place the heater on a stable and horizontally even ground.
Plug in power supply, press ON/OFF button (at the bottom of right housing) to connect power. Press it again to disconnect power.
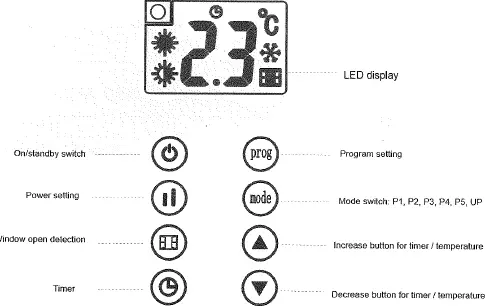
1. Set Current Day and Time:
When appliance is switch on, long touch ![]() for 3 seconds to activate current day setting.
for 3 seconds to activate current day setting.
1) Screen will display d1 and it flashes, then touch ▲or ▼ to set Day of the week among d1, d2, d3, d4, d5, d6, d7 in cycle.
Touch ![]() once to confirm the current day setting.
once to confirm the current day setting.
2) Then appliance enter time setting. Hour icon flashes, touch ▲or ▼ to set current hour among 00-23 in cycle. Touch once to confirm hour.
3) Then follow the same way to set minutes. Finally Touch ![]() to confirm setting.
to confirm setting.
After setting finish, touch ![]() once in standby mode to check if the current day and time setting is correct. Screen will automatically show “Day” — “Hour” – “Minutes” in turns within1 second each, then switch back to temperature display.
once in standby mode to check if the current day and time setting is correct. Screen will automatically show “Day” — “Hour” – “Minutes” in turns within1 second each, then switch back to temperature display.
For example, when your current day setting is Wed. 12:45 a.m., screen will show d3, 12, 45 in turns accordingly.
Note: At the first usage, icon ![]() will keep flashing to remind user
will keep flashing to remind user
to set current day and time. It will not stop flashing until current day and time is set. Please finish the setting before any other operation.
2. Power Setting
When appliance is switch on, screen display ![]() and appliance work at full power 1500W. You may touch
and appliance work at full power 1500W. You may touch ![]() button to switch between
button to switch between ![]() and
and ![]()
3. Temperature Setting
After power setting, touch ▲ or ▼ to activate temperature setting and choose among 5-35°C. It will save automatically in 5 seconds when no further operation is conducted.
Note:
1) When room temperature is found to reach the set temperature, appliance will stop heating. When room temperature is found to drop 1°C below set temperature, appliance will recover heating.
2) In anti-frost working mode, temperature setting is not allowed.
4. Mode Switch
When appliance is switch on, touch (Mode) to select program mode among PI, P2, P3, P4, P5, UP in cycle.
– P1, P2, P3, P4, P5 are factory default program.
– UP is customized program for end-user to set working period and mode upon their habit.
Table below shows factory default program P1, P2, P3, P4, P5
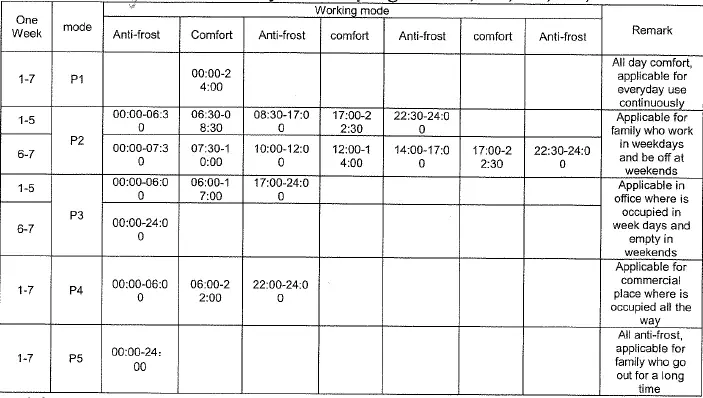
** Anti-frost: appliance keep room temperature at default 5°C to prevent frost. time
** Comfort: upon your need to set power and temperature. (follow step 2&3)
5. Timer Setting
In P1 working mode, touch ![]() twice quickly to activate timer setting.
twice quickly to activate timer setting.
Icon ![]() flashes on the screen, then touch ▲ or ▼ to set timer reverse among 0 to 24 hours. It will save automatically in 5 seconds after setting. Icon
flashes on the screen, then touch ▲ or ▼ to set timer reverse among 0 to 24 hours. It will save automatically in 5 seconds after setting. Icon ![]() stop flashing and appliance starts count down to turn off.
stop flashing and appliance starts count down to turn off.
Touch ![]() twice quickly again to cancel timer reverse setting, icon
twice quickly again to cancel timer reverse setting, icon ![]() become gray.
become gray.
6. Customized program, UP Setting
When appliance is switch on,
1) Touch (Mode) button and choose UP mode, then touch (Prog) button to activate customized setting to set one (or up to three) working period in comfort mode.
2) Screen displays d1 to begin Monday setting, touch ▲ or ▼ once to activate the 1st working period setting, screen display 1 and icon ![]() flashes. Touch ▲ or ▼ once again to select button to confirm start time among 0 to 23. Then touch
flashes. Touch ▲ or ▼ once again to select button to confirm start time among 0 to 23. Then touch ![]() setting, screen will switch to finish time setting, touch ▲ or ▼ to choose and touch
setting, screen will switch to finish time setting, touch ▲ or ▼ to choose and touch ![]() button to confirm. Appliance will automatically enter into the 2nd working period setting, the screen will display 2 and icon
button to confirm. Appliance will automatically enter into the 2nd working period setting, the screen will display 2 and icon ![]() flashes. In the same way, you may set the 2nd and the 3rd working period.
flashes. In the same way, you may set the 2nd and the 3rd working period.
Note
– Touch ![]() button at first instead of ▲ or ▼ steps to keep the appliance in Anti-frost function.
button at first instead of ▲ or ▼ steps to keep the appliance in Anti-frost function.
– In comfort mode working time, you may touch ![]() to switch power setting among
to switch power setting among ![]() (1500W)
(1500W) ![]() (750W).
(750W).
– In spite of the set period, appliance will display room temperature at anti-frost mode at 5°C.
3) Touch ![]() button to confirm every setting, when d1 setting is finish, it will automatically turn to d2. In the same way, you may set d2, d3, d4, d5, d6 and d7.
button to confirm every setting, when d1 setting is finish, it will automatically turn to d2. In the same way, you may set d2, d3, d4, d5, d6 and d7.
4) When all setting is confirmed, icon ![]() stop flashing.
stop flashing.
5) Long touch PROG button for 3 seconds to check UP mode setting,
– touch (Prog) button each time to check each setting in turns, for example, d1 – 1st working start time – 1st working finish time and so on.
– touch ![]() button to choose among d1 to d7. Press (Prog) activate the corresponding day’s working period setting.
button to choose among d1 to d7. Press (Prog) activate the corresponding day’s working period setting.
– it will quit automatically when no operation within 2 minutes.
7. Child Lock Function
When appliance is switch on, long touch ▲ and ▼ at the same time for 3 seconds to activate child lock function, screen will show [ ] after setting and will recover to original display in 5 seconds. No button will be active during it. Once button is touch,
screen will flashes [ ] and recover to original display in 5 seconds.
Long press ▲ and ▼ at the same time for 3 seconds again to cancel child lock function
8. Window Open Detection Function:
When appliance is switch on, touch ![]() once to activate window open detection, icon
once to activate window open detection, icon ![]() flashes on the screen, touch
flashes on the screen, touch ![]() again to cancel the setting, icon
again to cancel the setting, icon ![]() disappear.
disappear.
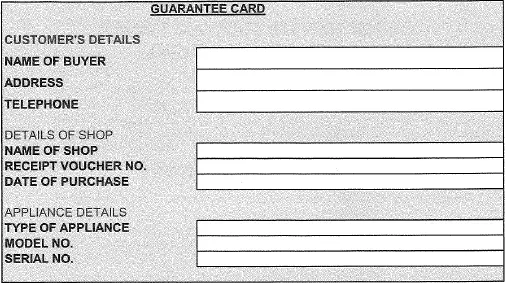
PLEASE FILL YOUR DETAILS FOR FUTURE USE


![Oypla Glass Panel Heater Manual [model:4018, 4019]](https://static-data1.manualsee.com/1/img/98/71374/2021/02/Oypla-Glass-Panel-Heater-Manual-Model4018-4019.jpg "Oypla Glass Panel Heater Manual [model:4018, 4019]")

