![]()
MP3 Player
T2
User Manual
Dear Customer,
Thanks so much for choosing RUIZU®. Please note that items purchased from RUIZU are covered by a 1-year warranty. Let us know if there is anything we can ever do to assist you further.
Customer Service: [email protected]
Your suggestions and feedback have helped us shape our business to perfectly fit your standards. As a token of our appreciation, we are soon to introduce a series of new products for our valued customers like your, please share this with all of your friends.
We look forward to serving you for many years to come.
Kind Regard
RUIZU Customer Service Team
Basic Function
- Full Touch Screen
- Music Play
Supports formats: MP3, WMA, APE, WAV, FLAC, OGG
- Voice Recorder
Supports FM, MIC, and LINE IN recording with MP3 or WAV format
- Photo Browser: Supports JPEG, BMP, GIF Format
- Video Play
Supports 240*320 converted video with AMV or AVI format
- Arithmetic Exercise
- Multi-task Operation
Listening to music or FM radio while reading E-Book or using a pedometer
- Supports Bluetooth 5.0, FM Radio, Pedometer, E-Book
- Supports Tools: Calendar, Stopwatch, Alarm Clock, Screen Saver
- Support Micro SD Card Expansion(Up to 128GB)
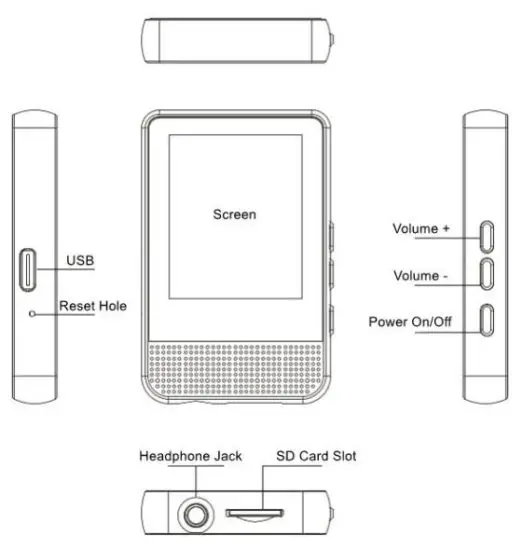
Basic Operation
- Power On/Off Button
Press and hold the power button for 3s to turn on/off the MP3.
When the MP3 is on, short press to lock/unlock the screen. - Unlock Screen
Swipe the screen or press the power button to unlock the screen - Main Interface
※ Swipe right/left or tap the left/right arrow to select the functions.
※ Swipe the screen from bottom to up or tap to the main interface.
 - Volume +/-
Press or hold the ‘Volume +’/‘Volume -’ button to increase or reduce the volume.
Music
- Music Icon: Tap the ‘Music’ icon to enter into the music menu.
Tap to return to the ‘Music’ icon.
 - Play/Pause
In the playing interface, Tap or
or to play or pause music.
 - Switch Tracks
In the playing interface, tap or play the last/next song.
 - Fast Forward/Backward
In the playing interface, holdor to fast forward or fast backward the playing music. - Lyrics
If music is downloaded with lyrics(LRC format), the lyrics will be displayed when you tap the music playing interface. - Playing Modes
In the music playing interface, tap the following icon to set playing modes.
![]() Shuffle Play
Shuffle Play![]() Sequential Play
Sequential Play![]() Repeat Play All
Repeat Play All![]() Repeat One
Repeat One
- Add to playlist(2 Methods)
3 playlists in total, they’re playlist 1, playlist 2, and playlist 3.
※ In the playing interface, tap![]() , the playing music will be added into playlist 1.
, the playing music will be added into playlist 1.
※ Add the playing music to playlist 1, playlist 2 or playlist 3 In the music playing interface, tap![]() —->‘Add to playlist’, then choose the Playlist 1, Playlist 2 or Playlist 3
—->‘Add to playlist’, then choose the Playlist 1, Playlist 2 or Playlist 3
- Equalizer
In the music playing interface, tap —-> ‘Sound settings’ —->‘Equalizer’, then select the equalizer (Rock/ Funk/ Hip hop/ Jazz/ Classical/ Techno), turn off or custom it by yourself.
 - A-B Repeat
In the music playing interface, tap ‘AB’(The ‘A’ will be in red color) to set the starting point, tap ‘AB’ again(The ‘B’ will be in red color) to set the endpoint. Then, if tap ‘AB’ once again, the A-B repeat will be canceled.
How to Set Replay Times?
In the music playing interface, tap ![]() —->‘Repeat settings’ —->‘Replay Times’/ ‘Replay Interval’
—->‘Repeat settings’ —->‘Replay Times’/ ‘Replay Interval’
Video
- Play/Pause(2 Methods)
※ In the video playing interface, tapor pause or play the video.
※ Tap the center of the screen to play or pause the video. - Fast Forward/Backward(2 Methods)
※ Holdor to fast forward or fast backward.
※ Long press the right or left of the screen to fast forward or fast backward. - Switch Tracks(Two Methods)
※ Tapor to play the last or next video.
※ Swipe left-to-right to play the last or next video. - Return
When the video is playing, tap back to the last interface. - Video Setting
In the video play interface, tap to set the video, the related list is as follows.
※Brightness ※Repeat ※Delete video ※Update Playlist
FM Radio
Note: Please use wired earphones that will be used as an antenna.
- FM Setting
Tap the ‘Radio’ icon to enter into the radio setting menu. The related list is as follows.
※ Stations: There can save 30 FM stations.
※ Manual tune: Tune stations manually.
※ Autotune: Tunes stations automatically.
※ FM Recording(FM Recording files will be here)
How to FM record?
In the FM playing interface, tap ![]() —> ‘Start FM radio recording’. The MP3 device will begin to record the FM. In the FM recording interface, tap
—> ‘Start FM radio recording’. The MP3 device will begin to record the FM. In the FM recording interface, tap ![]() to pause the voice recording, tap
to pause the voice recording, tap ![]() to continue the voice recording. Tap
to continue the voice recording. Tap ![]() or,
or, ![]() then click ‘Yes’ or ‘No’ in the pop-up prompt window to save or don’t save the FM radio record.
then click ‘Yes’ or ‘No’ in the pop-up prompt window to save or don’t save the FM radio record.
How to Select the FM Band
In the FM playing interface, tap ![]() —>‘Tuner Region’. Then you can select the FM bands.
—>‘Tuner Region’. Then you can select the FM bands.
Common Band: 87.50 MHZ ~ 108.00 MHZ
Japan Band: 76.00 MHZ ~ 90.00 MHZ
Euro Band: 87.50 MHZ ~ 108.00 MHZ
- Switch Stations
In the FM playing interface, tapto switch stations.
Tap or
or  tune stations.
Pictures
Tap the ‘Pictures’ icon to enter the picture menu. All pictures will be listed here. Tap each picture file to view the picture.
- Switch Pictures
In the viewing picture interface, horizontally scroll the screen to view the last or next picture. - Picture Setting
In the picture viewing interface, tap to enter the setting menu. The related list is as follows.
※ Brightness
※ Backlight timer:10 seconds/20 seconds/30 seconds/Always on
※ Slideshow settings: Timer per slide / Repeat(On/Off) / Shuffle(Off/On). After setting the slideshow playtime, please return to the picture viewing interface and tap or
or start or pause the slideshow play.
※ Delete picture
※ Update Playlist: Pictures will be reordered.
Voice Record
- How to Recording?
In the recording interface, tap to start to record.
Tapto pause the voice recording.
Tap to continue the voice recording.
Tap or, then click ‘Yes’ or ‘No’ in the pop-up prompt window to save or don’t save the record.
 - Recorder Play
In the recording interface, tap to choose and play the recording file.
 - Record-Setting
Tap to enter into the setting menu. The related list is as follows.
※ Record Format—>MP3 Rec, WAV Rec
※ Set rec bitrate —->512kbps, 768kbps, 1024kbps, 1536kbps
※ Record from—->Microphone, Line In
E-Book
Tap the ‘EBook’ icon to enter to the menu. All the TXT files will be listed here. Tap each TXT file to start reading.
How to Set Auto Play(2 Methods)
※ Tap the ‘Ebook’ icon—->Tap![]() . The menu is as follows.
. The menu is as follows.
Playtesting: set the interval time of autoplay
Delete ebook: Delete the ebook you chose
※ In the reading interface, tap ![]() —->Playsetting
—->Playsetting
Note: After set the interval time of autoplay, please return to the reading interface and tap ![]() or
or![]() start or pause autoplay.
start or pause autoplay.
- Setting
In the reading interface, swipe the screen right or tap to enter the settings. The related list is as follows.
※ Playsetting: Set the interval time of autoplay.
※ Delete book
※ Bookmark select
※ Delete bookmark
※ Add bookmark
※ Page select
※ Font size
※ Ebook background: 6 backgrounds in total - Last/Next Page
In the reading interface, scroll the screen up or down to switch the last and next page.
Bluetooth
Tap the ‘Bluetooth’ icon to enter to Bluetooth mode.
On the Bluetooth menu, the related list will show as:
※ Bluetooth on/off: Turn on or turn off Bluetooth
※ Search for the device: Search Bluetooth devices around.
Bluetooth device will appear here once it is searched. Tap the Bluetooth device you want the MP3 to connect to, then tap ‘math’
※ Device List: All the Bluetooth devices the MP3 searched for will be shown here.
※ BT Upgrade: Upgrade Bluetooth
Setting
Tap the ‘Setting’ icon to enter the setting menu. The related list will show as:
- Language: There are 28 kinds of languages in total.
- Display setting
※ Brightness: Adjust the screen brightness from 00 to 11
※ Backlight timer: Set the backlight time
※ Screensaver: None/Digital clock-1/ 2/ 3 - ※ Desktop background: Background 1/ 4/ 5
- Sleep timer: Off / Set sleep time from 1 to 99 mins. When
there is no app running, the MP3 will shut down automatically
after you set the sleep time. - Power Off Timer: The MP3 device will shut down
automatically after you set power-off time from 0 to 99 mins. - Speaker On/Off: Turn on the speaker or not
- Date and time
※ Time settings: Time format: 12H / 24H, Set time
※ Date settings: Set date format, Set date - Information
※ Player information: Software version of the MP3 device
※ Disk space: The MP3 device will show you the total storage space and unused storage space - Format device: Deleted all data after formatting the device. Please back up all your files on the MP3 device.
- Factory Setting: Restore factory settings
Specification:
| Internal Memory | 16GB❑ 32GB❑ | ||
| Support Micro SD | Up to 128GB | ||
| Bluetooth 5.0 | 10m Connection Distance without Obstacles | ||
| Screen | 1.8 inches TFT Full-Color Touch Screen | ||
| 160*128 Resolution | |||
| Battery | Lithium Polymer Battery 200mAh | ||
| USB Connection | USB 2.0 Type C | ||
| Lyric Formats | LRC | ||
| E-Book Formats | TXT | ||
| Audio Formats | MP3/WMA/APE/FLAC/WAV/DRM/ACELA | ||
| Video Formats | AMV/ AVI | ||
| Picture Formats | JPG/ BMP | ||
| Recorder Formats | WAV/ MP3 | ||
| 3 Meters Recording Distance | |||
| Charging | DC 5V, 500mA, about 211 Full Charge | ||
| Playing Time (Note: It’s tested when the volume is 20 and there’s no other app is running. Please note: there may be some differences.) | Music | By Earphones | 25H |
| By Speaker | 10H | ||
| By Bluetooth | 8H | ||
| Video | By earphones | 7H | |
| By Speaker | 5H | ||
| FM Radio | By Earphones | 7H | |
FCC Statement
This equipment has been tested and found to comply with the limits for a Class B digital device, pursuant to part 15 of the FCC Rules. These limits are designed to provide reasonable protection against harmful interference in a residential installation. This equipment generates, uses, and can radiate radio frequency energy and, if not installed and used in accordance with the instructions, may cause harmful interference to radio communications. However, there is no guarantee that interference will not occur in a particular installation. If this equipment does cause harmful interference to radio or television reception, which can be determined by turning the equipment off and on, the user is encouraged to try to correct the interference by one or more of the following measures:
- Reorient or relocate the receiving antenna.
- Increase the separation between the equipment and receiver.
- Connect the equipment into an outlet on a circuit different from that to which the receiver is connected.
- Consult the dealer or an experienced radio/TV technician for help.
Caution: Any changes or modifications to this device not explicitly approved by the manufacturer could void your authority to operate this equipment.
This device complies with part 15 of the FCC Rules. Operation is subject to the following two conditions: (1) This device may not cause harmful interference, and (2) this device must accept any interference received, including interference that may cause undesired operation.
RF Exposure Information
The device has been evaluated to meet general RF exposure requirements. The device can be used in portable exposure conditions without restriction.


