![]()
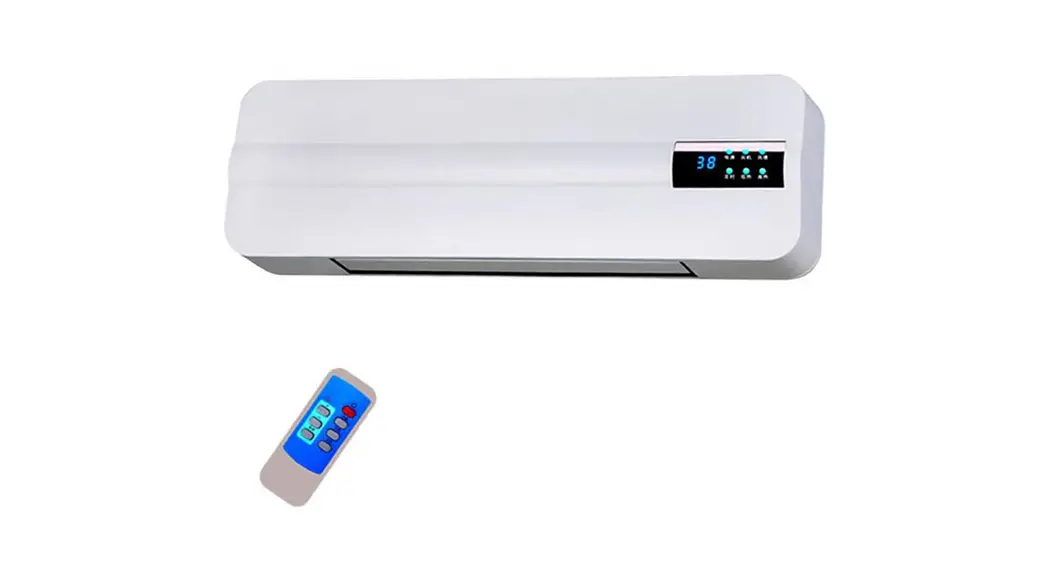
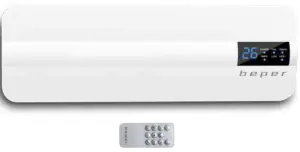
DIGITAL FAN HEATER – USE INSTRUCTIONS
THIS PRODUCT IS SUITABLE FOR PROPERLY INSULATED SPACES O FOR OCCASIONAL USE ONLY
![]()
GENERAL SAFETY ADVICE
READ THE OPERATING INSTRUCTIONS CAREFULLY BEFORE FIRST USE OF THE APPLIANCE.
Read the following instructions carefully, since they give you useful safety information about installation, use, and maintenance, and help you avoid mishaps and possible accidents. Remove the packing and make sure that the appliance is intact, with special attention to the supply cable. The elements of the packing (plastic bags, polystyrene, etc) do not have to be accessible to the children, in order to preserve them from dangerous sources. It is recommended not to throw these packing materials in the domestic waste, but to deliver them to the appropriate station of collection or destruction refusals, asking eventually information to the manager of the Sanitation Department of your own municipality. Before connecting the appliance make sure that the mains voltage corresponds to the data specified on the label. If the plug does not suit the socket, let it be replaced with another suitable plug by qualified personnel only, which shall also ensure that the section of the socket cables is suitable for your appliance power absorption. Never pull the supply cord to unplug the appliance. Make sure that the supply cord never comes into contact with hot or cutting surfaces Do not use this appliance if the supply cord is damaged. In case of damage, it must be replaced by the manufacturer, its service agent, or similarly qualified persons in order to avoid a hazard. Only connect this appliance on alternating current Generally, the use of adaptors multiple plugs and/or extensions is not recommended; should they be necessary, please use only simple or multiple adaptors and extensions in compliance with the safety rules in force, making sure that the capacity absorption limit marked on the simple adaptors and the extensions and the maximum power limit marked on the multiple adaptors is not exceeded. This appliance is to be destined for its special purpose only. Any other use is to be considered improper and thus dangerous. The manufacturer cannot be responsible for any damages deriving from improper, wrong, or incautious use. To avoid any heating risk, it is recommended to unroll completely the supply cord and to unplug the appliance, when not used. Before cleaning, always unplug the appliance. To protect against electric shock, do not immerse the cord, plug, or any parts of the appliance into water or other fluids. Do not hold the appliance with wet hands or feet. Do not hold the appliance with naked feet. Do not expose the appliance to atmospheric agents such as rain, wind, snow, hail. Do not use the appliance near explosives, highly flammable materials, gases, burning flames, heaters. Do not allow children, disabled people, or every people without experience or technical ability to use the appliance if they are not properly watched over. Close supervision is necessary when any appliance is used by or near children. Make sure that children do not lay with this appliance. If you decide not to use the appliance any longer, make it unserviceable by simply cutting the supply cable after disconnecting the plug from the socket.
ALSO MAKE ANY DANGEROUS PARTS UNSERVICEABLE, ESPECIALLY FOR CHILDREN WHO COULD PLAY WITH THE APPLIANCE.
CAUTION FOR OPERATION
Check good conditions of the appliance after removing it from its package Do not install the appliance behind doors or near curtains and drapes Do not cover or obstruct the grid on the appliance Maintain a distance from other objects and appliances of at least 1 m when installing the appliance Keep the appliance away from external heating sources or flammable objects The appliance may become hot during operation; please do not touch the appliance while operating, to avoid burns Do not use the appliance to dry clothes and linens Do not insert any object or allow any object to penetrate the openings of the grid Do not submerge the appliance in water or other liquids Do not allow water and/or other liquids to penetrate inside the appliance Do not install the appliance near bathtubs, showers, or other water sources.for assistance This appliance is only intended for domestic use Once the appliance is installed, make sure to regularly clean it to remove any dust and dirt Only plug the appliance into the wall socket once the installing and mounting operations have been correctly carried out Do not use the appliance if the power cord is tangled Do not turn the appliance off by pulling the power cable; use the on/ off switch Unplug the appliance from the wall socket when not in use for a long period of time Keep the power cable away from hot surfaces Do not store the appliance in small places until it has cooled down completely Do not connect the appliance to external timer devices Do not install the appliance outdoors The appliance is fitted with an overheating protection system, that will automatically shut the appliance off in case it becomes too hot during operation; if the appliance suddenly shuts off, turn it off and let it cool down for a few minutes. In case the appliance fails to turn back on, contact your local after-sale center
INSTALLING AND MOUNTING OF APPLIANCE
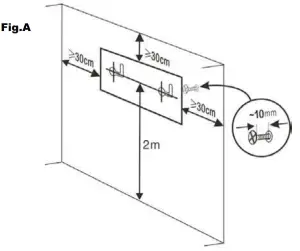
Warning: before mounting the appliance on the wall, make sure that the chosen position for installation is free from electrical wires, water channels, or similar. Make sure that the appliance is firmly fixed on to the wall before letting go. For installing the appliance, make sure to drill 2 holes at a height of at least 2 m from the floor. Leave at least 30 m of distance from corners and ceiling. Make sure that the holes drilled are wide enough for the screws to fit snugly, but also not too wide to avoid them becoming loose. Fix the crews to the wall anchors on the wall, making sure that the screw head protrudes from the wall surface for at least 10 mm, to allow the correct and safe installation of the appliance. (see image below)
Warning: appliance weight is about 4,5 kg, make sure that the wall is able to bear this weight ( Fig.A)
OPERATION OF APPLIANCE
1. Once the appliance is firmly installed on to the wall, plug it into the wall socket
2. Place the general switch found on the side of the appliance on “ON” position; a slight “BEEP” will be heard, and the light on the control panel will turn on, the appliance will now be in “Stand-by” mode
3. Activate the remote control by removing the protective film found next to the battery case
4. It will now be possible to set the appliance as wished by using the remote control. The display will show the light based on the selected setting.
WARNING: in case the remote control is lost, it will still be possible to operate the appliance, by pressing the “START/STOP” button found next to the ON/OFF switch. (Only the basic settings will be available).
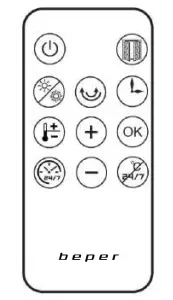
REMOTE CONTROL:
| Press” | ||
| Press | ||
| Press “ | ||
| Press | ||
| Set temperature modeLight On | 1, Press “ The selected temperature Is lower or the same as room temperature, the appliance will stop heating the air Press “+”: The selected temperature is 1-2°C higher than room temperature, the appliance will start operating in low heating mode. The selected temperature is 3°C higher than room temperature, the appliance will start operating in high heating mode. 2., To set the temperature, press “OK” or wait until the LED lights on the display have blinked for S seconds | |
| Open window detection light flickering | 1, “Open window detection” mode can only be activated when the appliance is operating in heating mode (no fan mode) or inset temperature mode 2, Press | |
| Cancel of the week program | / | By pressing canceled. | ||||||||
| Display description | 1, After t e setting, the display will showroom temperature; the indication lights related to the selected week program and function mode will! so be displayed 2, Heating mode (high, low, no selection); during week timer programming, the display will showroom temperature, while LED lights related to the operating mode will blink. Once the operating mode Is selected, the related LED light will stop blinking and will be shown on the display 3, Swing, high heating, low heating, open window detection mode can be activated with or without a timer 4, Working LED lights are always on based on the selected setting | |||||||||
| Program selection table | ||||||||||
| Mode | Monday | Tuesday | Wednesday | Thursday | Friday | Saturday | Sunday | |||
| P1 | 8:00- 17:00 | 8:00- 17:00 | 8:00-17:00 | 8:00- 17:00 | 8:00- 17:00 | 8:00- 17:00 | 8:00- 17:00 | |||
| P2 | 18:00- 7:00′ | 18:00- 7:00′ | 18:00.7:00° | 18:00- 7:00′ | 18:00- 7:003 | 18:00- 7:004 | 18:00- 7:00° | |||
| P3 | 8:00- 17:00 | 8:00- 17:00 | 8:00-17:00 | 8:00- 17:00 | 8:00- 17:00 | OFF | OFF | |||
| P4 | 18:00- 7:00° | 18:00- 7:00° | 18:00-7:00′ | 18:00- 7:00. | 18:00- 7:00′ | OFF | OFF | |||
| PS | OFF | OFF | OFF | OFF | OFF | 00:00- 23:59 | 00:00- 23:59 | |||
| P6 | Custom selection | Custom selection | Custom selection | Custom selection | Custom selection | Custom selection | Custom selection | |||
| Note | a: for programs P2/P4, turn off time Is set in the following day | |||||||||
| P6: it is possible to set time from 00 to 24; turn on time must be prior to turning off time, otherwise setting will not be confirmed | ||||||||||
| Cancel temperature setting | 1, During setting, press | |||||||||
 Cancel Cancel | 2, Once the set Is selected, first press 3, If the temperature set is low, after pressing If the temperature set is high, after pressing | |
| Cancel week timer setting | 1, During setting, press 2, Once the selection, is set, first pressthento cancel setting | |
| Safety shut off | Max temperature detectable is S1°C. When this temperature is detected by the appliance, it will shut off automatically |
 The European directive 2011/65/EU on Waste Electrical and Electronic Equipment (WEEE), requires that old household electrical appliances must not be disposed of in the normal unsorted municipal waste stream. Old appliances must be collected separately in order to optimize the recovery and recycling of the materials they contain and reduce the impact on human health and the environment. The crossed-out “wheeled bin” symbol on the product reminds you of your obligation, that when you dispose of the appliance, it must be separately collected.
GUARANTEE CERTIFICATE
This appliance has been checked in the factory. From the date of original purchase, a 24-month guarantee applies to material and production defects. The purchase receipt and the guarantee certificate must be submitted together in case of a claim to guarantee. The guarantee is valid only with a guaranty certificate and proof of purchase (fiscal receipt) indicating the date of purchase and the model of the appliance For any technical assistance, please contact directly the seller or our head office in order to preserve the appliance’s efficiency and NOT TO void the guarantee. Any intervention on this appliance by non-authorized persons will automatically void the guarantee.
GUARANTEE CONDITIONS
If the appliance shows defects as a result of faulty material and/or production during the period of guarantee, we guarantee repair free of charge on the condition that:
– The appliance has been used properly and for the purpose for which it has been intended.
– The appliance has not been tampered with, otherwise, it is not maintainable.
– The purchase receipt shall be presented.
– The appliance showing fair wear and tear shall not be covered by this guarantee.
Therefore, any part that could be accidentally broken or has visible signs of use in consumable products (such as lamps, batteries, heating elements…) the aesthetic parts are excluded from the guarantee, and any defect whatsoever resulting from non-respect of the rules for use, negligence in usage and/or maintenance of the appliance, carelessness, wrong or improper installation, damage during transport and any other damage not attributable the supplier.
For every defect that could not be repaired within the guarantee period, the appliance will be replaced free of charge.
In any case, if the part to be replaced for defect, breakage or malfunction is an accessory and/or a detachable
part of the product, Beer reserves the right to replace only the very part in a question and not the entire product
CONTACT YOUR DISTRIBUTOR IN YOUR COUNTRY OR ATER SALES DEPARTMENT BEER. E-MAIL [email protected] WHICH WILL FORWARD YOUR ENQUIRIES TO YOUR DISTRIBUTOR.
BEPER SRL
Via Salieri, 30
37050 – Vallese di Oppeano – Verona
Tel. 045/7134674 – Fax 045/6984019
e-mail: [email protected]
beper.com![]()


