
BenQ MX720 Lumen XGA SmartEco

Features
- Native XGA (1024 x 768) Resolution
- 3,500 ANSI Lumens, 13,000:1 Contrast Ratio
- Up to 6,000 Hours Long Lamp Life
- Smart Eco Power Saving Technology
- LAN control and LAN display function
Input and Output Terminals
- RS232 (DB-9pin)
- LAN (RJ45)
- USB (Type Mini B)
- HDMI
- Audio Out (Mini Jack)
- Monitor Out (D-sub 15pin)
- Computer In 1 & 2 (D-sub 15pin)
- S-Video In (Mini DIN 4pin)
- Audio In L/R (RCA)
- Audio In (Mini Jack)
- Composite Video In (RCA)
- Microphone in
Specification
| Projection System | DLP® |
| Native Resolution | XGA(1024×768 ) |
| Brightness | 3,500AL |
| Contrast Ratio | 13,000:1 |
| Display Color | 1.07 Billion Colors |
| Lens | F2.54~2.73, f=18.18~21.84 |
| Aspect Ratio | Native 4:3 (5 aspect ratio selectable) |
| Throw Ratio | 1.64-1.97(60”@ 2m) |
| Image Size (Diagonal) | 37’’- 300’’ |
| Zoom Ratio | 1.2:1 |
| Lamp Type | 240W |
| Lamp Life | 3500/5000/6000 hours (Normal/Eco/SmartEco) |
| Keystone Adjustment | |
| Projection Offset | 1D, Vertical +/- 40 degrees |
| Resolution Support | 110%±5% |
| Horizontal Frequency | VGA(640 x 480) to UXGA(1600 x 1200) |
| Vertical Scan Rate | 15-102KHz |
| Compatibility | 23-120Hz
HDTV Compatibility: 480i, 480p, 576i, 576p, 720p, 1080i, 1080p |
| Interface | Video Compatibility: NTSC, PAL, SECAM
Computer in (D-sub 15pin) x 2(Share with component) Monitor out (D-sub 15pin) x 1 Composite Video in (RCA) x 1 S-Video in (Mini DIN 4pin) x 1 HDMI x 1 Audio in (Mini Jack) x 2 Audio in (L/R) x 1 Audio out (Mini Jack) x 1 Microphone in (Mini Jack) x 1 Speaker 10W x 1 USB (Type mini B) x1 (Download & page/down) RJ45 x 1 (LAN Control & LAN Display) RS232 (DB-9pin) x 1 IR Receiver x 2 (Front + Real) |
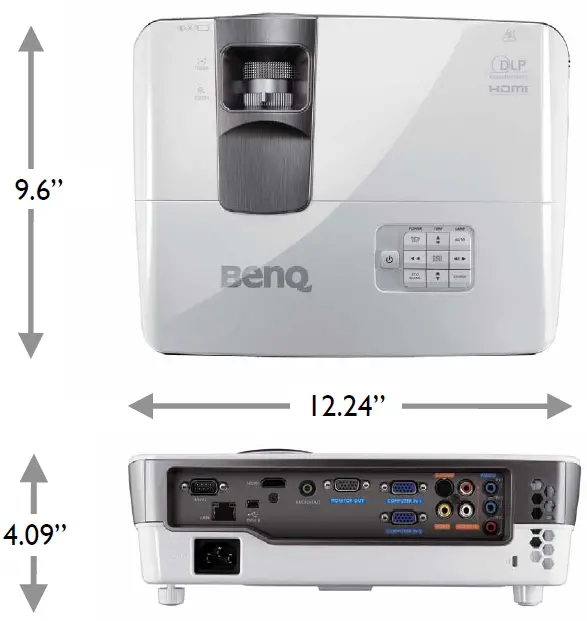
| Dimensions (WxHxD) | 12.24” x 4.09” x 9.6” |
| Weight | 6.41 lbs (2.9 kgs) |
| Power Supply | AC100 to 240V, 3.5A, 50 to 60 Hz |
| Power Consumption | 375W(Max), Standby<0.5W |
| Audible Noise | 33/30 dBA (Normal/Economic mode) |
| On-Screen Display Languages | Arabic/Bulgarian/ Croatian/ Czech/ Danish/ Dutch/ English/ Finnish/ French/ German/ Greek/ Hindi/ Hungarian/ Italian/ Indonesian/ Japanese/ Korean/ Norwegian/ Polish/ Portuguese/ Romanian/ Russian/ Simplified Chinese/Spanish/ Swedish/ Turkish/ Thai/
Traditional Chinese (28 Languages) |
| Picture Modes | Dynamic/Presentation/sRGB/Cinema/User 1/User 2 |
| Accessories (Standard) | Lens Cover, Remote Control w/ Battery, Power Cord, User Manual CD, Quick Start Guide, Warranty Card, Carry bag, VGA(D-sub 15pin) Cable |
| Accessories (Optional) | Spare Lamp Kit 5J.J6E05.001
Ceiling Mount 5J.J4N10.001 3D glasses 5J.J7K25.001 Case 5J.J3T09.001 |
| UPC Code | 8400460-2497-0 |
| Limited Warranty | 3-Years Parts & Labor / 1-Year or 2000 hours of lamp life |
Distance Chart
The screen aspect ratio is 4:3 and the projected picture is 4:3
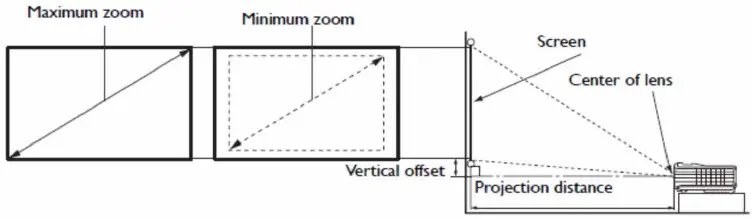
| Screen Size | Distance from screen (in) | Vertical offset (in) | |||||
| LDiagonal | W (in) | H (in) | Min length | Average | Min length | ||
| Inch | mm | (Max zoom) | (Max zoom) | ||||
| 40 | 1016 | 24 | 32 | 52.4 | 57.7 | 62.9 | 1.18 |
| 50 | 1270 | 30 | 40 | 65.6 | 72.1 | 78.7 | 1.49 |
| 60 | 1524 | 36 | 48 | 78.7 | 86.6 | 94.4 | 1.81 |
| 70 | 1778 | 42 | 56 | 91.8 | 101.0 | 110.2 | 2.08 |
| 80 | 2032 | 48 | 64 | 105 | 115.4 | 125.9 | 2.40 |
| 90 | 2286 | 54 | 72 | 118.1 | 129.9 | 141.7 | 2.71 |
| 100 | 2540 | 60 | 80 | 131.2 | 144.3 | 157.4 | 2.99 |
| 120 | 3048 | 72 | 96 | 157.4 | 173.2 | 188.9 | 3.58 |
| 150 | 3810 | 90 | 120 | 196.8 | 216.5 | 236.2 | 4.48 |
| 200 | 5080 | 120 | 160 | 262.4 | 288.7 | 314.9 | 5.98 |
| 250 | 6350 | 150 | 200 | 328.0 | 360.9 | 393.7 | 7.51 |
| 300 | 7620 | 180 | 240 | 393.7 | 433.0 | 472.4 | 9.01 |
Wall Mount Chart
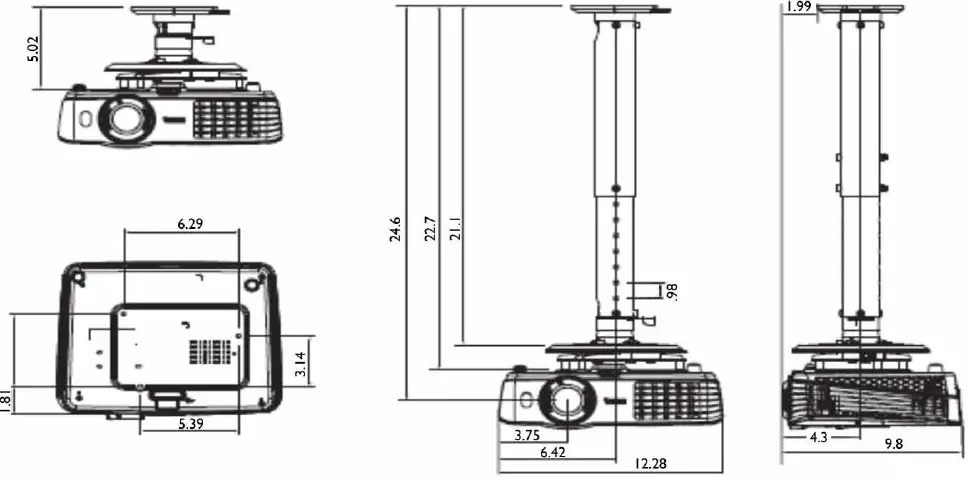
Ceiling Mount screw: M4 (Max L = 25 mm; Min L = 20 mm)
Dimensions
Frequently Asked Questions
On the projector’s bottom are four screw adjusters. Using these sliders, you can change the projection’s height or angle.
The HDMI-2 connector on the TV projector does, in fact, support ARC. To enable the ARC function on the projector from the OSD menu, please follow the procedures below.
The projector and laptop are now connected after you simply attach a transmitter into the HDMI or USB-C Thunderbolt connection on your laptop and press a button. There is no software to run, no networking requirements (although it can be connected to a network for updates).
To get started, simply utilise a Chromecast device on your projector as the receiver and turn on the Chromecast feature in your Google Chrome web browser. Many Android smartphones and tablets can rely on Chromecast to effectively mirror their screen.
The projector and laptop are now connected after you simply attach a transmitter into the HDMI or USB-C Thunderbolt connection on your laptop and press a button. There is no software to run, no networking requirements (although it can be connected to a network for updates).
Rotate the screen manually (Screen Pivot)
Select Display from the menu. 2. Pick a direction for the screen. The setting will become active right away.
Step 1: Click on the “System Setup: Basic” submenu’s “Projector Position.” Step 2: If your projector is in front of your screen, choose “Front Table” or “Rear Table” using the “Left” and “Right” arrow keys (if your projector is behind your screen). Your BenQ projector’s inverted images ought to be fixed by doing this.
BenQ – Using the Freeze button on your BenQ remote, you can freeze the image that’s displayed. SMART – You can pause an image on the screen by pushing the “Pause” button on the front bezel of the screen or by using the “Freeze” button on your remote control.
Link the device’s HDMI output port to the projector’s HDMI input port, the projector’s SPDIF output port to the AVR’s SPDIF input port, and then use speaker cords to connect the AVR to the device’s external speakers.
Multiple audio outputs, including as 2.0, 5.1, 7.1, and Dolby Atmos, are supported by BenQ’s Audio Return+ to an external audio system like a soundbar.
For wireless connectivity, BenQ Android Smart Projectors offer a direct Wi-Fi hotspot and Bluetooth. Additionally, OTA (over-the-air) firmware updates spare IT managers time and effort.
The new USB-C button, which is now available for any InstaShow WDC-10 receiver, is the simplest method to wirelessly connect your Android phone or tablet. The button is plugged into your phone’s USB-C connector. Your phone will enter desktop mode and treat this as a separate display.
A wireless projector is a projector that has wireless networking capabilities, allowing it to communicate wirelessly with other wirelessly equipped devices. The projector may need a wireless adapter or USB dongle to provide wireless communications or it may already have one built in. If you use a projector
You can use cables and adapters such as USB-C to USB-C, HDMI to HDMI, MHL, and USB-C to VGA to connect your phone (Android or iPhone) to a projector. Apple Airplay, Miracast, Chromecast, and Wi-Fi Direct are examples of wireless technologies. Here are the home theatre projectors I consider to be the best.
You need a USB-C to HDMI adapter if your Android phone has a USB-C port rather than a Micro-USB one. All you have to do is attach one end of the HDMI cable to the adaptor and the other to your projector. You’re ready to go after you connect the USB-C end to your phone.


