 friedrich air conditioner troubleshooting User Manual

IMPORTANT SAFETY INSTRUCTIONS
Before install Ing and using your air conditioner, please read this owner’s manual carefully. Store this manual in a safe place for future reference. Your safety and the safety of others is very important to us. Please pay attention to all safety messages outlined in this owner’s manual.
WARNING: To reduce the risk of fire, electrical shock or injury when using your air conditioner, follow the following basic precautions:
- Plug into a grounded 3 prong outlet.
- Do not remove the ground prong.
- Do not use a plug adapter.
- Do not use an extension cord.
- Unplug the air conditioner before servicing
- Use two or more people to move and install the air conditioner
This is a safety alert symbol. This symbol alerts you to potential hazards that can harm you or others or even cause death. All safety messages will directly follow the safety alert symbol and/or the words All Safety messages alert you of potential hazards, how to reduce the chance of injury, and what can happen if instructions are not followed correctly.
ELECTRICAL REQUIREMENTS
- Electrical Shock Hazard
- Plug into a grounded 3 prong outlet
- Do not remove the ground prong.
- Do not use an adapter
- Do not use an extension cord.
- Failure to follow these instructions can result in death, fire, or electrical shock
- The electrical ratings for your air conditioner are listed on the model and serial number label located on the front left side of the unit (when facing the front).
- Specific electrical requirements are listed in the chart below. Follow the requirements below for the type of plug on the power supply cord.


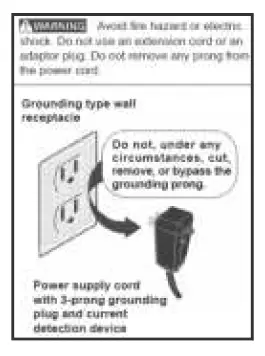
Recommended Ground Method
For your personal safety, this air conditioner must be grounded. This air conditioner is equipped with a 3 prong power supply cord with a grounded plug. To minimize the possibility of electrical shock, the cord must be plugged into a 3 prong outlet and grounded in accordance with all local codes and ordinances. If a 3 prong outlet is not available, it is the customer’s responsibility to have a properly grounded 3 prong outlet installed by a qualified electrician.
- To contact a qualified electrician
- To assure that the electrical installation is adequate and in conformance with the National Electrical Code, ANSI/NFPA 70 – latest edition, and all local codes and ordinances.
LCDI Power Cord and Plug
This air conditioner is equipped with an LCDI (Leakage Current Detection and Interruption) power cord that is required by UL. This power supply cord contains state-of-the-art electronics that sense leakage current. If the cord is damaged and leakage occurs, power will be disconnected from the unit. The test and reset buttons on the LCDI Plug are used to check if the plug is functioning properly. To test the plug:
- Plug power cord into a grounded 3 prong outlet
- Press RESET (on some units a green light will turn on).
- Press the TEST Button, the circuit should trip and cut all power to the air conditioner (on some units a green light may turn off.
- Press the RESET button for use. You will hear a click and the A/C is ready for use.
NOTES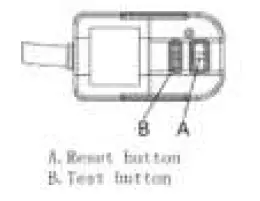
- The RESET button must be engaged for proper use.
- The power supply cord must be replaced if it fails to trip when the TEST button is pressed and the unit fails to reset.
- Do not use the power supply cord as an ON/OFF switch. The power supply cord is designed as a protection device.
- A damaged power supply cord must be replaced with a new power supply cord.
- The power supply cord contains new user serviceable parts.
- Opening the tamper-resistant case voids all warranty and per formance claims.
NOTE: Your unit’s power cord and plug may differ from the one shown.
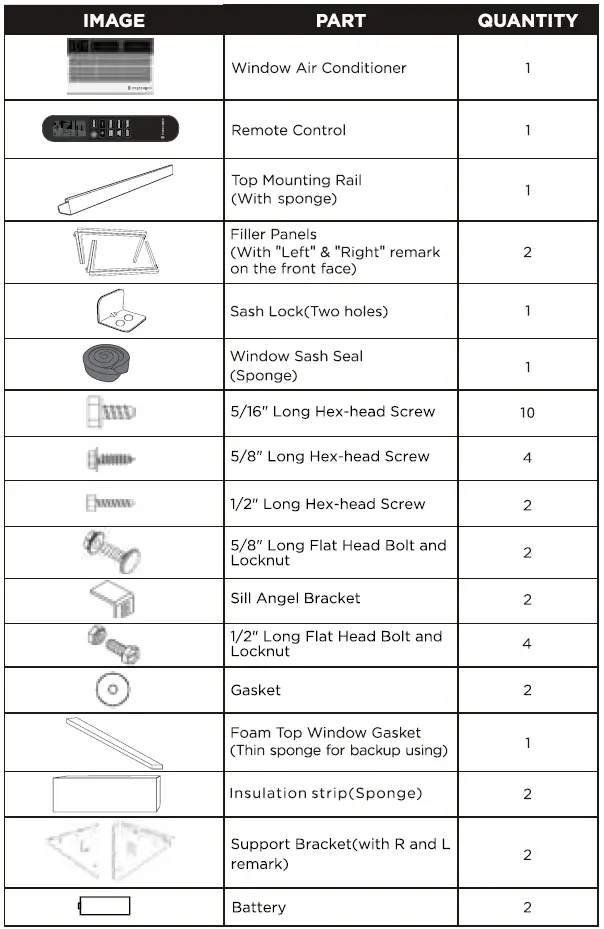
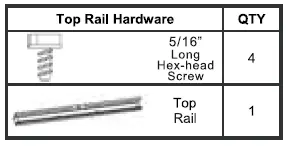
PACKING LIST
INSTALLATION & ASSEMBLY INSTRUCTIONS
Window Preparation
Please read all instructions prior to installing your air conditioner. Two people are recommended to install this product. If a new electrical outlet is required, have the outlet installed by a qualified electrician before installing the unit.Before installing the unit, check the dimensions of your window to make sure the air conditioner will fit. This unit is made to fit inside a standard double-hung window. Make sure the window is in good shape and able to firmly hold the needed screws. If not, make repairs prior to installing the unit.
| Mode l | J SK / J SK 22 K/ 24K | |
| Unit Heig ht(inche s) | 1 7.9 1 1 8 . 625 | |
| Unit Width( i nches) | 23.625 26.50 | |
| Min . Window Ope ning (See FIG I ) (inches) | 19.00 1 9 . 50 | |
| Min. Window Width (inches) | 28.00 30.00 | |
| Max Wi ndow Widt h(i nch es) | 41.00 | 41.00 |
Storm Window Requirements
A storm window frame will not allow the air conditioner to tilt properly which in turn will keep it from draining properly. To adjust for this, attach a board or piece of wood to the sill. The board or wood piece should have a depth of at least 1/2″. Make sure the board or piece of wood is approximately 1/2″ higher than the storm window frame. This will allow the air conditioner to tilt enough for proper drainage. (15K See FIG.1).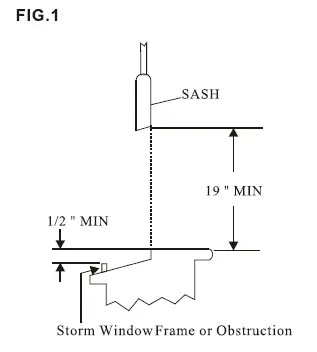
Prior to Installing the Air Conditioner
- Check for anything that could block airflow. Check the area outside of the window for things such as shrubs, trees, or awnings. Check the inside area to make sure curtains, drapes, or blinds will not prevent proper airflow.
- . Check the available electrical outlet. The power supply must be the same as shown on the unit serial nameplate (located on the left side of the unit, near the front faceplate). Be sure the outlet is close enough for the power cord to reach.
- Carefully unpack the air conditioner. Remove all packing material and make sure the floor is protected when removing. Due to the large size of this air conditioner, two people should move the unit together.
INSTALLATION & ASSEMBLY INSTRUCTIONS – WINDOW MOUNTING REMOVE CHASSIS
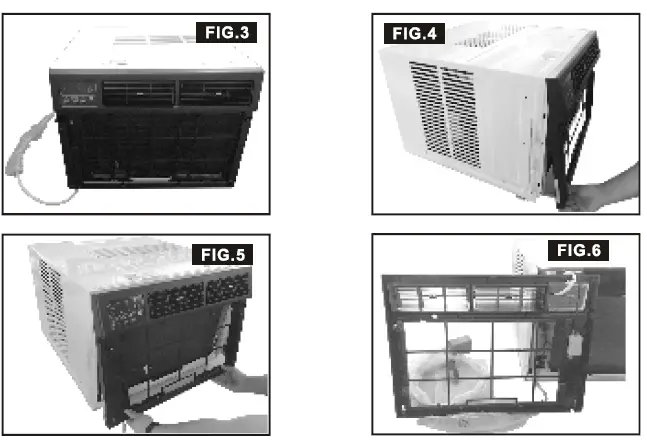
- Pull down the front panel and remove the filter ( FIG.2 below)
- Lift the front panel upwards to remove and place to the side.

- Locate the four faceplate screws and remove. These screws will need to be re-installed prior to mounting the air conditioner ( FIG.3 above)
- After removing the screws, gently pull away the faceplate from the air conditioner cabinet ( FIG.4 & 5 ).
- Remove the one control panel screw and one WIFI model screw from the front panel {FIG.6).


INSTALLATION & ASSEMBLY INSTRUCTIONS – WINDOW MOUNTING REMOVE CHASSIS
Remove the six screws from the cabinet.(There are two screws on the top, left and right.) (FIG.7) 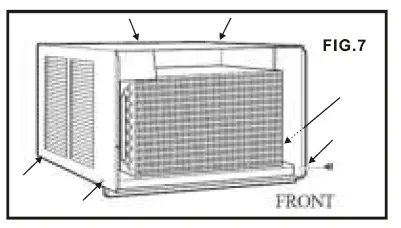
Hold the cabinet while pulling on the base handle to carefully remove the unit. Do not pull or lift near the top of the unit (FIG.8). 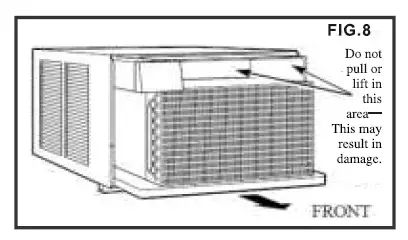
ASSEMBLY INSTALLATION
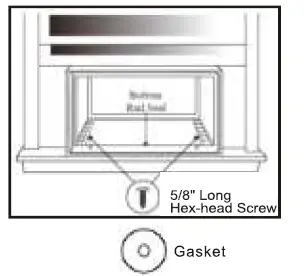
- Fasten cabinet to window sill using two 5/8″ Round

- Head screws. Pre-drill holes if needed. Add the bottom rail seal over the screws.

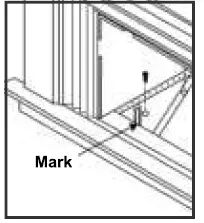
- Hold each support bracket flush against the outside of the window sill. Tighten each bracket to the bottom of the cabinet as shown below. Mark the brackets at top lever of the window sill and then remove.

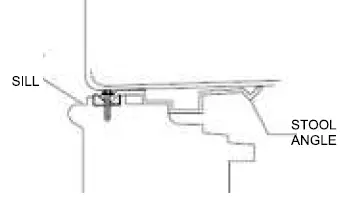
- Assemble the sill angle brackets to the support brackets at the marked position as shown above. Hand tighten, but not all the way for any changes that may need to be made later during installation.

- Install the support brackets (with sill angle brackets attached) to the bottom of the cabinet as shown below.

- Tighten all 6 bolts securely.

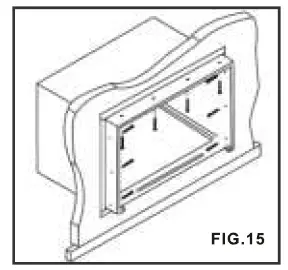
ASSEMBLY & INSTALLATION -THRU-THE-WALL (CONT.)
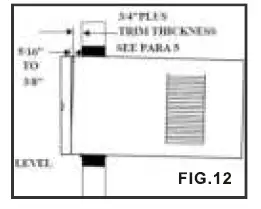
Carefully measure and cut an opening with the following dimensions depending on your model.
WIDTH “X” = inside model plus twice the thickness of the framing material used.
HEIGHT “Y” = inside model height plus twice the thickness of framing material used. 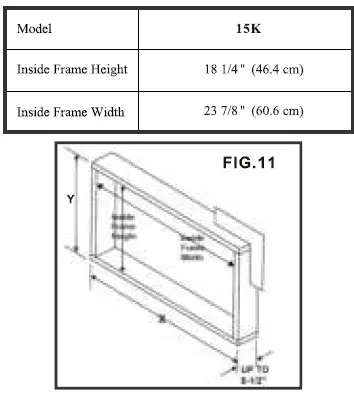
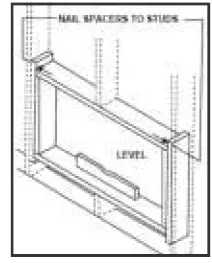
- Build a wooden frame with the INSIDE dimensions of your model listed above (Measure twice). The frame depth should be the same as the wall thickness. Fill in extra space from the opening to the studs with wood spacers as shown below.
- Nail the spacers to the studs. They should be flush with the dry wall.

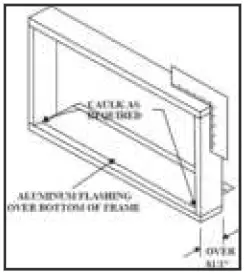
- NOTE: If wall thickness is 8-1/2″ or more, add aluminum flashing over the bottom of the frame opening to assure water is unable to enter the area between the inner and outer wall.

Prepare and Install the Cabinet
- Slide the chassis from the cabinet. Refer back to the REMOVE CHASSIS instructions (Page 6 and 7) in the WINDOW MOUNTING SECTION.
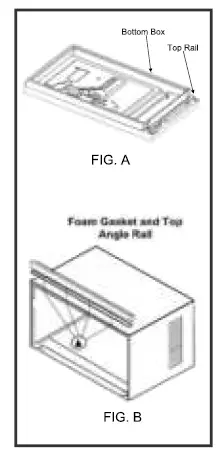
- Place the cabinet into the opening with the bottom rail resting firmly on the bottom board of the wood frame.
- Position the cabinet so it is tilted properly for water removal as seen below.

- Secure the bottom rail to the wood frame with two large 1″ (2.5 cm) long wood screws as shown below.

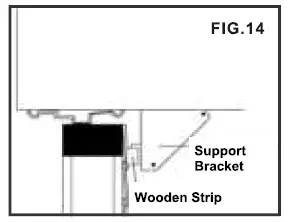
- Refer to the SUPPORT BRACKET ASSEMBLY in the WINDOW MOUNTING section to assemble the support brackets. A wooden strip nailed to the outside wall should be used in conjunction with the angled sill support brackets.

- Screw or nail the cabinet to the wooden frame using shims if the frame is oversized, to eliminate possible noise. Remember to maintain proper slope for water elimination.

- Install the chassis into the cabinet by following the steps described in the WINDOW MOUNTING section.

OPTIONAL: Caulking and installation of the trim on the interior wall may be done if desired. Caulk the openings around the top and sides of the cabinet and all sides of the wood sleeve to the opening.
NOTE: See the WINDOW MOUNTING instructions for the bottom rail seal location.
MASONRY CONSTRUCTION
- Cut or build a wall opening in the masonry wall similar to the frame construction (refer to the THRU-THEWALL installation for a wall thickness greater than 8
1/2″) .. - Secure the cabinet in place using masonry nails, or masonry anchor screws. Or, build a frame using the instructions found in the TH RU-THE-WALL installation section.
- Make sure the masonry above the cabinet is supported well. Use the existing holes in the cabinet or additional drilled holes to fasten the cabinet at various positions. Make sure that the side louvers are clear of any obstructions.
- Install the exterior cabinet support brackets according to the SUPPORT BRACKET INSTALLATION instructions in the THRU-THE-WALL installation section. Caulk or flash with aluminum if needed. This will provide a tight seal around the top and sides of the cabinet.
- For a more aesthetically pleasing installation, apply wood trim molding around the sides of the cabinet without obstructing the side louvers.
USING YOUR AIR CONDITIONER Electronic Control Panel & Remote Control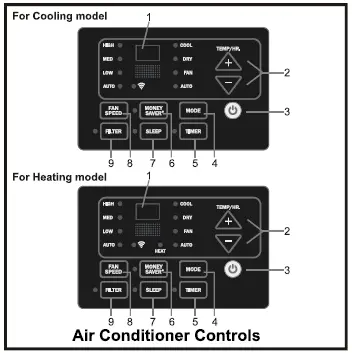
Air Conditioner Controls Normal Operating Sounds
- You may hear a pinging noise caused by water hitting the condenser on rainy days, or when the humidity is high. This design feature helps remove moisture and improve efficiency.
- You may hear the thermostat click when the compressor cycles on and off.
- Water will collect in the base pan during rain or days of high humidity. The water may overflow and drip from the outside part of the unit.
- The fan may run even when the compressor is not on.
- Digital Display: Without timer setting, the set temperature will be displayed.Time will be displayed under the timer setting.
- + and – Button: Use these buttons on the control panel and remote to increase or decrease the Set Temperature or Timer.Temperature range: 611′-881′ or 16″C-31″C.
- Button: Turn the air conditioner on and off.
- Mode Button: Press the mode button to cycle through the various modes: Cool, Dry, Fan and Auto, or Heat.
- Cool Mode: The cooling function allows the air conditioner to cool the room and at the same time reduces air humidity. Press the MODE button to activate the cooling function. To optimize the function of the air conditioner, adjust the temperature and the speed by pressing the button indicated.
- Dry Mode: This function reduces the humidity of the air to make the room more comfortable. Press MODE button to set the DRY mode. An automatic function of alternating cooling cycles and air fan is activated.
- Fan Mode: The conditioner works in only ventilation. Press MODE button to set the FAN mode. With pressing the FAN SPEED button the speed changes in the following sequence: Hi, Med and Lo in FAN mode.
- Auto Mode: In AUTO mode the unit automatically chooses the fan speed and the mode of operation (COOL,HEAT,DRY or FAN). In this mode the temperature are set automatically according to the room temperature (tested bythe temperature sensor which is incorporated in the indoor unit.). Heat Mode: The heating function allows the air conditioner to heat the room. Press the MODE button to activate the heating function. To optimize the function of the air conditioner, adjust the temperature and the speed by pressing the button indicated.
- Timer Button: Use these buttons on the control panel and remote to setthe Timer. Timer Off: The timed stop is programmed by pressing TIMER button. Set the rest time by pressing the button “+” or “-” until the rest time displayed is to your liking then press
the TIMER button again. - Timer On: When the unit is off, press TIMER button at the first time, set the temperature with pressing the button “+” or “-” . Press TIMER button at the second time, set the rest time with pressing the button “+” or “-” . Press TIMER button at the third time, confirm the setting, then the rest time to nextautomatical switching-on could be read on the display of the machine. Note: It can be set to automatically turn off or on in 0.5-24 hours. Each press of the “+” “-”
buttons will increase or decrease the timer. The Timer can be set in 0.5 hours increment below 10 hours and 1 hour increment for 1 O hours or above. The SET light will turn on while setting. - To cancel the set function, press the TIMER button again.

CARE AND CLEANING
Clean your air conditioner to keep it looking new and to minimize dust build up.
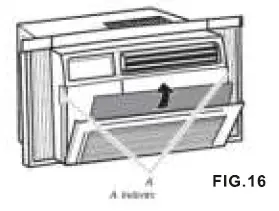
Air Filter Cleaning
The air filter should be checked at least once every month to see if it needs cleaning. Trapped particles and dust can build up in the filter and may decrease airflow as well as cause the cooling coils to accumulate frost. To clean the air filter:
- Remove the filter by pulling down on the indents of the filter door on the front of the unit.(See FIG.16)
- Wash the filter using liquid dish soap and warm water. Rinse the filter thoroughly. Gently shake the filter to remove excess water.
- Let the filter dry completely before placing it into the air conditioner.
- If you do not wish to wash the filter, you may vacuum the filter to remove the dust and other particles.

Wear and Tear
To minimize wear and tear on the air conditioner, always wait at least 3 minutes before changing modes. This will help prevent the compressor from overheating and the circuit breaker from tripping.
Cabinet Cleaning
To clean the air conditioner cabinet:
- Unplug the air conditioner to prevent shock or a fire hazard. The cabinet and front panel of the air conditioner may be dusted with an oilfree cloth or washed with a cloth dampened in a solution of warm water and mild liquid soap. Rinse thoroughly with a damp cloth and wipe dry.
- Never use harsh cleaners, wax or polish on the cabinet front.
- Be sure to wring excess water from the cloth before wiping around the controls. Excess water in or around the controls may cause damage to the air conditioner.
Winter Storage
To store the air conditioner when it is not in use for an extended period of time, remove it carefully from the window according to the installation instructions and cover it with plastic or place it in the original box.
TROUBLESHOOTING
| PROBLEM | POSSIBLE CAUSES | SOLUTIONS |
| The Air Conditioner will not start | The air conditioner is unplugged | Make sure the air conditioner is plug is pushed completely into the outlet |
| The fuse is blown/circuit breaker is tripped | • Check the house fuse/circuit breaker box and replace the fuse or reset the breaker | |
| Power Failure | • The unit will automatically re-start when power is restored There is a protective time delay (approx. 3 minutes) to prevent tripping of the compressor overload. For this reason, the unit may not start normal cooling for 3 minutes after it is turned back on. | |
| The current interrupter device is tripped | Press the RESET button located on the power cord plug • If the RESET button will not stay engaged, discontinue use of the air conditioner and contact a qualified service technician | |
| The Air Conditioner does not cool as it should | Airflow is restricted | Make sure there are no curtains, blinds, or furniture blocking the front of the air conditioner |
| The temperature control may not be set correctly | Lower the set thermostat tempera ture | |
| The air filter is dirty | • Clean the filter. See the Cleaning and Care Section of the manual | |
| The room may be too warm | • Please allow time for the room to cool down after turning on the air conditioner | |
| Cold air is escaping | Check for open furnace registers and cold air returns | |
| The Cooling Coils are frozen | See “Air Conditioner Freezing Up” below | |
| The Air Conditioner is freezing up | Ice blocks the air flow and stops the air conditioner from cooling the room | • Set the MODE to HIGH FAN or HIGH COOL and set the ther mostat to a higher temperature |
| The Remote Control is not working | The batteries are inserted incorrectly
The batteries may be dead | Check the position of the batteries
Replace the batteries |
| PROBLEM | POSSIBLE CAUSES | SOLUTIONS |
| Water is dripping outside | Hot and Humid weather | This is normal |
| Water is dripping inside the room | The air conditioner is not correctly tilted outside | For proper water drainage, make sure the air conditioner is slightly tilted downward from the front of the unit to the rear |
| Water collects in the base pan | Moisture removed from the air is draining into the base pan. | • This is normal for a short period in areas with low humidity and nor mal for a longer period in areas with high humidity |
| Digital Display reads “E1”, “E2” | A sensor has failed | Contact customer service |
CHILL® PREMIER ROOM AIR CONDITIONERS
LIMITED WARRANTY FIRST YEAR
ANY PART: If any part supplied by FRIEDRICH fails because of a defect in workmanship or material within twelve months from date of original purchase, FRIEDRICH will repair the product at no charge, provided room air conditioner is reasonably accessible for service. Any additional labor cost for removing inaccessible units and/or charges for mileage related to travel by a Service Agency that exceeds 25 miles one way will be the responsibility of the owner. This remedy is expressly agreed to be the exclusive remedy within twelve months from the date of the original purchase.
SECOND THROUGH FIFTH YEAR
SEALED REFRIGERANT SYSTEM: If the Sealed Refrigeration System (defined for this purpose as the compressor, condenser coil, evaporator coil, reversing valve, check valve, capillary, filter drier, and all interconnecting tubing) supplied by FRIEDRICH in your Room Air Conditioner fails because of a defect in workmanship or material within sixty months from date of purchase, FRIEDRICH will pay a labor allowance and parts necessary to repair the Sealed Refrigeration System; PROVIDED FRIEDRICH will not pay the cost of diagnosis of the problem, removal, freight charges, and transportation of the air conditioner to and from the Service Agency, and the reinstallation charges associated with repair of the Sealed Refrigeration System. All such cost will be the sole responsibility of the owner. This remedy is expressly agreed to be the exclusive remedy within sixty months from the date of the original purchase.
APPLICABILITY AND LIMITATIONS: This warranty is applicable only to units retained within the Fifty States of the U.S.A., District of Columbia, and Canada. This warranty is not applicable to:
- Air filters, fuses, batteries and the front grille removal tool.
- Products on which the model and serial numbers have been removed.
- Products which have defects or damage which results from improper installation, wiring, electrical current characteristics, or maintenance; or caused by accident, misuse or abuse, fire, flood, alterations and/or misapplication of the product and/or units installed in a corrosive atmosphere, and/or operation of the unit during construction, default or delay in performance caused by war, government restrictions or restraints, strikes, material shortages beyond the control of FRIEDRICH, or acts of God.
OBTAINING WARRANTY PERFORMANCE: Service will be provided by the FRIEDRICH Authorized Dealer or Service Organization in your area. They are listed in the Yellow Pages. If assistance is required in obtaining warranty performance, write to: Room Air Conditioner Service Manager (the Friedrich address is at the top of this warranty) or email [email protected].
LIMITATIONS: THIS WARRANTY IS GIVEN IN LIEU OF ALL OTHER WARRANTIES. Anything in the warranty notwithstanding, ANY IMPLIED WARRANTIES OF FITNESS FOR PARTICULAR PURPOSE AND/OR MERCHANTABILITY SHALL BE LIMITED TO THE DURATION OF THIS EXPRESS WARRANTY. MANUFACTURER EXPRESSLY DISCLAIMS AND EXCLUDES ANY LIABILITY FOR CONSEQUENTIAL OR INCIDENTAL DAMAGE FOR BREACH OF ANY EXPRESSED OR IMPLIED WARRANTY. Performance of Friedrich’s Warranty obligation is limited to one of the following methods:
- Repair of the unit
- A refund to the customer for the prorated value of the unit based upon the remaining warranty period of the unit.
- Providing a replacement unit of equal value
The method of fulfillment of the warranty obligation is at the sole discretion of Friedrich Air Conditioning.
NOTE: Some states do not allow limitations on how long an implied warranty lasts, or do not allow the limitation or exclusion of consequential or incidental damages, so the foregoing exclusions and limitations may not apply to you.
OTHER: This warranty gives you specific legal rights, and you may also have other rights which vary from state to state.
PROOF OF PURCHASE: Owner must provide proof of purchase in order to receive any warranty related services.
All service calls for explaining the operation of this product will be the sole responsibility of the consumer. All warranty service must be provided by an Authorized FRIEDRICH Service Agency, unless authorized by FRIEDRICH prior to repairs being made. You can also view this manual on our website our website: www .friedrich.com


