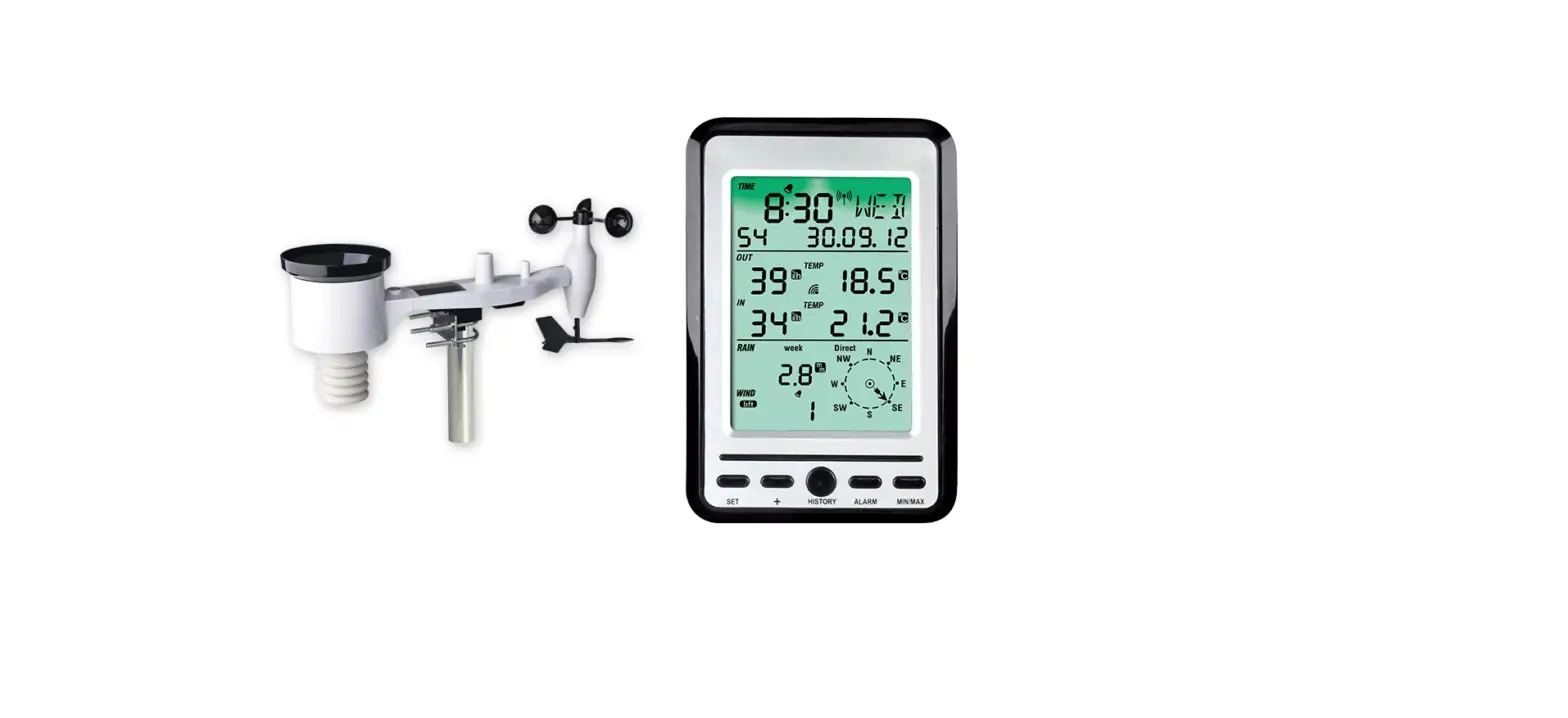
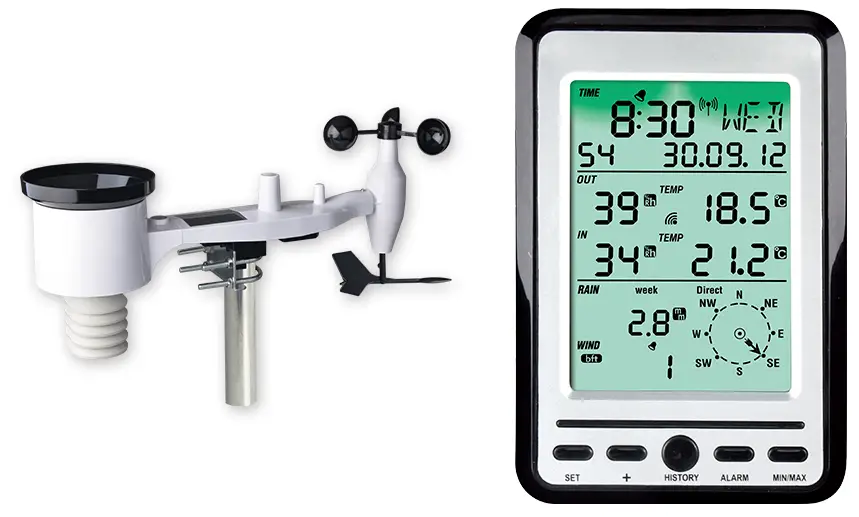
Fine Professional Weather Station
Instructions
Attention:
Our product is continuously changing and improving, particularly online services and associated applications.
To download the latest manual and additional help, please contact us at [email protected] or
[email protected] (EU/UK).
Manufacturer:
ShenZhenShi OuSaiTeDianZi YouXianGongSi
Add: C Dong 4 Ceng A, Minzhujiujiugongyecheng AQu, Xihuanlu, Shajingjiedao, Baoan Shenzhen, Guangdong 518101, CN E-mail: [email protected] [email protected] (EU/UK)
- UK representative
- HUA TENG LIMITED
- UK AR
- 3 Glass Street, Hanley, Stoke On Trent,
- ST1 2ET United Kingdom
- EC representative
- AC WORKS CONSULTING Srl
- Via Vilfredo Pareto 125,47521
- Cesena(FC),ITALY
- EC
- REP
- Please scan the QR code to read English manual and keep it for future reference
- Bitte scannen Sie den QR-Code zudeutsche Anleitung lesen und aufbewahren füZukunftsbezug
- Si prega di scansionare il codice QR perleggi il manuale italiano e conservalo perReferenza futura
- Instruction manuals
- https://www.ecowitt.com/support/download/106
Warning:
- Any metal object may attract a lightning strike, including your weather station mounting pole. Never install the weather station in a storm.
- If you are mounting the weather station to a house or structure, consult a licensed electrician for proper grounding. A direct lightning strike to a metal pole can damage or destroy your home and the product.
- Installing your weather station in a high location may result in injury or death. Perform as much of the initial check out and operation on the ground and inside a building or home. Only install the weather station on a clear, dry, day.
- Please setup the system and put the sensors in a conveniently accessible temporary location for a few days, familiar with the system and make sure the system operate normally before install them into a permanent position. When you mount the sensor, remember to take your phone and have the webpage showing the data displayed, before fixing to the mounting pole, be sure you can see the signal can be picked up by the GW1100 gateway reliably. So check out on site system data while you are mounting the sensors.
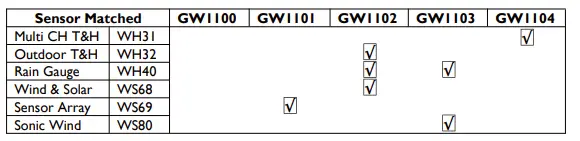
Model difference overview
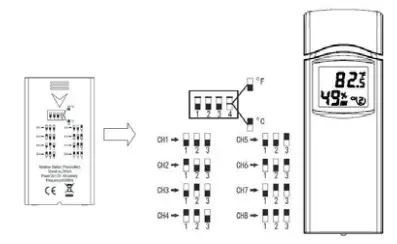
WH31&WH32
WH31 andWH32 looks quite similar, but with different function, and definition applied.WH32 is a dedicated outdoor temperature and humidity sensor, it has the highest priority against WS69 or WS80 integrated sensor temperature and humidity data.WH31 is a dip switch selectable multi-channel temperature and humidity sensor. It supports a maximum of 8 channels. The sensor operates on 2pcs AA Alkaline batteries.
- Switch to the down position.
- Switch in the up position.

WH40
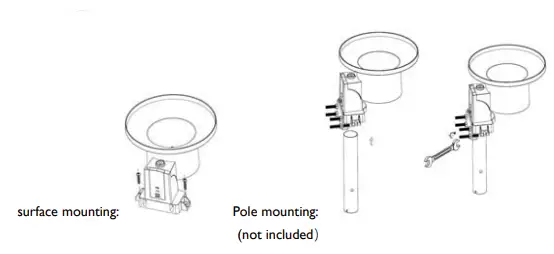
WH40 is a rain gauge. Be sure to lock the funnel firmly and in position( tell by having the arrow mark matched). The battery door should be tightly locked without gaps. 1pc AA battery ( Lithium non-rechargeable recommended). LED flashes every 49s in normal operation. Press the “RESET” button if LED doesn’t light up or stays on all the time.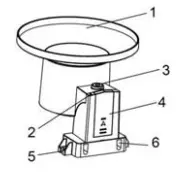
| 1. Rain collector top | 4. Battery compartment door |
| 2. LED Indicator | 5. Surface installation screw hole |
| 3. Bubble level | 6. U-bolt installation hole |
WS68
It operates on a 1 AA battery ( Lithium recommended).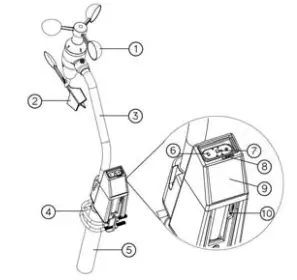
| 1. Wind speed cups | 6. LED (red) to indicate data transmission |
| 2. Wind vane | 7. Light sensor and UV sensor |
| 3. Connection tube | 8. NORTH arrow |
| 4. U-Bolts | 9. Solar panel |
| 5. Mounting Pole(not included) | 10. Reset button |
WS69
It requires 2pcs AA Lithium(recommended) or Alkaline batteries. LED flashes every 16s in normal operation. Press the “RESET” button if LED doesn’t light up or stays on all the time.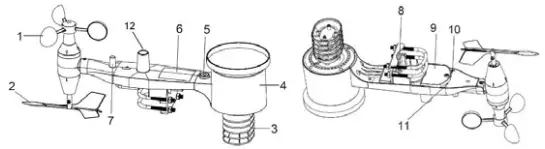
| 1.Wind Speed cups | 7.Antenna |
| 2.Wind Vane | 8. U-Bolts |
| 3.Thermo- and hygro-meter sensors | 9. Battery compartment door |
| 4. Rain collector | 10. Reset button |
| 5. Bubble level | 11. LED (red) to indicate data transmission |
| 6. Solar panel | 12.Light sensor and UV sensor |
WS80
It requires 2pcs AA Lithium(recommended) or Alkaline batteries. LED flashes every 5s in normal operation. Press the “RESET” button if LED doesn’t light up or stays on all the time.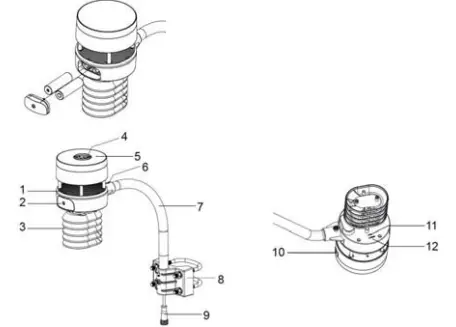
| 1. Surface tension conditioner layer ( patent pending) | 7. Mounting arm |
| 2. Battery compartment | 8. Mounting bracelet and U-bolt set |
| 3. Temperature & humidity sensor | 9. Power cord for built-in heater(12v1.0A) |
| 4. Light & UV sensor, LED indicator | 10. USB port (factory use only ) |
| 5. Solar Panel | 11.Calibration button (factory use only ) |
| 6. NORTH alignment indicator | 12. Reset button |
When new sensor is powered, usually the GW1100 gateway will automatically pick up the data and value is displayed at the live data page. In case GW1100 gateway has previously memorized sensor ID learned before during factory QC control testing, it is needed to go to live data page, make “register” action to force gateway to search for new sensors around.
GW1105, GW1105N,GW1106,GW107 Descriptions
Ecowitt home care series products measures air quality and garden plants soil moisture.The Model difference overview:
| Sensor Matched | GW1105 | GW1105N | GW1106 | GW1107 | Sensor Number | |
| Indoor CO2 | WH45N | R | 1* | |||
| Indoor PM2.5 | WH43 | R | 4 | |||
| Indoor | ||||||
| Co2+PM2.5, | WH45 | R | 1* | |||
| PM10 | ||||||
| Soil Moisture | WH51 | R | 8 | |||
Please look at the special marking in the below description for sensor QTY supported.
WH43,45N,45
The three model looks quite similar with the housing, and it is designed for indoor air quality measurement.The power supply is from the USB ports at the side of the sensor housing, and the two AA alkaline batteries are mainly for back up purpose.The sensor wakes up and take a measurement once every minute.When at very quiet night time, the tiny sound of fan being turned on periodically is noticeable. Please be noted that WH45 and WH45N can’t be received at the same time on the same GW1100 gateway: it is allowed to have only one of them to be paired.WH43 allows maximum 4 devices to be connected at the same time.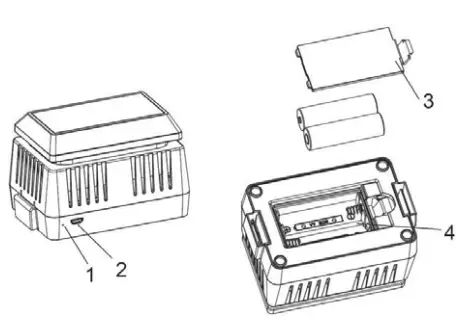
| No | Description | No | Description |
| 1 | Red LED Indicator (RF transmission) | 3 | Battery Compartment Cover |
| 2 | AC Adapter USB Power Port | 4 | Battery Compartment |
WH51
WH51 measures soil moisture level, and it is very useful in telling the relative moisture level change status. Once we know the level when just watered, and then wait until the reading dropped to a certain level and it can remind us to water the plant again, so we won’t miss the time that the plant starts to be “thirsty;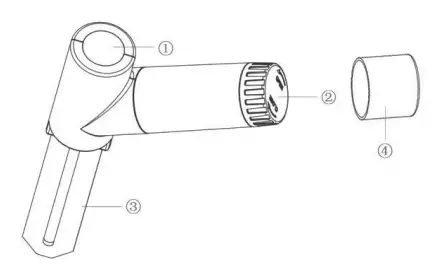
| 1 | LED Indicator (RF transmission) |
| 2 | Battery Cap |
| 3 | Soil Moisture Sensor |
| 4 | Battery Door Protection Cover |
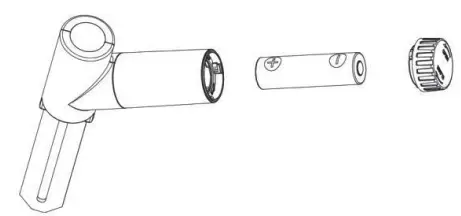
Place one AA alkaline battery in the sensor and close the battery door.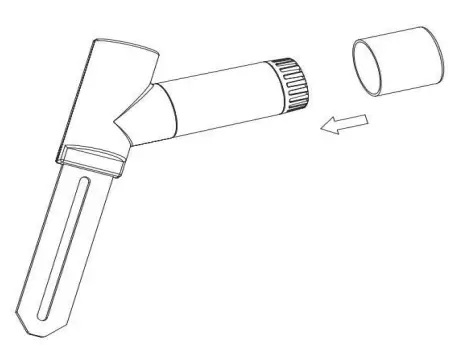
Place the extra protection sensor cap over the battery door to achieve better sealing against moisture.
FCC WARNING
This device complies with part 15 of the FCC Rules. Operation is subject to the following two conditions: (1) this device may not cause harmful interference, and (2) this device must accept any interference received, including interference that may cause undesired operation. Any changes or modifications not expressly approved by the party responsible for compliance could void the user’s authority to operate the equipment.
NOTE: This equipment has been tested and found to comply with the limits for a Class B digital device, pursuant to Part 15 of the FCC Rules. These limits are designed to provide reasonable protection against harmful interference in a residential installation. This equipment generates, uses and can radiate radio frequency energy and, if not installed and used in accordance with the instructions, may cause harmful interference to radio communications. However, there is no guarantee that interference will not occur in a particular installation. If this equipment does cause harmful interference to radio or television reception, which can be determined by turning the equipment off and on, the user is encouraged to try to correct the interference by one or more of the following measuresS
- Reorient or relocate the receiving antenna.
- Increase the separation between the equipment and receiver.
- Connect the equipment to an outlet on a circuit different from that to which the receiver is connected.
- Consult the dealer or an experienced radio/TV technician for help.
- To maintain compliance with FCC’s RF Exposure guidelines, This equipment should be installed and operated with a minimum distance between 20cm of the radiator and your body: Use only the supplied antenna.
FCC ID: WA5GW1100


