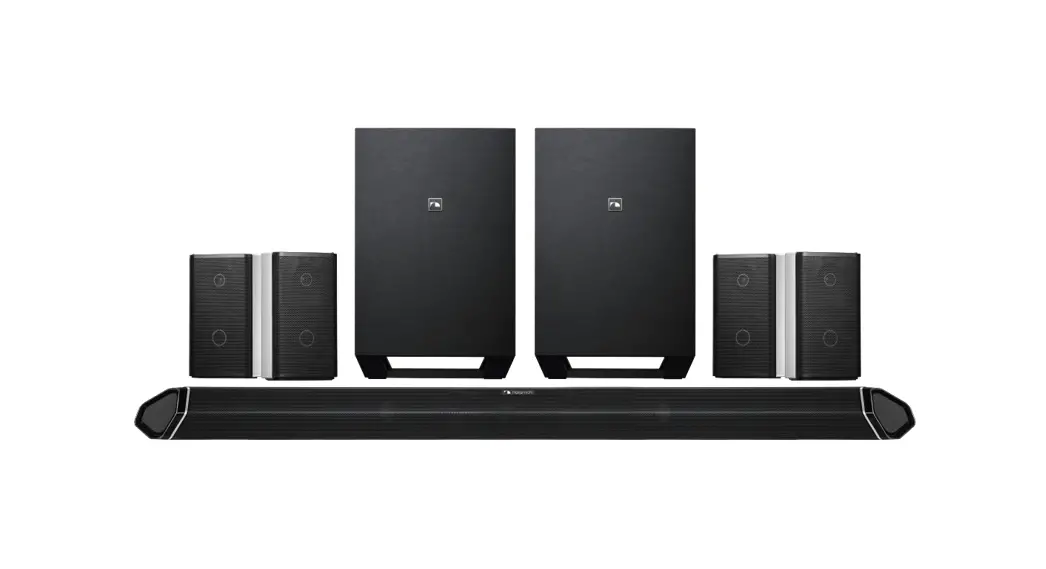
![]() Shockwafe Ultra 9.2 SSE with Dolby Atmos Soundbar
Shockwafe Ultra 9.2 SSE with Dolby Atmos Soundbar
User Guide
A HUGE THANKS
Your support allows us to continue pursuing our dream of disrupting the future of home audio. We hope this investment brings much joy and excitement to all of your entertainment needs. Pump up the BASS!
RAYMAN CHENG. CEO of![]()
BEST CONNECTIONS
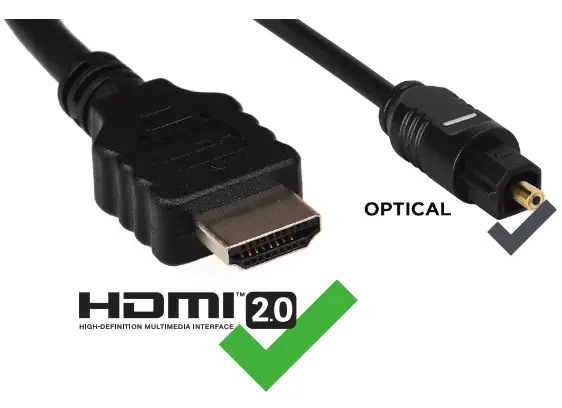
Always use HDMI 2.0 High Speed Cable or Optical Cable for best audio quality
BEST SETUP
 https://bit.ly/plug-play-matching-tool
Use our-Perfect Device Matchinr to create a custom setup guide based on your TV and devices. Scan QR code or visit bittyldevice-matching-toot![]() Connect Directlyto the TV via HDMI
Connect Directlyto the TV via HDMI![]() Conned Directly to Soundbar via HDMI
Conned Directly to Soundbar via HDMI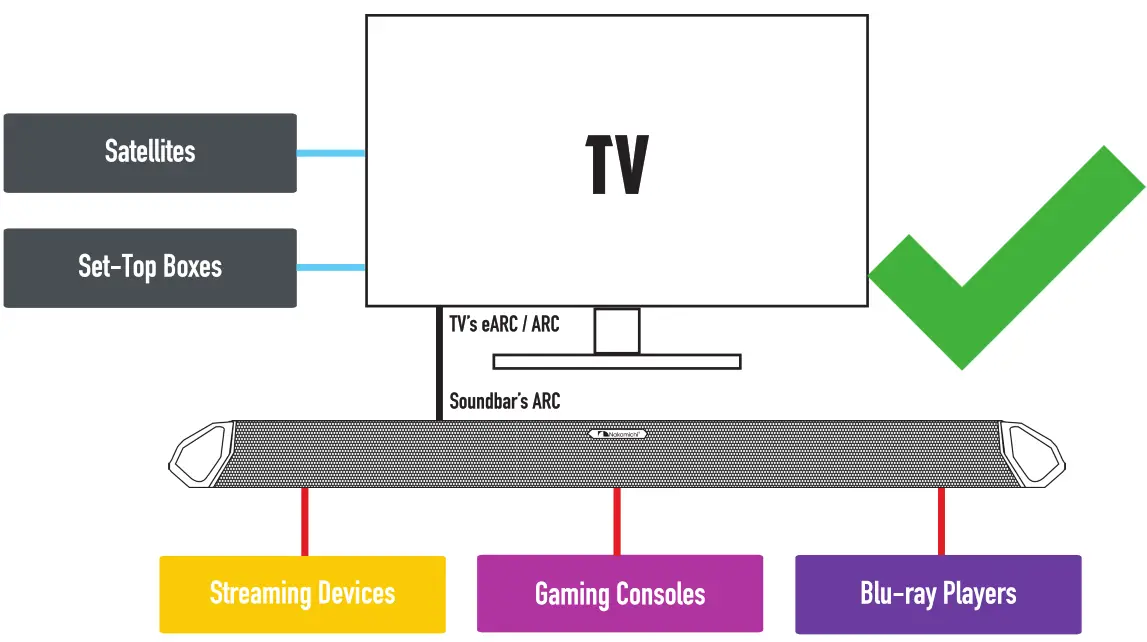 IMPORTANT: Before connecting your new soundbar, unplug TV and all source devices from the AC wall socket for 5 minutes to establish a clean HDMI handshake between devices
BEST SURROUND

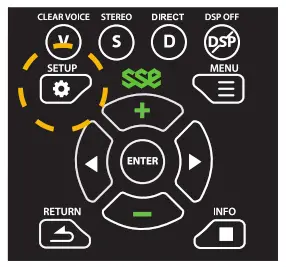
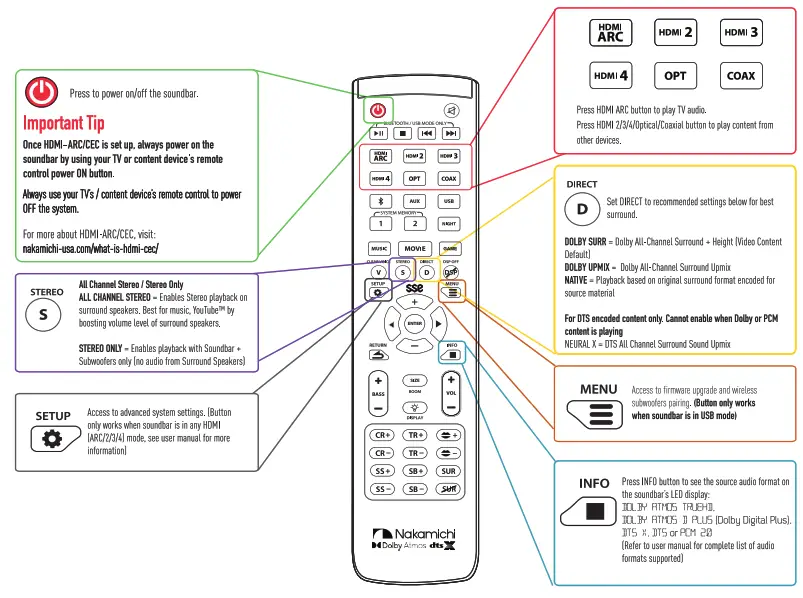
Scan OR code to view expanded remote control guide or visit bit.ly/92-shockwafe-remote
All Channel Stereo /Stereo Only:
ALL CHANNEL STEREO = Enables Stereo playback on surround speakers. Best for music, YoulubeTM by boosting volume level of surround speakers.
STEREO ONLY = Enables playback with Soundbar + Subwoofers only (no audio from Surround Speakers)
For Dolby / PCM audio:
DOLBY SURR = Dolby All-Channel Surround + Height (Video Content Default)
DOLBY UPMIX = Dolby All-Channel Surround Upmix
NATIVE = Playback based on original surround format encoded for source material
For DTS encoded content only. Cannot enable when Dolby or PCM content is playing:
NEURALX = DTS All-Channel Surround Sound Upmix
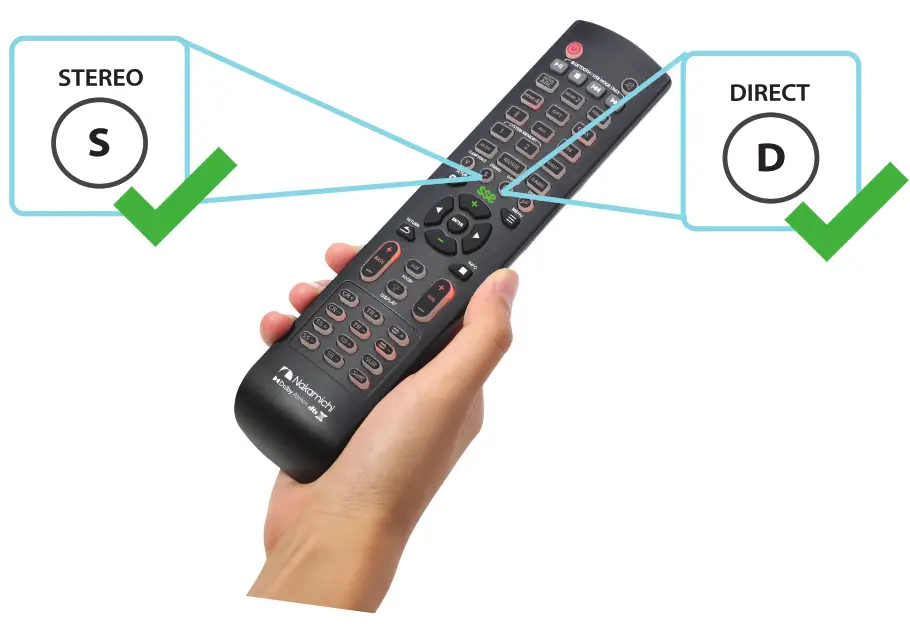
Use the DIRECT or STEREO button to toggle between the various surround modes for your desired experience
PERFECTING SUBWOOFER (5) /SURROUND SPEAKERS SETUP
The wireless connection between the soundbar and subwoofer(s) + rear speakers should be seamless. In rare instances, if you hear any interference* from your subwoofer(s) or surround speakers, we have an instant fix in this video for you.

Alternatively, follow the steps below to enable dedicated frequency communication between the soundbar and the subwoofers + rear speakers:
- Switch soundbar to HDMI ARC input
- Press the SETUP button on your remote several times until you see D FRO
- Press the left and right arrow key to change the selection value, which will turn OF ON
- Press ENTER
 If you still experience issues after the above steps, scan the OR code on the left or visit: bit.ly/92-subwoofers-audio-distortion.
*Speaker! Subwoofer drivers and components are rarely defective. If you hear any crackling, cut out. distortion or anything that resembles a defective speaker, it is most likely caused by the wireless transmission between the soundbar, the subwoofer(s1 and surrounds.
SEMTTING UP YOUR HOME THEATER
1A SEMTTING&SUBWOOFER PLACEMENT
Recommended speaker placement with optimal distance. Actual distance may vary based on room layout.

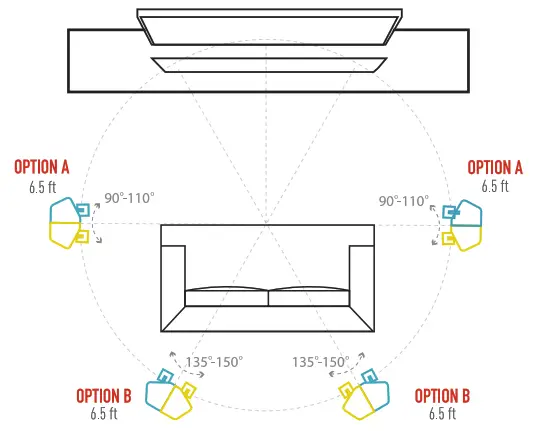
1B SURROUND SPEAKER PLACEMENT
The bottom speaker driver of the surround speakers should be at ear level for optimal performance.
| BEST 9.2CH SETUP (DETACHED) For more surround speaker placement options, visit nakamichi-usa.comisse-placement | BETTER DIPOLE SETUP (ATTACHED) Dipole Setup: Refer to user manual for how to attach the surround speakers together. Flip the switch at the back of the Surround Back speakers from 9.2CH to DIPOLE. |
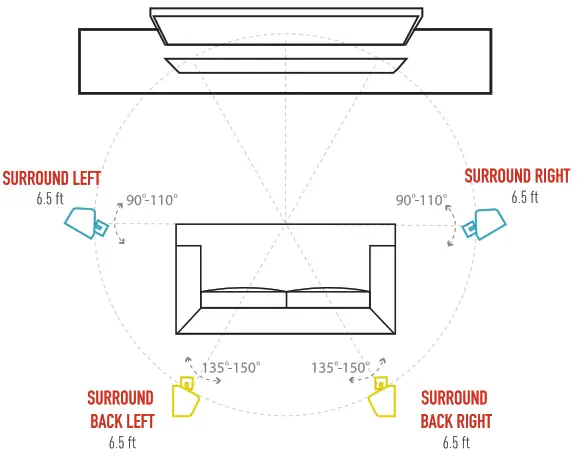 |  |
NOTE: Illustration is not to scale. Speaker stands are not included.
Recommended speaker stands. scan QR code or visit bit.ly/92-speaker-stands BEST SURROUND SCENES TO SHOWCASE YOUR SYSTEM
Scan QR Code or visit: bit.lylbest-surround-scenes 
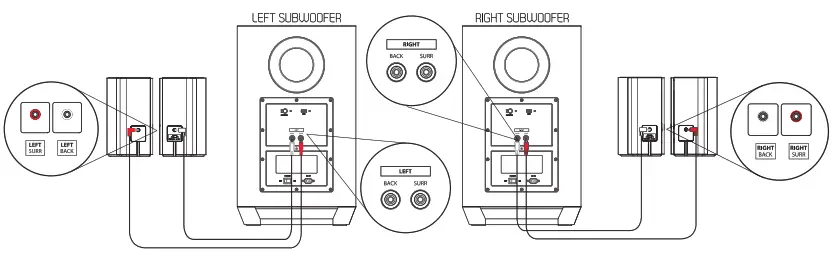
CONNECTING SURROUND SPEAKERS TO SUBWOOFERS
Connect surround speakers to the ports on the back panel of subwoofers
TURNING ON YOUR TV & SOUNDBAR
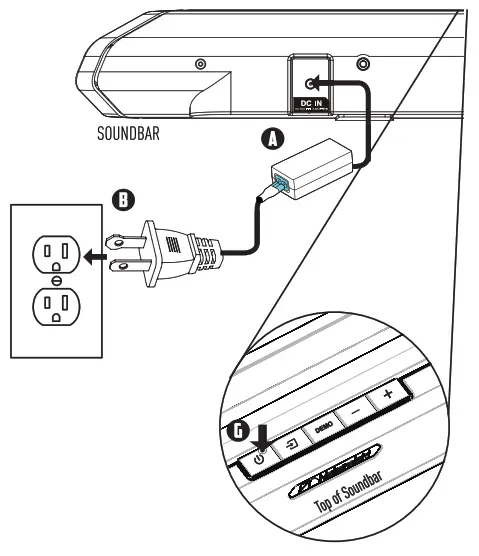
Blinking Blue Light:
Subwoofer is in pairing mode.
Blue Light Stays On:
Subwoofer successfully paired
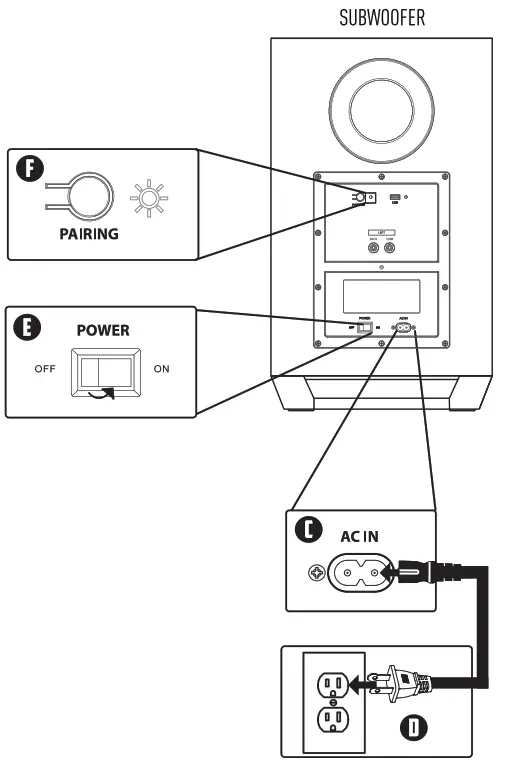
Note: Once soundbar is powered off, the subwoofer will go into standby mode. The blinking blue light behind the sub will turn off after 10 minutes.
CONNECTING TO YOUR TV
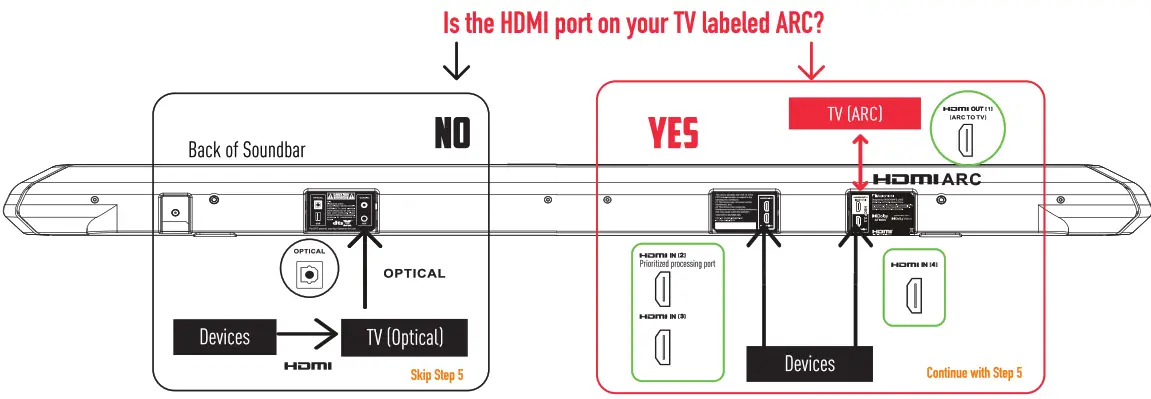
SETTING UP NMI ARE/EEC
To ensure device stability, perform a HDMI connection refresh between all devices:
- While all devices are on, disconnect all HDMI cables connected to TV and existing sound system
- Power OFF TV and all source devices
- Unplug all devices from the AC outlets
- Wait for 5 minutes before plugging TV, new Shockwafe soundbar and source devices back to the AC outlets
- Power ON the soundbar, TV and all source devices
- While they are on, connect the N and soundbar via HDMI ARC. To find the optimal ARC/CEC settings for your TV, please scan the OR code below or visit the link: bit.ly/hdmi-cec-settings

- Once the HDMI ARCICEC connection is established between your TV and soundbar, connect the source devices one at a time. Use Perfect Device Matching Tnn] on top of this page to create a customized setup guide based on your devices

Note: HMI ARC/CEC can only be enabled if your TV has a HDMI input labeled HDMI ARC.
LISTENING TO YOUR SOUNDBAR
For expanded remote control guide. scan OR code or visit: bit.ly/92-shockwafe-remote 
![]() STOP
STOP
PLEASE DO NOT RETURN THIS UNIT
Speak to one of our Shockwafe Ninjas in![]() today!
today!
TROUBLESHOOTING
A HDMI ARCICEC – No sound or video:
Performing a Soundbar Soft Reset can restore the soundbar settings back to factory default and refresh HDMI settings. If your TV’s connected to another sound system via HDMI previously, perform a Soundbar & TV Hard Reset + HDMI Connection Refresh to establish a new HOMI handshake.
Soundbar Soft Reset:
- Switch to HDMI ARC input
- Press SETUP button multiple times to locate RESET function
- Press ENTER button to select the function
- Press ENTER button again to confirm RESET function
- The soundbar will restart automatically to complete the reset sequence. (-HELLO- appears on soundbar LED and it will be back to ARC mode by default)
Soundbar & TV Hard Reset + HDMI Connection Refresh:
- While all source devices are on, disconnect all HDMI cables connected to TV and soundbar as well as TV to soundbar
- Power OFF TV, soundbar and all source devices
- Unplug all devices from the AC outlets
- Wait for 5 minutes before plugging the TV, soundbar and source devices back to the AC outlets
- Power ON the soundbar, TV and all source devices
- While they are on, connect the TV and soundbar via HDMI ARC. Once the connection is established, connect the source devices one at a time. Use Perfect Device Matching Tool on top of this page to create a customized setup guide based on your source devices
B Soundbar Intermittent Cut Out or No Sound:
Perform a soft reset on the soundbar with the following steps:
- Switch to HDMI ARC input, press the MOVIE button on the remote
- Press the SETUP button
- Toggle and select “RESET’
- Press ENTER button
- Disconnect the source device that is having issues from the soundbar or TV. Unplug the source device from the AC outlet for 5 minutes before powering it back on
- While the source device is on, connect it to the soundbar or TV. Use Perfect Device Matching Tool on top of this page to create a customized setup guide based on your device
- Get the best performance using the recommended AUDIO*+VIDEO** settings using the links below:
* For audio settings, visit: bit.ty/audio-settings ** For video settings: visit: bit.ty/video-settings
C The Soundbar or the Subwoofer Does Not Power On:
Please contact [email protected] so we can work on a replacement (within 30 days of purchase). The system comes with a 1 year parts and labor warranty.
D No Sound from Surround Speakers
Press the “DIRECT’ or “STEREO” buttons on the remote to enable Dolby Surround, Dolby Upmix or All Channel Stereo to get sound from all speakers.
E Low Volume from Surround Speakers
Press the “STEREO” button on the remote to enable All Channel Stereo for maximum surround speakers output. Best for YouTubeTm and music.
F FAO. Links:
Please refer to the following links or scan the QR code to access the information
| 9.2 Soundbar FAQ: bit.ly/92-shockwafe-soundbar-faq | Video Issues FAQ: bit.ly/92-video-issues-faq |
 | |
| 9.2 Dual Subwoofers FAQ: bit.ly/92-dual-subwoofers-faq | HMI ARCICEC FAQ: bit.ly/92-hdmi-arc-cec-fag |
 | |
| 9.2 Quad Speakers FAQ: bit.ly/92-quad-speakers-faq | Source Devices & Settings FAQ: bit.ly/92-source-devices-faq |
 | |
| No Sound/Sound Issues FAQ: bit.ty/92-no-sound-issues-faq | Firmware FAQ: bit.ly/192-firmware-faq |
 | |
![]() Use our “Perfect Device Matching Tool” to create a custom setup guide based on your TV and devices.
Use our “Perfect Device Matching Tool” to create a custom setup guide based on your TV and devices.
Scan OR code or visit bit.ly/device-matching-tool ONE-STOP SUPPORT SOLUTION
www.helpdesk.nakamichi-usa.com
CUSTOMER CARE
[email protected]
(415) 805 6913
(Weekdays 10am -6 45pm PST. Saturday. Holidays 10am -4:45pm PS1)


