![]() VCR20 Remote Control for UVC Cameras
VCR20 Remote Control for UVC Cameras
User Guide
Getting Started
This chapter introduces the basic operation of VCR20.
- The hardware of the VCR20 Remote Control
- Idle Screen
- Icons Introduction
- Running the Setup Wizard
- Powering on the System
- Powering off the System
- Putting the System to Sleep
- Waking up the System
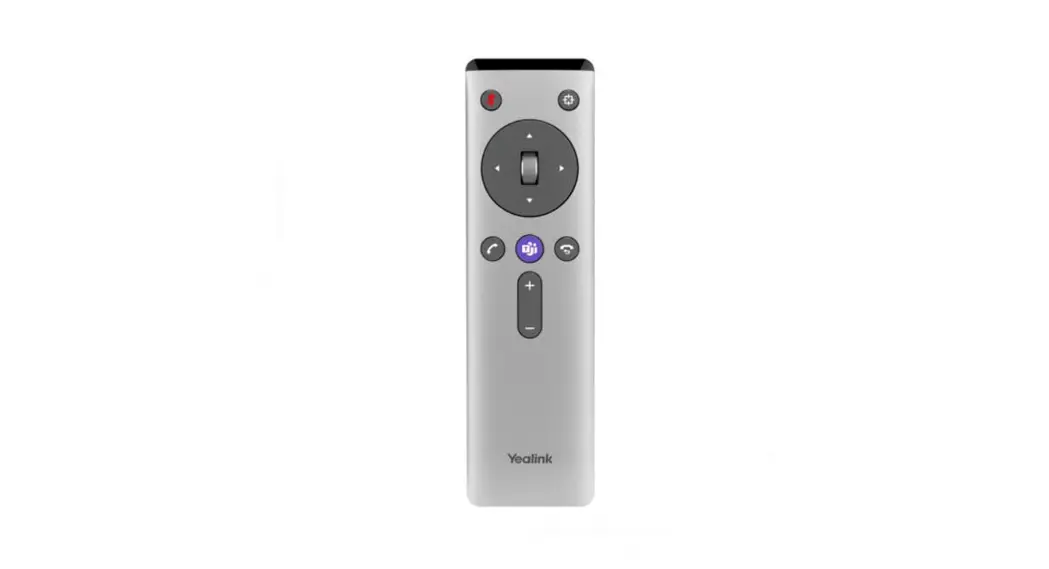
The hardware of the VCR20 Remote Control
You can use the following features with VCR20 remote control:
- Initiate or join a conference
- Control conferences, for example, inviting participants or ending the conference
- Control a camera
- Record video or audio, present content, or take screenshots
- Modify the settings of the VCS endpoint
The following introduces the keys of the VCR20 remote control and how to use it to enter characters. - Introduction of VCR20 Remote Control
Introduction of VCR20 Remote Control
The features of the keys on the remote control are described below:
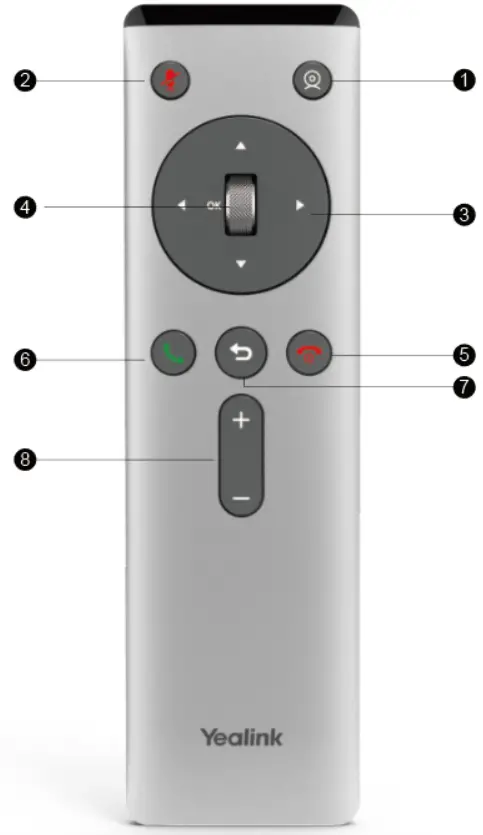
| No. | Name | Description |
| 1 | Custom Key | Customize the key function. The system administrator can customize the key as the Presentation key (the default value), the Tracking Mode key, the ScreenShot key, the Mute Speaker key, the Preset key, or the Camera Control key. |
| 2 | Mute Key | Mute or unmute the microphone |
| 3 | Navigation Key | • Navigate to the desired menu item. • Pan or tilt the camera to adjust the angle. |
| 4 | Scroll Wheel (OK Key) | • Scroll up or down to the desired menu item. • Press the key to go to the sub-menu or confirm actions • After selecting the video, scroll up or down to zoom in/out the video. |
| 5 | On-hook Key | • End a call or exit a conference call • Return to the idle screen • Long press to shut down the system or put the system to sleep • Press it to power on the system when the system is shut down but not powered off |
| 6 | Off-hook Key | Enter the pre-dialing screen, the dialing screen, or the answering screen. |
| 7 | Back key | Return to the previous menu. |
| 8 | Volume Key | Adjust the speaker volume. |
![]() Note: The infrared sensor locates within the LED indicator of the camera. Aim the remote control at the infrared sensor to operate the camera.
Note: The infrared sensor locates within the LED indicator of the camera. Aim the remote control at the infrared sensor to operate the camera.
Idle Screen
If the video conferencing system has a Yealink Cloud account registered, the monitor (non-touch) idle screen is as below:
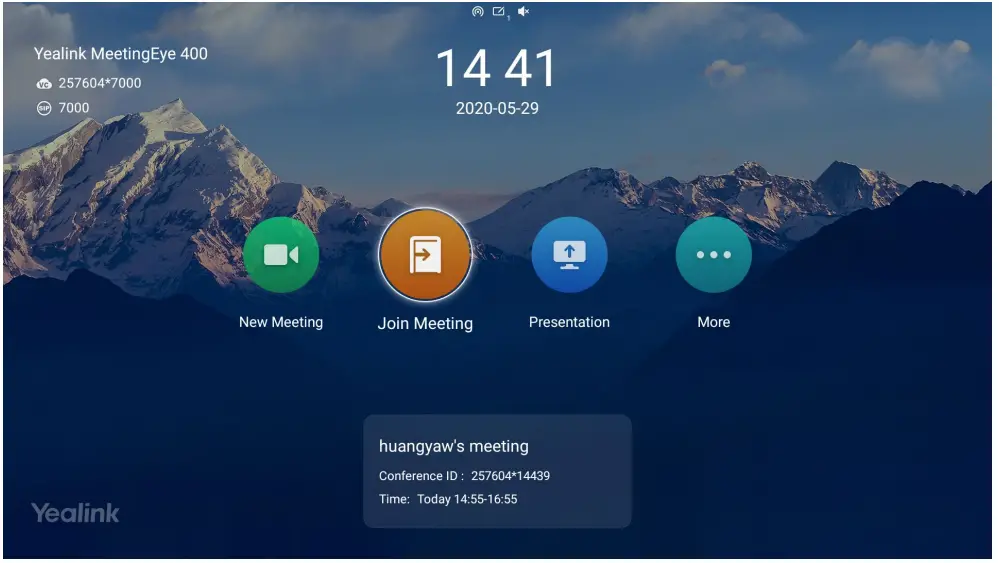
| Name | Description |
| Time and Date | The time and date are displayed on the top of the screen. |
| Site Name | The site name of the system is displayed in the top-left corner of the screen. |
| Status Icon | The status icons are displayed in the center of the status bar. |
| Register Account | Generally, your system administrator will pre-configure the related account information for the phone. If not, contact your system administrator. |
| New Meeting | Go to the Dialing screen. |
| Join Meeting | Enter the conference ID and password to join conferences. |
| More | • Camera Control • Setting • File Manager • Go to Cloud Experience Lobby. |
| Conference Schedule | When you register a Yealink Meeting account or a YMS account, you can view the ongoing or upcoming conference. |
| Video Image | Display the local video image, the local PC content, or the image of the Whiteboard collaboration. |
Icons Introduction
The icons displayed in the status bar of the monitor are introduced as below:
| Icon | Description |
| Network is available | |
| Wi-Fi mode is enabled but is not connected to the wireless network | |
| Wi-Fi mode is enabled and is connected to the wireless network | |
| A wireless hotspot is enabled, but no device is connected to it | |
| Wireless hotspot is enabled, and some devices are connected to the system (the number of the connected devices is displayed in the bottom-right corner) | |
| A SIP account is registered | |
| An H.323 account is registered |
| Icon | Description |
| A Yealink Cloud account/YMS account is registered | |
| A PSTN account is registered | |
| Log into StarLeaf/Zoom/Pexip/BlueJeans/EasyMeet/Videxio platform | |
| VCH51 video conferencing hub is connected to the device | |
| Auto answer | |
| Missed calls (it is displayed in the status bar of the monitor) | |
| The volume is 0 | |
| DND (do not disturb) is enabled | |
| Wired sharing (when a PC is connected to the VCH51 video conferencing hub) | |
| Wireless sharing (use the WPP20 wireless presentation pod to share the content on PC and the number of the connected WPP20 is displayed in the bottom-right corner) | |
| A USB flash drive is inserted | |
| VPN is enabled | |
| The device is muted | |
| Call encryption | |
| Record the video and the audio to your system memory | |
| Records the video and the audio to your PC by Yealink Wireless Presentation Pod | |
| Records the video and the audio to the USB flash drive | |
| Dialed calls (H.323 account/SIP account/IP Call) | |
| Dialed calls (Cloud platform) |
| Icon | Description |
| Received calls (H.323 account/SIP account/IP Call) | |
| Received calls (Cloud platform) | |
| Missed calls (H.323 account/SIP account/IP Call) | |
| Missed calls (Cloud platform) | |
| Local Directory | |
| Yealink Cloud contacts or YMS contacts | |
| Virtual Meeting Room (VMR) | |
| Room system |
Running the Setup Wizard
The setup wizard appears automatically the first time when you start up the system or reset the system to factory. You can configure the initial settings, for example, the language, the network, and the account, for the device by your remote control.
Powering on the System
About this task
Your system starts up automatically after you connect an electrical supply. If you power off the system using the remote control, do the following to power it on.
Procedure
Long press the Hang up key.
Your system is powered on successfully, and the LED indicator glows green.
Powering off the System
Procedure
- Long press the Hangup key for 3s.
The option pops up on the display. - Select Shut down.
The system shuts down immediately, and the LED on the system goes out.
Putting the System to Sleep
You can put the system to sleep immediately if you do not use it temporarily.
Procedure
- Long press the Hangup key for 3s.
The option pops up on the display. - Select Sleep.
The system goes to sleep immediately, and the LED on the system or the camera glows red.
Waking up the System
Procedure
On your remote control, press any button.
Calling
This section is about call operations.
- Placing a Call by Entering a Number
- Placing Calls to Contacts
- Placing Calls from Call History
- Answering Calls
- DND (Do Not Disturb)
- Rejecting Incoming Calls
- Ending Calls
Placing a Call by Entering a Number
About this task
You can dial the following contacts on your system:
- SIP URI (for example, [email protected])
- IP address (for example, 192.168.1.15)
- H. 323 account, SIP account, Cloud account, YMS account, or PSTN account
- If you register different accounts on the phone, you can use one of them to place the call, including the Cloud account/YMS account/H.323 account/SIP account/PSTN account/H.323 IP Call/SIP IP Call
- Calling a video conference system that is set up as a virtual conference room
- If the virtual meeting room requires no password, dial the IP address of the device (for example, 10.3.6.201) or the account number to enter the virtual meeting room.
- If the virtual meeting room requires a password, dial IP##meeting password or conference meeting password@IP (for example, 10.3.6.201##123 or [email protected]).


