![]()
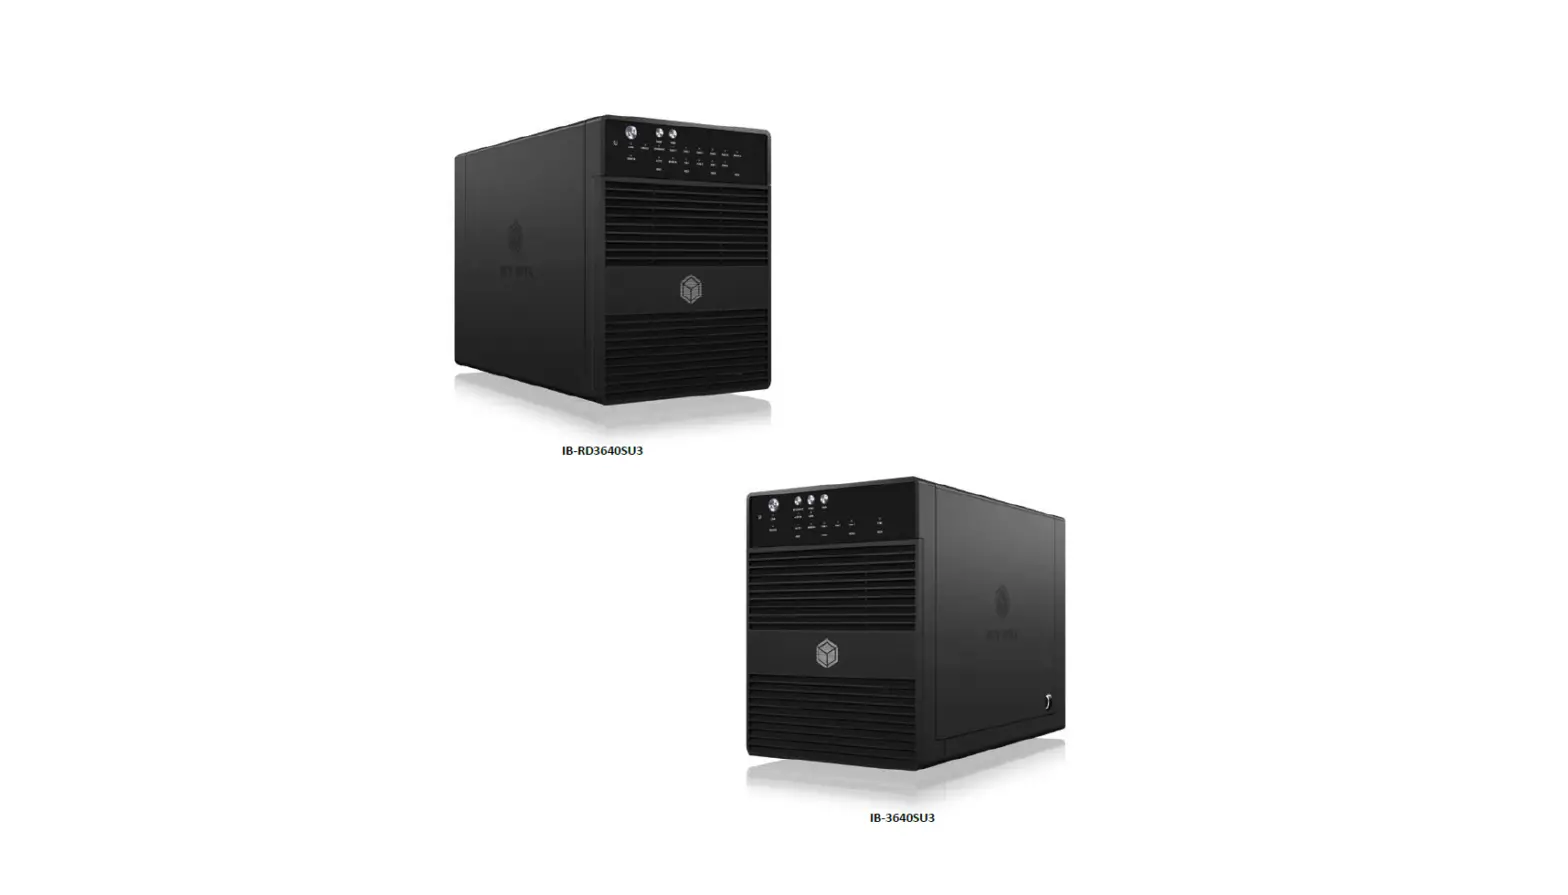
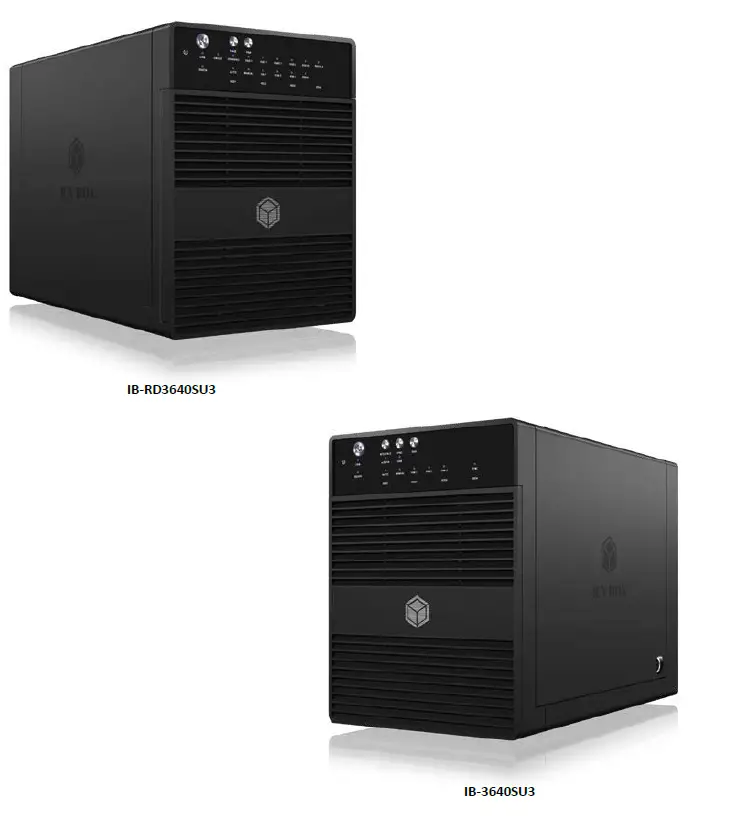
ICY BOX IB-RD3640SU3 IB-3640 Series Enclosure for Hard Drives 
Please read carefully the following information to prevent injuries, damage to material and device as well as data loss:
Warning levels
Signal words and safety codes indicate the warning level and provide immediate information in terms of the probability of occurrence as well as the type and severity of the consequences if the measures to prevent hazards are not complied with.
Danger: Warns of a directly hazardous situation causing death or serious injury.
Warning: Warns of a potentially hazardous situation that may cause death or serious injury.
Caution: Warns of a potentially hazardous situation that may cause minor injury.
Important: Warns of a potential situation that may cause material or environmental damage and disrupt operative processes.
Risk of electrical shock
warning: Contact with parts conducting electricity Risk of death by electrical shock
- Read the operating instructions prior to use
- Make sure the device has been de-energised prior to working on it
- Do not remove contact protection panels
- Avoid contact with conducting parts
- Do not bring plug contacts in contact with pointed and metal objects
- Use in intended environments only
- Operate the device using a power unit meeting the specifications of the type plate only!
- Keep the device/power unit away from humidity, liquid, vapour and dust
- Do not modify the device
- Do not connect the device during thunderstorms
- Approach specialist retailers if you require repairs
Hazards during assembly (if intended)
Caution: Sharp components
Potential injuries to fingers or hands during assembly (if intended)
- Read the operating instructions prior to assembly
- Avoid coming into contact with sharp edges or pointed components
- Do not force components together
- Use suitable tools
- Use potentially enclosed accessories and tools only
Hazards caused by a development of heat
Important: Insufficient device/power unit ventilation
Overheating and failure of the device/power unit
- Prevent externally heating up components and ensure an exchange of air
- Do not cover the fan outlet and passive cooling elements
- Avoid direct sunlight on the device/power unit
- Guarantee sufficient ambient air for the device/power unit
- Do not place objects on the device/power unit
Hazards caused by very small parts and packaging
Warning: Risk of suffocation
Risk of death by suffocation or swallowing
- Keep small parts and accessories away from children
- Store/dispose of plastic bags and packaging in an area that is inaccessible to children
- Do not hand over small parts and packaging to children
Potential data loss
Important; Data lost during commissioning
Potentially irreversible data loss
- Always comply with the information in the operating instructions/quick installation guide
- Exclusively use the product once the specifications have been met
- Back up data prior to commissioning
- Back up data prior to connecting new hardware
- Use accessories enclosed with the product
Cleaning the device
IMPORTANT Harmful cleaning agents
Scratches, discolouration, damage caused by moisture or short circuit in the device
- Disconnect the device prior to cleaning
- Aggressive or intense cleaning agents and solvents are unsuitable
- Make sure there is no residual moisture after cleaning
- We recommend cleaning devices using a dry, anti-static cloth
Disposing of the device
IMPORTANT Environmental pollution, unsuitable for recycling
Potential environmental pollution caused by components, recycling circle interrupted
This icon on product and packaging indicates that this product must not be disposed of as part of domestic waste. In compliance with the Waste Electrical and Electronic Equipment Di rective (WEEE) this electrical device and potentially included batteries must not be disposed of in conventional, domestic waste or recycling waste. If you would like to dispose of this product and potentially included batteries, please return it to the retailer or your local waste disposal and recycling point.
If you have any questions, please do not hesitate to contact our support at [email protected] or visit our website at www.raidsonic.de.
INTRODUCTION
GENERAL INFORMATION
Usage
The user should not modify this device. The environmental temperature should be within +s•c ~ +35°C
No-Port multiplier at host computer needed, if connected via eSATA
Power
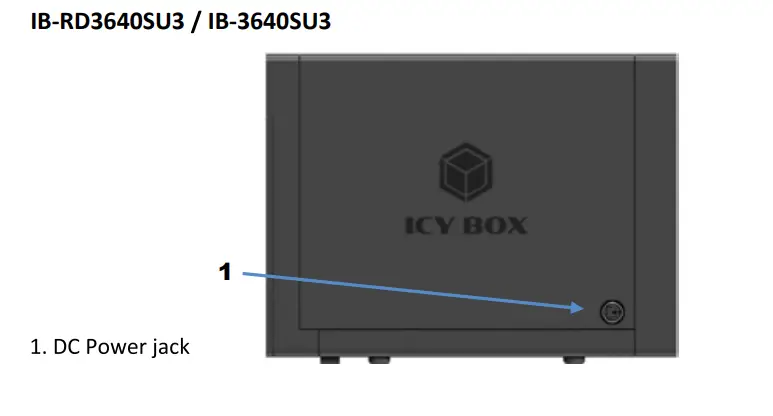
Power voltage: DC 12 V.
When using this device, please connect the supplied AC adapter or AC adapter cable to the power jack of the device. When placing the adapter cable, make sure it cannot get damaged or be subject to pressure. To reduce the risk of electric shock, unplug the adapter rst before cleaning it. Never connect the adapter to the device in a humid or dusty area. Do not replace the adapter or cable’s wire or connector.
Radio interference/compatibility
- If not properly shielded, almost all electronic devices will get radio interference. Under some
conditions, your player might get interference. - The design of this device has followed the FCC/CE standard, and has followed the following rules:
- This device may not cause harmful interference;
- This device could accept some interference received including interference that may cause
undesired operation.
Repair
If the device has a problem, you should take it to an appointed repair center and let the
specialists do the repair, never repair the player yourself, you might damage the device or
endanger yourself or your data.
Disposing of the player
When you dispose of the device, be sure to dispose it appropriately. Some countries may
regulate disposal of electrical device, please consult with your local authority.
Others
When using this device, please do not let the device come into contact with water or other liquid, if
water is accidentally spilled on the device, please use a dry cloth to absorb the spillage.
Do not let the device come into contact with water or other liquid.
Do not disassemble the device; repair the device or change the design of the device, any damage
done will not be included in the repair policy.
Avoid hitting the device with a hard object, avoid shaking the player, and stay away from magnetic fields. During electrostatic discharge and the strong electromagnetic field, the product will malfunction and then unplug the power cable and the product will return to normal performance next time it is powered on.
Note: All the information contained in this manual was correct at the time of publication. However, as our engineers are always updating and improving the product, your device’s software may have a slightly different appearance or modified functionality than presented in this manual.
HARDWARE IB-3640 SERIES
THE FRONT VIEW LED INDICATION
- Blue Power on
Orange Sleep mode on/off line - USB
- SATA
on/off line - Power button
It needs to be pressed and held for 3 seconds to power off.
Remark! This design prevents accidental power off. - . Interface button
Change between USB and eSATA connection - . SYNC button
Switch power sync mode (no PowerSync/ Hibernate/
Power OFF)
Hold SYNC button to switch between sync modes. - .Fan button
Controls auto & manual modes and fan speed from level 1 to level 3. - . eSATA
in use /access - USB 3.0
in use /access - Smart Fan
automatic mode - Smart Fan
manual mode - Fan speed
Level 1 below 35°C 1,000 rpm 1,400 rpm - Fan speed
Level 2 35-45°C 1,500 rpm1,900 rpm - Fan speed
Level 3 higher than 45 C = 2,400 rpm 2,800 rpm - SYNC modes
blue When the PC is off, the device goes off in 15 seconds
orange: When the PC is off, the device goes to sleeping mode
off: Sync is off - HDD access HDD1/HDD2/ HDD3/HDD4
blue flashing active
purple access
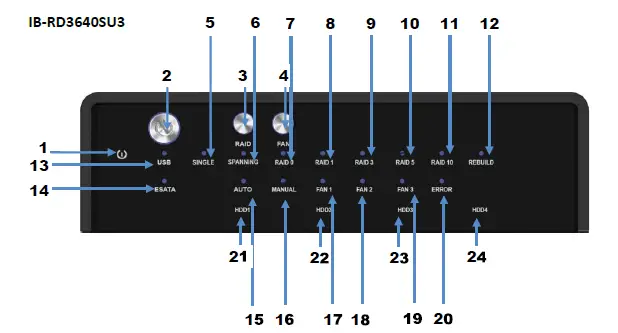
- Blue: Power on
Orange: Sleep mode - power button: It needs to be pressed and held for 3 seconds to power off.
Remark! This design prevents accidental power off. - Mode button: RAID mode butt on needs to be pressed and held for 3 seconds to switch
the device’s raid mode.
Remark! This design will prevent the accidental execution of this function. - Fan button: Controls auto & manual modes and fan speed from level 1 to level 3
- Single-mode
- RAID O Spanning Mode/ large
RAID 0 Striping Mode
RAID 1
RAID 3
RAID 5
RAID 10
Rebuild - USB in use/ access
- eSATA in use/ access
- Smart Fan automatic mode
- Smart Fan manual mode
- Fan 1 level 1 below 35°C = 1,000 rpm 1,400 rpm
- Fan 2 Level 2 35-45°C =1,500 rpm~ 1,900 rpm
- Fan 3 Level 3 higher than 45°C 2,400 rpm 2,800 rpm
- HDD error
When any of HDD1 to HDD4 has an error, the HDD error is on.
Remark! LED doesn’t function in SINGLE mode. - 21.-24. HDD access
HDD1/HDD2/HDD3/ HDD4
blue active
purple access
red rebuild
REAR VIEW
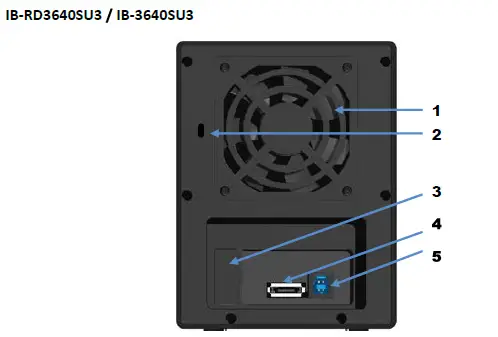
- Fan
- Kensington Lock support
- RAID Mode confirmation button (behind the plastic cover)
- eSATA port
Note: Port multiplier at host computer needed, if connected via eSATA - USB 3.0 port
SIDE VIEW
HDD INSTALLATION
Please use the provided screws to secure the handles to the 4 HDDs.
- Open the front door.
- Press down the tabs (1) of metal frame to unlock and remove it.
- Take the transport paper board out of the device.
- Slide the 4 HDDs into the guide rails and push them downwards until it locks into the connector in
order from up to down. - Reinstall the metal frame that was removed before. Please make sure the bottom of the frame stays
inside the track (2) before closing the front door. - Connect the power adapter and choose one cable to connect to your computer (depends on
version) and power on the device. - When connected and powered on, the System LED will turn blue; the HDD LED lights will turn blue. If
there are HDDs, the HDD LED will stay blue. If the HDDs are accessed the corresponding HDD LEDs will
ash blue.
IB-3640SU3/ 1B-RD3640SU3 - Power on the product and complete the setting inside Disk management of your computer system.
SETTING/CHANGING THE RAID MODE
1B-RD36ANSU3
REMARK: Default setting is SINGLE mode.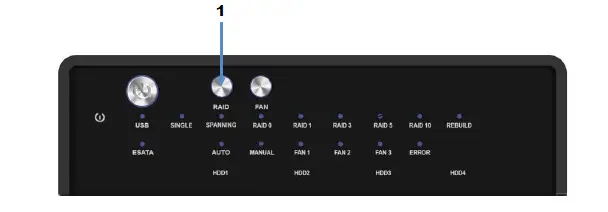
For RAID mode setup, users need to press and HOLD the RAID button (1) at the front for 3 seconds
until the LEDs are flashing.
Press again for changing the RAID mode.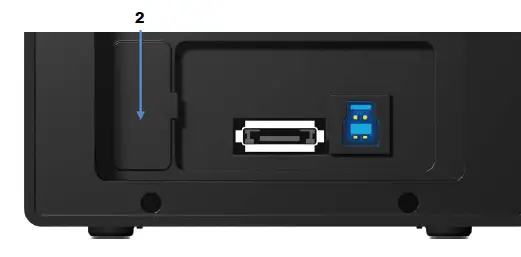
After selecting the RAID mode you want, press and hold the confirmation button at the rear panel
(behind the plastic cover) (2) until the device shuts down.
Power on the product again and complete the setting inside Disk management of your computer
system.
RAID 0 Spanning (BIG) JBOD
Spanning concatenates multiple hard drives as a single large volume; resulting in a seamless expansion of virtual volumes beyond the physical limitations of separately connected hard drives. The data are written frim HDD1 to HDD4.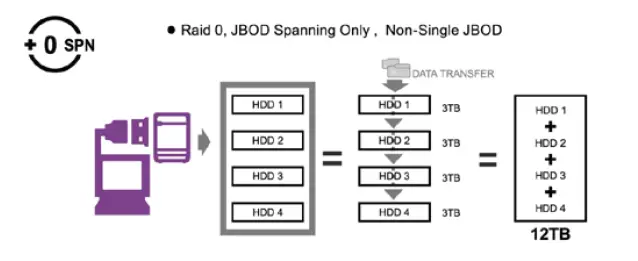
RAID 0 Striping
Striping is a method of concatenating multiple hard drives into one logical storage unit. It is the automated process of writing data across .multiple drives simultaneously. Striping is used to increase the performance of disk reads. The multiple hard drives will write data in “column” effect. If one drive in a striped set fails, all of the data in the stripe set is lost.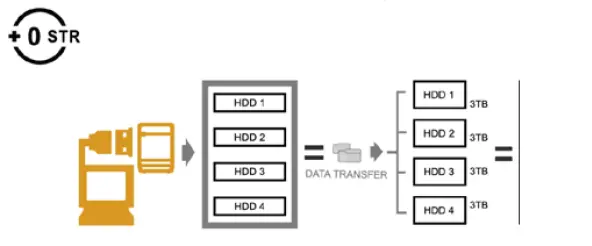 RAID 1 Mirroring
Mirroring is the automated process of writing data to multiple drives simultaneously. Mirroring is used to provide redundancy. If one drive fails, the redundant drive(s) will continue to store the data and provide access to it. The failed drive can then be replaced and the drive set can be rebuild.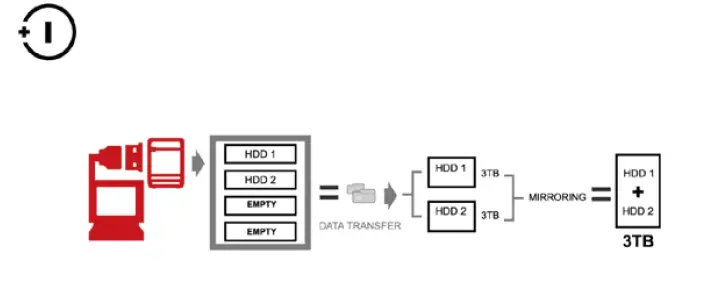
RAID 3 Striped set
This mechanism provides improved performance and faut tolerance similar to RAID 5 but with a dedicated parity disk rather than rotated parity stripes. The single parity disk isa bottle-neck for writing since every write requires updating the parity data. One minor benefit is the dedicated parity disk allows the parity drive to fail and operation will continue without parity or performance penalty
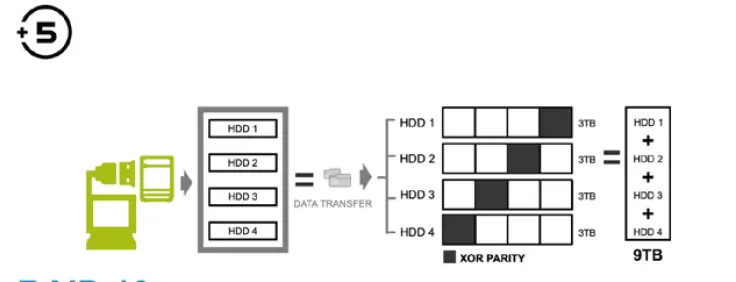
RAID 5 Striped set with distributed parity
Upon drive failure, any subsequent reads can be calculated from the distributed parity Distributed parity requires all drives but one to be present to operate; drive failure requires replacement, but the array is not destroyed by a single drive failure. such that the drive failure is masked from the end-user. The array will have data loss in the event of a second drive failure and is vulnerable until the data that was on the failed drive is rebuilt onto a replacement drive.
RAID 10 Mirroring +Striping
RAID 10 is mirrored(Raid 1) sets in a striped(Raid 0) set.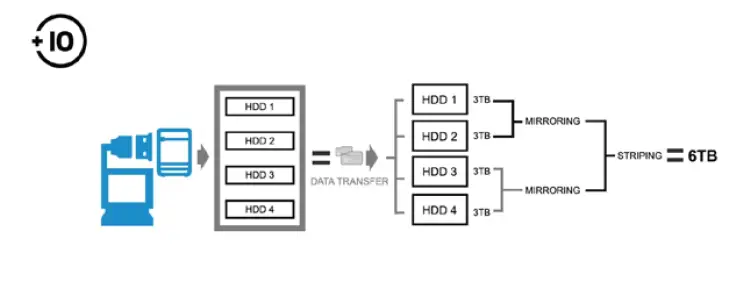
DiSK INITIALISATION
WINDOws® (32/64 BIT)
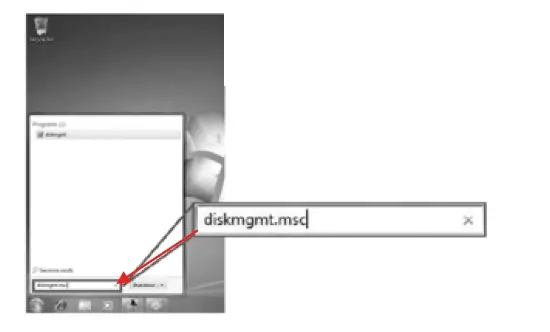
If the HDD is uninitialized, you may have to initialize it by doing steps as followed:
- At first click “Start”, “Execute” at your PC and key in “diskmgmt. msc”.
- After that please press the “RETURN” key.

Start disk initialization.
Remark: Please enable GPT if the total capacity is more than 2 TB and enable MBR if the total
capacity is less than 2 TB.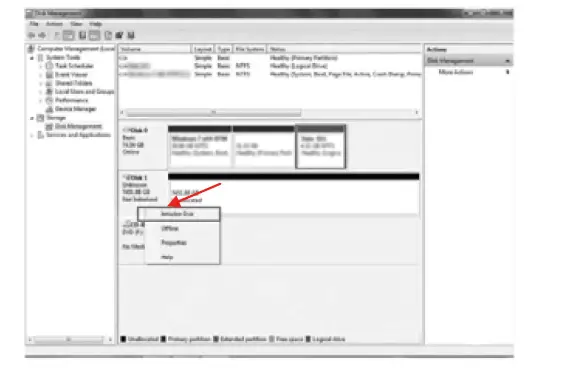
Create new partition and format disk.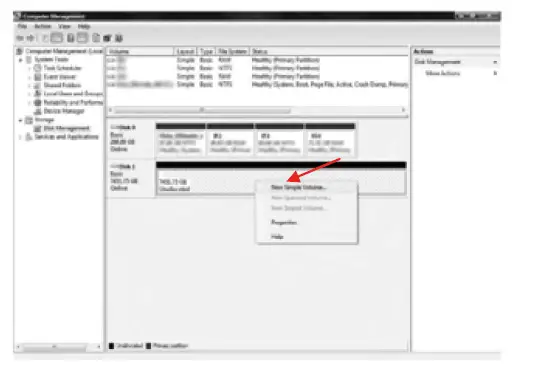
Disk format completed.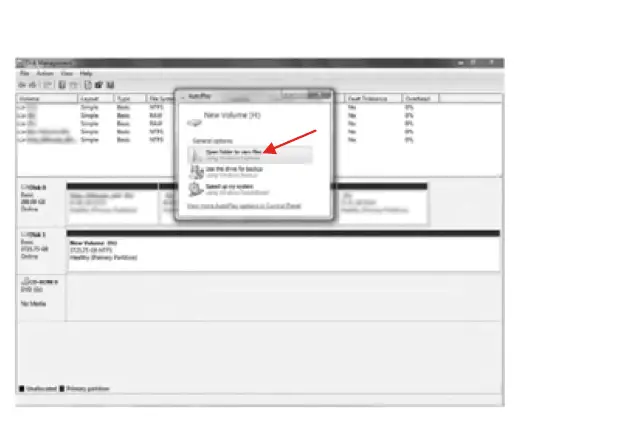
5.2 macOS®
If the HDD is uninitialized, you may have to initialize it by doing steps as followed:
Click the Disk Utility icon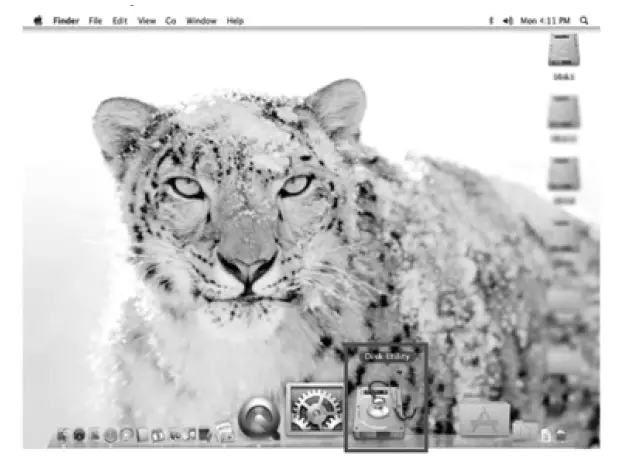
HDD initialise…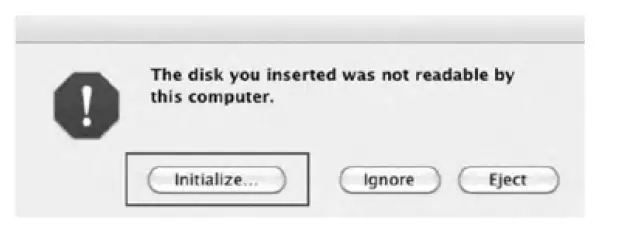 Click Erase
 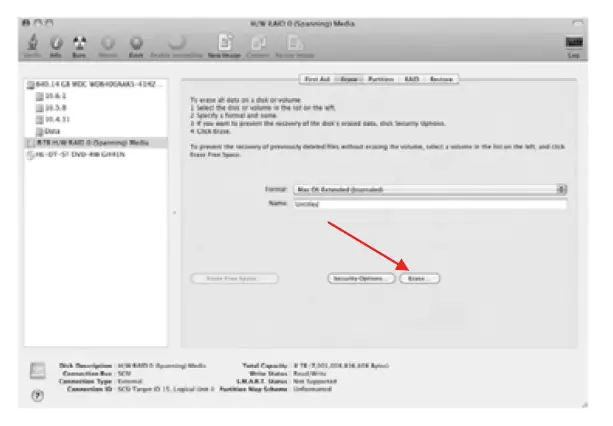 Click Erase
 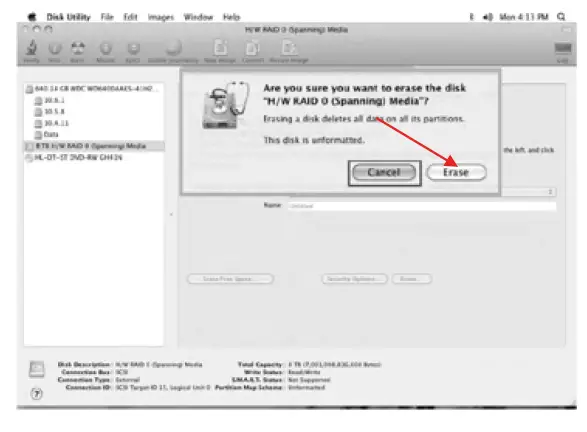 HDD format in process
 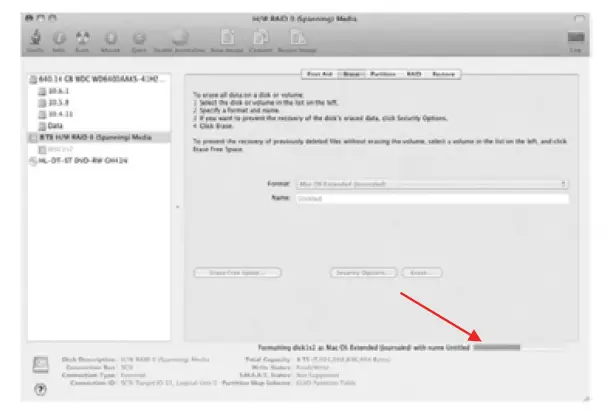 Format completed
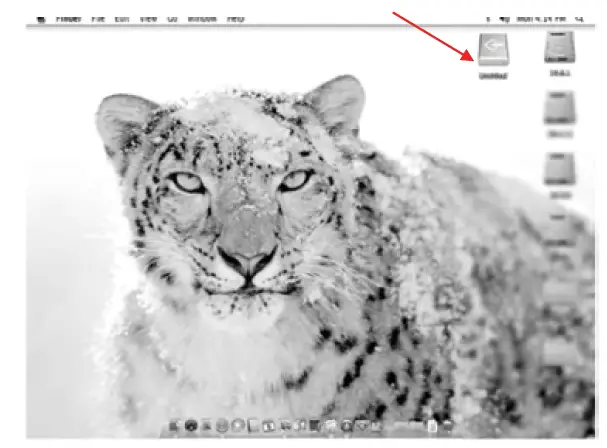
REFERENCES
- Changing the RAID mode will cause data lost.
- Please refer to the instructions when switching the RAID mode, otherwise the execution
might fail. - The interface of USB/ eSATA cannot be used at the same time.
- When using the RAID function, HDDs with the same brand, model and capacity is strong
recommended. - When using RAID function, more than one HDD partition is not recommended.
- Under Windows° users can enable GPT when initializing HDD with a total capacity of more than 2 TB.
- Older OS may not recognize the device if you use a different operation system than
- Windows For more detailed information about GTP, please visit: http://msdn.microsoft.com/en-us/library/windows/hardware/gg463525.aspx
- If users enable MBR by mistake, in order to clean the partition table, you have to switch to another RAID mode and do the RAID mode switch all over again referring to Setup. Then go back to the RAID mode you want, repeat the previous actions and enable GPT when initializing HDD.
- For Macintosh users: the total capacity of more than 2 TB could be recognized only for the operation system 10.4.11 Tiger or later.
- Do not connect the device to the SATA on board port of the motherboard. Either use SATA to eSATA PCI-Express or SATA to eSATA PCI add-on card; otherwise the PC (Windows
Macintosh) may not recognize the device. - In RAID 1, HDD1 and HDD2 must be installed; otherwise the PC (Windows/ macos° ) cannot
recognize the device. Raid 1 is for two hard drives only. Slot 3 and Slot 4, will not be usable. - Rebuild time is based on the capacity, e.g. it takes about 1 hour for 200 GB.
- When the USB/ eSATA cable is plugged out, the device goes to sleeping mode automatically.
- To take out the HDD from the device, slightly press down the handle of the tray and pull it out.
- Setting up motherboard’s power management in $3 is recommended. (For more details refer to the user guide of motherboard BIOS setting).
- If the device takes too long to initialize, please check if the HDD is securely installed or update the SATA host driver version.
- If the transfer rate is not normal, please check if the setting of SATA disk jumper is 1.5 or 3.0 Gbit/s.
- If there is noise with the fan, power of the device, unscrew the fan, take out the cover, clean the fan end assemble it back.
- If the noise is still present, you can change the fan with an identical fan of size 80x80x20 mm.
- If the fan stops working, do not dismantle it. Please send back to the retail store immediately.
- Temperature +5°C ~ 35°C Humidity 90 RH
- Smart fan is controlled by the built-in thermal sensor and it comes with 2 modes (auto/manual) and 3 levels of speed:
level 1 below 35°C = 1,000 rpm ~1,400 rpm
Level 2 35-45°C =1,500 rpm 1,900 rpm
Level 3 higher than 45°C 2,400 rpm 2,800 rpm - Operation system: Windows (32/64bit)
(with GPT enabled, supports a total capacity more than 2TB) macos - Support USB transfer speeds of low speed (up to 1.5 Mbit/s), full speed (up to 12 Mbit/s), high speed (up to 480 Mbit/s), super speed (up to 5 Gbit/s), eSATA transfer speed (up to 1.56.0 Gbit/s)
Note: Portmultiplier at host computer needed, if connected via eSATA.
Copyright 2021 by RaidSonic Technology GmbH. All Rights Reserved
The information contained in this manual is believed to be accurate and reliable. RaidSonic Technology GmbH assumes no responsibility for any errors contained in this manual. RaidSonic Technology GmbH reserves the right to make changes in the specifications and/or design of the above mentioned product without prior notice. The diagrams contained in this manual may also not fully represent the product that you are using and are there for illustration purposes only. RaidSonic Technology GmbH assumes no responsibility for any differences between the product mentioned in this manual and the product you may have. All the information contained in this manual was correct at the time of publication. However, as our engineers are always updating and improving the product, your device’s software may have a slightly different appearance or modified functionality than presented in this manual.


