
![]() ISMART 4-Wire Digital-Analog Hybrid System
ISMART 4-Wire Digital-Analog Hybrid System
Instruction Manual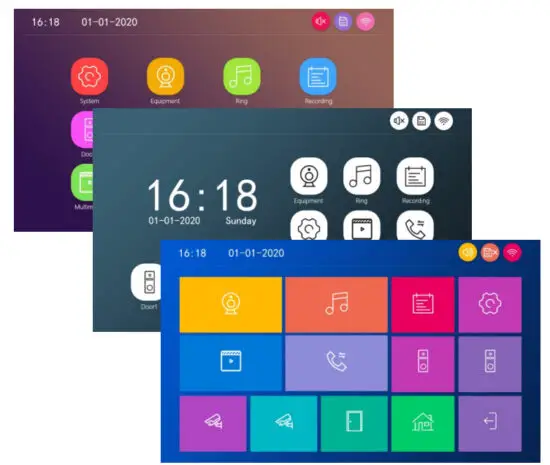
DESCRIPTION ON INDOOR UNIT
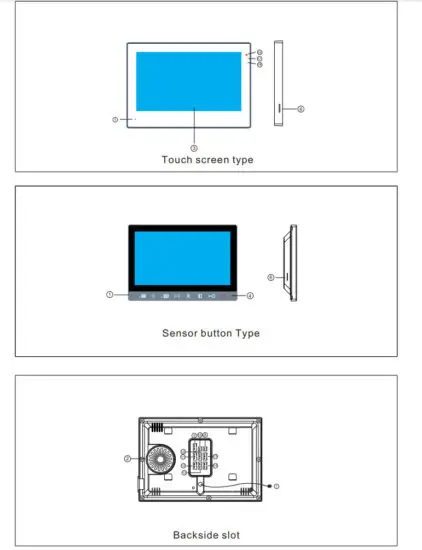
Function Description
| 1 | Microphone |
| 2 | Speaker |
| 3 | TFT-Icd |
| 4 | Function button |
| 5 | Operation button |
| 6 | SD card |
| 7 | AC-IN ( 90V-240V) |
| 8 | DC-IN:12V-15V |
| 9 | Rj45 |
| 10 | CAM1 |
| 11 | DOOR1 |
| 12 | DOOR2 |
| 13 | CAM2 |
| 14 | OUT, connect the next indoor unit |
| 15 | Input (Connect the Slave monitor) |
| 16 | Status Indicator |
| 17 | DOOR1 status indicator |
| 18 | DOOR2 status indicator |
| 19 | Independent Unlock |
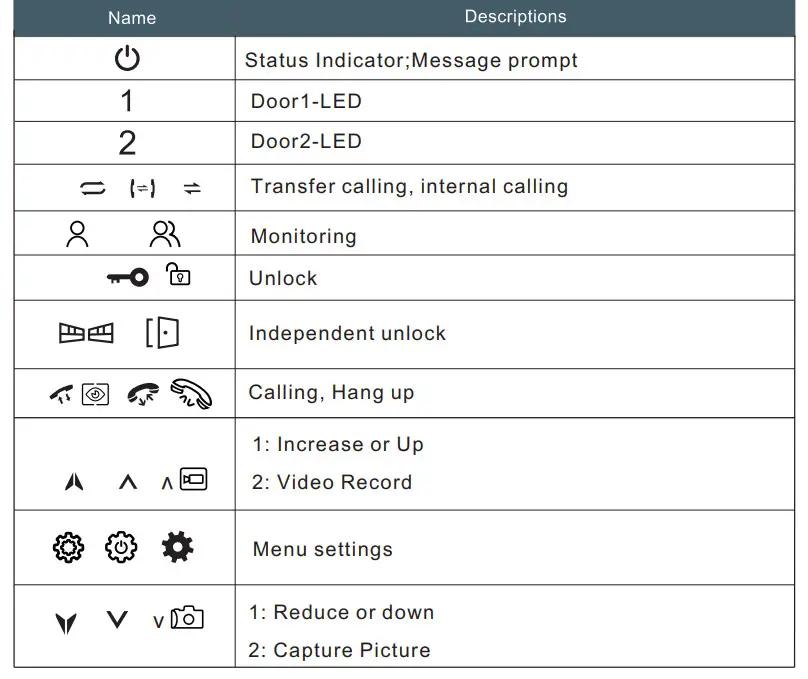
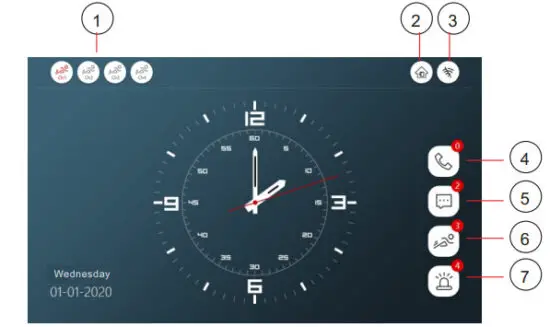
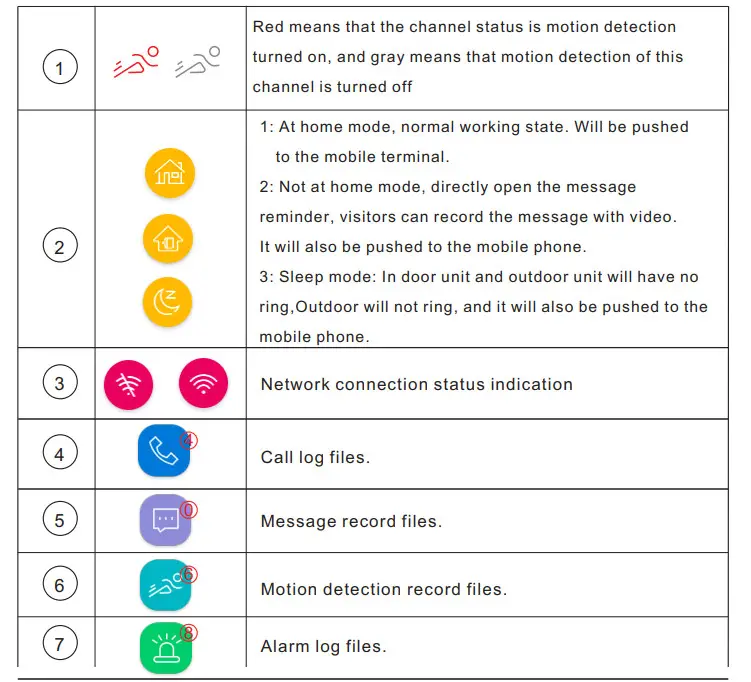
Panel icon function description
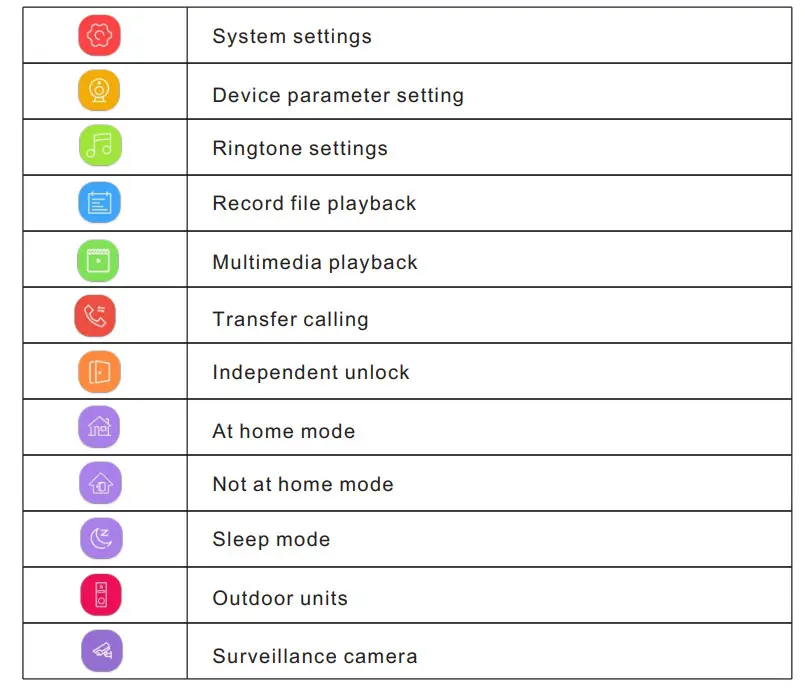
Touch screen icon function definition
WIRING DIAGRAM
1 Tuya Monitor+1 Outdoor unit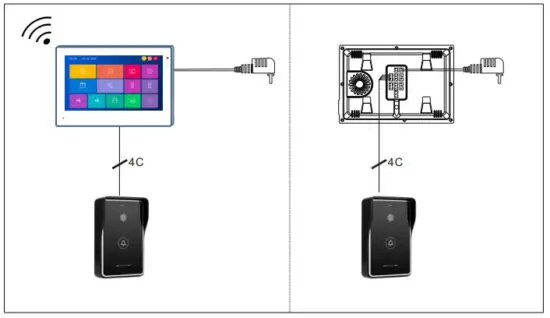
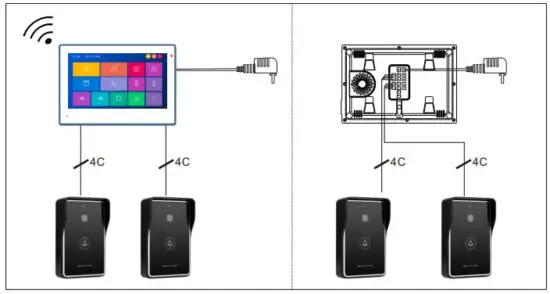
1 Tuya Monitor+2 Outdoor units
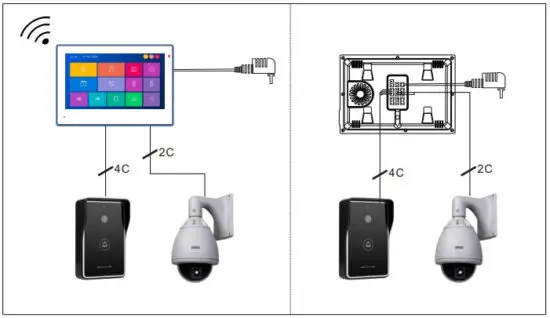
1 Tuya Monitor+1 Outdoor unit+1 CCTV camera
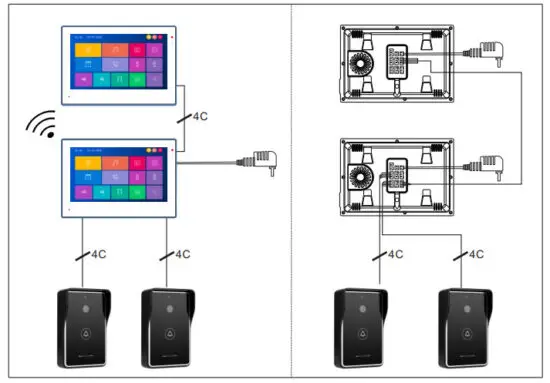
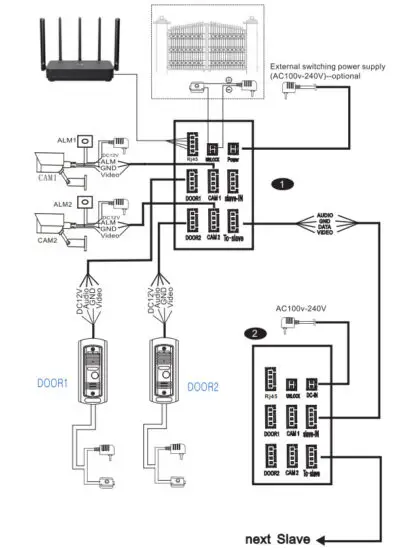
 1Tuya Monitor+1 Slave analog monitor +2 Outdoor units
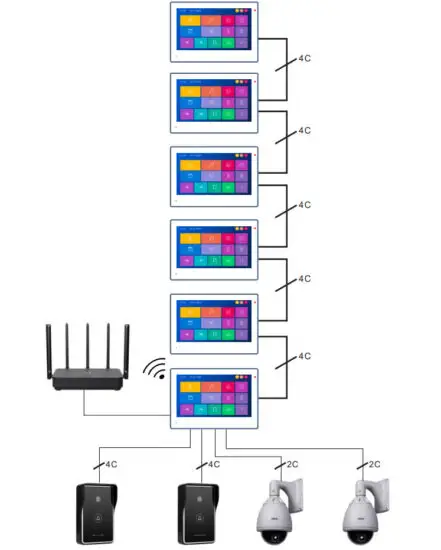
1 Tuya Monitor+5 slave Tuya monitors+2 Outdoor units + 2 CCTV Cameras+ Router
 |  |
Default setting: Select language and device ID
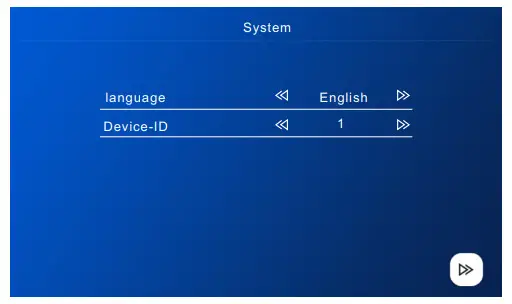
Please note: The Device ID is an important configuration of the equipment in the system.
It must be configured correctly, Otherwise, it will not work properly. If the current device is connected to the Outdoor unit1, it must be set to 1, and the other Slave monitors must be set 2/3/4/5/6 then work normally. 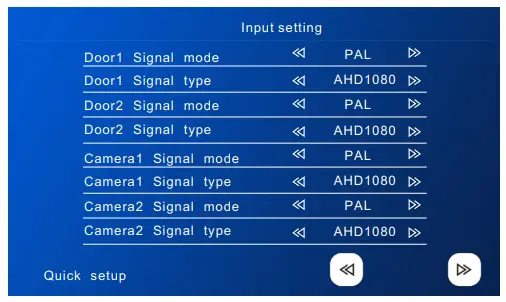
Note: The input video signal must be accurate, otherwise the video signal will not be displayed correctly. If you cannot accurately know the resolution and format of the input signal, you can use the automatic detection function. 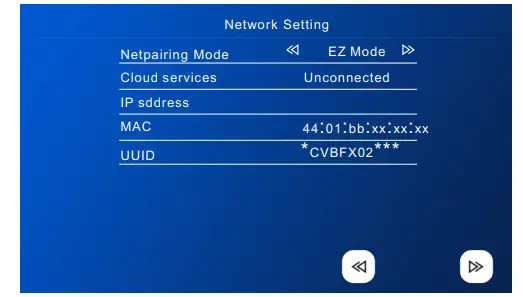
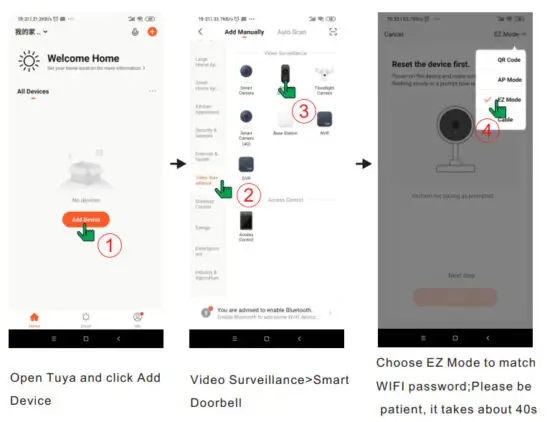
EZ mode
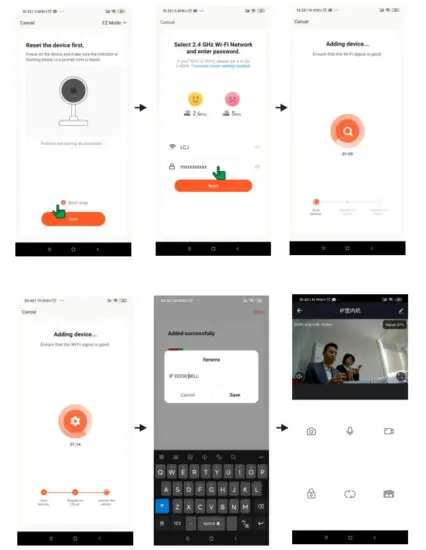
- EZ mode, only use the mobile phone to connect the WIFI router and match the WIFI password (Monitor no need to set), as shown below


Precautions
- It is better to turn off the data flow when connecting to the network, use WIFI communication, and firstly use WIFI to test whether the network is smooth, the signal is better to be above 90% because the EZ mode uses the broadcast mode, and The strong signal will make the connection easier to succeed.W
Note: If the connection using EZ mode is unsuccessful, generally there are the following points:
- The total number of road management mail users is generally 16, 32; 128; most of them The number users is 16, if all users are connected, it will be difficult to reconnect Access this device through EZ broadcast mode. In this case, you can delete some users, Or use AP connection mode
- The encoding and decoding methods of some older WIFI routers are relatively old and do not support EZ Quick connection In this case, you can only connect using AP mode.
- If you connect a high-definition WIFI camera to a WIFI router, it will also affect the success rate of the connection, because the high-definition video will take up a lot of bandwidth and cause broadcast interruption during the EZ mode connection, successful configuration will be more difficult. The method can be to first suspend the power supply of the WIFI camera, and then resume the power supply of the camera after the connection is successful, or use the AP mode to connect.
- Do not connect more than two devices at the same time under the same router environment, otherwise, they will cross code with each other. You can turn off one of them and then connect the other one.
AP mode
To quickly configure the interface and configure the AP mode in (Settings>Network Interface), note: In (Settings>Network Interface), press the back button to restart the device. (Settings>Network Interface) view the WIFI hotspot name and password. 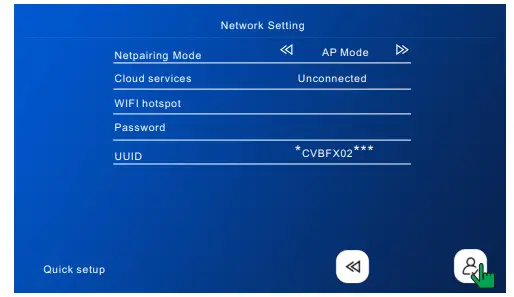
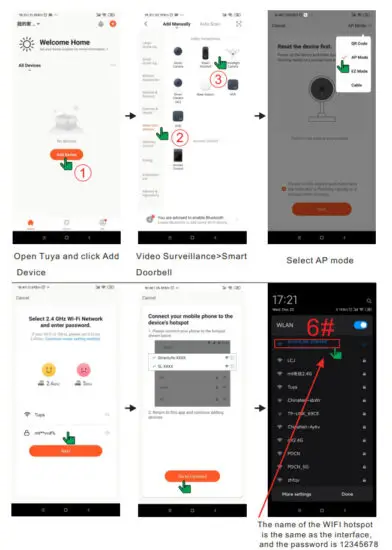
After restarting as prompted, enter the following interface in turn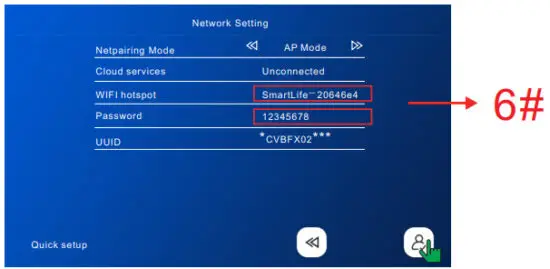 Tuya APP operates as follows
Notes on using APP
- If the device has been successfully connected to the user,the user needs to delete the device on the APP before adding it to another user. (note: The user should be deleted when the network is good, otherwise it’s only deleted on the mobile APP, but not on the server). After deleting, go back to the APP to check and confirm.
- If a new user needs to be added again after the machine restores to the factory settings, the current user also needs to delete the device then re-connect. Otherwise, the device has deleted the password of the router and it’s unable to connect.
App function definition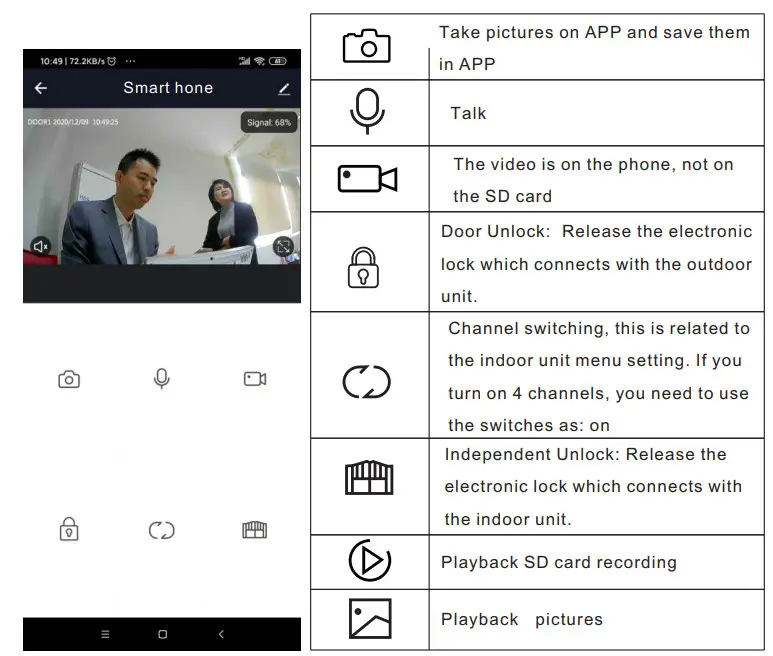
- Win10 style

- Android style

- Standard style

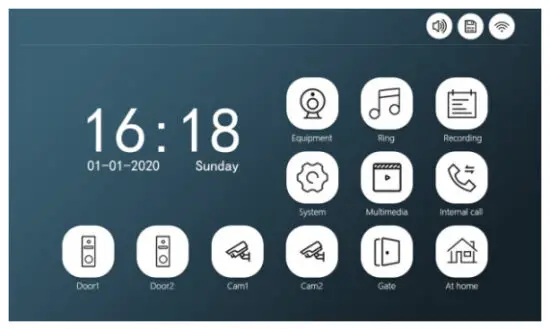
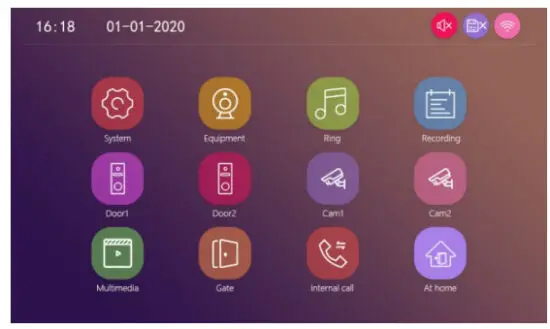
Three styles of interface can be set through the menu. No need to restart
Setting
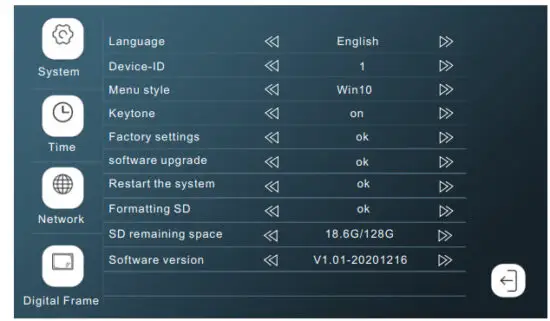
![]() System
System
- Please format the SD card with the device and copy the files to the corresponding folder. Please note: it must match the corresponding folder.
- Restore factory settings: All set parameters are restored to factory mode. Note that Tuya’s device must be deleted together before it can be used again, otherwise it cannot be added and used by other accounts. Can’t connect to the Internet. ! ! !
![]() Time
Time
- (Screen off): Back to system menu 10s later will be off.
- (Clock): Standby display time.
![]() Digital Frame
Digital Frame
note:
- The picture file must be copied to the Digital Frame folder, the picture resolution must not be greater than: 2526×1576, the format is JPEG.
- Long press the file to pop up the submenu, select “Delete” or “Delete All”, and click the file to enter the playback interface.
Devices
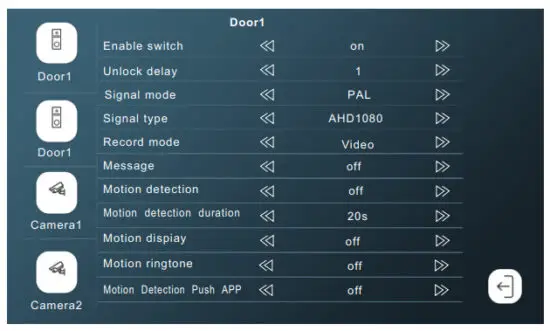
- If the channel is closed, it will be skipped when monitoring the polling screen. This channel and APP will not display this channel. Please set it carefully.
- When Motion Detection Push APP is closed, the phone will not receive any push information.
Ring

- The ringtone of each channel can be set to three time periods,and different ringtone types and volume can be set, but it should, be noted that there can be no gaps and overlaps between the three time periods, otherwise the system will play the default parameters.
- Please note that the volume setting of the Door bell cannot be greater than the volume of the indoor unit.
Recording
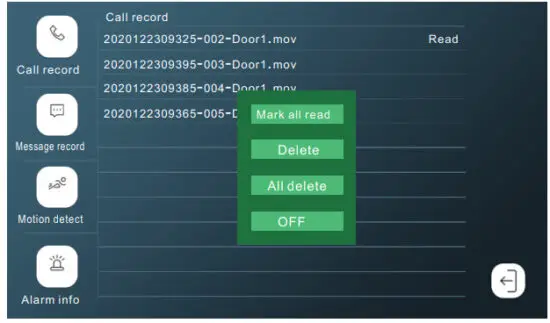
- Click the file to play directly, long press the file to enter the delete/read operation.
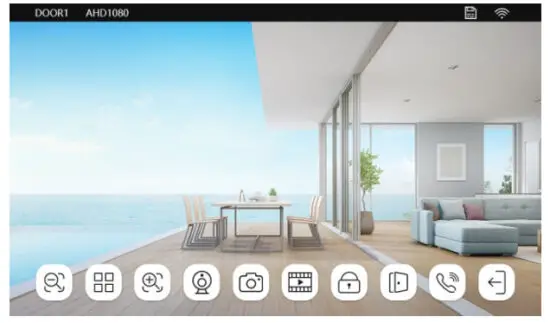
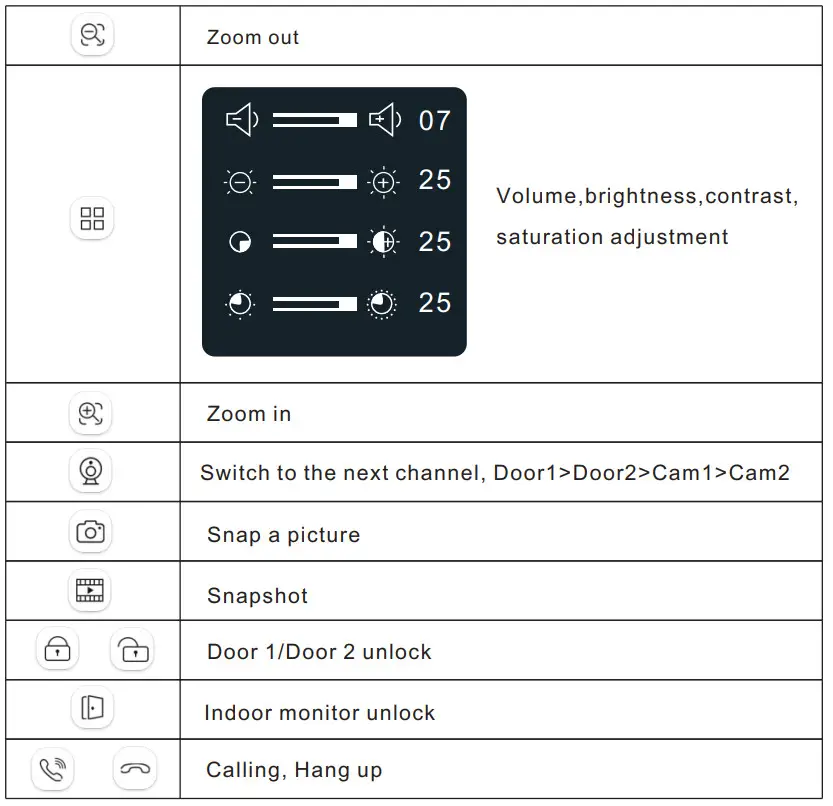
Video interface icon description
NOTE ON WIRING CONNECTION
Please pay attention to the name marked on the sticker of the machine toavoid wrong connection.Wiring requirements (the actual effect and wire quality are Great elationship):
- core ordinary unshielded and shielded wiring cable;
- The effective distance from the outdoor camera to the furthest indoor monitor:
Transmission <30m (4×0.4mm² )
Transmission <60m (4×0.65mm² )
- If you want to extend the distance to more than 60m, it is best to choose thick copper core cable, shielded wire or 3-core ordinary unshielded wire + 75-3 video cable.
Connect the shield terminal to GND.
Three-wire unshielded cable + SYV75-3 video cable Integrated video surveillance cable with power cord(2×0.5mm² +75-3)
- If user wants to use CATS or CAT6 network cable.effective distance from the outdoor camera to the furthest indoor monitor will be limited. For unshielded network cable, the distance will be up to 20m. For shielded network cable, the distance will be up to 40m. So CATS or CAT6 network cable is not recommended.CATS or CAT6 network cable consists of 4 pairs of twisted pairs(8 wires), here one pair of twisted pair will be used as one cable.Green &White+Green, Brown&White+Brown, Orange&White+Orange, Blue&White+Blue.


 Integrated video surveillance cable with power cord(2×0.5mm² +75-3)

If it is a shielded wire, it must be connected to GND.
FCC Statement
This device complies with part 15 of the FCC Rules. Operation is subject to the following two conditions: (1) This device may not cause harmful interference, and (2) this device must accept any interference received, including interference that may cause undesired operation.
Note: This equipment has been tested and found to comply with the limits for a Class B digital device, pursuant to part 15 of the FCC Rules. These limits are designed to provide reasonable protection against harmful interference in a residential installation. This equipment generates, uses and can radiate radio frequency energy and, if not installed and used in accordance with the instructions, may cause harmful interference to radio communications. However, there is no guarantee that interference will not occur in a particular installation. If this equipment does cause harmful interference to radio or television reception, which can be determined by turning the equipment off and on, the user is encouraged to try to correct the interference by one or more of the following measures:
- Reorient or relocate the receiving antenna.
- Increase the separation between the equipment and receiver.
- Connect the equipment into an outlet on a circuit different from that to which the receiver is connected.
- Consult the dealer or an experienced radio/TV technician for help.
Note: The Grantee is not responsible for any changes or modifications not expressly approved by the party responsible for compliance. such modifications could void the user’s authority to operate the equipment.
The device has been evaluated to meet general RF exposure requirement.
To maintain compliance with FCC’s RF exposure guidelines, the distance must be at least 20 cm between the radiator and your body, and fully supported by the operating and installation configurations of the transmitter and its antenna(s).


