
Smart Home
4MP Full Color Dual-Antenna
Outdoor Wi-Fi Security Camera
Model: ASH47-W
Quick Start Guide
ASH47-W 4MP Full Color Dual-Antenna

How can we help?
We are dedicated to providing the highest quality support to our customers and are available 7 days a week.
Online Quick Start Guide
amcrest.com/support
Need help?
amcrest.com/contact
1-888-212-7538
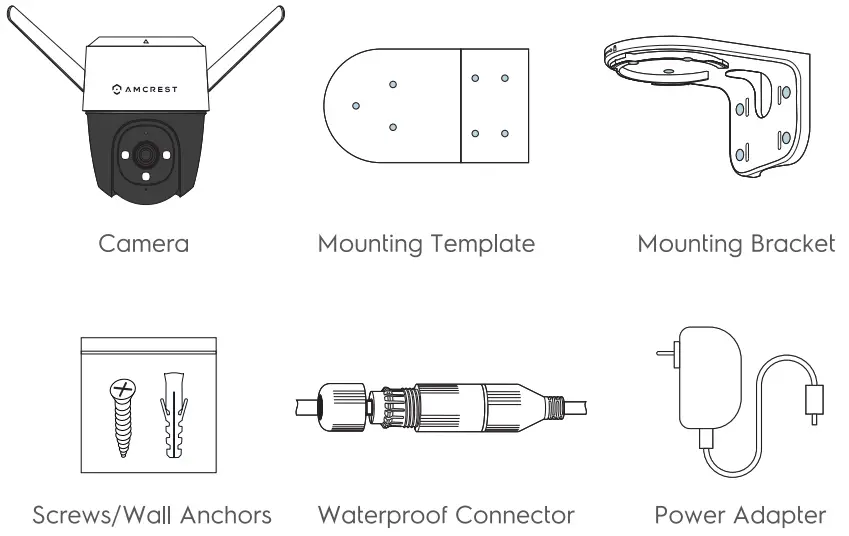
What’s Included
Camera Introduction
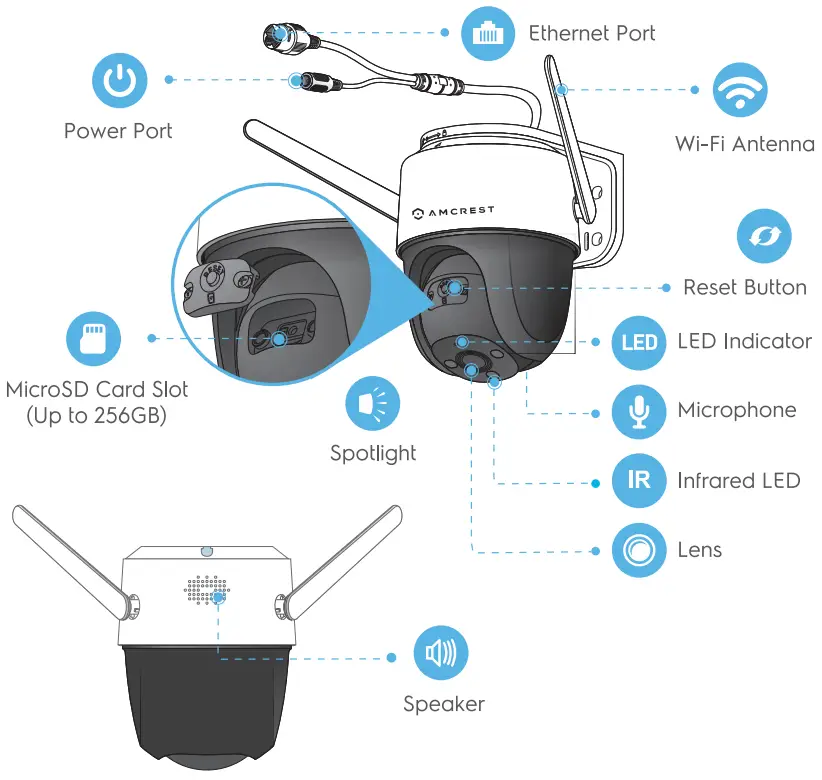
![]() Note: Disconnect the camera from power before installation or when removing the microSD cord.
Note: Disconnect the camera from power before installation or when removing the microSD cord.
See the table below for definitions of camera’s LED behaviors.
| LED Indicator Status | Device Status |
| Off | • Power off/LED turned off • Rebooting after reset |
| Solid red | • Booting • Device malfunction |
| Flashing red | • Network connection failed • Pairing failed |
| Flashing green | • Ready for network configuration • Ready to pair |
| Solid green | • Functioning Properly |
| Flashing green and red alternately | • Updating firmware |
![]() NOTE:
NOTE:
- Press and hold the reset button for 10 seconds to reset the camera.
- Double tap the reset button to enable the camera’s hotspot.
Setting Up the Camera
The Amcrest Smart Home app connects your Amcrest camera to your Android or iOS mobile device, ensuring you are always connected to what matters most.

To get the app, search for “Amcrest Smart Home” in the Google Play or App Store.![]() Note: To odd the device on the Amcrest View Pro app you must complete setup on Amcrest Smart Home app first. Then follow link below: amcrest.com/usingviewpro
Note: To odd the device on the Amcrest View Pro app you must complete setup on Amcrest Smart Home app first. Then follow link below: amcrest.com/usingviewpro
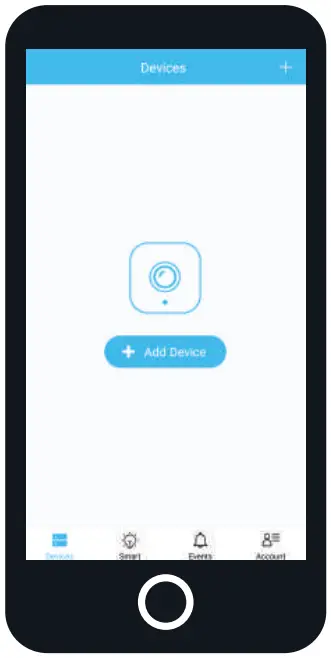
Connecting to the Smart Home app
Open the Amcrest Smart Home app and tap on “Register” to register an account. After registering an account, log into the app and tap on “Add Device”.
You will need to allow all notification and location permissions to allow the camera to connect to your mobile device.
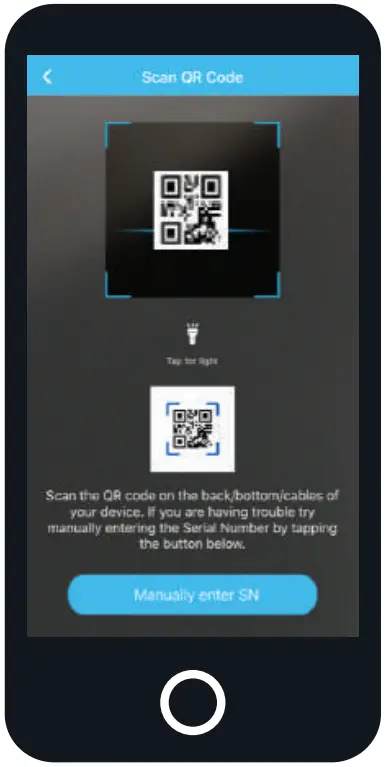
Scan the QR Code or Manually Enter the S/N
Apply power to the camera and allow the camera to initialize. Scan the QR code located on the camera.
If you are unable to scan the OR code you can manually enter the serial number by tapping “Manually enter SN”.
Follow the on-screen prompts to finish adding the camera to your account.
![]() Note: For more information on the setup and use of your device, please visit: amcrest.com/support
Note: For more information on the setup and use of your device, please visit: amcrest.com/support
Physical Installation
After the camera has been successfully connected to your account you can begin physically installing the camera.
While installing the camera, please make sure the mounting surface is strong enough to support three times the weight of the camera and the bracket.![]() Note: For more information on the physical installation of your camera, please visit amcrest.com/support
Note: For more information on the physical installation of your camera, please visit amcrest.com/support
Ceiling Mount
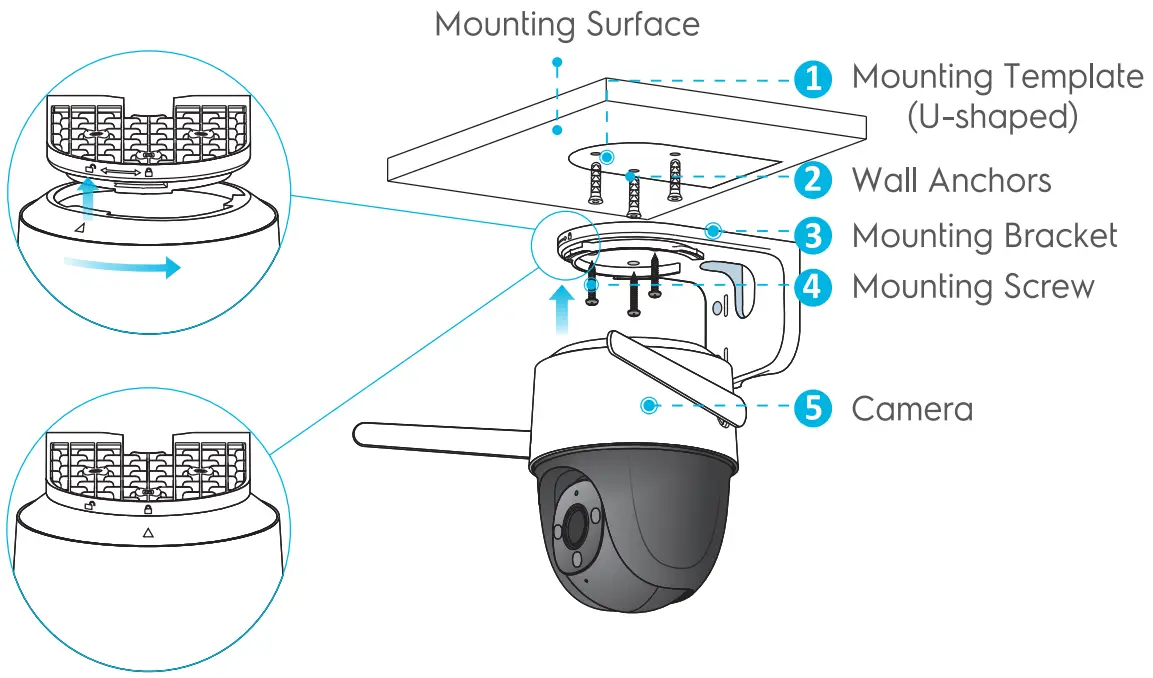
Step 1: Peel off the U-shaped mounting template and stick it onto the desired installation area.
Step 2: Drill holes into the mounting surface as the mounting template marks and then insert the wall anchors as needed.
Step 3: Secure the mounting bracket to the surface with the included mounting screws.
Step 4: Align the ![]() on top of the camera with the
on top of the camera with the![]() on the bracket, then fit the two parts together.
on the bracket, then fit the two parts together.
Step 5: Rotate the camera counterclockwise until it is locked. Make sure the ![]() aligns with the
aligns with the ![]() .
.
Step 6: Apply power to the camera and allow it to initialize, then adjust the angle of the camera accordingly.
Wall Mount
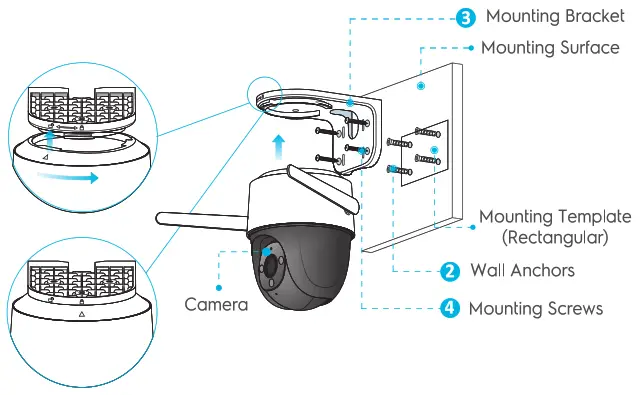
Step 1: Peel off the rectangular mounting template and stick it onto the desired installation area.
Step 2: Drill holes into the mounting surface as the mounting template marks and then insert the wall anchors as needed.
Step 3: Secure the mounting bracket to the surface with the included mounting screws.
Step 4: Align the ![]() on top of the camera with the
on top of the camera with the![]() on the bracket, then fit the two parts together.
on the bracket, then fit the two parts together.
Step 5: Rotate the camera counterclockwise until it is locked. Make sure the ![]() aligns with the
aligns with the![]() .
.
Step 6: Apply power to the camera and allow it to initialize, then adjust the angle of the camera accordingly.
FAQ
– Check the LED indicator status. If the light is not in green, press and hold the reset button for 10 seconds to reset the camera.
– In the Amcrest Smart Home app access the device and go to Settings > WiF1 Settings and select the Wi-Fi network from the list. If the camera is registering as offline, press and hold the reset button for 10 seconds to reset the camera and try to connect to the camera again.
– Check the distance between the camera and the router and ensure that the distance between the camera and the router is within 16ft (5m). Check the Wi-Fi configuration of the router: Select the channel to auto, and the mode to llbgn mixed.
– When the micro SD card is full, the system will overwrite the previous recorded videos. Save the important information in time.
– If you have activated the cloud storage and installed a micro SD card, the recordings will be both saved to the card and cloud. If the cloud storage is deactivated, the recordings are saved to the SD card. Videos recorded during live view or playback is saved on your phone.


