![]()
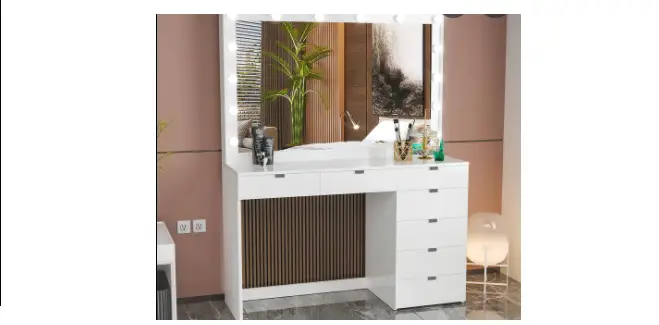
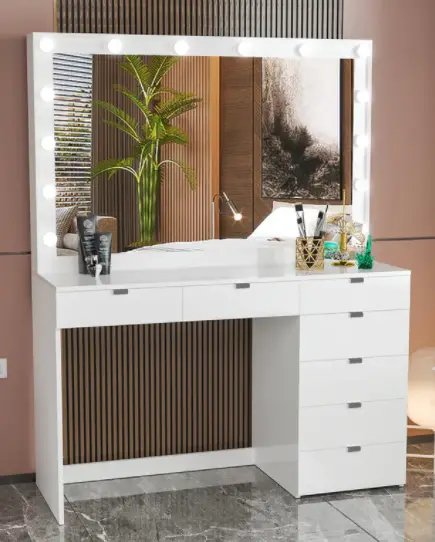
BOhaus 1609 Dressing Table with Mirror
ATTENTION!!!
Any inquiry or replacement parts
you need, contact us directly at:
[email protected]
Scan this QR Code to contact to Customer Support Team.
Or Call Us at +1 (832) 479-1709 / (646) 491-8149 / (415) 594-5401
ASSEMBLY INSTRUCTIONS INSTRUCCIONES DE ARMADO
- MODEL #: 1609
- DRESSING TABLE WITH MIRROR
- Tocador con Espejo
- Aprox. product weight 105.02 lbs. / 47,71 Kg. *
- *Weight may vary +/- 5%.
- Lot: See package
THIS INFORMATION BOOKLET CONTAINS IMPORTANT SAFETY INFORMATION. PLEASE READ AND KEEP FOR FUTURE REFERENCE. ESTE FOLLETO CONTIENE INFORMACIÓN DE SEGURIDAD IMPORTANTE. POR FAVOR, LEA Y GUÁRDELO PARA REFERENCIA FUTURA.
Need some Help? Call +1 (832) 479-1709 / (646) 491-8149 / (415) 594-5401 or email [email protected]
Need some Help? Call +1 (832) 479-1709 / (646) 491-8149 / (415) 594-5401 or email [email protected]
GENERAL SAFETY INFORMATION$
- Please read the Assembly Instructions prior to assembling this product.
- Remove all the hardware from the box and sort by type.
- Check to see that all the hardware and parts are present BEFORE assembling.
- To avoid damage, assemble the product on a sturdy, level, and protective surface.
- Please wait until all steps are completed before fully tightening bolts.
- Make sure all bolts are tightly fastened before the unit is used.
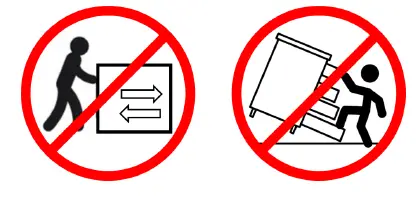
- To move the product, you must lift it. DO NOT drag it, if you drag it can cause overturning.
- This product is sold with a hardware kit to be fixed on the wall. You must install this kit to prevent any accidents or damages. When properly installed, this restrain can provide protection against the unexpected tipping of the unit due to smalls tremors, bumps or climbing. The restrain is only a deterrent and is not a substitute for proper adult supervision. Use of tip-over restraints may only reduce, but not eliminate, the risk of tip-over

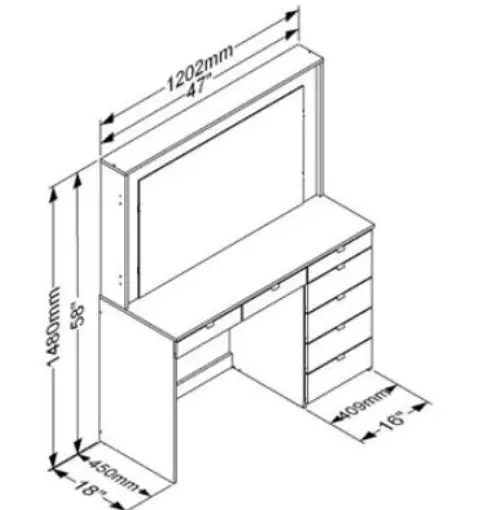
General Dimensions
Maximum weight supported
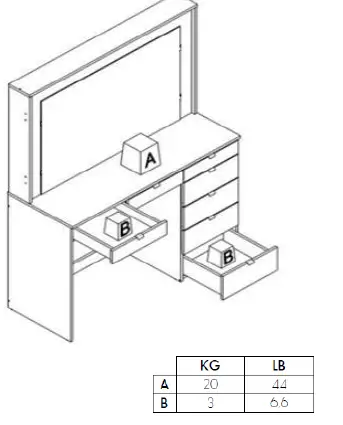
Weight in pounds. / Peso en Libras.
Note: weight must be evenly distributed.
You will need 2 people recommended space for assembling.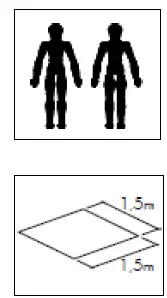
Note: Place a carpet or blanket in the assembly area to avoid damage to the parts during the process.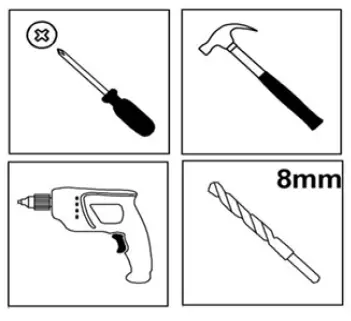
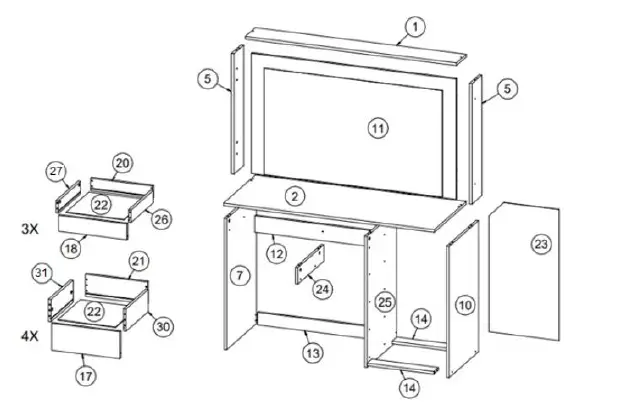
PARTS IDENTIFICATION
| Nº | DESCRIPTION – DESCRIPCIÓN | QTY. | BOX |
| 1 | Top tray / Travesaño superior | 1 | 2/2 |
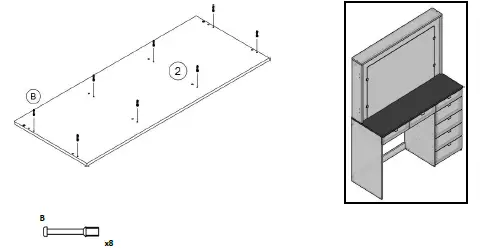
| 2 | Top base / Base superior | 1 | 2/2 |
| 5 | Side tray / Travesaño lateral | 2 | 1/2 |
| 7 | Left side / Lateral izquierdo | 1 | 1/2 |
| 10 | Right side / Lateral derecho | 1 | 1/2 |
| 11 | Mirror / Espejo | 1 | 2/2 |
| 12 | Crossbeam / Travesaño | 1 | 1/2 |
| 13 | Large footer / Zócalo grande | 1 | 1/2 |
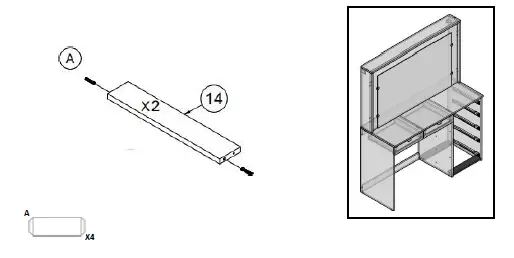
| 14 | Small footer / Zócalo pequeño | 2 | 1/2 |
| 17 | Front of large drawer / Frontal de cajón grande | 4 | 1/2 |
| 18 | Front of small drawer / Frontal de cajón pequeño | 3 | 2/2 |
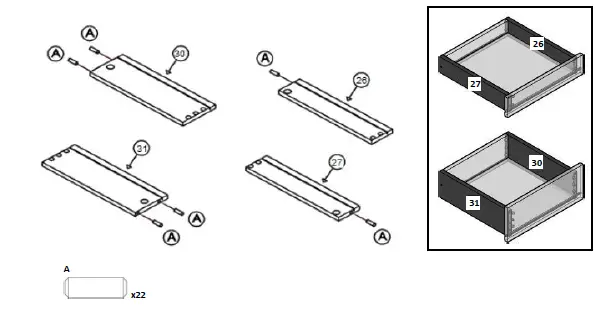
| 20 | Rear of small drawer / Posterior de cajón pequeño | 3 | 1/2 |
| 21 | Rear of large drawer / Posterior de cajón grande | 4 | 1/2 |
| 22 | Bottom of drawer / Fondo de cajón | 7 | 1/2 |
| 23 | Backboard / Fondo | 1 | 1/2 |
| 24 | Drawer divide support / Divisoria soporte cajón | 1 | 1/2 |
| 25 | Division / División | 1 | 1/2 |
| 26 | Side of the small right drawer / Lateral de cajón pequeño derecha | 3 | 1/2 |
| 27 | Side of the small left drawer / Lateral de cajón pequeño izquierda | 3 | 1/2 |
| 30 | Right side of large drawer / Lateral derecho de cajón grande | 4 | 1/2 |
| 31 | Left side of large drawer / Lateral izquierdo de cajón grande | 4 | 1/2 |
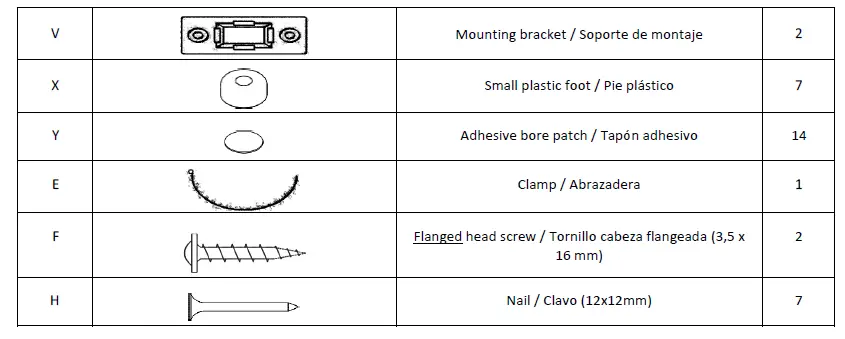
IDENTIFICATION OF ACCESSORIES
Note: the separation of the accessories before starting the assembly will facilitate it.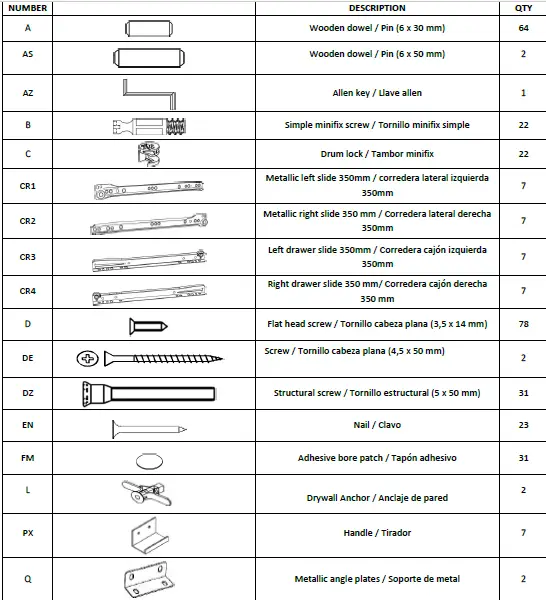
ATTENTION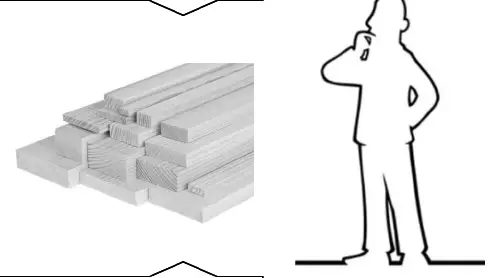
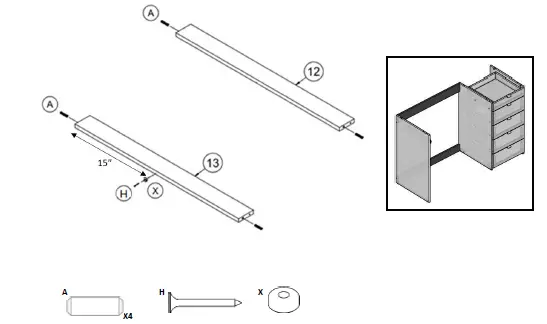
PRE-ASSEMBLY
- Fix wooden dowel (A) to crossbeam (12) and large footer (13).

- Fix wooden dowel (A) to small footer (14)

- Fix simple mini fix screw (B) to top base (2).
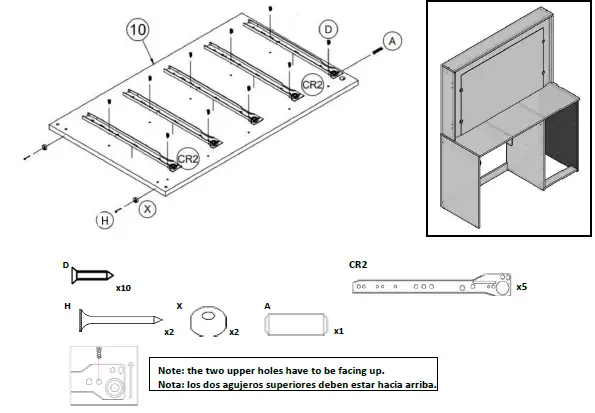
 Fix wooden dowel (A), metallic left slide (CR1) and plastic foot (X) to left side (7).
Note: the two upper holes have to be facing up.- Fix wooden dowel (A) to sides of drawer (30/31) x8 and side drawer (26/27) x6

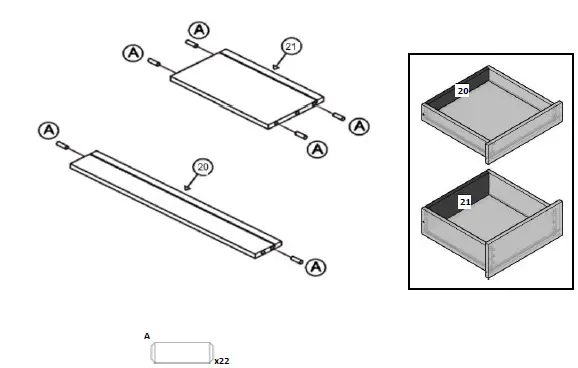
- Fix wooden dowel (A) to rear of large drawer (21) and rear of small drawer (20)
 Need some Help? Call +1 (832) 479-1709 / (646) 491-8149 / (415) 594-5401 or email [email protected]
 - Fix simple mini fix screw (B) to the front of the large drawer (17) x4 and front of small drawer (18) x3.

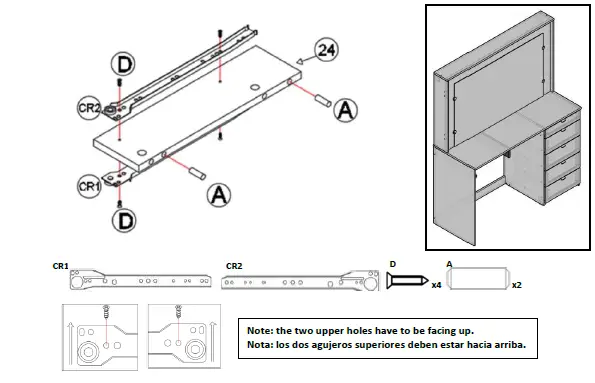
- Fix wooden dowel (A), metallic right slide (CR2) to drawer divide support (24). Flip drawer divide support (24) and fix metallic left slide (CR1)
 Note: the two upper holes have to be facing up.
 - Fix wooden dowel (A) to side tray (5) x2

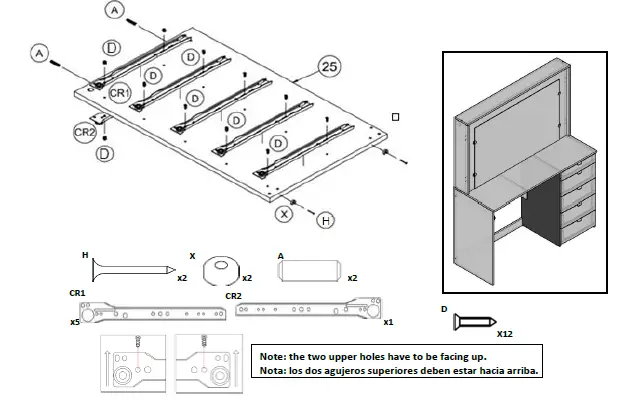
- Fix wooden dowel (A), metallic right slide (CR2) and plastic foot (X) to right side (10)

Note: the two upper holes have to be facing up. - Fix wooden dowel (A), metallic left slide (CR1) to division (25). Flip division (25) and fix metallic right slide (CR2) and plastic foot (X)

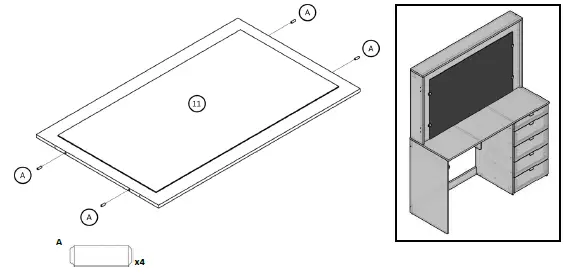
Note: the two upper holes have to be facing up. - Fix wooden dowel (A) and mirror support)

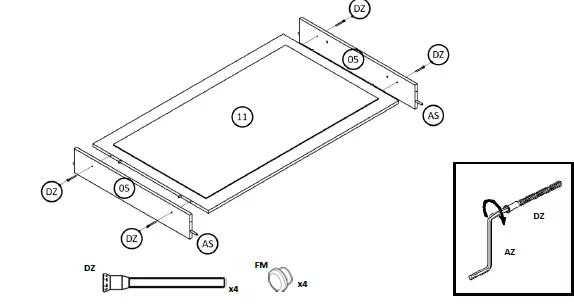
- Fix side tray (5) x2 to mirror (11)

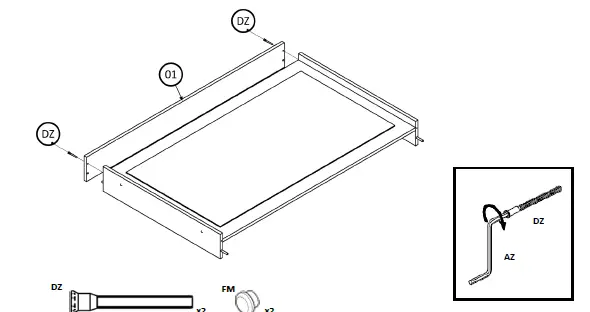
- Fix top tray (1) to the previous assembly.
 Note: use the allen key (AZ) to adjust the structural screws (DZ).
 - Fix top base (2) and drawer divide support (24) to previous assembly.

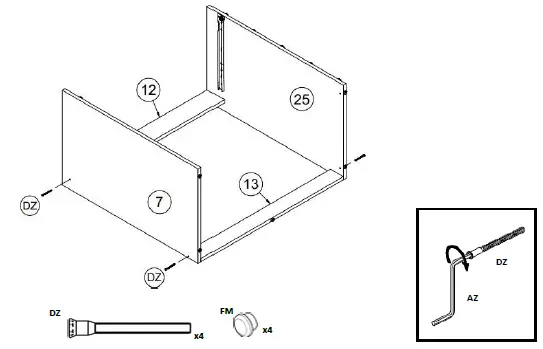
- Fix crossbeam (12) and large footer (13) to left side (7) and division (25).

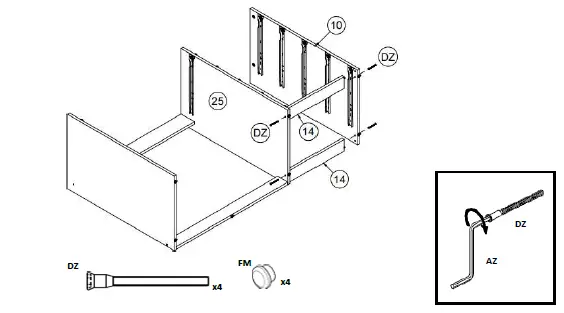
- Fix small footer (14) x2 and right side (10) to the previous assembly.
 Note: use the allen key (AZ) to adjust the structural screws (DZ).
 - Fix both previous assemblies (14 and 17)

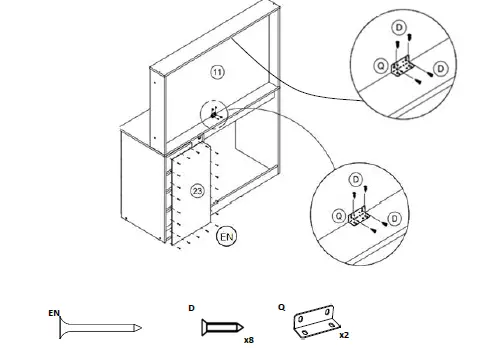
- Fix backboard (23) and metallic angle plates (Q) to previous assembly.
 Note: the missing holes must be made with the screwdriver and the corresponding screw.
 - Fix side of drawer (30/31) and bottom of drawer (22) to rear of drawer (21)

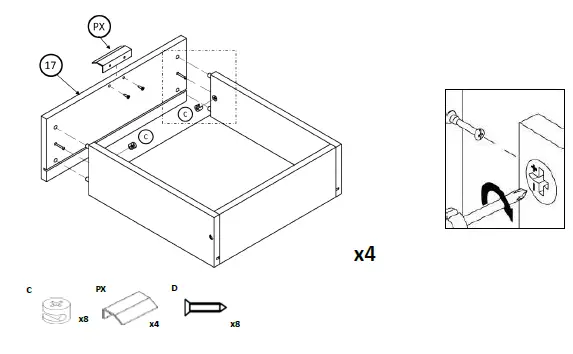
- Fix front large drawer (17) x4 and handle (PX) x4 to previous assembly

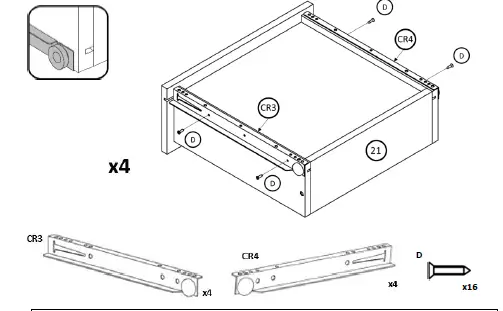
- Fix left drawer slide (CR3) x4 and right drawer slide (CR4) x4 to large drawer x4.
 Note: the missing holes must be made with the screwdriver and the corresponding screw.
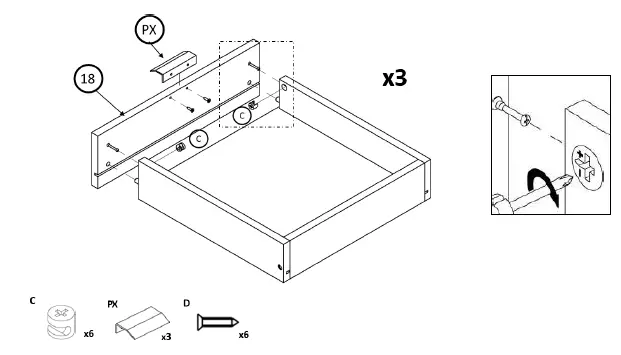
 - Attach the side of the small drawer (26/27) x6 to the rear of the small drawer (20) x3

- Fix front of small drawer (18) x3 and handle (PX) x3 to previous assembly

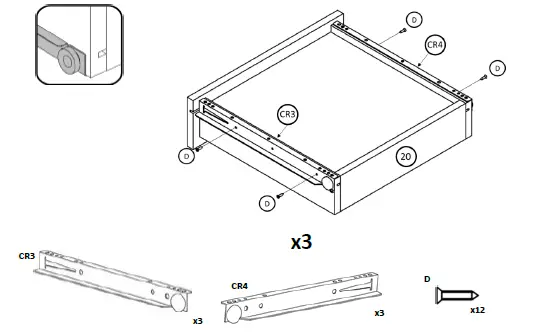
- Fix left drawer slide (CR3) x3 and right drawer slide (CR4) x3 to small drawer x3.
Note: the missing holes must be made with the screwdriver and the corresponding screw.

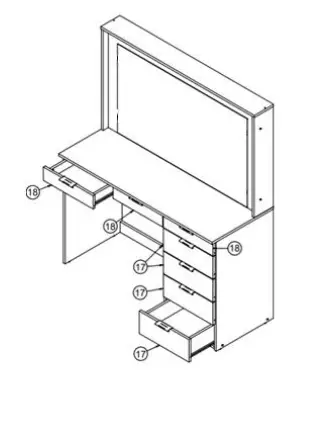
- Place drawers.

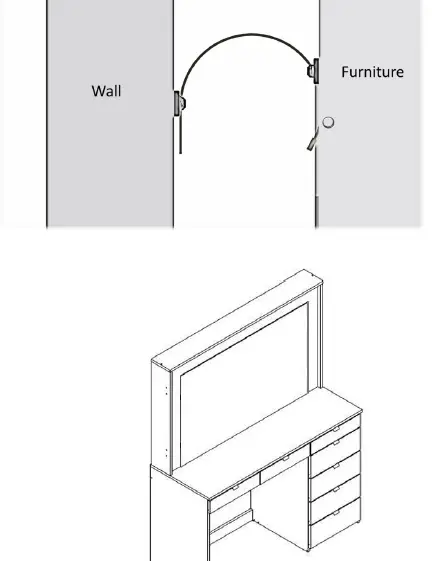
- And finally fix furniture to the wall.

 Fix wooden dowel (A), metallic left slide (CR1) and plastic foot (X) to left side (7).
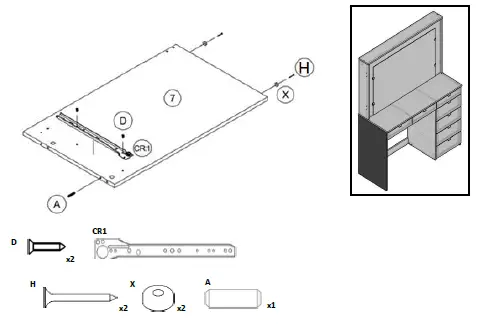
 Need some Help? Call +1 (832) 479-1709 / (646) 491-8149 / (415) 594-5401 or email
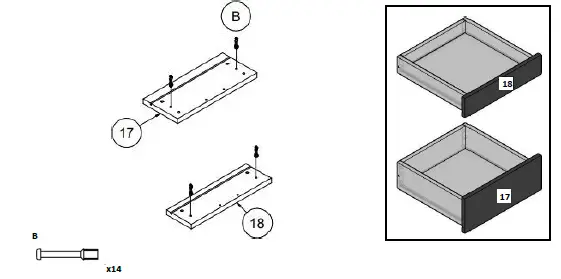
 Note: the two upper holes have to be facing up.
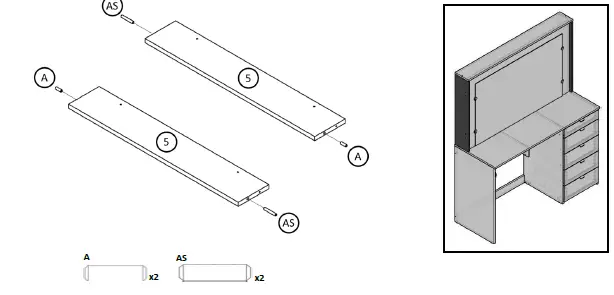
 Note: use the allen key (AZ) to adjust the structural screws (DZ).
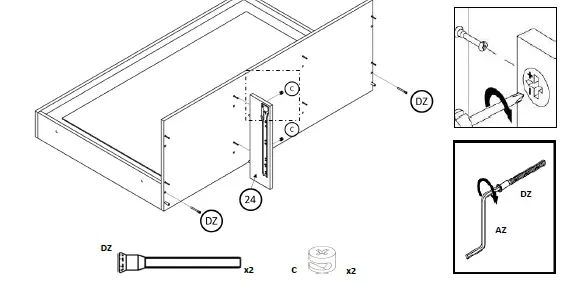
 Note: use the allen key (AZ) to adjust the structural screws (DZ).
 Note: the missing holes must be made with the screwdriver and the corresponding screw.
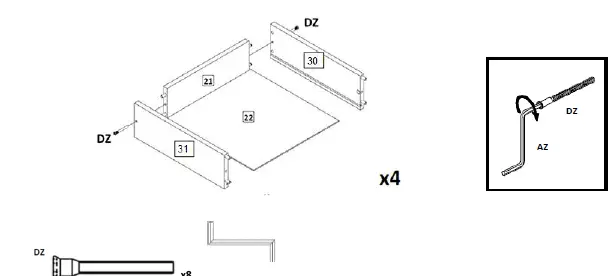
 Note: the missing holes must be made with the screwdriver and the corresponding screw.
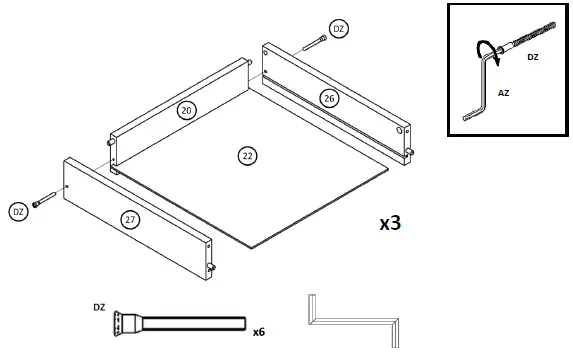

Need some Help? Call +1 (832) 479-1709 / (646) 491-8149 / (415) 594-5401 or email [email protected]
IMPORTANT INFORMATION, PLEASE READ THE INSTRUCTIONS CAREFULLY.
- Fix the mounting bracket (V) on the back of the furniture as shown in the figure, using the screws (F)
- Locate a post on the wall to attach the mounting bracket (V), place it approximately 1” below the one that is attached to the furniture. Use wall anchors (L) and screws (DE).
- Move the furniture to its final position, taking care to align the wall mounting bracket with the cabinet mounting bracket. Pass the clamp (E) through each bracket as shown in the picture and tighten enough until it is snug.
- Make sure all parts are tight.
1609 Boahaus DRESSING TABLE WITH MIRROR Warranty
6-Months Limited Warranty
- a. Boahaus, LLC provides limited warranty coverage to the original purchaser of this product for a period of six months from the date of purchase against defects in materials or workmanship of Bauhaus furniture components. As used in this Warranty, “defect” means imperfections in components that substantially impair the utility of the product. This Warranty gives you specific legal rights, and you may also have other rights which vary from state to state.
- b. There is no warranty coverage for defects or conditions that result from the failure to follow product assembly instructions, information or warnings, misuse or abuse, intentional damage, fire, flood, alteration or modification of the product, or use of the product in a manner inconsistent with its intended use, nor any condition resulting from incorrect or inadequate maintenance, cleaning, or care. There is also no warranty coverage for rented products or any products purchased “used” or “as is”, at a distress or going-out-of business sale, or from a liquidator.
- c. As the exclusive remedy under this Warranty, Bauhaus will (at its sole option) repair, replace or refund the value of any defective furniture component. Bauhaus may require independent confirmation of the claimed defect and proof of purchase. Replacement parts will be warranted for only the remaining period of the original Warranty. BAUHAUS SHALL HAVE NO LIABILITY for ANY INCIDENTAL OR CONSEQUENTIAL DAMAGES OF ANY KIND and all such damages are EXCLUDED FROM THIS WARRANTY, such as loss of use, disassembly, transportation, labor, or damage to property on or near the product. Some states do not allow the exclusion or limitation of incidental or consequential damages, so the above limitation or exclusion may not apply to you.
- d. This Warranty applies only to warranted defects that first arise and are transferred to subsequent owners or users of the product, and it shall be immediately void in the event the product is resold, transferred, leased or rented to any third party or person other than the original purchaser.
- e. THERE ARE NO OTHER WARRANTIES APPLICABLE TO THIS PRODUCT. Under the laws of certain states, there may be no implied warranties from Bauhaus and all implied warranties, INCLUDING ANY IMPLIED WARRANTY OF MERCHANTABILITY OR FITNESS FOR A PARTICULAR PURPOSE are disclaimed where allowed by law. TO THE EXTENT ANY IMPLIED WARRANTIES ARE APPLICABLE, ANY IMPLIED WARRANTIES, INCLUDING ANY IMPLIED WARRANTY OF MERCHANTABILITY OR FITNESS FOR A PARTICULAR PURPOSE, ARE LIMITED IN DURATION TO THE DURATION OF THIS EXPRESS WARRANTY or the minimum period allowed by law, whichever is shorter. Some states do not allow limitations on how long an implied Warranty lasts, so the above limitation may not apply to you.
- f. For Warranty inquiries, questions about disposition or claims, please visit our website www.boahaus.com. You can also contact Boahaus at +1 (832) 479-1709 / (646) 491-8149 / (415) 594-5401 or email at [email protected] Boahaus may require Warranty claims to be submitted in writing to:
Boahaus LLC.
1250-1252
Ave. Franklin Delano Roosevelt,
San Juan, PR 00926.
Please include your sales receipt or other proof of purchase and a specific description of the product defect.


