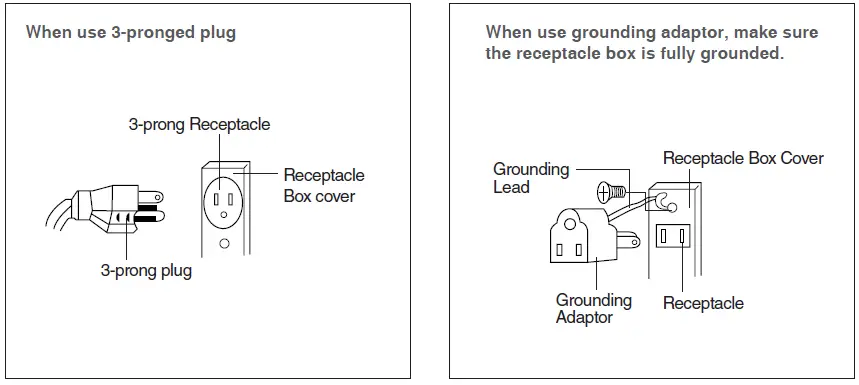
GROUNDING INSTRUCTIONS
This appliance must be grounded. In the event of an electrical short circuit, the grounding plug reduces the risk of electric shock by providing an escape wire for electric current. This appliance is equipped with a cord having a grounding wire with a grounding plug. The plug must be plugged into an outlet that is properly installed and grounded.
IMPORTANT INSTRUCTIONS
- Read all instructions before using the appliance.
- Read and follow the specific “PRECAUTIONS TO AVOID POSSIBLE EXPOSURE TO EXCESSIVE MICROWAVE ENERGY” found on page 2.
- This appliance must be grounded. Connect only to properly grounded outlet. See “GROUNDING INSTRUCTIONS” found on page 5.
- Install or locate this appliance only in accordance with the provided installation instructions.
- Some products such as whole eggs and sealed containers – for example, closed glass jars are able to explode and should not be heated in this oven.
- Use this appliance only for its intended use as described in this manual. Do not use corrosive chemicals or vapors in this appliance. This type of oven is specifically designed to heat, cook, or dry food. It is not designed for industrial or laboratory use.
- As with any appliance, close supervision is necessary when used by children.
- Do not operate this appliance if it has a damaged cord or plug, if it is not working properly, or if it has been damaged or dropped.
- This appliance should be serviced only by qualified service personnel.
- Contact nearest authorized service facility for examination, repair or adjustment.
- Do not cover or block any openings on the appliance.
- Do not store this appliance outdoors. Do not use this product near water — for example, near a kitchen sink, in a wet basement, near a swimming pool, or similar locations.
- Do not immerse cord or plug in water.
- Keep cord away from heated surfaces.
- Do not let cord hang over edge of table or counter. Either.
INSTALLATION GUIDE
- Examine the oven after unpacking.
- Check for damage such as a misaligned door, broken door or dent in the cavity.
- If any damage is visible, DO NOT INSTALL, and notify your dealer immediately.
- Level, flat location.
- Install the microwave oven on a level, flat surface.
- Ventilation.
- Do not block air vents. If they are blocked during operation, the oven may overheat and eventually cause a failure.
- For proper ventilation, allow 4 inches of space between oven top, sides, rear and adjacent surfaces.
- Away from radio and TV sets.
- Poor television reception and radio interference may result if the oven is located close to a TV, radio, antenna, feeder, etc.
- Place the oven as far from them as possible.
- Away from heating appliances and water taps.
- Keep the oven away from heat, steam or splashing liquids. These things can adversely affect oven wiring and contacts.
- Power supply.
- Check your local power source.
- This microwave oven requires a current of approximately 13 amperes, 120Volts, 60Hz and a grounded outlet.
- A short power-supply cord is provided to reduce the risks of the user becoming entangled in or tripping over a longer cord.
- Longer cord sets or extension cords are available and may be used if care is exercised in their use.
- If a long cord or extension cord is used:
- The marked electrical rating of the cord set or extension cord should be at least as great as the electrical rating of the oven.
- The extension cord must be a grounding type 3-wire cord.
- The longer cord should be arranged so that it will not drape the table top or counter where it can be pulled on by children or tripped over unintentionally.
- The minimum height of free space necessary above the top surface of the oven is about 4 inches.
SPECIFICATIONS
| POWER SUPPLY | 120V AC, 60Hz SINGLE PHASE WITH GROUNDING | |
| MICROWAVE | INPUT POWER | 1500 W |
| ENERGY OUTPUT | 1000 W | |
| FREQUENCY | 2,450MHz | |
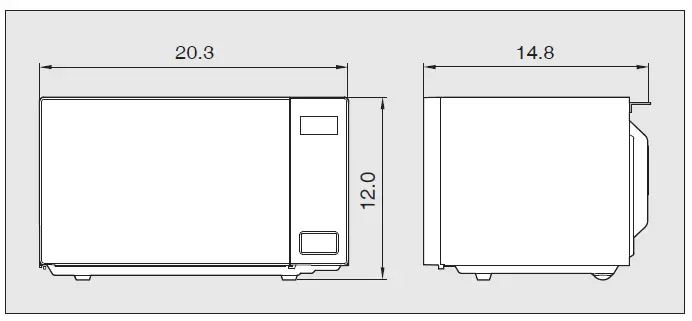
| OUTSIDE DIMENSIONS (W x H x D) | 20.3 x 12.0 x 14.8 in. | |
| CAVITY DIMENSIONS (W x H x D) | 14.0 x 9.4 x 14.1 in. | |
| CAVITY VOLUME | 1.1 cu.ft | |
| NET WEIGHT | APPROX. 30.0 lbs. | |
| TIMER | 59 min. 99 sec. | |
| POWER SELECTIONS | 10 Levels | |
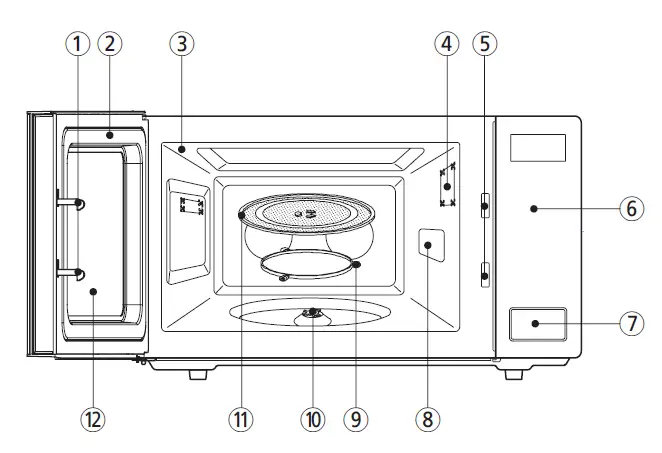
FEATURES DIAGRAM
- Door latch – When the door is closed, it will automatically shut off. If the door is opened while the oven is operating, the magnetron will automatically shut off.
- Door seal – The door seal surfaces prevent microwaves escaping from the oven cavity.
- Oven cavity
- Oven lamp – Automatically turns on during oven operating.
- Safety interlock system
- Control panel
- Door open button – To open the door push the door open button.
- Waveguide cover – Protects the microwave outlet from splashes of cooking foods.
- Roller guide – This must always be used for cooking together with the glass cooking tray.
- Coupler – This fits over the shaft in the center of the oven cavity floor.
- This is to remain in the oven for all cooking.
- Glass cooking tray – Made of special heat resistant glass. The tray must always be in proper position before operating. Do not cook food directly on the tray.
- Viewing screen – Allows viewing of food.
- The screen is designed so that light can pass through, but not the microwave.
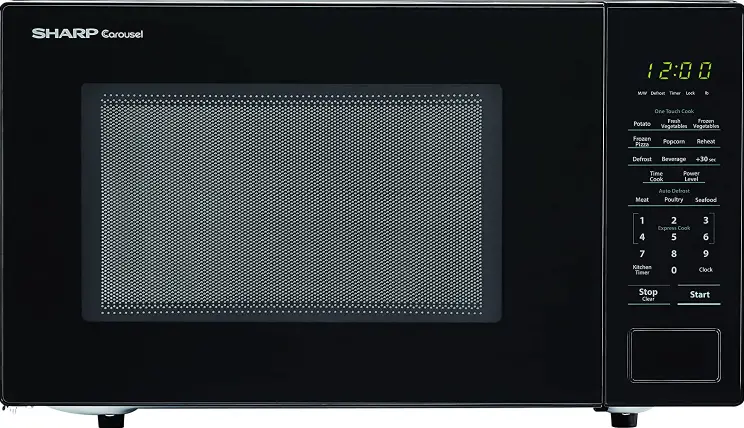
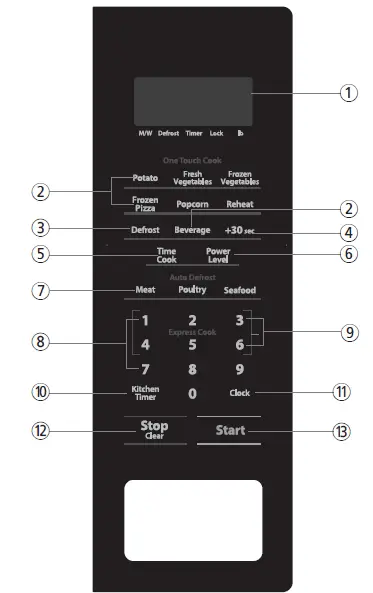
REMOTE CONTROL
- DISPLAY – Cooking time, power level, indicators and current time are displayed.
- ONE TOUCH COOK – Used to cook or reheat specific quantites of food.
- DEFROST – Used to defrost foods for time.
- +30 SEC – Used to extend heating time by 30 second increments or for an “instant on” for 30 seconds.
- TIME COOK – Microwave for a selected amount of time.
- POWER LEVEL – Used to set power level.
- AUTO DEFROST – Press to select DEFROST feature by weight.
- TIME SET Pad – Used to set the cooking time and the current time.
- EXPRESS COOK – Used to set 1-6 minutes preset cooking time at 100% power level.
- KITCHEN TIMER – Used as a minute timer, delay cooking, hold setting after cooking.
- CLOCK – Used to set clock.
- STOP / CLEAR – Used to stop the oven operation or to delete the cooking data.
- START – Used to start the oven.
OPERATION PROCEDURE
- Plug power supply cord into a standard 3-pronged 13 Amp, 120V AC 60Hz power outlet.
- After placing the food in a suitable container, open the oven door and put it on the glass tray.
- The glass tray and roller guide must always be in place during cooking.
- Close the door. Make sure that it is firmly closed.
- The oven light is on when the microwave oven is operating.
- The oven door can be opened at any time during operation by pushing the door open button of control panel. The oven will automatically shut off.
- Each time a pad is pressed, a BEEP will sound to acknowledge the press.
- The oven automatically cooks on full power unless set to a lower power level.
- The display will show “ : 0” when the oven is plugged in.
WATTAGE OUTPUT CHART
The power-level is set by pressing the Power Level pad and number pad. If you wish to use a different power level, press the POWER LEVEL pad before pressing START pad. Enter the power level desired by pressing the appropriate number pad. The chart shows the display, the power level and the percentage of power. (See TIME COOK Cooking Guide
| PR ES S P OWE R P A D AN D NUM BE R | PO WE R L EVE L ( DISP LA Y ) | AP PROXI MA T E PER CENT AG E O F PO WER |
| POWER LEVEL + 1 + 0 | PL10 | 100% |
| POWER LEVEL + 9 | PL-9 | 90% |
| POWER LEVEL + 8 | PL-8 | 80% |
| POWER LEVEL + 7 | PL-7 | 70% |
| POWER LEVEL + 6 | PL-6 | 60% |
| POWER LEVEL + 5 | PL-5 | 50% |
| POWER LEVEL + 4 | PL-4 | 40% |
| POWER LEVEL + 3 | PL-3 | 30% |
| POWER LEVEL + 2 | PL-2 | 20% |
| POWER LEVEL + 1 | PL-1 | 10% |
| POWER LEVEL + 0 | PL-0 | 0% |
CONTROLS
- Press the CLOCK pad.
- This is a 12 hour clock system.
- Press the CLOCK pad once more.
- This is a 24 hour clock system.
- Enter the correct time of day by pressing the TIME SET pads in sequence.
- Press the CLOCK pad
KITCHEN TIMER MODE
Timer operates as a minute timer. Timer operates without microwave energy.
HOW TO USE AS A MINUTE TIMER
- Press KITCHEN TIMER pad.
- Press the amount of time you want to count down.
- Press START pad
HOW TO USE TO DELAY THE START OF COOKING
- Press KITCHEN TIMER pad.
- Press the amount of time you want to delay.
- Program the desired cooking time and power level for food to be cooked.
- Press START pad.
AUTO DEFROST CHART
| PR ESS P A D | ME A T | PO ULTR Y | SEA FOOD |
| once | 1.0 lb | 1.5 lb | 0.5 lb |
| twice | 1.5 lb | 2.0 lb | 1.0 lb |
| 3 times | 2.0 lb | 2.5 lb | 1.5 lb |
| 4 times | 2.5 lb | 3.0 lb | 2.0 lb |
COOKING INSTRUCTIONS
UTENSIL GUIDE
Only use utensils that are suitable for use in microwave ovens. To cook food in the microwave oven, the microwaves must be able to penetrate the food, without being reflected or absorbed by the dish used. Care must therefore be taken choosing the utensil. If the utensil is marked microwave-safe, you do not need to worry. The following table lists various utensil and indicates whether and how they should be used in a microwave oven.
USE YOUR MICROWAVE OVEN SAFELY
General Use
- Do not attempt to defeat or tamper with safety interlocks.
- Do not place any object between the oven front frame and the door or allow residue to build up on sealing surfaces.
- Wipe with a mild detergent, rinse and dry. Never use abrasive powders or pads.
- Do not subject the oven door to strain or weight such as a child hanging on an open door.
- This could cause the oven to fall forward resulting in injury to you and damage to the oven.
Food
- Never use your microwave oven for home canning.
- The oven is not designed for proper home canning.
- Improperly canned food may spoil and be dangerous to consume. Always use the minimum recipe cooking time.
- It is better to undercook rather than overcook foods. Undercooked foods can be returned to the oven for more cooking.
- If food is overcooked, nothing can be done. Heat small quantities of food or foods with low moisture carefully.
- These can quickly dry out, burn or catch on fire. Do not heat eggs in the shell. Pressure may build up and eggs can explode.
- Potatoes, apples, egg yolks and sausages are examples of food with non-porous skins. These must be pierced before cooking to prevent bursting.
- Do not attempt to deep fat fry in your microwave oven.
- Always allow a standing time of at least 20 seconds after the oven has been switched off to allow the temperature to even out, stir during heating,
COOKING TECHNIQUES
STANDING TIME Dense foods e.g. meat, jacket potatoes and cakes, require standing time(inside or outside of the oven) after cooking, to allow heat to finish conducting to cook the center completely. Wrap meat joints and jacket potatoes in aluminium foil while standing. Meat joints need approx. 10-15 minutes, jacket potatoes 5 minutes. Other foods such as plated meal, vegetables, fish etc require 2-5 minutes standing. After defrosting food, standing time should also be allowed. If food is not cooked after standing time, return to the oven and cook for additional time.
MOISTURE CONTENT Many fresh foods e.g. vegetables and fruit, vary in their moisture content throughout the season, particularly jacket potatoes. For this reason cooking times may have to be adjusted. Dry ingredients e.g. rice, pasta, can dry out during storage so cooking times may differ.
DENSITY Porous airy foods heat more quickly than dense heavy foods.
CLING FILM Cling film helps keep the food moist and the trapped steam assists in speeding up cooking times. Pierce before cooking to allow excess steam to escape. Always take care when removing cling film from a dish as the build-up of steam will be very hot.
SHAPE Even shapes cook evenly. Food cooks better by microwave when in a round container rather than square.
SPACING Foods cook more quickly and evenly if spaced apart.
NEVER pile foods on top of each other.
DEFROSTING GUIDE
- Do not defrost covered meat. Covering might allow cooking to take place. Always remove outer wrap and tray. Use only containers that are microwave-safe.
- Begin defrosting whole poultry breast-side-down. Begin defrosting roasts fat-side-down.
- The shape of the package alters the defrosting time. Shallow rectangular shapes defrost more quickly than a deep block.
- After 1/3 of the defrost time has elapsed, check the food. Toy may wish to turn over, break apart, rearrange or remove thawed portions of the food.
- During defrost, the oven will prompt you to turn the over. At this point, open oven door and check the food. Follow the techniques listed below for optimum defrost results.
- Then, close oven door, press the START pad to complete defrosting.
DEFROSTING CHART (by Time Defrost)
| UT ENSIL | SA FE | CO MMENT S |
| Aluminium foil | ▲ | Can be used in small quantities to protect areas against overcooking. Arcing can occur if the foil is too close to the oven wall or if too much foil is used. |
| Crisp plate | ● | Do not preheat for more than 8minutes. |
| China and earthenware | ● | Porcelain, pottery, glazed earthenware and bone china are usually suitable, unless deco-rated with a metal trim. |
| Disposable polyester cardboard dishes | ● | Some frozen foods are packaged in these dishes. |
| Fast-food packaging • Polystyrene cups containers
• Paper bags or newspaper • Recycled paper or metal trims | ●
✕ ✕ | Can be used to warm food. Overheating may cause the polystyrene to melt. May catch fire. May cause arcing. |
| Glassware • Oven-to-table ware • Fine glassware
• Glass jars | ● ●
● | Can be used, unless decorated with a metal trim. Can be used to warm foods or liquids. Delicate glass may break or crack if heated suddenly. Must remove the lid. Suitable for warming only. |
| Metal • Dishes • Freezer bag twist ties | ✕ ✕ | May cause arcing or fire. |
| Paper • Plates, cups, napkins and Kitch- en paper • Recycled paper | ●
✕ | For short cooking times and warming. Also to absorb excess moisture. May cause arcing. |
| Plastic • Containers
• Cling film
• Freezer bags | ●
●
▲ | Particularly if heat-resistant thermoplastic. Some other plastics may warp or discolour at high temperatures. Do not use Melamine plastic. Can be used to retain moisture. Should not touch the food. Take care when removing the film as hot steam will escape. Only if boilable or oven-proof. Should not be airtight. Prick with a fork, if necessary. |
| Wax or grease-proof paper | ● | Can be used to retain moisture and prevent spattering. |
COOKING & REHEATING CHART
| UT ENSIL | SA FE | CO MMENT S |
| Aluminium foil | ▲ | Can be used in small quantities to protect areas against overcooking. Arcing can occur if the foil is too close to the oven wall or if too much foil is used. |
| Crisp plate | ● | Do not preheat for more than 8minutes. |
| China and earthenware | ● | Porcelain, pottery, glazed earthenware and bone china are usually suitable, unless deco-rated with a metal trim. |
| Disposable polyester cardboard dishes | ● | Some frozen foods are packaged in these dishes. |
| Fast-food packaging • Polystyrene cups containers
• Paper bags or newspaper • Recycled paper or metal trims | ●
✕ ✕ | Can be used to warm food. Overheating may cause the polystyrene to melt. May catch fire. May cause arcing. |
| Glassware • Oven-to-table ware • Fine glassware
• Glass jars | ● ●
● | Can be used, unless decorated with a metal trim. Can be used to warm foods or liquids. Delicate glass may break or crack if heated suddenly. Must remove the lid. Suitable for warming only. |
| Metal • Dishes • Freezer bag twist ties | ✕ ✕ | May cause arcing or fire. |
| Paper • Plates, cups, napkins and Kitch- en paper • Recycled paper | ●
✕ | For short cooking times and warming. Also to absorb excess moisture. May cause arcing. |
| Plastic • Containers
• Cling film
• Freezer bags | ●
●
▲ | Particularly if heat-resistant thermoplastic. Some other plastics may warp or discolour at high temperatures. Do not use Melamine plastic. Can be used to retain moisture. Should not touch the food. Take care when removing the film as hot steam will escape. Only if boilable or oven-proof. Should not be airtight. Prick with a fork, if necessary. |
| Wax or grease-proof paper | ● | Can be used to retain moisture and prevent spattering. |
RECIPES
TOMATO & ORANGE SOUP
- 1 oz.(25g) butter
- 1 medium onion, chopped
- 1 large carrot & 1 large potato, chopped
- 13/4lb(800g) canned, chopped tomatoes juice and grated rind of 1 small orange 11/2pints(900ml) hot vegetable stock salt and pepper to taste
- Melt the butter in a large bowl on PL10 for 30 seconds.
- Add the onion, carrot and potato and cook on PL10 for 4 minutes. stir halfway through cooking.
- Add the tomatoes, orange juice, orange rind and stock. Mix thoroughly. Season with salt and pepper to taste. Cover the bowl and cook on PL10 for 15 minutes. stir 2-3 times during cooking, until the vegetables are tender.
- Blend and serve immediately
FRENCH ONION SOUP
- 1 large onions, sliced
- 1 tbsp (15ml) corn oil
- 2 oz.(50g) plain flour
- 2 pints(1.2 liters) hot meat or vegetable stock salt and pepper to taste
- 2 tbsp (30ml) parsley, chopped
- 4 thick slices French bread
- 2 oz.(50g) cheese, grated
- Place the onion and oil a bowl, mix well and cook on PL10 for 1 minutes.
- Stir in the flour to make a paste and gradually add stock. Season and add the parsley.
- Cover the bowl and cook on PL-7 for 16 minutes.
- Pour the soup into serving bowls, submerge bread and sprinkle generously with cheese.
- Cook on PL-7 for 2 minutes, until the cheese has melted.
STIR-FRIED VEGETABLES
- 1 tbsp(15ml) sunflower oil
- 2 tbsp (30ml) soy sauce
- 1 tbsp (15ml) sherry
- 1″(2.5cm) root ginger, peeled and finely grated
- 2 medium carrots, cut into fine strips
- 4 oz.(100g) button mushrooms, chopped
- 2 oz.(50g) beansprouts
- 4 oz.(100g) mange-tout
- 1 red pepper, seeded and thinly sliced
- 4 spring onions, chopped
- 4 oz.(100g) canned water chestnuts, sliced
- 1/4 head of chinese leaves, thinly sliced
- Place the oil, soy sauce, sherry, ginger, garlic and carrots in a large bowl, mix thoroughly
- Cover and cook on PL10 for 3-5 minutes, stirring once.
- Add the button mushrooms, beansprouts, mange-tout, red pepper, spring onions, water chestnuts and chinese leaves. Mix thoroughly.
- Cook on PL10 for 5-6 minutes, until the vegetables are tender. Stir 2-3 times during cooking. Stir fried vegetables are ideally served with meat or fish
HONEYED CHICKEN
- 4 boneless chicken breasts
- 2 tbsp(30ml) clear honey
- 1 tbsp(15ml) whole grain mustard
- 1/2 tsp(2.5ml) dried tarragon
- 1 tbsp(15ml) tomato puree
- 1/4 pint(150ml) chicken stock
- Place the chicken breasts in a casserole dish.
- Mix all remaining ingredients together and pour over the chicken. Salt and pepper to taste.
- Cook on PL10 for 13-14 minutes. Rearrange and coat the chicken with the sauce twice during cooking.
WARRANTY
CONSUMER LIMITED WARRANTY
SHARP ELECTRONICS CORPORATION warrants to the first consumer purchaser that this Sharp brand product (the “Product”), when shipped in its original container, will be free from defective workmanship and materials, and agrees that it will, at its option, either repair the defect or replace the defective Product or part thereof with a new or remanufactured equivalent at no charge to the purchaser for parts or labor for the period(s) set forth below. This warranty does not apply to any appearance items of the Product nor to the additional excluded item(s) set forth below nor to any Product the exterior of which has been damaged or defaced, which has been subjected to improper voltage or other misuse, abnormal service or handling, or which has been altered or modified in design or construction. In order to enforce the rights under this limited warranty, the purchaser should follow the steps set forth below and provide proof of purchase to the servicer. The limited warranty described herein is in addition to whatever implied warranties may be granted to purchasers by law. ALL IMPLIED WARRANTIES INCLUDING THE WARRANTIES OF MERCHANTABILITY AND FITNESS FOR USE ARE LIMITED TO THE PERIOD(S) FROM THE DATE OF PURCHASE SET FORTH BELOW. Some states do not allow limitations on how long an implied warranty lasts, so the above limitation may not apply to you. Neither the sales personnel of the seller nor any other person is authorized to make any warranties other than those described herein, or to extend the duration of any warranties beyond the time period described herein on behalf of Sharp. The warranties described herein shall be the sole and exclusive warranties granted by Sharp and shall be the sole and exclusive remedy available to the purchaser. Correction of defects, in the manner and for the period of time described herein, shall constitute complete fulfillment of all liabilities and responsibilities of Sharp to the purchaser with respect to the Product, and shall constitute full satisfaction of all claims, whether based on contract, negligence, strict liability or otherwise. In no event shall Sharp be liable, or in any way responsible, for any damages or defects in the Product which were caused by repairs or attempted repairs performed by anyone other than an authorized servicer. Nor shall Sharp be liable or in any way responsible for any incidental or consequential economic or property damage. Some states do not allow the exclusion of incidental or consequential damages, so the above exclusion may not apply to you
FCC
This equipment generates and uses ISM frequency energy and if not installed and used properly, that is in strict accordance with the manufacturer’s instructions, may cause interference to radio and television reception. It has been type-tested and found to comply with limits for an ISM Equipment pursuant to part 18 of FCC Rules, which are designed to provide reasonable protection against such interference in a residential installation. However, there is no guarantee that interference will not occur in a particular installation. If this equipment does cause interference to radio or television reception, which can be determined by turning the equipment off and on, the user is encouraged to try to correct the interference by one or more of the followings.
- Reorient the receiving antenna of radio or television.
- Relocate the Microwave oven with respect to the receiver.
- Move the microwave oven away from the receiver.
- Plug the microwave oven into a different outlet so that microwave oven and receiver are on different branch circuits.
FAQS
I accidentally ran my microwave oven without any food in it. Is it damaged?
Running the oven empty for a short time will not damage the oven. However, it is not recommended.
Can the oven be used with the glass tray or roller guide removed?
No. Both the glass tray and roller guide must always be used in the oven before cooking.
Can I open the door when the oven is operating?
The door can be opened anytime during the cooking operation. Then microwave energy will be instantly switched off and the time setting will maintain until the door is closed.
Why do I have moisture in my microwave oven after cooking?
The moisture on the side of your microwave oven is normal. It is caused by steam from cooking food hitting the cool oven surface.
Does microwave energy pass through the viewing screen in the door?
No. The metal screen bounces back the energy to the oven cavity. The holes are made to allow light to pass through. They do not let microwave energy pass through.
Why do eggs sometimes pop?
When baking or poaching eggs, the yolk may pop due to steam build-up inside the yolk membrane. To prevent this, simply pierce the yolk with a toothpick before cooking. Never cook eggs without piercing their shells.
Why is this standing time recommended after the cooking operation has been completed?
Standing time is very important. With microwave cooking, the heat is in the food, not in the oven.
What does “standing time” mean?
“Standing time” means that food should be removed from the oven and covered for additional time to allow it to finish cooking. This frees the oven for other cooking.
Why does my oven not always cook as fast as the microwave cooking guide says?
Check your cooking guide again, to make sure you’ve followed directions exactly ; and to see what might cause variations in cooking time. Cooking guide times and heat settings are suggestions, to help prevent over-cooking… the most common problem in getting used to a microwave oven.
Will the microwave oven be damaged if it operates while empty?
Yes. Never run it empty.
Can I operate my microwave oven without the turntable or turn the turntable over to hold a large dish?
No. If you remove or turn over the turntable, you will get poor cooking results. Dishes used in your oven must fit on the turntable.
Is it normal for the turntable to turn in either direction?
Yes. The turntable rotates clockwise or counterclockwise, depending on the rotation of the motor when the cooking cycle begins.
Can I pop popcorn in my microwave oven? How do I get the best results?
Yes. Pop packaged microwave popcorn following manufacture’s guidelines.


![Sharp Microwave Oven [r-651zs] User Manual](https://static-data1.manualsee.com/1/img/298/17741/2020/12/sharp-microwave-oven-r-651zs-images.png "Sharp Microwave Oven [r-651zs] User Manual")


![Sharp Convection Microwave Oven User Manual [smc1585bb,smc1585bs,smc1585bw]](https://static-data1.manualsee.com/1/img/398/60662/2021/02/Sharp-Convection-Microwave-Oven-User-Manual-SMC1585BBSMC1585BSSMC1585BW.jpg "Sharp Convection Microwave Oven User Manual [smc1585bb,smc1585bs,smc1585bw]")


